ZS-RS70BT_E92 [GB] 4-15 (1)
*
and VOLUME +
have a tactile dot.
Using the display
Checking MP3/WMA file informa
Pr
repea
an MP3/WMA file on the disc/USB device
T
Song title ( )*
1
Artist name (
)*
1
Album name (
)*
1
Current file number and playing time*
2
*
1
If the file does not have c
WMA tag information,
and
artist name,
*
2
in a few sec
Checking the fr
device
1
Pr
repea
folder play mode,
mode,
repea
2 P
while the USB device is
stopped.
“FREE***G”/“FREE***M”
space on the devic
appears on the display
Checking the connect
device name
Pr
while connecting the
Bluetoo
Checking the r
Pr
repea
to the r
T
Pr Fr
Pr
to re
* A preset number is displayed only when you ar
listening to the pr
Selecting play mode
Y
repeat
device is stoppe
Pr
repea
Each time you pres
changes as follows:
Normal play (None)
Single repeat (
1)
All repeat (
)
Selected f
)*
Selected f
, )*
Shuffle play (SHUF)
Pr
Pr
,
* T
MP3/WMA files on an MP3/WMA disc or USB
device.
Playing tr
(Repeat P
Y
track
CD-R/CD-RW disc or on a USB device in normal
and progr
1 Pr
or USB
to turn on the CD
or USB function.
2 P
T Do this
A single track/
file
1 Pres
repeat
until “
1”
2 Press
or
to
select a track/file tha
want to r
want to specify a f
contains MP3/WMA files,
pres
(Folder) + or
first to select a folder
then pres
or
to
select a file.
3 Press
to start Repeat
Play
All track
1
P
res
repeat
until “
”
2 Press
to start Repeat
Play
A selected
folder on an
MP3/WMA disc
or USB device
1
P
res
repeat
until “
” ”
appear
2 Select a f
(Folder) + or
.
3 Press
to start Repeat
Play
Pr
track
1
P
rogr
“Creating your own pr
(Pr
2
P
res
and “
”
display
3 Press
to start Repeat
Play
T
Press
to stop playback,
MODE
repeat ” 1”)
disappears from the display
Other Oper
Playing tr
(Shuffle Play)
Y
audio CD or MP3/WMA files on a CD-R/CD-RW
disc or on a USB device in r
1 Pr
or USB
to turn on the CD
or USB function.
2 P
repea
appears on the display
3 Pr
to start Shuffle Play
T
Press
to stop playback,
MODE
repeat
from the display
Tips
During Shuffle Play
track/file by pr
.
mode in the USB function.
after you
have stopped Shuffle Play by pr
.
Shuffle Play starts from the point wher
stopped.
Cr
Play)
Y
track
1 Pr
or USB
to turn on the CD
or USB function.
2 P
repea
appears on the display
3 Pr or
to select a tr
file.
When you w
contains MP3/WMA files,
(Folder) + or
first to select a folder
or
to select a file.
4 Pr
.
T
T
by the total playing time
(Example:
Step number
Last progr
number
T
* “--:--”
WMA disc/USB device or when the to
playing time is longer than 100 minutes.
5 Repeat steps 3 and 4 to progr
additional track
6 Press
to start Pr
T
you open the CD compartment,
USB device or turn off the power of the unit.
T
.
Note
If you try to progr
appears on the display
Tip
Resume Play is available when using P
mode in the USB function.
after you
have stopped Pr
.
Progr
stopped.
T
information
After crea
information about pr
Pr
repeat
changes as follows:
T Last
progr
playing time*
* “--:--”
devices.
T
Press
to stop playback,
MODE
repeat
the display
T
pr
Stop playback,
.
appears and you can cr
following the pr
progr
Pr
Y
Y
and 10 for AM.
1 Pr
repea
select a band.
2 Hold down RADIO FM/AM-
until
3 P
to stor
T
frequencies t
If a station c
automatic
Y
manually
1 Pr
repea
select a band.
2 T
3 Hold down MANU
until
“FM-
(Example:
4 Pr
until the prese
number for the station you w
on the display
5 Press ENTER
to stor
If another station is alr
selected pr
replac
Tip
T
memory even in the following situations.
T
T
Listening to pr
stations
1 Pr
repea
select a band.
2 P
to select a stor
prese
station.
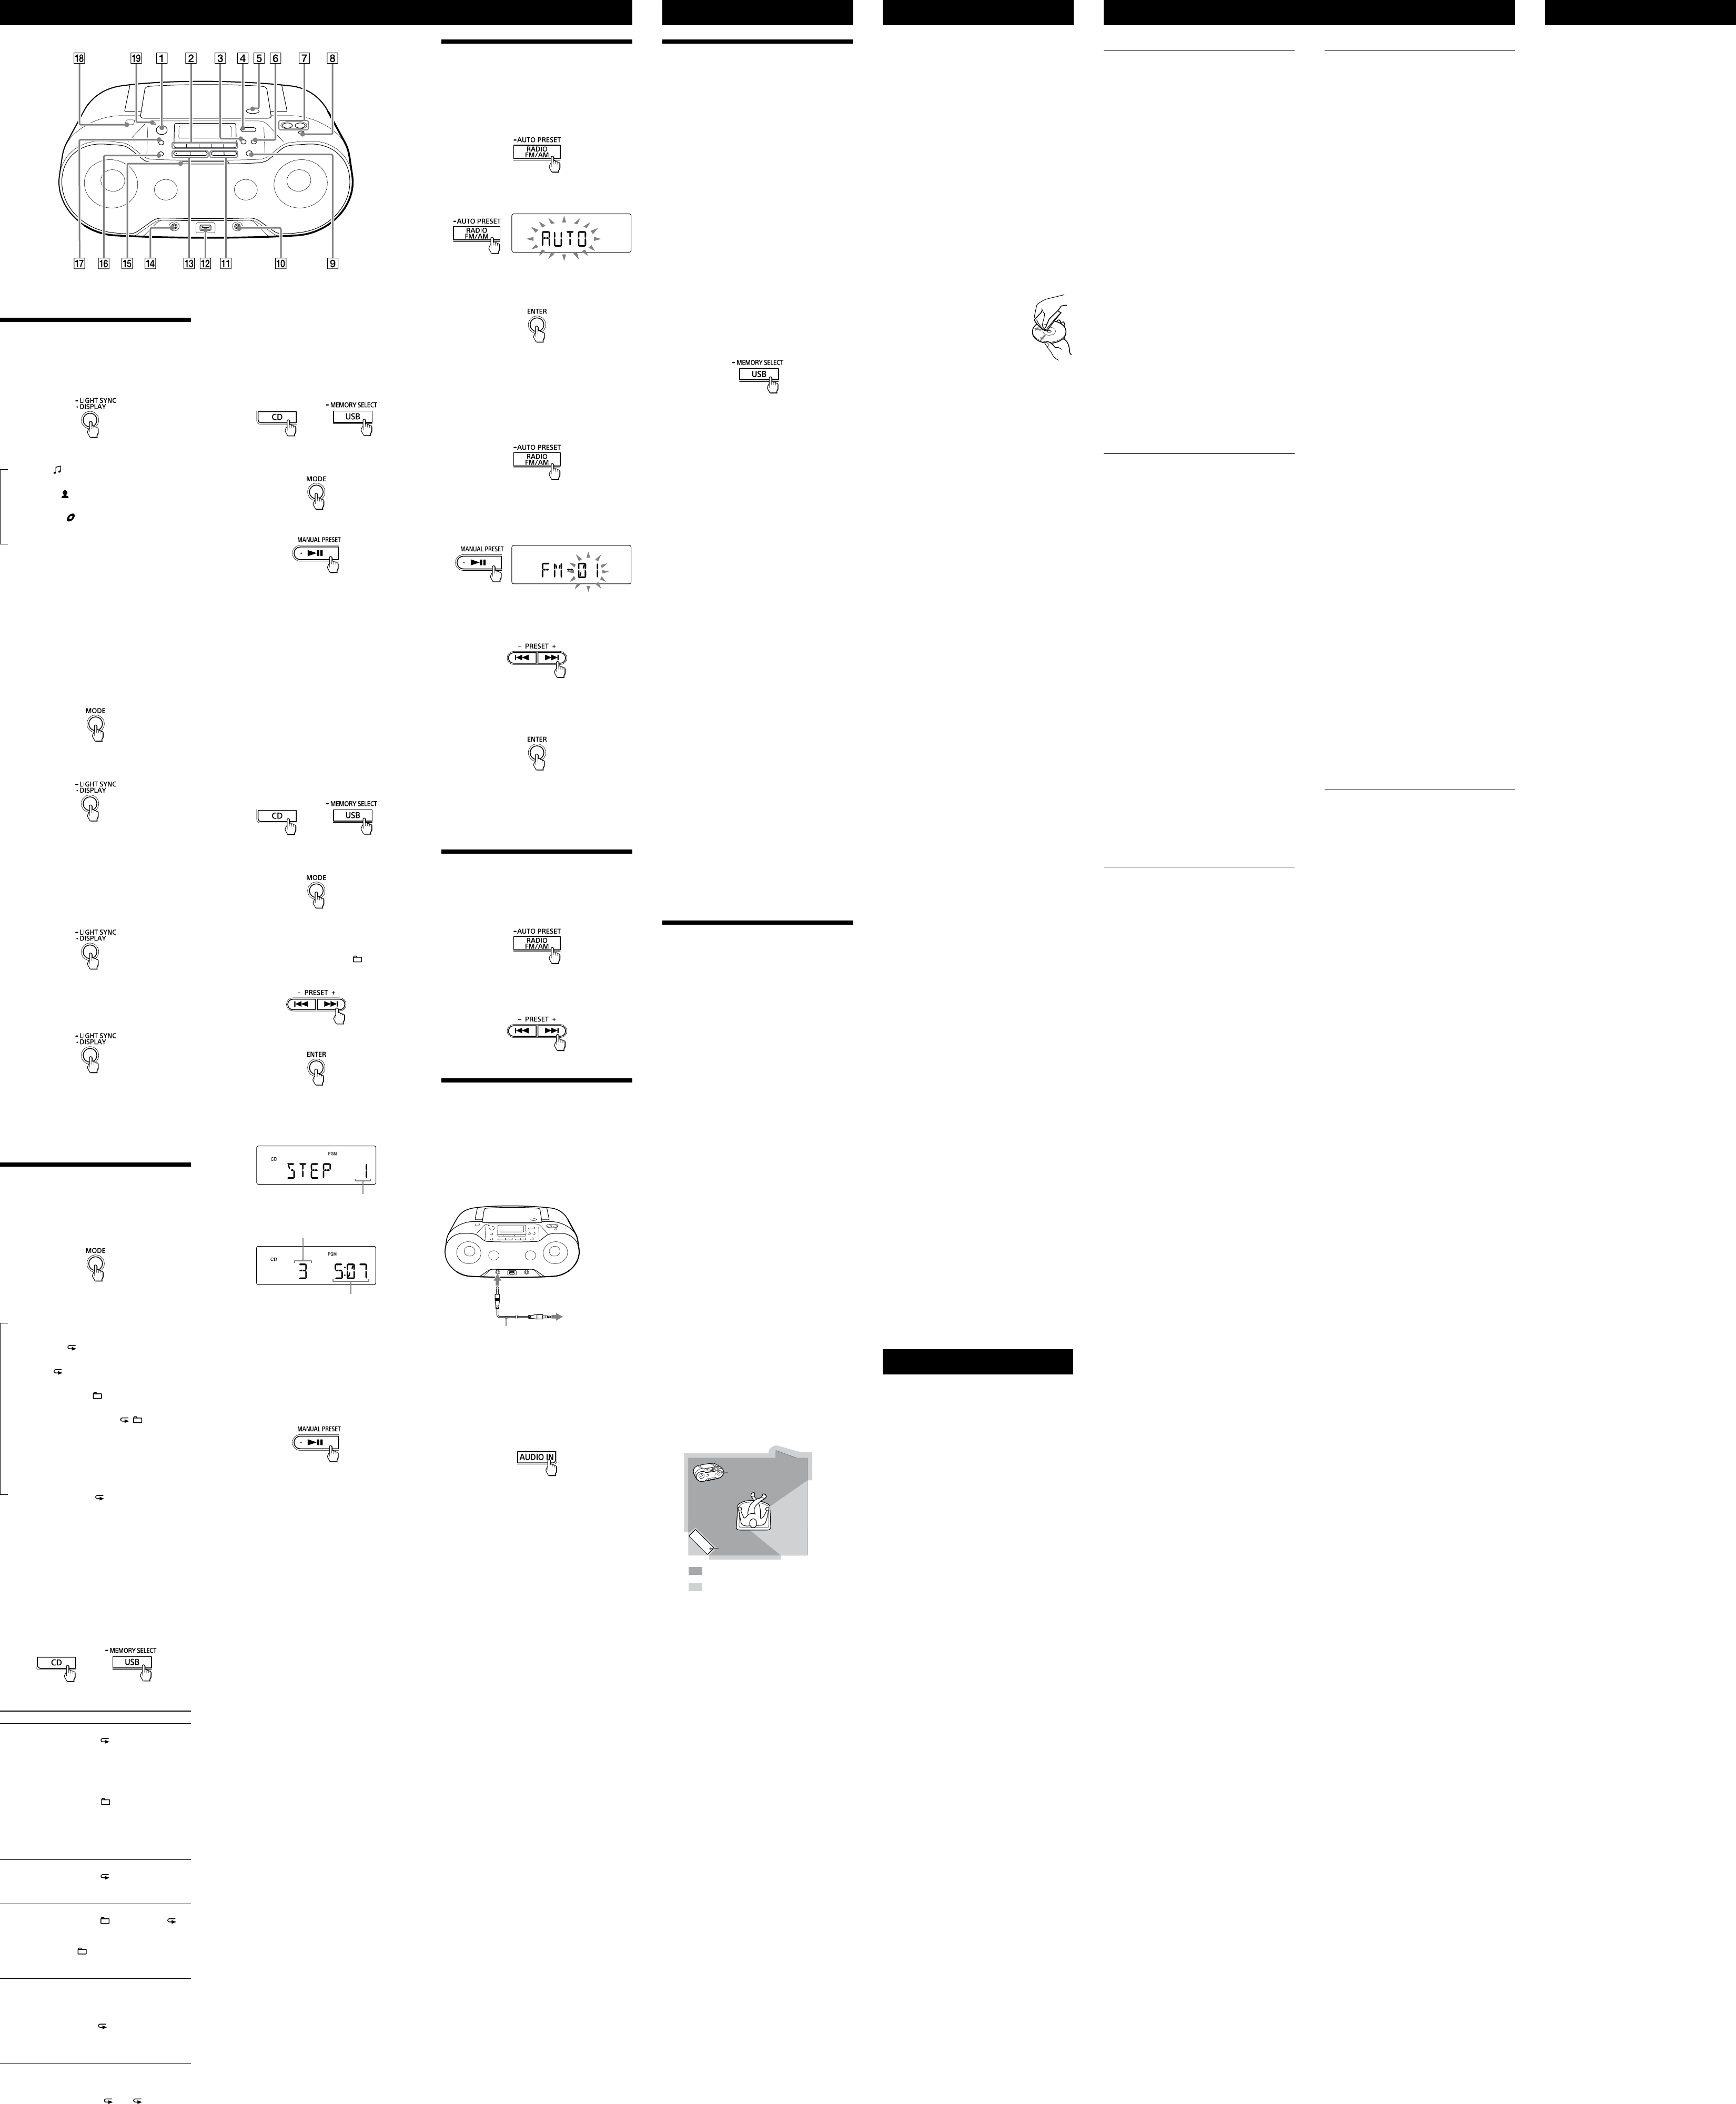
Connecting op
components
Y
component,
player
Be sure to turn off the power of each c
befor
For de
component to be c
Audio connection c
(not supplied)
T
(e.g.,portable
digital music
player)
T
IN jack
1 Connect the A
to the line
output jack of the portable digital music
player or other c
audio connection c
2 T
3 P
and start playing
sound on the connect
T
output from the speak
T
extension c
mini jack on one end and two phono plugs on
the other end.
Notes
digital music player
through the right speak
player
distorted,
music player
music player
unit.
Gener
T
power cor
the wall outlet secur
T
battery oper
“L
alternat
automatic
T
unexpect
standby mode automatic
minutes if there is no oper
output.
function.
T
for the music or sound sour
listen to
through speak
T
equipment emitting radio w
If so,
away fr
mobile phones,
communica
CD/MP3/WMA player
T
is displayed even when a CD is in place
compartment open for about an hour to dry
moisture c
disc.
CD-R/CD-RW
softwar
are e
T
damaged.
blower
heard when using a poor quality CD-R/CD-RW
or if there is a pr
device or applica
Starting playback takes mor
usual.
playback.
structure
WMA files.
USB device
T
following pr
unit.
“OVER CURRENT ” appe
electrical curr
(USB) port
.
T
from the
(USB) port
.
no problem with the USB devic
message persists,
dealer
T
T
T
T
sound.
T
sound is distorted.
during the creation of audio files.
re-cr
this unit.
T
the
(USB) port
.
cable is being inserted backw
the
(USB) port
in the corr
“READING ” is displayed for an e
time,
playback starts.
following cases:
device.
T
that you adhere t
device to 100 or les
100 or less.
Err
corrupt
device again.
of the alphabet.
displayed corr
“REC ERROR”
unit and remove the USB devic
T
USB device.
the rec
folders.
corrupt
compatible with the unit.
If the message still persists,
nearest Sony dealer
T
then turn on the unit.
Refer to the USB devic
details on how to deal with this pr
Play does not st
Play does not st
MP3/WMA files cannot be played back.
extensions.
this unit are as f
formats other than MP3/WMA f
than F
MP3/WMA files in the first partition can be
played.
255 (including the
5,00
passwor
* T
stor
For de
USB stor
manufacturer
T
CD player section
System
Compact disc digital audio syst
Laser diode properties
Emission dur
Laser output:
(T
distance of 200 mm fr
surface on the optic
aperture.)
Number of channels
2
Fr
20Hz 20,
W
Below measurable limit
Bluetoo
Communic
Bluetooth Spe
Output
Bluetooth Spe
Maximum communica
Line of sight appro
1
Fr
2.4GHz band (2.4000 GHz 2.4835 GHz)
Modulation method
FHSS
Supported Bluetoo
2
A2DP (Advance
A
3
(Audio/Video Remote C
Supported codec*
4
SBC (Subband Codec)
*
1
T
such as obstacles between devic
fields around a micr
electricity
performance,
software
*
2
specifications f
between devices.
*
3
depending on the device.
*
4
conversion f
Radio section
Fr
European,
FM: 108 MHz (50 kHz step)
AM: 1,
Uruguay
models
FM: 108 MHz (100 kHz step)
87 108 MHz (50 kHz step)
AM: 1,
531 kHz 1,60
Latin American models e
P
FM: 108 MHz (100 kHz step)
AM: 1,
Other models
FM: 108 MHz (50 kHz step)
87 108 MHz (100 kHz step)
AM: 1,
530 kHz 1,6
Intermediat
FM:
AM:
Antennas
FM:
AM:
Input
AUDIO IN
Ster
(USB) port
T
Speed compa
Output
(headphones) stere
For 16
32 impedance headphones
Supported audio formats
Supported bit ra
MP3 (MPEG 1 Audio Layer
32kbps 320kbps,
WMA:
48kbps 192kbps,
Sampling frequencies
MP3 (MPEG 1 Audio Layer
32/
WMA:
32/
Gener
Speaker
Full r
,
Power output
2.3W + 2.3W (at 3.2
,
distortion)
Power r
European,
Bolivia models
230 V AC,
9 V DC (6 R14 (size C) batt
Brazil model
120 V 127 V AC/220 V 230 V A
50/60Hz,
(AC power supply)
9 V DC (6 R14 (size C) batt
Latin American models e
P
120 V AC,
9 V DC (6 R14 (size C) batt
UAE model
240 V A
9 V DC (6 R14 (size C) batt
T
120 V AC,
9 V DC (6 R14 (size C) batt
T
220 V AC,
9 V DC (6 R14 (size C) batt
Other models
220 V 240 V A
9 V DC (6 R14 (size C) batt
Power c
AC 16W
Battery Life*
1
*
2
Playback of CD
Appro
Playback of USB device
Appro
Appro
FM rec
Appro
Bluetooth
Appro
*
1
Measured b
battery life may vary depending on the
circumstanc
conditions.
*
2
Dimensions
Appro
(incl.
Mass
Appro
Supplied acc
AC power c
Pr
Design and specifications ar
without notice
Specifica
Compa
Compa
Compatibility r
are as f
unit,
* Mass Stor
device to bec
enabling file transf
support Mass Stor
T
playback or r
If the USB device has mor
example
car
then start playback or rec
select a memory before starting playback or
rec
opera
1 Connect the USB devic
(USB)
port
.
2 P
to turn on the USB function.
3 P
until
“SELECT?”
4 Pr
.
5 Press or
repea
a memory number
T
displayed in various ways,
specifications of the USB devic
If only one memory can be selected,
to step 6
6 Pr
.
Notes on the USB devic
USB devices meet the c
the files on the device.
files on the device,
unit to finish reading them.
USB hub.
operation is perf
before it is perf
provided with a c
the playback order on a c
Compa
Compatibility r
follows.
check that it meets the r
version 3.0
Distribution Pr
Remote C
NFC pairing function of the unit).
For the la
Bluetooth devic
smartphones,
For cust
http://support.sony-europe.c
For cust
http://esupport.sony
For cust
http://www
What is Bluet
technology?
Bluetooth wir
wireles
communica
a computer and digit
wireles
about 10 m.
Connecting two devic
but some devices can be c
devices at the same time
Y
nor is it neces
another
technology
device in a bag or pock
Bluetooth st
supported by thousands of companies all over
the world,
worldwide.
Communic
Bluetoo
Pr
Bluetooth devic
the following Bluet
Communic
Bluetooth Spe
Compatible Blue
T
high-quality
Contr
stopping,
Maximum communic
Use Bluetooth devic
of the unit.
Maximum communica
under the following conditions.
wall between the unit and Blue
radia
Optimal performance
Limited performanc
T
Steel c
Interfer
Because Bluet
(IEEE802.
microw
in communica
invalid c
wireles
following.
wireles
device,
possible.
Interfer
Microw
may affect the oper
devices.
devices in the following loc
cause an accident.
hospital,
Notes
Bluetooth devic
same profile as the unit’
Note also that even if the same pr
devices may vary in function depending on their
specifications.
technology
slightly delayed from the sound playe
Bluetooth devic
with the Bluetooth st
connection when the Bluet
technology is used,
enough depending on the setting.
when communica
technology
of information during Bluet
requir
specified by Bluet
Even if the c
above mentioned Bluetoo
devices may not be c
depending on the featur
device.
Bluetooth devic
communica
environment.
Bluetoo
T
Bluetooth devic
unit is not re
wireles
or a microw
complet
Bluetooth devic
connection with Blue
activate
smartphone).
T
distance is short.
radia
Bluetooth devic
nearby
device and the unit away fr
the device or move the devic
away fr
other as possible
in another position.
A connection c
may requir
communica
connection with Blue
with this unit.
compatible Blue
information on the website
under
P
Bluetooth devic
(See
Bluetooth devic
with this unit.
compatible Blue
information on the website
under
P
connection with Blue
NFC-c
paired using the NFC function of this unit,
depending on the featur
the device.
smartphone slowly over the N mark
.
compatibility r
smartphones”).
Radio
T
length,
For AM r
the best rec
loud noise may be heard fr
the phone away fr
T
with an indoor antenna,
from the TV
After trying the suggested reme
problem persists,
remove all the batt
on the display disappear
cor
problem persists,
dealer
Additional Informa
Discs that this unit CAN play
1
track
is finalized*
2
corr
*1
Audio.
CDs.
*2
Finalizing is the process t
discs playable on the consumer disc player
products,
disabled as optional settings during disc cr
in most rec
Discs that this unit CANNO
audio CD format or f
ISO9660 Level 1/L
CD-RW with scra
CD-RW rec
rec
incorr
Notes on discs
a cleaning cloth.
from the c
scra
the CD
benzine,
available cleaners or anti-static
spray int
sourc
car park
consider
scra
Note on DualDiscs
mates D
digital audio material on the o
However
not conf
standard
guarant
Music discs encoded with c
pr
conform t
Recently
copyright pr
market
be awar
some that do not c
and may not be playable by this pr
On safe
section is harmful to eyes,
disassemble the casing.
qualified personnel only
unit,
qualified personnel befor
further
square
Attempting to do so may damage the unit.
not use such discs.
On power sour
cor
to be used for an e
avoid damage that can be c
leakage or corr
On placement
sourc
ex
subject to the dir
unstable surface
of the cabinet.
be unobstructed for the unit t
properly and pr
components.
keep personal cr
coding or spring-wound wa
the unit to prevent pos
magnet.
On oper
warm loca
room,
inside the CD player section.
the unit will not oper
remove the CD and w
moisture to ev
On handling the unit
avoid dust and debris contamina
On cleaning the cabine
soft cloth slightly moistened with a mild
deter
abrasive pad
such as alcohol or benzine.
If you have any questions or problems
conc
dealer
Messages
DAAn audio file is c
ERASE ERROR: Erase of the audio files or f
failed.
F T
during rec
have been damaged.
FULL: Y
or files (steps).
LT
exhauste
NO BT: Blue
NO DEV: No USB devic
connect
NO STEP: All of the progr
have been erase
NO TRK: T
on the USB device.
NO Y
opera
opera
NO T
NO An unsupported USB device is
connect
PRO T
prot
clear the write pro
device.
PUSH ST Y
opera
paused.
to stop playback,
try the operation again.
REC ERROR: Rec
partway
Pr