669702
1
Verklein
Vergroot
Pagina terug
1/2
Pagina verder
COMPASS CALIBRATION
BATTERY WARNINGS AND USAGE GUIDELINES
WARNING: Lithium Polymer (LiPo) baeries are significantly more volale than alkaline, NiCd or NiMH baeries. All instrucons and
warnings must be followed exactly to prevent property damage and/or serious injury as the mishandling of LiPo baeries can result
in fire. By handling, charging or using the included LiPo baery you assume all risks associated with LiPo baeries. If you do not agree
with these condions please return the complete product in new, unused condion to the place of purchase immediately.
You must always charge the LiPo baery in a safe, well-venlated area away from flammable materials.
• Never charge the LiPo baery unaended at any me. When charging the baery you must always remain in constant observaon
to monitor the charging process and react immediately to any potenal problems that may occur.
Aer flying/discharging the LiPo baery you must allow it to cool to ambient/room temperature before recharging.
To charge the LiPo baery you must use only the included charger or a suitably compable LiPo baery charger. Failure to do so may
result in a fire causing property damage and/or serious injury.
If at any me the LiPo baery begins to balloon or swell, disconnue charging or discharging immediately. Quickly and safely
disconnect the baery, then place it in a safe, open area away from flammable materials to observe it for at least 15 minutes.
Connuing to charge or discharge a baery that has begun to balloon or swell can result in a fire. A baery that has ballooned or
swollen even a small amount must be removed from service completely.
• Do not over-discharge the LiPo baery. Discharging the baery too low can cause damage to the baery resulng in reduced power,
flight duraon or failure of the baery enrely. LiPo cells should not be discharged to below 3.0V each under load.
• Store the LiPo baery at room temperature and in a dry area for best results.
• When charging, transporng or temporarily storing the LiPo baery the temperature range should be from approximately 40–120°
F (5–49° C). Do not store the baery or aircra in a hot garage, car or direct sunlight. If stored in a hot garage or car the baery can be
damaged or even catch fire.
• Never leave baeries, chargers and power supplies unaended during use.
• Never aempt to charge low voltage, ballooned/swollen, damaged or wet baeries.
• Never allow children under 14 years of age to charge baeries.
• Never charge a baery if any of the wire leads have been damaged or shorted.
• Never aempt to disassemble the baery, charger or power supply.
• Never drop baeries, chargers or power supplies.
Always inspect the baery, charger and power supply before charging.
Always ensure correct polarity before connecng baeries, chargers and power supplies.
Always disconnect the baery aer charging.
Always terminate all processes if the baery, charger or power supply malfuncons.
IMPORTANT NOTE: It’s safer and beer for the longevity of the baery to store it only parally charged for any length of me. Storing
the baery approximately 50% charged is typically best, however, it will take some careful management of the charge me and the use
of a volt meter to achieve this voltage. If you have the equipment and skills to achieve the 50% charge level for storage it is recommend-
ed. If not, simply be sure to not store the baery fully charged whenever possible. In fact, as long as the baery will be stored at
approximately room temperature and for no more than a few weeks before the next use, it may be best to store the baery in the
discharged state aer the last flight (as long as the baery was not over-discharged on the last flight).
The Use of This Product for the Following is Forbidden
1. Defamaon, abuse, harassment, stalking, threatening or any other violaon of the law (e.g. infringement upon the privacy or third
pares and the public).
2. The photographing of private buildings or people beyond the strict rules of freedom of panorama, in their private environment or at
home, without their express wrien consent; taking photographs in areas where taking pictures is prohibited or where you require a permit.
3. Use of this product for any illegal or inappropriate purposes outside of personal use (e.g. spying; military operaons, illegal
invesgaons or unauthorised invesgaons, or air transport);
4. Infringement upon or non-compliance with other applicable laws or regulaons or immoral conduct.
Enquire beforehand as to whether you are allowed to take aerial shots in certain areas. Please note that copyright infringements could
occur if capturing and copying photos and films of events, demonstraons, exhibions or industrial property using a camera or another
device, even if the video or images are intended for private use. Please also note that, in some countries, remote-control flying objects
are generally prohibited at commercial events, especially if this is subject to the domiciliary rights of the organiser.
Yuneec Electric Aviaon as well as all product names and brands which are used in these instrucons are the registered trademarks of
the respecve owner. This product and its instrucons are protected by copyright law and fall to Yuneec Electric Aviaon. All rights
reserved. These instrucons may not be copied or reproduced in any form, wholly or in part, without the prior wrien consent of
Yuneec Electric Aviaon. It does not assume any liability for violaons of patent law in relaon to the use of the products or the
informaon contained in these instrucons.
Should you encounter problems while seng up the product which you cannot solve yourself, please contact your respecve Yuneec
Electric Aviaon Service at www.yuneec.com.
GENERAL SAFETY PRECAUTIONS AND WARNINGS
Warning: Neglecng to use this product in the way spulated in these operang instrucons may result in damage to the product or
personal property or cause serious injury. A remote-control mul-rotor copter is not a toy! Improper use can lead to serious injury and
material damage.
Warning: As the user of this product, you alone are wholly responsible for proper product use which does not put you yourself or others
at risk and which does not damage the property of others.
Always keep your hands, face and other body parts at a safe distance from the rotang propellers or other moving parts. Keep objects
away which could collide with the propellers or which could get caught in them, e.g. debris, individual parts, tools or loose clothing, etc.
Always operate your aircra in open spaces which are clear of people, vehicles or other obstacles. Never fly over large groups of people,
close to airports or buildings.
In order to ensure proper operaon and safe flying performance, never fly your aircra near to buildings or other obstacles which
prevent a clear view of the sky, thus compromising the GPS recepon.
Do not aempt to operate the aircra in areas where magnec interference fields and / or wireless interference could occur, e.g. in
areas near radio towers, power transmission staons, high-voltage lines, etc.
Always maintain the safety clearance in all direcons from the aircra in order to avoid collisions and/or injuries. This aircra is
controlled by a wireless signal which may be compromised by many potenal sources which are outside of your control. Impairments
can lead to a temporary loss of control.
In order to guarantee proper and safe use of the automac landing funcon in ‘Home’ Mode, only switch your aircra to Home Mode
when it is in a posion surrounded by at least 3 metres (approx. 10 .) of free and open space and note the need for sufficient GPS recepon.
Do not aempt to start the aircra if any components are damaged or worn. (includes, inter alia: damaged propellers/rotor blades, old baeries etc.)
Never operate your aircra in poor or extreme weather condions, this includes strong winds, rainfall, thunderstorms etc.
Always start operang your aircra with a fully charged baery. Always land as soon as possible following the inial baery level
warning or land immediately aer the second baery level warning (indicated by vibraon and audible warning tones of the transmier
or the Personal Ground Staon as the case may be).
Only operate your aircra if the voltage of the baery in the transmier or the Personal Ground Staon is within the safe range
(indicated by the baery charge level symbol on the screen of the transmier of the Personal Ground Staon as the case may be).
Always keep the aircra in view and under control. Leave the transmier or the Personal Ground Staon on as long as the aircra is switched on.
Always pull the throle sck right down and switch off the motors if the propellers/rotor blades come into contact with any objects.
Always leave all the components to cool down before touching them or flying again.
Please always remove the baeries aer use and transport these separately and in line with the applicable guidelines.
Avoid water coming into contact with any electronic components, these parts are not suitable for use in contact with water. Moisture
can damage the electronics.
Never put parts of the aircra or its accessories in your mouth. This may lead to serious injury and even death.
Always keep small parts, electronic components and chemicals out of the reach of children.
Always follow the instrucons and warnings in relaon to all components, accessory parts, chargers and rechargeable baeries carefully.
CAUTION: The electronic speed controllers (ESCs) installed in the Yuneec the TORNADO H920 are not compable with other
products. And the YUNEEC the TORNADO H920 is not compable with other ESCs. The use of other ESCs in the Yuneec the
TORNADO H920 may lead to accidents which may result in defects in the Yuneec the TORNADO H920, damage to property or to your
health or that of others.
FCC STATEMENT:
This equipment has been tested and found to comply with the limits for Part 15 of the FCC rules. These limits are designed to provide
reasonable protecon against harmful interference in a residenal installaon. This equipment generates, uses and can radiate radio
frequency energy and, if not installed and used in accordance with the instrucons, may cause harmful interference to radio
communicaons.
However, there is no guarantee that interference will not occur in a parcular installaon. If this equipment does cause harmful
interference to radio or television recepon, which can be determined by turning the equipment off and on, the user is encouraged to
try to correct the interference by one or more of the following measures:
Reorient or relocate the receiving antenna.
Increase the separaon between the equipment and receiver.
Connect the equipment to an outlet on a circuit different from that to which the receiver is connected.
This device complies with part 15 of the FCC rules. Operaon is subject to the following two condions:
(1) This device may not cause harmful interference, and (2) this device must accept any interference received, including interference that
may cause undesired operaon.
NOTE: This equipment has been tested and found to comply with the limits for a Class B digital device, pursuant to part 15 of the FCC
Rules. These limits are designed to provide reasonable protecon against harmful interference in a residenal installaon. This
equipment generates, uses and can radiate radio frequency energy and, if not installed and used in accordance with the instrucons,
may cause harmful interference to radio communicaons. However, there is no guarantee that interference will not occur in a parcular
installaon. If this equipment does cause harmful interference to radio or television recepon, which can be determined by turning the
equipment off and on, the user is encouraged to try to correct the interference by one or more of the following measures:
—Reorient or relocate the receiving antenna.
—Increase the separaon between the equipment and receiver.
—Connect the equipment into an outlet on a circuit different from that to which the receiver is connected.
—Consult the dealer or an experienced radio/TV technician for help.
RF EXPOSURE WARNING
This equipment must be installed and operated in accordance with provided instrucons and the antenna(s) used for this transmier
must be installed to provide a separaon distance of at least 20 cm from all persons and must not be co-located or operang in
conjuncon with any other antenna or transmier. End-users and installers must be provide with antenna installaon instrucons and
transmier operang condions for sasfying RF exposure compliance.
IC RADIATION EXPOSURE STATEMENT FOR CANADA
This device complies with Industry Canada licence-exempt RSS standard(s).
Operaon is subject to the following two condions: (1) this device may not cause interference, and (2) this device must accept any
interference, including interference that may cause undesired operaon of the device.
Le présent appareil est conforme aux CNR d'Industrie Canada applicables aux appareils radio exempts de licence. L'exploitaon est
autorisée aux deux condions suivantes : (1) l'appareil ne doit pas produire de brouillage, et (2) l'ulisateur de l'appareil doit accepter
tout brouillage radioélectrique subi, même si le brouillage est suscepble d'en compromere le fonconnement.
This equipment complies with IC RSS-102 radiaon exposure limit set forth for an uncontrolled environment.
Cet équipement respecte les limites d'exposion aux rayonnements IC définies pour un environnement non contrôlé
V 1.0
HOME MODE
When the Flight Mode selecon switch is in the
boom posion, H920 will be in Home (also known
as Return to Home) Mode.
In Home Mode, the GPS connecvity will fly back
H920 in a straight line in the direcon of the pilots’
current locaon, and automacally land within
13-26  (4-8m) of the pilot. This can be very helpful
for beginning pilots who aren’t quite ready to land
H920 themselves. It can also be helpful for pilots
that lose orientaon during flight. Simply acvate
Home Mode unl H920 automacally moves
toward the home posion, and once you've
confirmed orientaon switch back to Angle (Pilot)
Mode. If H920 ever loses the link with the ST16
Ground Staon it will automacally enter Home
Mode.
NOTICE: If the signal of remote control is lost, H920
will automacally return to home point and hold its
posion (with a suitable GPS signal/lock) over the
home posion except for low baery.
CAUTION: Do not calibrate the compass in parking garages, close to buildings or near roads with a metal core. For optimum
performance, only calibrate H920 in open spaces, far away from power lines and other metal structures or concrete
buildings.
NOTICE:
Be sure to perform the compass calibration procedure at least 11 feet away from the nearest cell phone or other
electronic devices to ensur
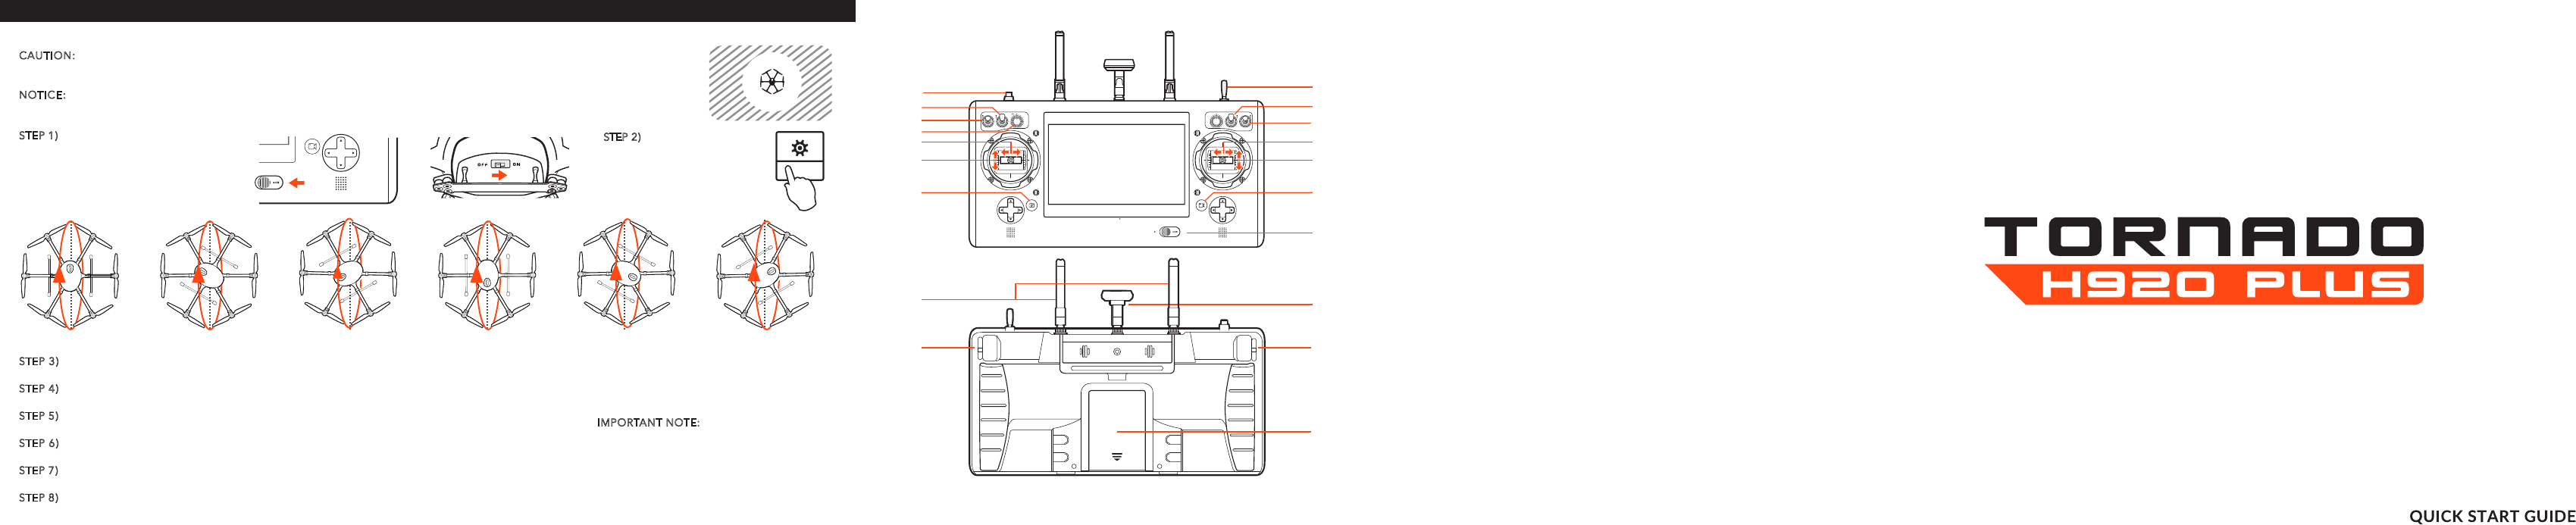
e proper calibration.
STEP 1) Power on the ST16 Ground Station
first and then the aircraft, and make sure
they are connected correctly. If they are
not connected correctly, the telemetry
data will not display on the screen.
STEP 2)
Tap the GPS CALIBRA-
TION icon on the ST16 screen
and choose COMPASS.
GPS
CALIBRATION
STEP 3) Lift H920 airframe straight & level. When you hear one beep, turn it forward as shown by the red
arrow above until you hear two beep.
STEP 4)
Turn the aircraft 60° to the left and then turn it forward as shown by the red arrow above until you
hear three beeps.
STEP 5)
Turn the aircraft 60° to the left again and then turn it forward as shown by the red arrow above
until you hear four beeps.
STEP 6)
Turn the aircraft 60° to the left again and then turn it forward as shown by the red arrow above
until you hear five beeps.
STEP 7)
Turn the aircraft 60° to the left again and then turn it forward as shown by the red arrow above
until you hear six beeps.
STEP 8)
Turn the aircraft 60° to the left again and then turn it forward as shown by the red arrow above
until you hear the acknowledgement tone.
If the calibration has been successful, you
will recognize this when you hear the
acknowledgement tone (the same one yu
hear when you switch the system on), and
the aircraft will restart.
IMPORTANT NOTE:
If calibration has failed,
the Main LED Status Indicator will be solid
white and you must repeat the calibration
process. If the calibration continues to fail,
either the site of calibration is unsuitable or
the compass is defective. Refer to your
Yuneec service center.
ST16 OVERVIEW
01
02
03
05
04
06
07
08
09
10
11
12
13
14
16
17
15
18
19
Start/Stop Motors Buon
Gimbal Pan Mode (Follow Mode/Follow Pan
Controllable Mode/Global Mode)
Gimbal Tilt Mode (Angle Mode/ Velocity Mode)
Gimbal Pan Control
Rudder/Yaw Control (Mode 2 and Mode 1)
Throttle/Altitude Control ( Mode 2)
Elevator/pitch control (Mode 1)
Take Still Photo Button
Landing Gear Switch
Obstacle Avoidance Switch
Flight Mode Selection Switch
Aileron/Roll Control (Mode 2 and Mode 1)
Elevator/Pitch Control (Mode 2)/Throttle joystick (mode 1)
Start/Stop Video Recording Button
Power Switch
Antenna
5.8GHz patch antenna
Proportional Control Rate Slider
Gimbal Tilt Control Slider
Battery
01
02
03
04
05
06
07
08
09
10
11
12
13
14
15
16
17
18
19
1

Hulp nodig? Stel uw vraag in het forum

Spelregels

Misbruik melden

Gebruikershandleiding.com neemt misbruik van zijn services uitermate serieus. U kunt hieronder aangeven waarom deze vraag ongepast is. Wij controleren de vraag en zonodig wordt deze verwijderd.

Product:

Bijvoorbeeld antisemitische inhoud, racistische inhoud, of materiaal dat gewelddadige fysieke handelingen tot gevolg kan hebben.

Bijvoorbeeld een creditcardnummer, een persoonlijk identificatienummer, of een geheim adres. E-mailadressen en volledige namen worden niet als privégegevens beschouwd.

Spelregels forum

Om tot zinvolle vragen te komen hanteren wij de volgende spelregels:

Belangrijk! Als er een antwoord wordt gegeven op uw vraag, dan is het voor de gever van het antwoord nuttig om te weten als u er wel (of niet) mee geholpen bent! Wij vragen u dus ook te reageren op een antwoord.

Belangrijk! Antwoorden worden ook per e-mail naar abonnees gestuurd. Laat uw emailadres achter op deze site, zodat u op de hoogte blijft. U krijgt dan ook andere vragen en antwoorden te zien.

Abonneren

Abonneer u voor het ontvangen van emails voor uw Yuneec Tornado H920 Plus bij:


U ontvangt een email met instructies om u voor één of beide opties in te schrijven.


Ontvang uw handleiding per email

Vul uw emailadres in en ontvang de handleiding van Yuneec Tornado H920 Plus in de taal/talen: Engels als bijlage per email.

De handleiding is 9,22 mb groot.


U ontvangt de handleiding per email binnen enkele minuten. Als u geen email heeft ontvangen, dan heeft u waarschijnlijk een verkeerd emailadres ingevuld of is uw mailbox te vol. Daarnaast kan het zijn dat uw internetprovider een maximum heeft aan de grootte per email. Omdat hier een handleiding wordt meegestuurd, kan het voorkomen dat de email groter is dan toegestaan bij uw provider.

Andere handleiding(en) van Yuneec Tornado H920 Plus

Yuneec Tornado H920 Plus Snelstart handleiding - Deutsch - 2 pagina's

Yuneec Tornado H920 Plus Gebruiksaanwijzing - Deutsch - 40 pagina's

Yuneec Tornado H920 Plus Gebruiksaanwijzing - English - 40 pagina's

Yuneec Tornado H920 Plus Gebruiksaanwijzing - Français - 40 pagina's

Yuneec Tornado H920 Plus Snelstart handleiding - Français - 2 pagina's


Uw handleiding is per email verstuurd. Controleer uw email

Als u niet binnen een kwartier uw email met handleiding ontvangen heeft, kan het zijn dat u een verkeerd emailadres heeft ingevuld of dat uw emailprovider een maximum grootte per email heeft ingesteld die kleiner is dan de grootte van de handleiding.

Er is een email naar u verstuurd om uw inschrijving definitief te maken.

Controleer uw email en volg de aanwijzingen op om uw inschrijving definitief te maken

U heeft geen emailadres opgegeven

Als u de handleiding per email wilt ontvangen, vul dan een geldig emailadres in.

Uw vraag is op deze pagina toegevoegd

Wilt u een email ontvangen bij een antwoord en/of nieuwe vragen? Vul dan hier uw emailadres in.


Info