RK
EN
NL
FR
DE
ES
PT | Manual
IT | Man
SV | Bruksa
PL | Inst
CS
SK | Návod na použ
RU
эксп
P
DESCRIP
BESKRIV
1
3
4
5
6 7
8
WW
T
5015
ENInstruction manual
SAFETY
• By ignoring the safety instructions the
manufacturer can not be held responsible for
the damage.
• If the supply cord is damaged, it must be
replaced by the manufacturer, its service
agent or similarly qualified persons in order to
avoid a hazard.
• Never move the appliance by pulling the cord
and make sure the cord can not become
entangled.
• The appliance must be placed on a stable,
level surface.
• The user must not leave the device
unattended while it is connected to the supply.
• This appliance is only to be used for
household purposes and only for the purpose
it is made for.
• This appliance shall not be used by children
aged less than 8 years. This appliance can be
used by children aged from 8 years and above
and persons with reduced physical, sensory or
mental capabilities or lack of experience and
knowledge if they have been given
supervision or instruction concerning use of
the appliance in a safe way and understand
the hazards involved. Children shall not play
with the appliance. Keep the appliance and its
cord out of reach of children aged less than 8
years. Cleaning and user maintenance shall
not be made by children unless older than 8
and supervised.
• To protect yourself against an electric shock,
do not immerse the cord, plug or appliance in
the water or any other liquid.
• This appliance is intended to be used in
household and similar applications such as:
– Staff kitchen areas in shops, offices and other working environments.
– By clients in hotels, motels and other residential type environments.
– Bed and breakfast type environments.
– Farm houses.
• Children shall not play with the appliance.
• This appliance shall not be used by children.
Keep the appliance and its cord out of reach
of children.
• To protect yourself against an electric shock,
do not immerse the cord, plug or appliance in
the water or any other liquid.
• Surface are liable to get hot during use.
• Only use the appliance with the appropriate
connector.
• The connector must be removed before the
appliance will be cleaned, please make sure
the inlet is completely dry before the unit will
be used again.
• Warning, the escaping steam can be very hot.
• Be aware of the steam vent during cooking, as
there is danger of burns.
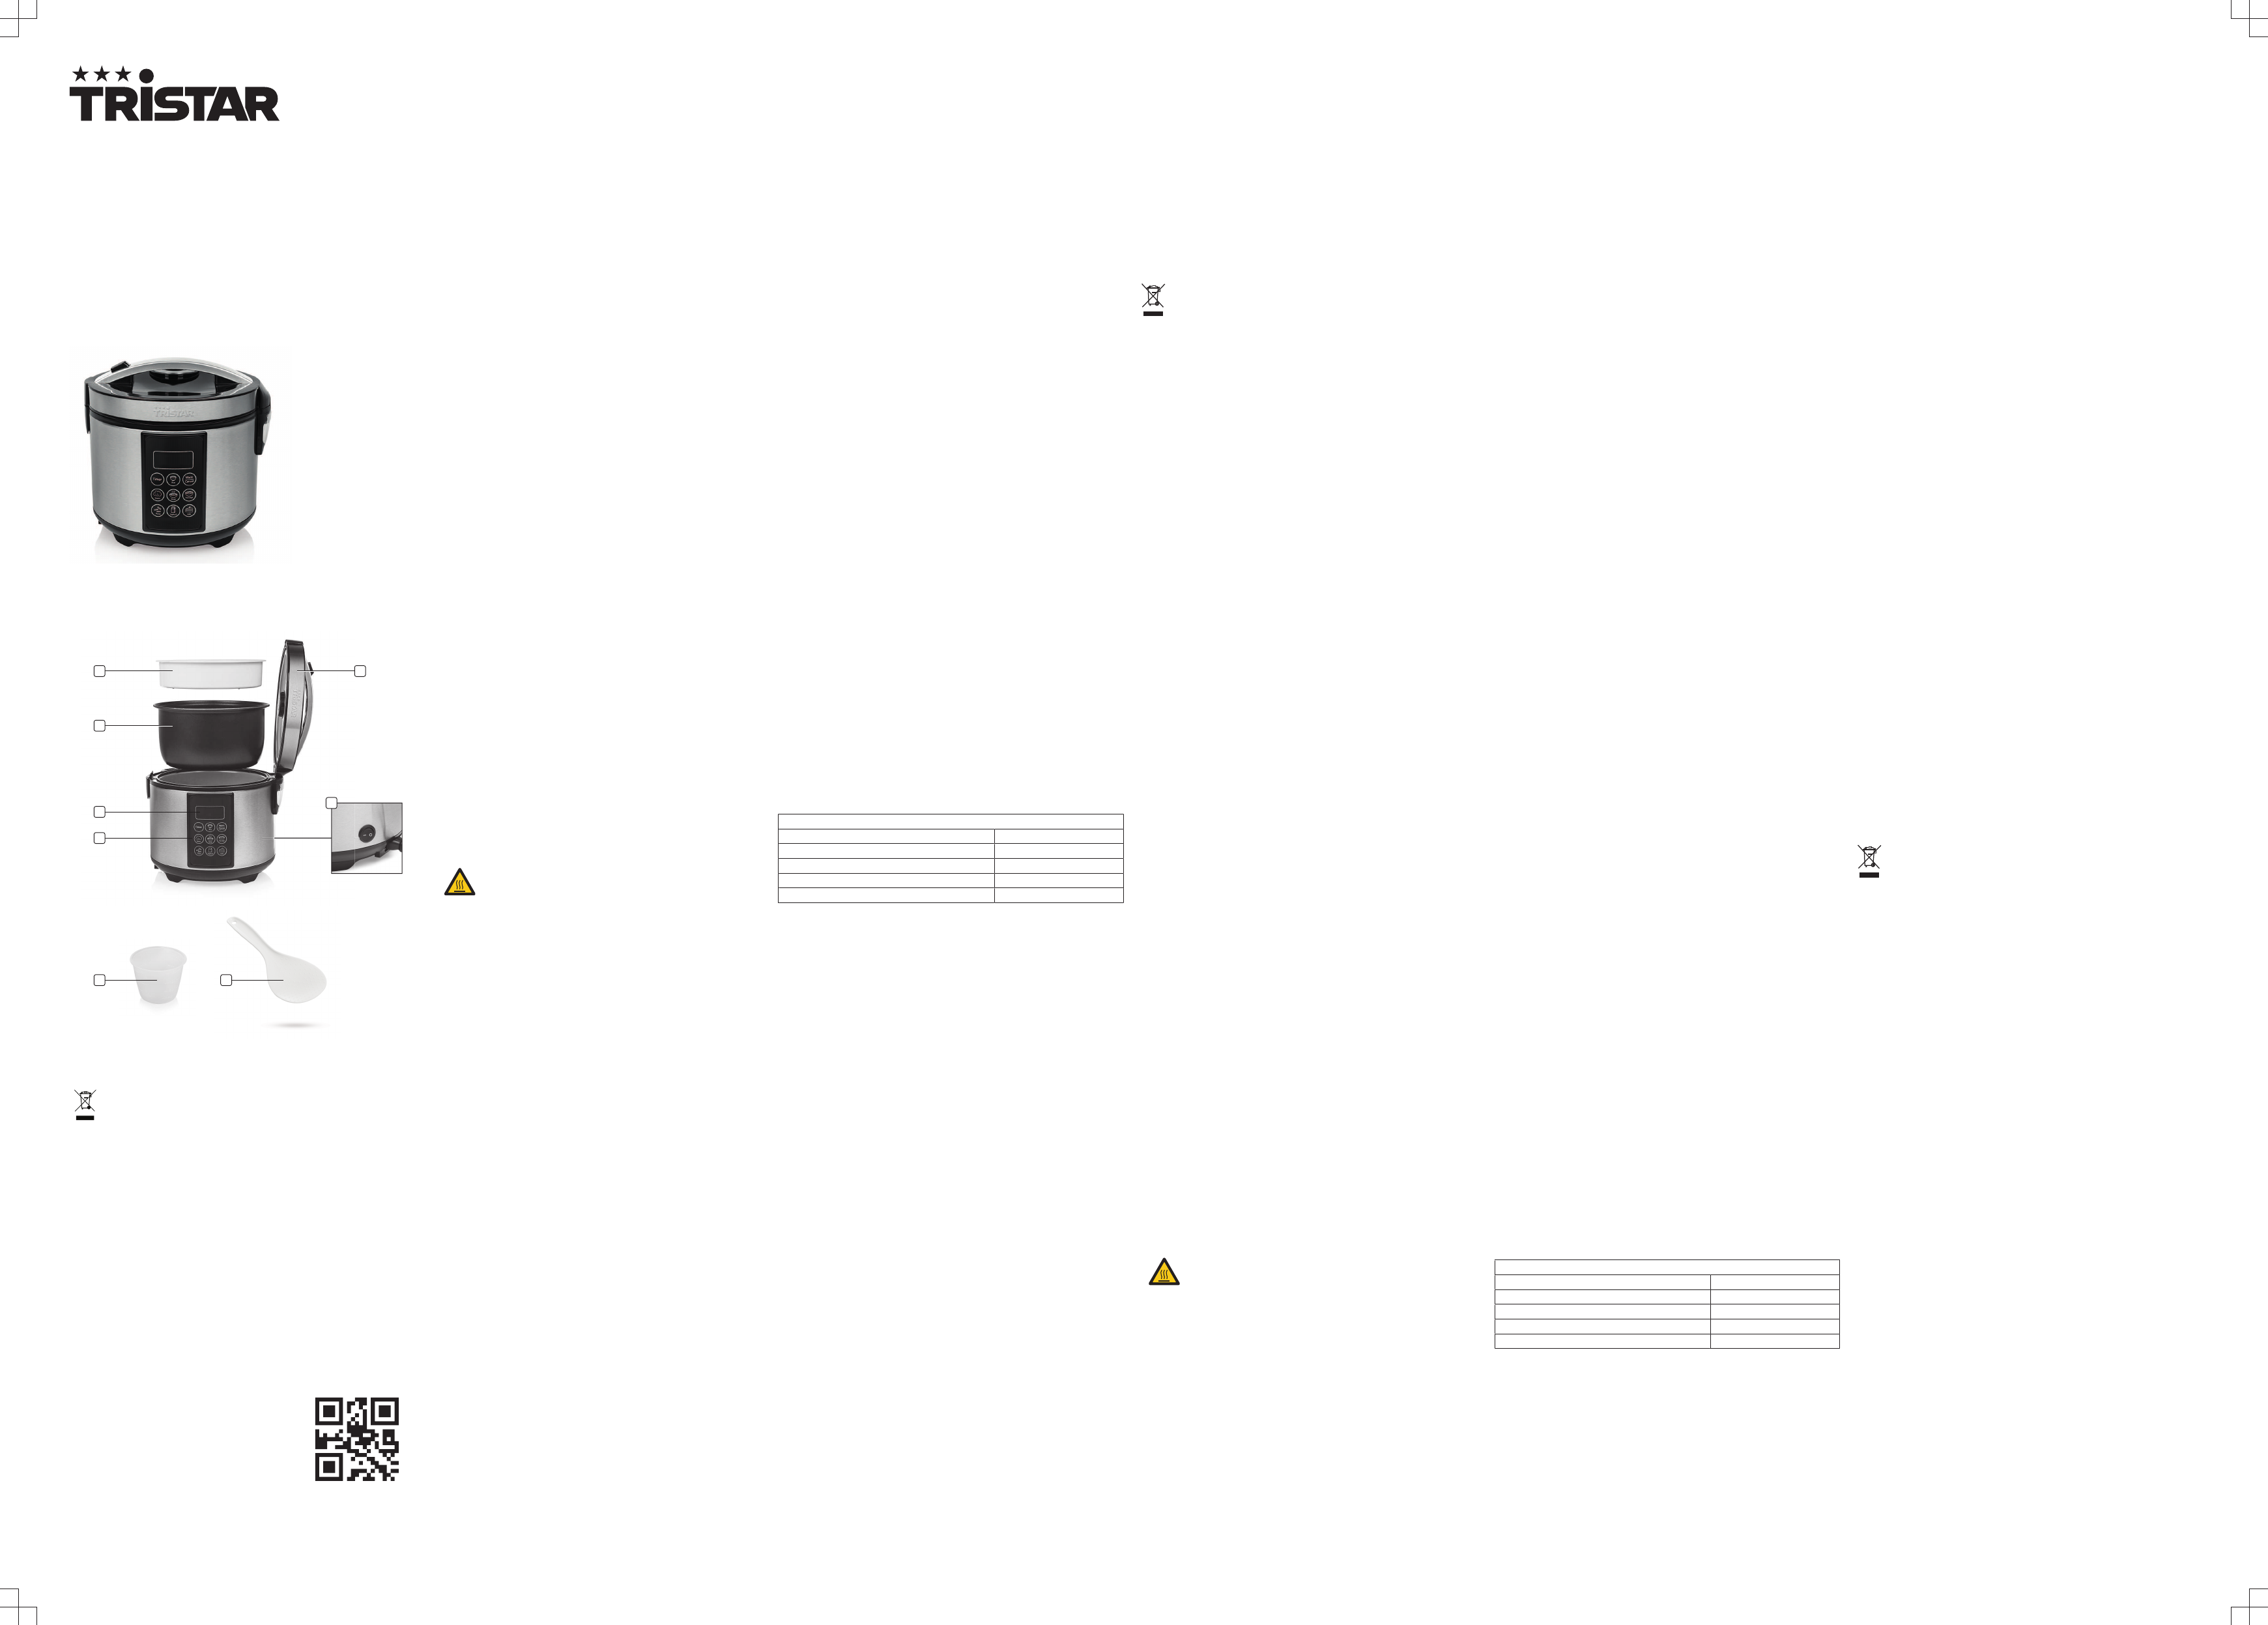
PARTS DESCRIPTION
1. Lid
2. Steam basket
3. Inner bowl
4. Display
5. Digital control panel
6. Measuring cup
7. Spoon
8. On/off switch
BEFORE THE FIRST USE
• Take the appliance andaccessoriesoutthebox.Removethe
stickers,protective foilorplasticfrom thedevice.
• Place the device on a flat stable surface and ensure a minimum of 10
cm. free space around the device. This device is not suitable for
installation in a cabinet or for outside use.
• Putthepower cable intothe socket.(Note: Make surethe
voltagewhich is indicated on the devicematchesthe localvoltage
beforeconnecting the device.Voltage220V-240V 50/60Hz)
• Always place the inner pot inside the outer pot before switching on the
rice cooker.
• Make sure that the inner pot contains liquid, or be ready to
immediately ad oil, butter or margarine to the inner pot before
switching on the rice cooker.
• Always dry the outer surface of the inner pot before placing it inside
the cooker. Any moisture remaining on the inner pot surface may
cause a cracking noise while the unit is heating up.
• Press the On/Off switch to the desired position to turn the device on or
off.
• When the device is turned on for the first time, a slight odour will
occur. This is normal, ensure adequate ventilation. This fragrance is
only temporary and will disappear soon.
USE
Timer
• Press the timer button to set the timer function. Press once to increase
by 30 minutes. Long press to increase automatically in 30 minutes
interval.
• Timer can be pre-set up to 24 hours.
• Note: Recommended timer pre-setting is no more than 12 hours to
avoid food deterioration.
• After setting the pre-set time press the desired program button that
needs to be started. The screen displays the completion time and
starts the countdown.
• Both lights of the timer button and selected program light up.
Rice
• Press the Rice button to select the Rice function.
• Indicator light above button will go on.
• Program starts and digital screen displays a moving “- - - -” from bottom
to top.
• The Rice function automatically enters the stew stage after cooking and
display countdown timer in the digital screen.
• Rice function automatically enters the temperature preservation function
when program completes.
• See “cooking rice” chapter for more information.
Warm/Cancel
• In standby mode press the Warm/Cancel button to start the temperature
preservation program.
• The digital screen displays "bb" and the light above the Warm/Cancel
button will be on to indicate the temperature preservation program is
active.
• Press Warm/Cancel button again to disable the temperature preservation
program.
• Food is best to be consumed within 5 hours after cooking, so that flavor
and taste do not deteriorate.
• If the device is in a program press Warm/Cancel button to cancel and
exit this program and return to standby mode.
Steam
• Put water in the inner bowl and ensure the amount of water is always
lower than the steam basket.
• Put the steam basket into the inner bowl.
• Add the desired ingredients to the steam basket.
• Press the Steam button to select the Steam function.
• Indicator light above button will go on.
• Press button to adjust the steaming time, the default time is 30 minutes.
• Time can be adjusted between 10 to 60 minutes.
• •When the water is boiled, the timer starts to count down on the digital
screen.
• Steam function automatically enters the temperature preservation
function when program completes.
Soup
• Press the Soup button to select the Soup function.
• Indicator light above button will go on.
• Press the button to adjust Soup cooking time, the default time is 1.5
hours.
• Time can be adjusted between 30 minutes to 3 hours.
• When the water is boiled, the timer starts to count down on the digital
screen.
• Soup function automatically enters the temperature preservation function
when program completes.
Porridge
• Press the Porridge button to select the Porridge function.
• Indicator light above button will go on.
• Press the button to adjust Porridge cooking time, the default time is 2
hours.
• Time can be adjusted between 30 minutes to 2 hours.
• The Porridge function will start and the digital screen display the
countdown timer.
• Porridge function automatically enters the temperature preservation
function when program completes.
Pasta
• Press the Pasta button to select the Pasta function, Pasta indicator light
will go on.
• Add water and some salt (refer to the proportion table).
• The Pasta program starts, wait until the water boils.
• When the water is boiled, cancel the program using the Warm/Cancel
button.
• Press Pasta button again to adjust Pasta cooking time, the default time is
30 minutes.
• Time can be adjusted between 3 to 30 minutes.
• The digital screen displays the countdown timer, open the cover, add the
corresponding amount of pasta according to water level and start mixing
(refer to the proportion table), stir 1 to 2 minutes, close the cover and
continue cooking.
• Pasta function automatically enters the temperature preservation
function when program completes.
Proportion table
Water volume Pasta (g)
2 cups of water 100g
4 cups of water 200g
6 cups of water 300g
8 cups of water 400g
Yogurt
• In a sauce pan, heat milk to +/- 80°C on the stovetop, stirring constantly
to prevent scalding.
• Allow milk to cool to 45°C for approximately 1-2 hours. Add yogurt
culture. Stir mixture thoroughly.
• Pour milk mixture into the inner pot.
• Be sure inner pot is clean and dry before placing into the rice cooker.
• Press Yogurt button, light above button will go on.
• Press "Yoghurt" button to adjust the Yogurt cooking time, the default time
is 8 hours. Time can be adjusted between 6 hours to 12 hours.
• Yogurt light stays on and digital screen shows countdown timer.
• The cooker returns to standby mode when Yogurt program completes.
• Once incubation is complete, store the yogurt in an air tight container in
the refrigerator.
• Do not leave it in the rice cooker.
Cake
• Defrost frozen dough thoroughly before use. Don’t use to much, or the
dough might overwhelm the appliance.
• Wipe the bowl with cooking oil, put the dough into the bowl.
• Press the Cake button.
• Indicator light above button will go on.
• Press Cake button again to adjust the cooking time, the default timing is
30 minutes. Time can be adjusted between 20 minutes to 3 hours.
• Program will start. The digital screen shows countdown timer.
• Bread function automatically enters the temperature preservation
function when program completes.
Additional information
Do not pour water or put ingredients in the device without the inner bowl
inside.
The maximum amount of water and ingredients should not exceed the
highest mark inside the inner bowl.
Press the desired program button once for default cooking time. Pressing
this button short will add extra time and cycle through the available time
settings (a beep sound will be heard by every new setting). Long press
program button to increase automatically and fast cycle through the
available time settings.
Once a program has finished the device will give a beep sound.
Programs can be interrupted or stopped by pressing the Cancel button.
Always turn the on/off switch to the off position after use and unplug the
device.
Cooking rice
• Use the measuring cup provided to measure the desired quantity of rice.
As a guide one cup of rice is sufficient for one person, but this will vary
according to individual tastes. Fill the cup with rice leveling the top.
• Thoroughly wash the rice in several changes of clean water and drain. If
you don't wash the rice this may cause poor results and/or a buildup of
steam within the appliance. Do not wash the rice in the inner bowl as you
may damage it.
• Put the rice in the inner bowl and level the surface of the rice. Add
sufficient cold water to the corresponding level marked on the bowl e.g.
to cook 6 cups of rice, place the washed rice into the inner bowl and then
fill with water up to the 6 cup level marked on the inner bowl. You may
adjust the amount of water added for your own personal taste. For a
softer rice add a little more water, and for a firmer rice a little less water.
• Place the inner bowl in the rice cooker ensuring that there is no rice or
any moisture on the outside of the bowl.
• Cover with the lid, ensuring that the vent hole in the lid is situated away
from the operator.
• Start the Rice program (see chapter Rice).
• Carefully lift the lid and allow any condensation to drip into the rice
cooker. Use the spatula provided to fluff up the rice which is then ready
to eat. Replace the lid as quickly as possible. Consume the stirred rice
within 1 hour.
CLEANING AND MAINTENANCE
• Before cleaning, unplug the appliance and wait for the appliance to cool
down.
• Wipe dry the water in condensation collector (located below the hinge)
with a dry cloth and clean the multi-cooker with a damp cloth.
• Open the top cover and clean the cover plate.
• Clean the water on heating plate (if any) with cloth; polish the burnt rice
on the plate (if any) with steel scrubber or sand paper and wipe the water
and rice around and below the cooking pot before placing it in.
• Never immerse the electrical device in water or any other liquid. The
device is not dishwasher proof.
ENVIRONMENT
This appliance should not be put into the domestic garbage at the
end of its durability, but must be offered at a central point for the recycling
of electric and electronic domestic appliances. This symbol on the
appliance, instruction manual and packaging puts your attention to this
important issue. The materials used in this appliance can be recycled. By
recycling of used domestic appliances you contribute an important push to
the protection of our environment. Ask your local authorities for information
regarding the point of recollection.
Support
You can find all available information and spare parts at www.tristar.eu!
NLGebruiksaanwijzing
VEILIGHEID
• Als u de veiligheidsinstructies negeert, kan de
fabrikant niet verantwoordelijk worden
gehouden voor de mogelijke schade.
• Als het netsnoer beschadigd is, moet het
worden vervangen door de fabrikant, de
onderhoudsmonteur van de fabrikant of door
personen met een soortgelijke kwalificatie om
gevaar te voorkomen.
• Verplaats het apparaat nooit door aan het snoer
te trekken. Zorg ervoor dat het snoer nergens in
verstrikt kan raken.
• Het apparaat moet op een stabiele, vlakke
ondergrond worden geplaatst.
• De gebruiker mag het apparaat niet onbeheerd
achterlaten wanneer de stekker zich in het
stopcontact bevindt.
• Dit apparaat is uitsluitend voor huishoudelijk
gebruik en voor het doel waar het voor bestemd
is.
• Dit apparaat mag niet worden gebruikt door
kinderen jonger dan 8 jaar. Dit apparaat kan
worden gebruikt door kinderen vanaf 8 jaar en
door personen met verminderde lichamelijke,
zintuiglijke of geestelijke vermogens of gebrek
aan de benodigde ervaring en kennis indien ze
onder toezicht staan of instructies krijgen over
hoe het apparaat op een veilige manier kan
worden gebruikt alsook de gevaren begrijpen
die met het gebruik samenhangen. Kinderen
mogen niet met het apparaat spelen. Houd het
apparaat en het netsnoer buiten bereik van
kinderen jonger dan 8 jaar. Laat reiniging en
onderhoud niet door kinderen uitvoeren, tenzij
ze ouder zijn dan 8 jaar en onder toezicht staan.
• Dompel het snoer, de stekker of het apparaat
niet onder in water of andere vloeistoffen om
elektrische schokken te voorkomen.
• Dit apparaat is bedoeld voor huishoudelijk en
soortgelijk gebruik, zoals:
– Personeelskeukens in winkels, kantoren en andere werkomgevingen.
– Door gasten in hotels, motels en andere residentiële omgevingen.
– Bed&Breakfast-type omgevingen.
– Boerderijen.
• Kinderen mogen niet met het apparaat spelen.
• Dit apparaat mag niet worden gebruikt door
kinderen. Houd het apparaat en het netsnoer
buiten bereik van kinderen.
• Dompel het snoer, de stekker of het apparaat
niet onder in water of andere vloeistoffen om
elektrische schokken te voorkomen.
• Het oppervlak kan heet worden tijdens
gebruik.
• Gebruik het apparaat uitsluitend met een
geschikte connector.
• De connector dient te worden verwijderd
alvorens het apparaat te reinigen. Wees er
zeker van dat de inlaat volledig droog is
alvorens het apparaat weer in gebruik te
nemen.
• Waarschuwing, de ontsnappende stoom kan
zeer heet zijn.
• Let tijdens het koken op de stoomopening,
omdat er kans is op brandwonden.
ONDERDELENBESCHRIJVING
1. Deksel
2. Stoommandje
3. Binnenpan
4. Display
5. Paneel met touchbediening
6. Maatbeker
7. Lepel
8. Aan/uit-schakelaar
VOOR HET EERSTE GEBRUIK
• Haal het apparaat en de accessoires uit de doos.Verwijder de stickers,
de beschermfolie of het plastic van het apparaat.
• Plaats het apparaat op een vlakke, stabiele ondergrond. Zorg voor
minimaal 10 cm vrije ruimte rondom het apparaat. Dit apparaat is niet
geschikt voor inbouw of gebruik buitenshuis.
• Sluit de voedingskabel aan op het stopcontact.(Opmerking: controleer of
het voltage op het apparaat overeenkomt met de plaatselijke
netspanning voordat u het apparaat
aansluit.Voltage220V-240V50/60Hz)
• Zorg er altijd voor dat de binnenpan zich in het apparaat bevindt voordat
u de rijstkoker inschakelt.
• Zorg ervoor dat de binnenpan vloeistof bevat of sta klaar om onmiddellijk
olie, boter of margarine in de binnenpan te doen voordat u de rijstkoker
inschakelt.
• Droog de buitenkant van de binnenpan altijd goed voordat u deze in het
apparaat plaatst, een natte binnenpan kan namelijk een krakend geluid
veroorzaken.
• Zet de aan/uit-schakelaar in de gewenste positie om het apparaat in of
uit te schakelen.
• Wanneer het apparaat voor de eerste keer wordt ingeschakeld, zal het
een lichte geur afgeven. Dit is normaal. Zorg voor voldoende ventilatie.
Deze geur is slechts tijdelijk en zal spoedig verdwijnen.
GEBRUIK
Timer
• Druk op de timerknop om de timerfunctie in te stellen. Druk één keer in
om in te stellen op 30 minuten. Houd de knop ingedrukt om automatisch
te verlengen, in stappen van 30 minuten.
• De timer kan tot op 24 uur vooraf worden ingesteld.
• Opmerking: De aanbevolen vooraf ingestelde timerinstelling is maximaal
12 uur, om bederving van voedsel te voorkomen.
• Na het instellen van de tijd drukt u op de gewenste programmaknop. Het
scherm geeft het tijdstip van voltooien weer en begint af te tellen.
• Het lampje van de timerknop en dat van het geselecteerde programma
gaan branden.
Rijst
• Druk op de knop Rice om de rijstfunctie te kiezen.
• Het indicatielampje boven de knop gaat branden.
• Het programma start en het display toont bewegende “- - - -” van
beneden naar boven.
• De functie 'Rice' schakelt na de bereiding automatisch over naar de
stooffase en de afteltimer wordt weergegeven op het digitale display.
• Wanneer het programma voltooid is, schakelt het apparaat automatisch
over van de rijstfunctie naar de functie temperatuurbehoud.
• Zie het hoofdstuk “Rijst koken” voor meer informatie.
Warm/Cancel (Warmhouden/Annuleren)
• Druk in de stand-bymodus op de knop 'Warm/Cancel' om het programma
voor temperatuurbehoud te selecteren.
• Het digitale display toont "bb" en het lampje boven de knop Warm/
Cancel brandt om aan te geven dat het programma voor
temperatuurbehoud actief is.
• Druk nogmaals op de knop Warm/Cancel om het programma voor
temperatuurbehoud uit te schakelen.
• Voor optimaal aroma en optimale smaak wordt aanbevolen binnen 5 uur
na bereiding te eten.
• Indien er reeds een programma is gestart, drukt u op de knop Warm/
Cancel om dit te annuleren en terug te keren naar de stand-bymodus.
Stomen
• Doe water in de binnenpan en zorg ervoor dat het waterniveau altijd
lager is dan het stoommandje.
• Plaats het stoommandje in de binnenpan.
• Voeg de gewenste ingrediënten toe aan het stoommandje.
• Druk op de knop Steam om de stoomfunctie te starten.
• Het indicatielampje boven de knop gaat branden.
• Druk op de knop Steam om de stoomtijd in te stellen, de timer staat
standaard ingesteld op 30 minuten.
• U kunt de tijd instellen tussen 10 en 60 minuten.
• •Zodra het water kookt, wordt de afteltimer weergegeven op het digitale
scherm.
• Wanneer het programma is voltooid, schakelt het apparaat automatisch
over van de stoomfunctie naar de functie Temperatuurbehoud.
Soep
• Druk op de knop Soup om de soepfunctie te starten.
• Het indicatielampje boven de knop gaat branden.
• Druk op de knop om de bereidingstijd van de soep in te stellen. De
standaardtijd bedraagt 1,5 uur.
• U kunt de tijd instellen tussen 30 minuten en 3 uur.
• Zodra het water kookt, wordt de afteltimer weergegeven op het digitale
scherm.
• Wanneer het programma is voltooid, schakelt het apparaat automatisch
over van de soepfunctie naar de functie Temperatuurbehoud.
Pap
• Druk op de knop Porridge om de papfunctie te starten.
• Het indicatielampje boven de knop gaat branden.
• Stel de bereidingstijd van de pap in met de knop. De standaardtijd
bedraagt 2 uur.
• U kunt de tijd instellen tussen 30 minuten en 2 uur.
• De papfunctie start en de afteltimer wordt weergegeven op het digitale
scherm.
• Wanneer het programma voltooid is, schakelt het apparaat automatisch
over van de papfunctie naar de functie Temperatuurbehoud.
Pasta
• Druk op de knop Pasta om de pastafunctie te selecteren, het lampje voor
Pasta gaat branden.
• Voeg water en een wat zout toe (zie de maattabel).
• Het pastaprogramma start, wacht tot het water kookt.
• Als het water kookt, annuleert u het programma met de knop Warm/
Cancel.
• Druk nogmaals op de knop Pasta om de bereidingstijd van de pasta in te
stellen. De standaardtijd bedraagt 30 minuten.
• U kunt de tijd instellen tussen 3 en 30 minuten.
• Op het digitale scherm wordt de afteltimer weergegeven. Open het
deksel, voeg de overeenkomstige hoeveelheid pasta toe volgens het
waterniveau en begin te mengen (zie de maattabel). Roer 1 tot 2
minuten, sluit het deksel en laat apparaat verder koken.
• Wanneer het programma voltooid is, schakelt het apparaat automatisch
over van de functie Pasta naar de functie Temperatuurbehoud.
Maattabel
Hoeveelheid water Pasta (g)
2 kopjes water 100 g
4 kopjes water 200 g
6 kopjes water 300 g
8 kopjes water 400 g
Yoghurt
• Verwarm in een sauspan melk tot ongeveer 80 °C. Blijf roeren om
verbranding te voorkomen.
• Laat de melk ongeveer 1 tot 2 uur afkoelen tot een temperatuur van 45
°C Voeg de yoghurtcultuur toe. Meng alles grondig.
• Giet het melkmengsel in de binnenpan.
• Zorg dat de binnenpan schoon en droog is voordat u deze in de
rijstkoker plaatst.
• Druk op de knop Yogurt, het indicatielampje boven de knop gaat
branden.
• Druk op de knop "Yogurt" om de bereidingstijd voor de yoghurt in te
stellen. De timer staat standaard ingesteld op 8 uur. U kunt de timer
instellen tussen 6 en 12 uur.
• Het lampje Yogurt blijft aan en de afteltimer wordt weergegeven op het
digitale scherm.
• Wanneer het programma Yogurt is afgelopen, keert de koker terug naar
de stand-bymodus.
• Bewaar de yoghurt na incubatie in de koelkast, in een luchtdichte
houder.
• Laat de yoghurt niet in de rijstkoker.
Cake
• Zorg dat diepgevroren deeg goed ontdooid is voor gebruik. Gebruik niet
te veel, anders werkt het apparaat mogelijk niet naar behoren.
• Vet de kom in met bakolie en plaats het deeg in de kom.
• Druk op de knop Cake.
• Het indicatielampje boven de knop gaat branden.
• Druk nogmaals op de knop Cake om de bereidingstijd in te stellen. De
timer staat standaard ingesteld op 30 minuten. U kunt de tijd instellen
tussen 20 minuten en 3 uur.
• Het programma start. Het digitale scherm geeft de afteltimer weer.
• Wanneer het programma voltooid is, schakelt het apparaat automatisch
over van de functie Cake naar de functie Temperatuurbehoud.
Aanvullende informatie
Doe geen water of ingrediënten in het apparaat zonder de binnenpan te
plaatsen.
De maximale hoeveelheid water en ingrediënten mag de bovenste
markering in de binnenpan niet overschrijden.
Druk de gewenste programmaknop één keer in voor de standaard
bereidingstijd. Druk kort op deze knop om extra tijd toe te voegen en de
beschikbare tijdsinstellingen te doorlopen (er klinkt een pieptoon bij iedere
nieuwe instelling). Druk lang op de programmaknop om de tijd
automatisch te verlengen en snel de beschikbare tijdsinstellingen te
doorlopen.
Zodra een programma is afgelopen geeft het apparaat een pieptoon.
Programma's kunnen worden onderbroken of gestopt door het indrukken
van de knop Cancel.
Zet de aan/uit-schakelaar na gebruik altijd in de uit-positie en verwijder de
stekker uit het stopcontact.
Rijst koken
• Meet de gewenste hoeveelheid rijst af met het bijgeleverde
maatbekertje. Als richtlijn kunt u aanhouden dat één bekertje rijst
voldoende is voor één persoon. Echter zal de exacte hoeveelheid
afhangen van uw persoonlijke voorkeur.
• Was de rijst een aantal keer grondig in schoon water en giet de rijst af.
Het niet wassen van de rijst kan leiden tot slechte resultaten en/of
opbouw van stoom in het apparaat. Was de rijst niet in de binnenpan om
beschadiging te voorkomen.
• Doe de rijst in de binnenpan en zorg ervoor dat de rijst vlak ligt. Voeg
koud water toe tot het bijbehorende niveau zoals gemarkeerd op de
binnenpan (voor 6 kopjes rijst: doe de gewassen rijst in de binnenpan en
vul de binnenpan tot aan het niveau voor 6 kopjes met water). U kunt de
hoeveelheid toe te voegen water aan te passen naar uw persoonlijke
smaak. Voeg voor zachtere rijst wat meer water en voor stevigere rijst
wat minder water toe.
• Plaats de binnenpan in het rijstkoker. Zorg ervoor dat er geen rijst of
vocht aan de buitenzijde van de binnenpan zit.
• Sluit het deksel van de rijstkoker en zorg ervoor dat de ventilatieopening
van u af gericht is.
• Start het programma Rice (zie hoofdstuk Rijst).
• Open het deksel, laat de condens van de deksel in de rijst druppen.
Gebruik de spatel om de rijst los te roeren en uit de pan te scheppen.
Plaats de deksel zo snel mogelijk weer terug op de rijstkoker.
Consumeer de rijst binnen een uur.
REINIGING EN ONDERHOUD
• Verwijder voor reiniging de stekker uit het stopcontact en wacht tot het
apparaat is afgekoeld.
• Veeg het water in de condensopvanger (onder het scharnier) weg met
een droge doek en reinig de multi-cooker met een vochtige doek.
• Open het deksel en maak de afdekplaat schoon.
• Veeg water op het verwarmingselement weg met een doek; poets
eventueel aangebakken rijst op het element met staalwol of schuurpapier
weg en ruim het water en de rijst rondom en onder de binnenpan op
voordat u de binnenpan terugplaatst.
• Dompel het apparaat nooit onder in water of andere vloeistoffen. Het
apparaat is niet vaatwasserbestendig.
MILIEU
Dit apparaat mag aan het einde van de levensduur niet bij het
normale huisafval worden gedeponeerd, maar moet bij een speciaal
inzamelpunt voor hergebruik van elektrische en elektronische apparaten
worden aangeboden. Het symbool op het apparaat, in de
gebruiksaanwijzing en op de verpakking attendeert u hierop. De in het
apparaat gebruikte materialen kunnen worden gerecycled. Met het
recyclen van gebruikte huishoudelijke apparaten levert u een belangrijke
bijdrage aan de bescherming van ons milieu. Informeer bij uw lokale
overheid naar het inzamelpunt.
Support
U kunt alle beschikbare informatie en reserveonderdelen vinden op
www.tristar.eu!
FRManuel d'instructions
SÉCURITÉ
• Si vous ignorez les consignes de sécurité, le
fabricant ne peut être tenu pour responsable
des dommages.
• Si le cordon d'alimentation est endommagé, il
doit être remplacé par le fabricant, son
réparateur ou des personnes qualifiées afin
d'éviter tout risque.
• Ne déplacez jamais l'appareil en tirant sur le
cordon et veillez à ce que ce dernier ne soit pas
entortillé.
• L'appareil doit être posé sur une surface stable
et nivelée.
• Ne laissez jamais le dispositif sans surveillance
s'il est connecté à l'alimentation.
• Cet appareil est uniquement destiné à des
utilisations domestiques et seulement dans le
but pour lequel il est fabriqué.
• Cet appareil ne doit pas être utilisé par des
enfants de moins de 8 ans. Cet appareil peut
être utilisé par des enfants de 8 ans ou plus et
des personnes présentant un handicap
physique, sensoriel ou mental voire ne
disposant pas des connaissances et de
l'expérience nécessaires en cas de surveillance
ou d'instructions sur l'usage de cet appareil en
toute sécurité et de compréhension des risques
impliqués. Les enfants ne doivent pas jouer
avec l'appareil. Maintenez l'appareil et son
cordon d'alimentation hors de portée des
enfants de moins de 8 ans. Le nettoyage et la