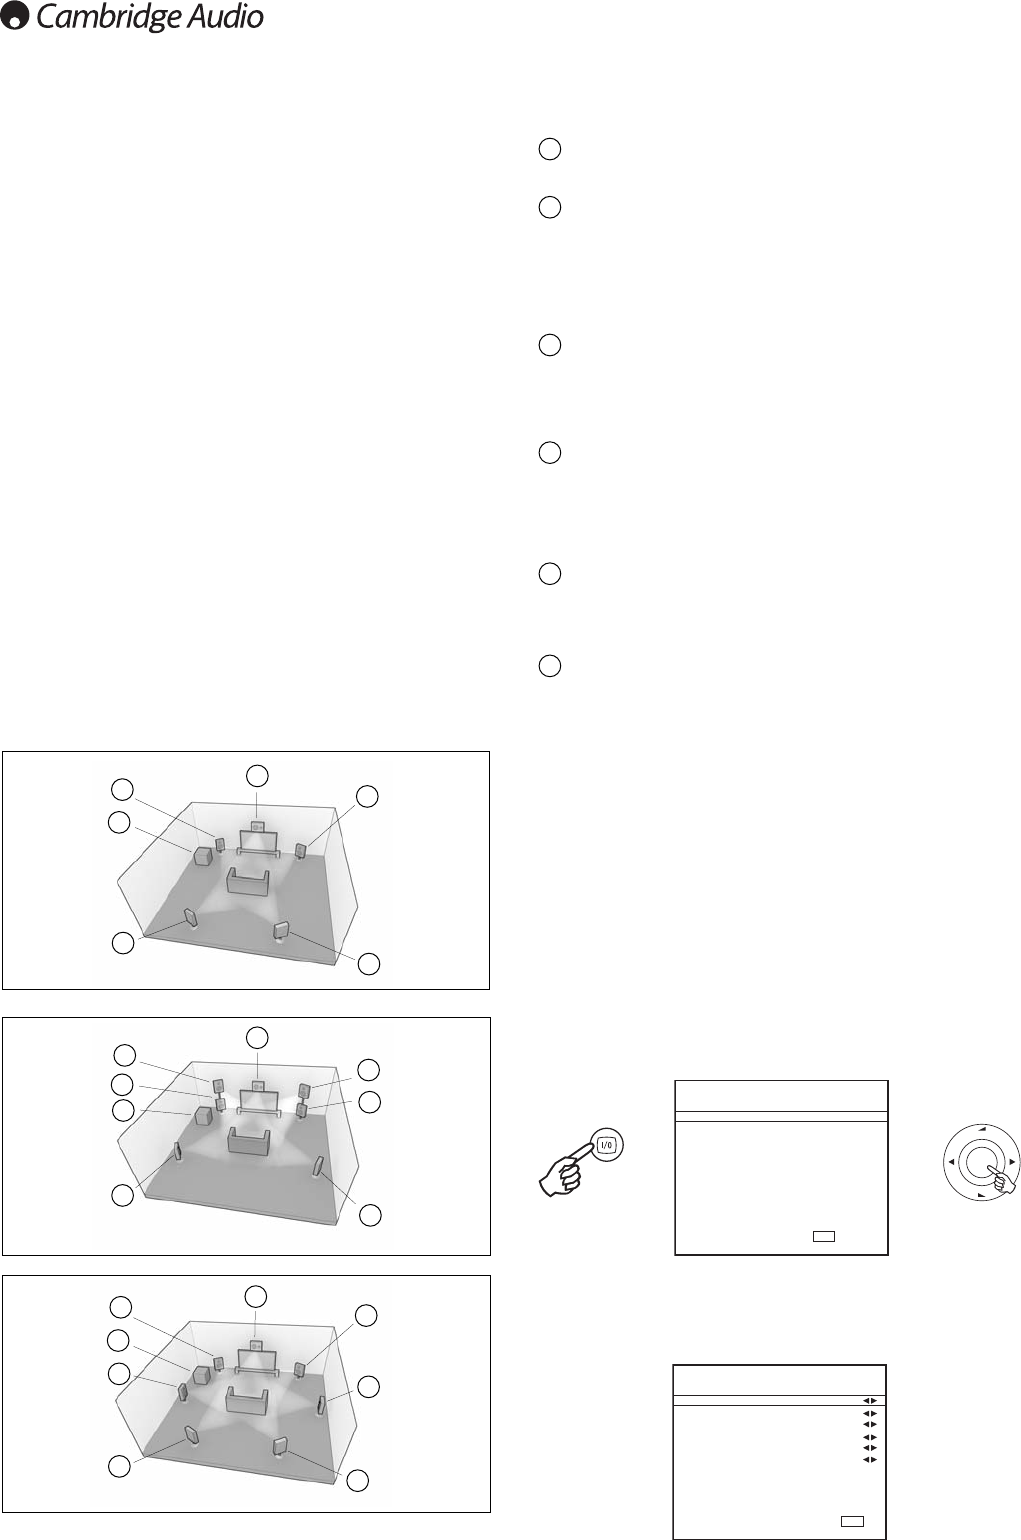
16
Front Left and Right speakers
For stereo and multi-channel sound.
Centre speaker
For dialogue and centre sounds. Ideally position at a similar height to the front
left and right speakers (above or below the TV/monitor). Using a centre
speaker from the same manufacturer/range as used for the front left and
right speakers is advisable. This “timbre matching” allows surround effects to
flow more naturally from left to right without obvious transitions between the
speakers.
Surround Left and Right speakers
For ambient and multi-channel sound. Floorstanding speakers should be
angled towards the listening position. Bookshelf/standmount speakers should
be wall mounted or used with dedicated speaker stands, positioned at or
above ear height.
Subwoofer
For improving the bass in your system, as well as reproducing dedicated LFE
(Low Frequency Effects) cinema effects when playing Dolby Digital or DTS
encoded discs. Your subwoofer can often be placed almost anywhere in the
room as bass is less directional, but experimentation with positioning is
recommended.
Surround Back Left and Right speakers
Individual back speakers in place of a single surround back. Used with the
7.1 processing types. Remember to experiment with the positions until you
are happy with the sound.
Front Left and Right Height speakers
Height speakers placed above the Front Left and Right to give the sound
field a vertical component with suitably encoded material or when using
Dolby Pro Logic IIz post processing.
In all cases the 5.1, 5.1+H or 7.1 in fact relate to the maximum number of
speakers that can be used, as the Centre, Sub and Surround speakers can
all be deleted if required (although of course performance is reduced). For
example, if you choose not to use a Centre Channel speaker you can set this
to 'None' in the settings as shown later and the 651R/751R will
automatically redirect the centre channel audio information into the Left and
Right Front channels, creating what is known as a 'Phantom Centre'.
Similarly, you might decide not to use a subwoofer if your main Left and Right
speakers are capable of reproducing enough bass for a satisfying
music/movie experience. The 651R/751R will then automatically re-direct
the bass from the Subwoofer/Low Frequency Effect channel to the Left and
Right Front Speakers.
Performing the setup
Note: This setup is important as the 651R/751R will also automatically use
this information to select appropriate Dolby and DTS decoding modes
dependant not only on the source material but also the speaker package it
knows you have.
To tell the unit the type of package you have, turn on the On-Screen Display
via the remote button as shown. Highlight the ‘Speaker Setup’ menu by using
volume up and down on the remote then go to it by pressing Enter:
Set the Decode mode as 5.1, 7.1 or 5.1+H by highlighting the Decode Mode
item and using the Left and Right arrows to scroll through the options:
651R/751R setup Background information
The full setup of the 651R/751R is a reasonably simple 3 stage process. The
Speaker Setup stage can either be performed manually or via the Audyssey
Auto Setup procedure.
Stage 1: Speaker setup (Speaker delay, Crossovers and Level calibration, via
Audyssey or manually)
Stage 2: Assigning HDMI and Analogue video inputs
Stage 3: Source setup
Speaker setup
To perform a manual speaker setup you always need to first tell the unit what
kind of speaker system you have connected.
If you prefer to use the Audyssey Autosetup process then you don’t need to
tell the unit what kind of speaker system you have if it is a simple 5.1 or 7.1
system, Audyssey will work this out for itself.
However if you wish to use 5.1 + Height mode or 5.1 with the rear SBL/SBR
reassigned to biamping the fronts or 5.1 with the SBL/SBR outputs driving
Zone 2 speakers, then you must tell the unit this before performing any
Audyssey Autosetup.
In any case setting the speaker configuration before running Audyssey will
not do any harm.
The options are 5.1, 7.1 or 5.1+H as shown below. The 651R/751R can
support up to a 7.2 speaker setups which means 7 speakers (Front Left,
Front Right, Centre, Surround Left, Surround Right, Surround Back Left, Back
Right) plus two mains powered subwoofers (the .2).
Refer to the diagrams below for typical examples of loudspeaker setups.
Always adjust the speaker and listening positions until you are happy with the
sound. Please refer to your loudspeaker and subwoofer manuals for more
detailed positioning information.
Tone/Sub/LFE Config.
Surr. L/R :
Surr. LB/RB :