Modications not approved by the party responsible for compliance
could void user’s authority to operate the equipment.
This equipment has been tested and found to comply with the limits
for Class B digital device, pursuant to part 15 of the FCC Rules. These
limits are designed to provide reasonable protection against harmful
interference in a residential installation. This equipment generates and
can radiate radio frequency energy and, if not installed and used in
accordance with the instructions, may cause harmful interference to
radio or television reception, which can be determined by turning the
equipment on and o.
The user is encouraged to try to correct the interference by one or
more of the following measures:
• Reorient or relocate the receiving antenna.
• Increase the separation between the equipment and the receiver.
• Connect the equipment into an outlet on a circuit different from that
to which the receiver is connected.
• Consult the dealer or an experienced radio/TV technician for help.
Radiation Exposure
Statement
The product comply with the FCC portable RF exposure limit set forth
for an uncontrolled environment and are safe for intended operation
as described in this manual. The further RF exposure reduction can be
achieved if the product can be kept as far as possible from the user
body or set the device to lower output power if such function is
available.
RC Watch
Quick Start Guide
SET
SETUP
OK
BINDING
RF
SELOKSTOP
SET button
PHOTO button
Charging port
MODE/SLEEP
button
Charging Battery
When the battery power is running low, do the following to charge the
battery:
1. Open the charging port cover.
2. Connect one end of the Pogo cable to
the charging port of your watch.
3. Connect the end of
the Pogo cable to
the USB port of
a computer or
AC adapter to
charge battery.
LEFT button
VIDEO button
RIGHT button
Clock Mode
In this mode, this watch can be used as a clock, stopwatch, countdown
clock, and alarm clock.
Set Date and Time
1. Press and hold the SET button to enter the setting mode.
2. Press the RIGHT button repeatedly to
select the field that you want to adjust.
3. Use the VIDEO or PHOTO button to
adjust the value or set time format or the
color of the LED clock display.
4. Repeat steps 2-3 to adjust other fields.
5. Press the SET button to save your changes.
Stopwatch
1. Press the LEFT button repeatedly to switch to
Stopwatch mode.
2. Press the VIDEO button to start the timer.
3. To record a lap while the timer is running,
press the RIGHT button. It displays the last
lap time.
• Repeat this step to create a new lap. You can
record up to 12 laps.
4. To stop the timer, press the VIDEO button.
5. To reset the timer, press the SET button.
Countdown Clock
1. Press the LEFT button repeatedly to switch to Countdown Clock
mode.
2. To start the countdown, press the VIDEO
button.
3. To pause the countdown, press the VIDEO
button.
• To resume, press the VIDEO button
again.
• To reset the countdown, press the SET button.
Setup Mode
In this mode, it allows to pair with a camera, set auto power off,
enable/disable sound, and adjust the brightness setting.
Pair with Camera
1. On your camera, press the Mode button
repeatedly to change to SET mode.
2. Press the Shutter button to enter SET mode.
3. Press the Mode button to highlight MORE. Then press the Shutter
button to enter the MORE menu.
4. Press the Mode button to highlight BINDING.
5. Press the Shutter button to enter the BINDING submenu. The
camera RF antenna is enabled and ready for pairing.
6. On your RC watch, press the MODE button
to switch to Preview mode.
Then press and hold the SET button to
enter to SET mode.
7. Use the LEFT or RIGHT button to
select Pairing and press the VIDEO button
to enter Pairing menu.
8. Use the LEFT or RIGHT button to select the
preview window that you want to pair with
your camera and press the VIDEO button
to start pairing.
9. When pairing is complete, press the SET
button to return to SET mode. Then press
the SET button to switch to Preview mode.
10. Repeat Step 7~9 to add more cameras. You can pair up to 6 cameras.
Alarm Clock
1. Press the RIGHT button repeatedly to switch
to Alarm Clock mode.
2. To activate an alarm, press the VIDEO button
to select ON.
To set the countdown time, do the following:
a. Press and hold the SET button. Then
press the RIGHT button repeatedly to
select the field that you want to adjust.
b. Use the VIDEO or PHOTO button to
adjust the value.
c. Press the SET button to confirm.
To set the alarm time, do the following:
a. Press and hold the SET button. Then
press the RIGHT button repeatedly to
select the field that you want to adjust.
b. Use the VIDEO or PHOTO button to
adjust the value.
c. Press the SET button to confirm.
To unpair or remove the paired camera, do the following:
a. In SET mode, use the LEFT or RIGHT
button to select Pairing and press the
VIDEO button to enter Pairing menu.
b. Use the LEFT or RIGHT button to
select the assigned preview window
that you want to unpair.
c. Press the VIDEO button to confirm.
Set Auto Power Off
1. Press the MODE button to switch to Preview mode.
Then press and hold the SET button to enter to SET mode.
2. Use the LEFT or RIGHT button to select
Auto off and press the VIDEO button to
enter Auto Power Off menu.
3. Use the LEFT or RIGHT button to select
the desired setting and press the VIDEO
button to confirm.
Enable/Disable Sound
1. Press the MODE button to switch to Preview mode.
Then press and hold the SET button to enter to SET mode.
2. Use the LEFT or RIGHT button to select
Sound and press the VIDEO button to enter
Sound menu.
3. Use the LEFT or RIGHT button to enable/
disable sound and press the VIDEO button
to confirm.
Adjust Brightness Level
1. Press the MODE button to switch to Preview mode.
Then press and hold the SET button to enter to SET mode.
2. Use the LEFT or RIGHT button to select
Bright and press the VIDEO button to enter
Brightness menu.
3. Use the LEFT or RIGHT button to select the
brightness level and press the VIDEO button
to confirm.
Number color
Time format
PM
ON
PM
Pairing
OK
Pairing
123
456
123
456
Pairing
AutoOff
sec
OK
Bright
OK
Sound
OK
Specifications
General
Function Remote control
Living View
Basic time function: Time, Stopwatch ,Timer, Alarm
Working Range 3m
RF Module 2.4GHz
IO TerminalsPoGo pin USB
Status OLED1.29”, 128.96 dot
Power SourcePolymer Battery 370mAh, 3.7V dc
Stream FormatMotion JPEG 128*96 pixel, 8fps
Video Aspect 4:3
Ratio
Power SavingAuto Sleeping in 5/10/30/60s/never
Charging TimeApprox. 2 hours
Battery LifeLiving living view continuously: 1.5 hours
Time without sleeping: 6 hours
Standby time in sleeping mode: up to 6 months
Troubleshooting
Problem Possible Cause Solution
A black screen
appears on the
screen and all
buttons are inactive.
The screen appears
unusually and all
buttons are inactive.
The battery is running
out.
The watch is shutting
down.
The micro SD card is
not inserted.
The battery is running
out.
Connect pogo cable
and the battery will
start charging after 10
seconds.
Connect the end of the
Pogo cable to the USB
port of a computer.
After 10 seconds, the
watch will restart.
Insert a micro SD card
into camera card slot.
(Note: If you use
internal memory to
record video, the live
view will disappear
when you start
recording.)
Connect the pogo
cable to charge battery.
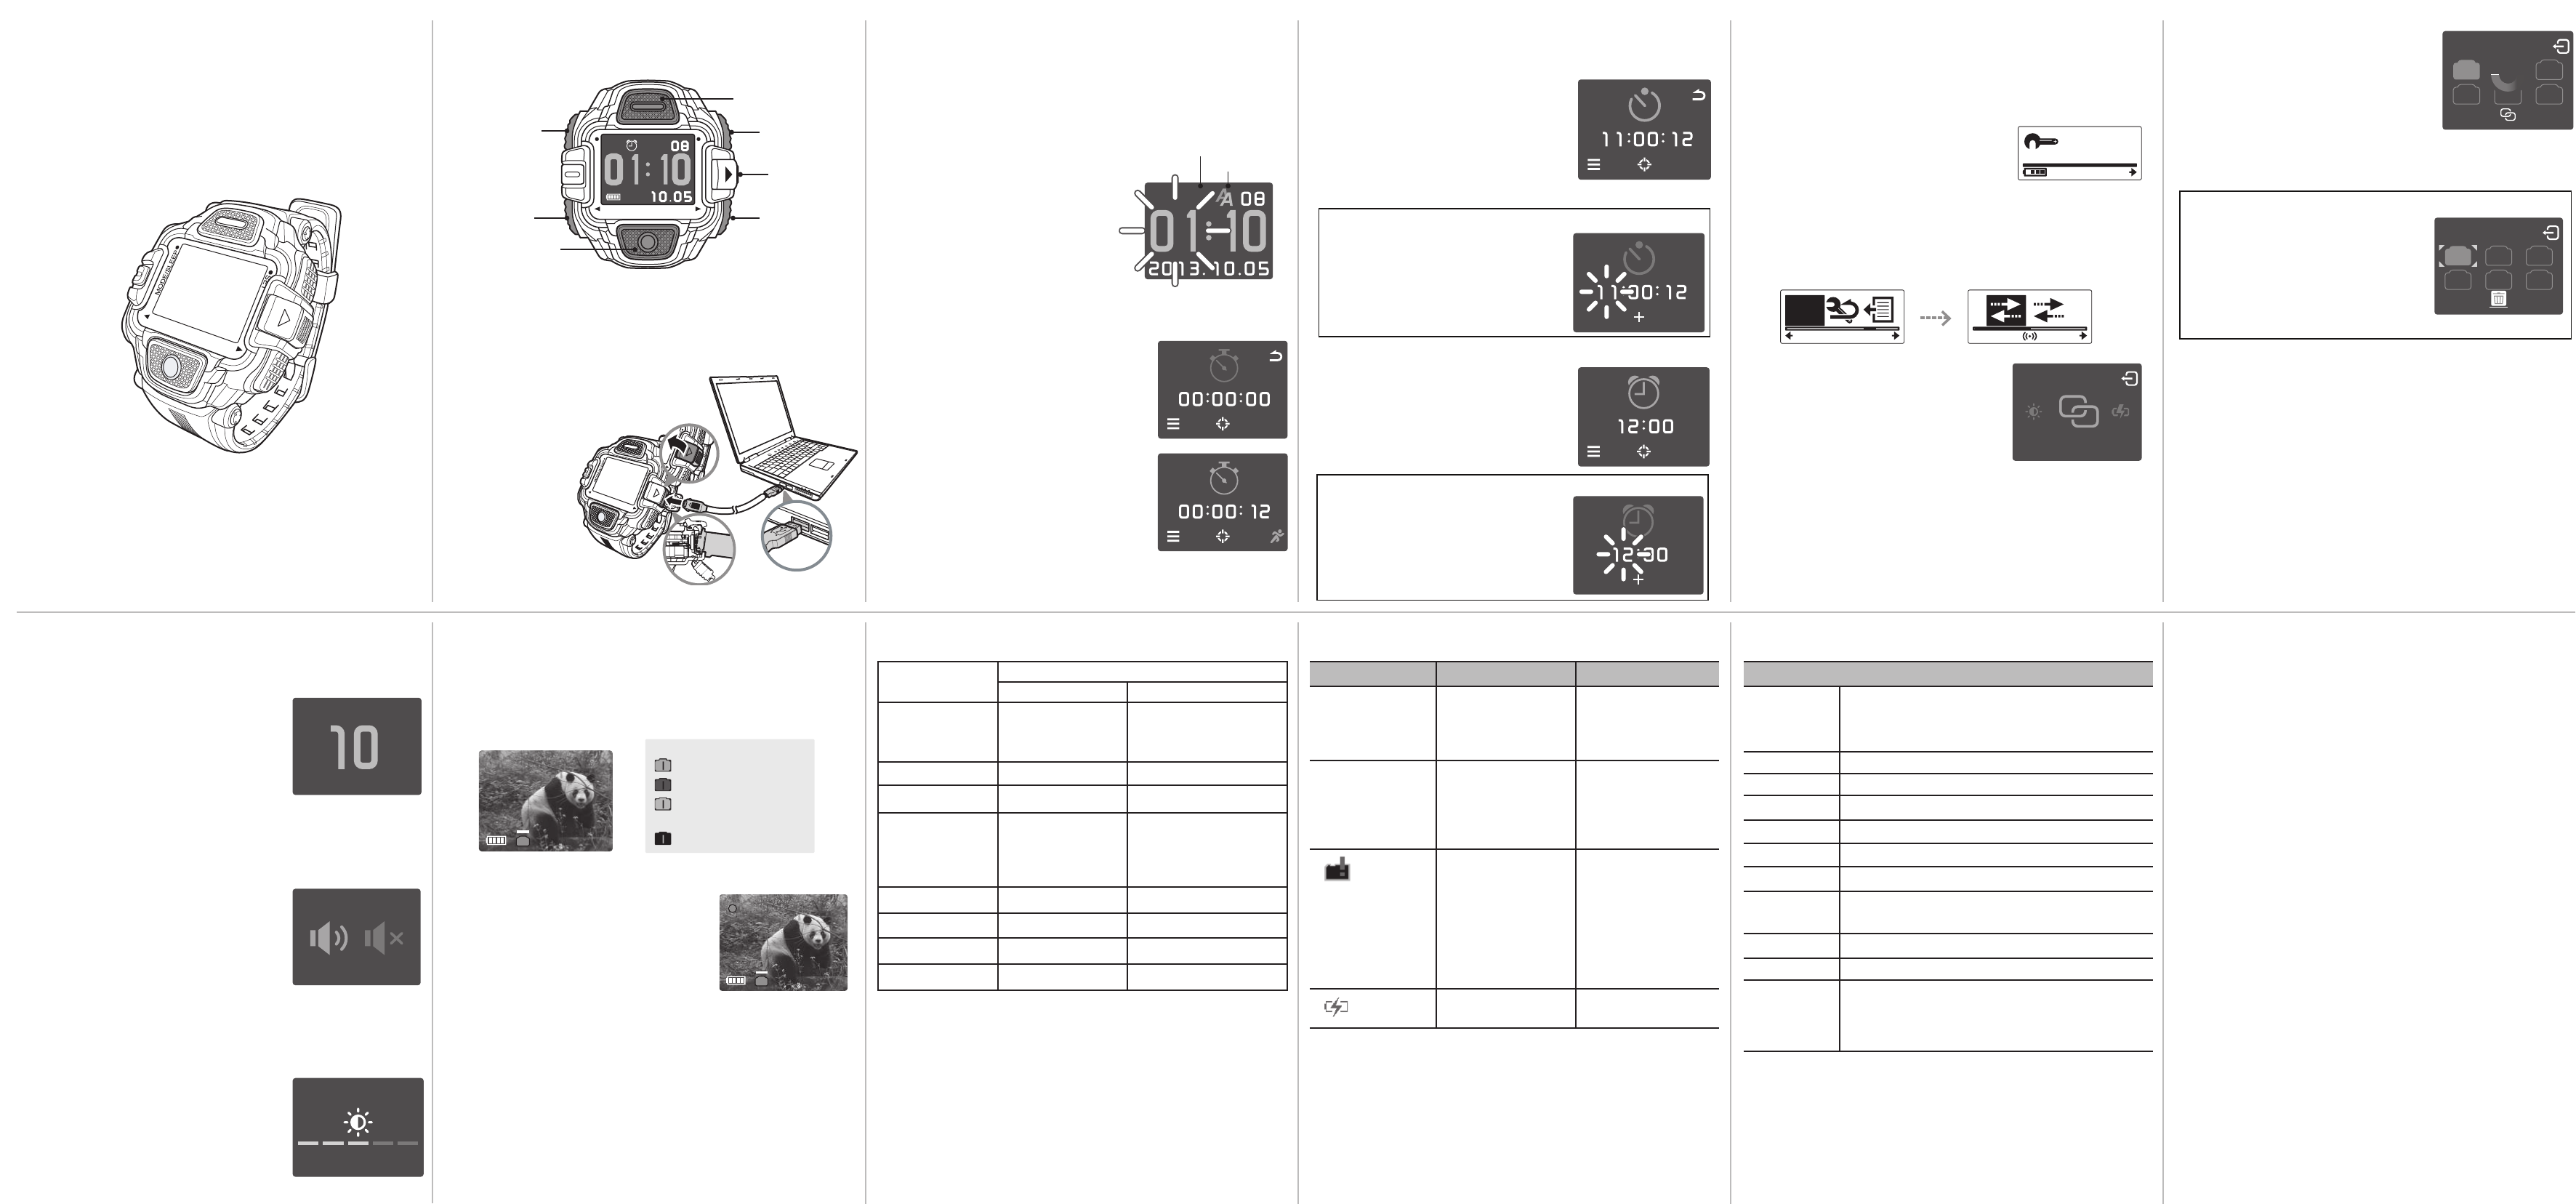
Live View Mode
When the devices are paired, the live view appears on the screen and
you can use this watch as a remote control to record videos or capture
photos.
1. Press the MODE button to switch to Preview mode. The live view
appears on the screen.
2. Do the following:
• To record videos:
Press the VIDEO button to start recording.
Press the VIDEO button again to stop video
recording.
• To capture photos:
Press the PHOTO button.
1
1
(orange) - card full
(blue) - recording
(gray)- standby (already
connected to camera)
(black)- disconnected
Live view icon indicators
Video button and Photo button in Live view mode
RC Watch
Video Button Photo Button
Video
Photo
Burst
Time Lapse @ video
Time Lapse @ photo
Self Timer
Looping
Set up/Wi-Fi…
Note: With PIV (Photo In Video) feature, you can take a photo when you
are recording a video.
Video
Video
Video
Start/Stop
Start/Stop
Video
Looping start/stop
Video
Photo
Note: “PIV” is available when
camera is recording.
Photo
Burst
Photo
Note: PIV is available when
camera is processing Time
Lapse @video.
Photo
Self Timer
N/A
Photo
Action Cam Mode
Hulp nodig? Stel uw vraag in het forum
Misbruik melden
Gebruikershandleiding.com neemt misbruik van zijn services uitermate serieus. U kunt hieronder aangeven waarom deze vraag ongepast is. Wij controleren de vraag en zonodig wordt deze verwijderd.
Product:
Spelregels forum
Om tot zinvolle vragen te komen hanteren wij de volgende spelregels:
lees eerst de handleiding door;
controleer of uw vraag al eerder door iemand anders is gesteld;
probeer uw vraag zo duidelijk mogelijk te stellen;
heeft u een probleem en al geprobeerd om dit op te lossen, vermeld dit erbij aub;
heeft u een oplossing gekregen van een bezoeker dan horen wij dat graag in dit forum;
wilt u een reactie geven op een vraag of antwoord, gebruik dan niet dit formulier maar klik op de knop 'reageer op deze vraag';
uw vraag wordt direct op de website gezet; vermijd daarom persoonlijke gegevens in te vullen;
Belangrijk! Als er een antwoord wordt gegeven op uw vraag, dan is het voor de gever van het antwoord nuttig om te weten als u er wel (of niet) mee geholpen bent! Wij vragen u dus ook te reageren op een antwoord.
Belangrijk! Antwoorden worden ook per e-mail naar abonnees gestuurd. Laat uw emailadres achter op deze site, zodat u op de hoogte blijft. U krijgt dan ook andere vragen en antwoorden te zien.
Abonneren
Abonneer u voor het ontvangen van emails voor uw WASPcam 9995 Gideon Remote bij:
nieuwe vragen en antwoorden
nieuwe handleidingen
U ontvangt een email met instructies om u voor één of beide opties in te schrijven.
Ontvang uw handleiding per email
Vul uw emailadres in en ontvang de handleiding van WASPcam 9995 Gideon Remote in de taal/talen: Engels als bijlage per email.
De handleiding is 0,22 mb groot.
U ontvangt de handleiding per email binnen enkele minuten. Als u geen email heeft ontvangen, dan heeft u waarschijnlijk een verkeerd emailadres ingevuld of is uw mailbox te vol. Daarnaast kan het zijn dat uw internetprovider een maximum heeft aan de grootte per email. Omdat hier een handleiding wordt meegestuurd, kan het voorkomen dat de email groter is dan toegestaan bij uw provider.
Andere handleiding(en) van WASPcam 9995 Gideon Remote
Uw handleiding is per email verstuurd. Controleer uw email
Als u niet binnen een kwartier uw email met handleiding ontvangen heeft, kan het zijn dat u een verkeerd emailadres heeft ingevuld of dat uw emailprovider een maximum grootte per email heeft ingesteld die kleiner is dan de grootte van de handleiding.
Er is een email naar u verstuurd om uw inschrijving definitief te maken.
Controleer uw email en volg de aanwijzingen op om uw inschrijving definitief te maken
U heeft geen emailadres opgegeven
Als u de handleiding per email wilt ontvangen, vul dan een geldig emailadres in.
Uw vraag is op deze pagina toegevoegd
Wilt u een email ontvangen bij een antwoord en/of nieuwe vragen? Vul dan hier uw emailadres in.