4
Entries
Basic Sales Entry
Listed below is a basic sales entry example when selling items by cash. For details, refer to “FULL
INSTRUCTUION MANUAL”.
1.
Enter the clerk code and press the key
2.
Enter the unit price and press the appropriate department
key
3.
Repeat step 2 for all department items.
4.
When the item entry is completed, press the key
The total amount due is displayed.
5.
Receive the amount from your customer
amount by the numeric keys.
6.
Press the key
drawer is opened.
7.
Close the drawer
Department Entries
Enter a unit price and press a department key
If you use a programmed unit price, press a department key
only
Department keyUnit price
(max. 8 digits)
When using a programmed unit price
PLU (Price Look Up) Entries
■
PLU code entry (max. 5 digits)
Enter a PLU code using the numeric keys, and press the key
For example, enter “71” and press the key for “PLU 00071”.
For ER-A421, press the key instead of the key
PLU code or
■
Direct PLU entry (ER-A421 only)
Enter a unit price and press a direct PLU key
If you use a programmed unit price, press a direct PLU key
only
Direct PLU key
(max. 8 digits)
When using a programmed unit price
EAN Entries
■
Create EAN8/13-Codes in REG mode
This is the easiest way to register and to store EAN Codes before you open your shop or to work for the fi rst
time with the cash register
After an EAN code scanning, you may be requested to enter a unit price with the display “UNDEFINED CODE”
and beep sound. Set the unit price, department code, and delete type.
Unit price Dept. code
“UNDEFINED CODE” display
and beep sounds
Dept. code input window
is displayed.
Delete method selection
window is displayed.
*Selection of
delete method
Scan an undefined
EAN code
* Select “2 NO DELETE” to store the article continuously
At the next scan entry of this EAN code, the registration is automatically done without the above steps.
■
EAN code entry (8 or 13 digits)
Enter the EAN code using the numeric keys, and press the key
For ER-A421, press the
key instead of the key
■
EAN code scanning (8 or 13 digits)
Read the EAN code on the item with the scanner
Scan EAN code
EAN code
or
Correction
■
Correction of entered number ( )
When you enter an incorrect number key immediately after the entry
■
Correction of the last entry ( )
If you make a mistake when making a department entry ) and discount ( ), you
can correct this entry by pressing the
key immediately
■
Correction of earlier entries (
➔
)
Yfi nd it before fi nalizing the transaction by
pressing the
key key
■
Subtotal void (
➔
➔
)
Y
issues a receipt.
Press the key immediately after pressing the key key again.
■
Correction after fi
When you need to void incorrect entries that are found after fi nalizing a transaction or cannot be corrected by
direct, indirect or subtotal void, the following steps should be taken.
1.
Enter to the manager mode by following the steps on the
right.
D
The key is not included in the standard keyboard for ER-A421.
T
Manager
code
or
Secret
code
2.
Press the
key to put your register in the VOID mode.
3.
Repeat the entries that are recorded on an incorrect
receipt.
5
Overview
•
resetting. Y
•
information and clears the entire memory except for the GT1 through GT3, reset count, and consecutive
number
•
•
mode.
•
•
and clerk report. For details on available reports, refer to “FULL
•
C
key
D
• When both sales quantities and sales amounts are zero, printing is skipped. If you do not want to skip,
change the programming. For details, refer to “FULL
• “X” represents read symbol and “Z” represents reset symbol in the reports.
• When printing is performed continuously
intermission, the printing will be restarted.
How to T
1.
Press the key
2.
Select the appropriate mode from the following by using the key key
1 OPXZ MODE
3 X1/Z1 MODE
4 X2/Z2 MODE
3.
Select the operation from the following by using the key key to display the items list.
1 READING
2 RESETTING
4.
Select the appropriate report title.
5.
Press the key
Flash Report
Yfl ash reports (display only) in the X1 mode for department sales, cash in drawer (CID) and sales
total at the point you take the report.
1.
Press the key
2.
Select the “3 X1/Z1 MODE” by using the key key
3.
Select “3 FLASH MODE”, and press the key
4.
Select the appropriate report title from the following by using the key
1 DEPT Department sales
2 CID Cash in drawer
3 SALES T Sales total
5.
Press the key
D
When you select “1 DEPT
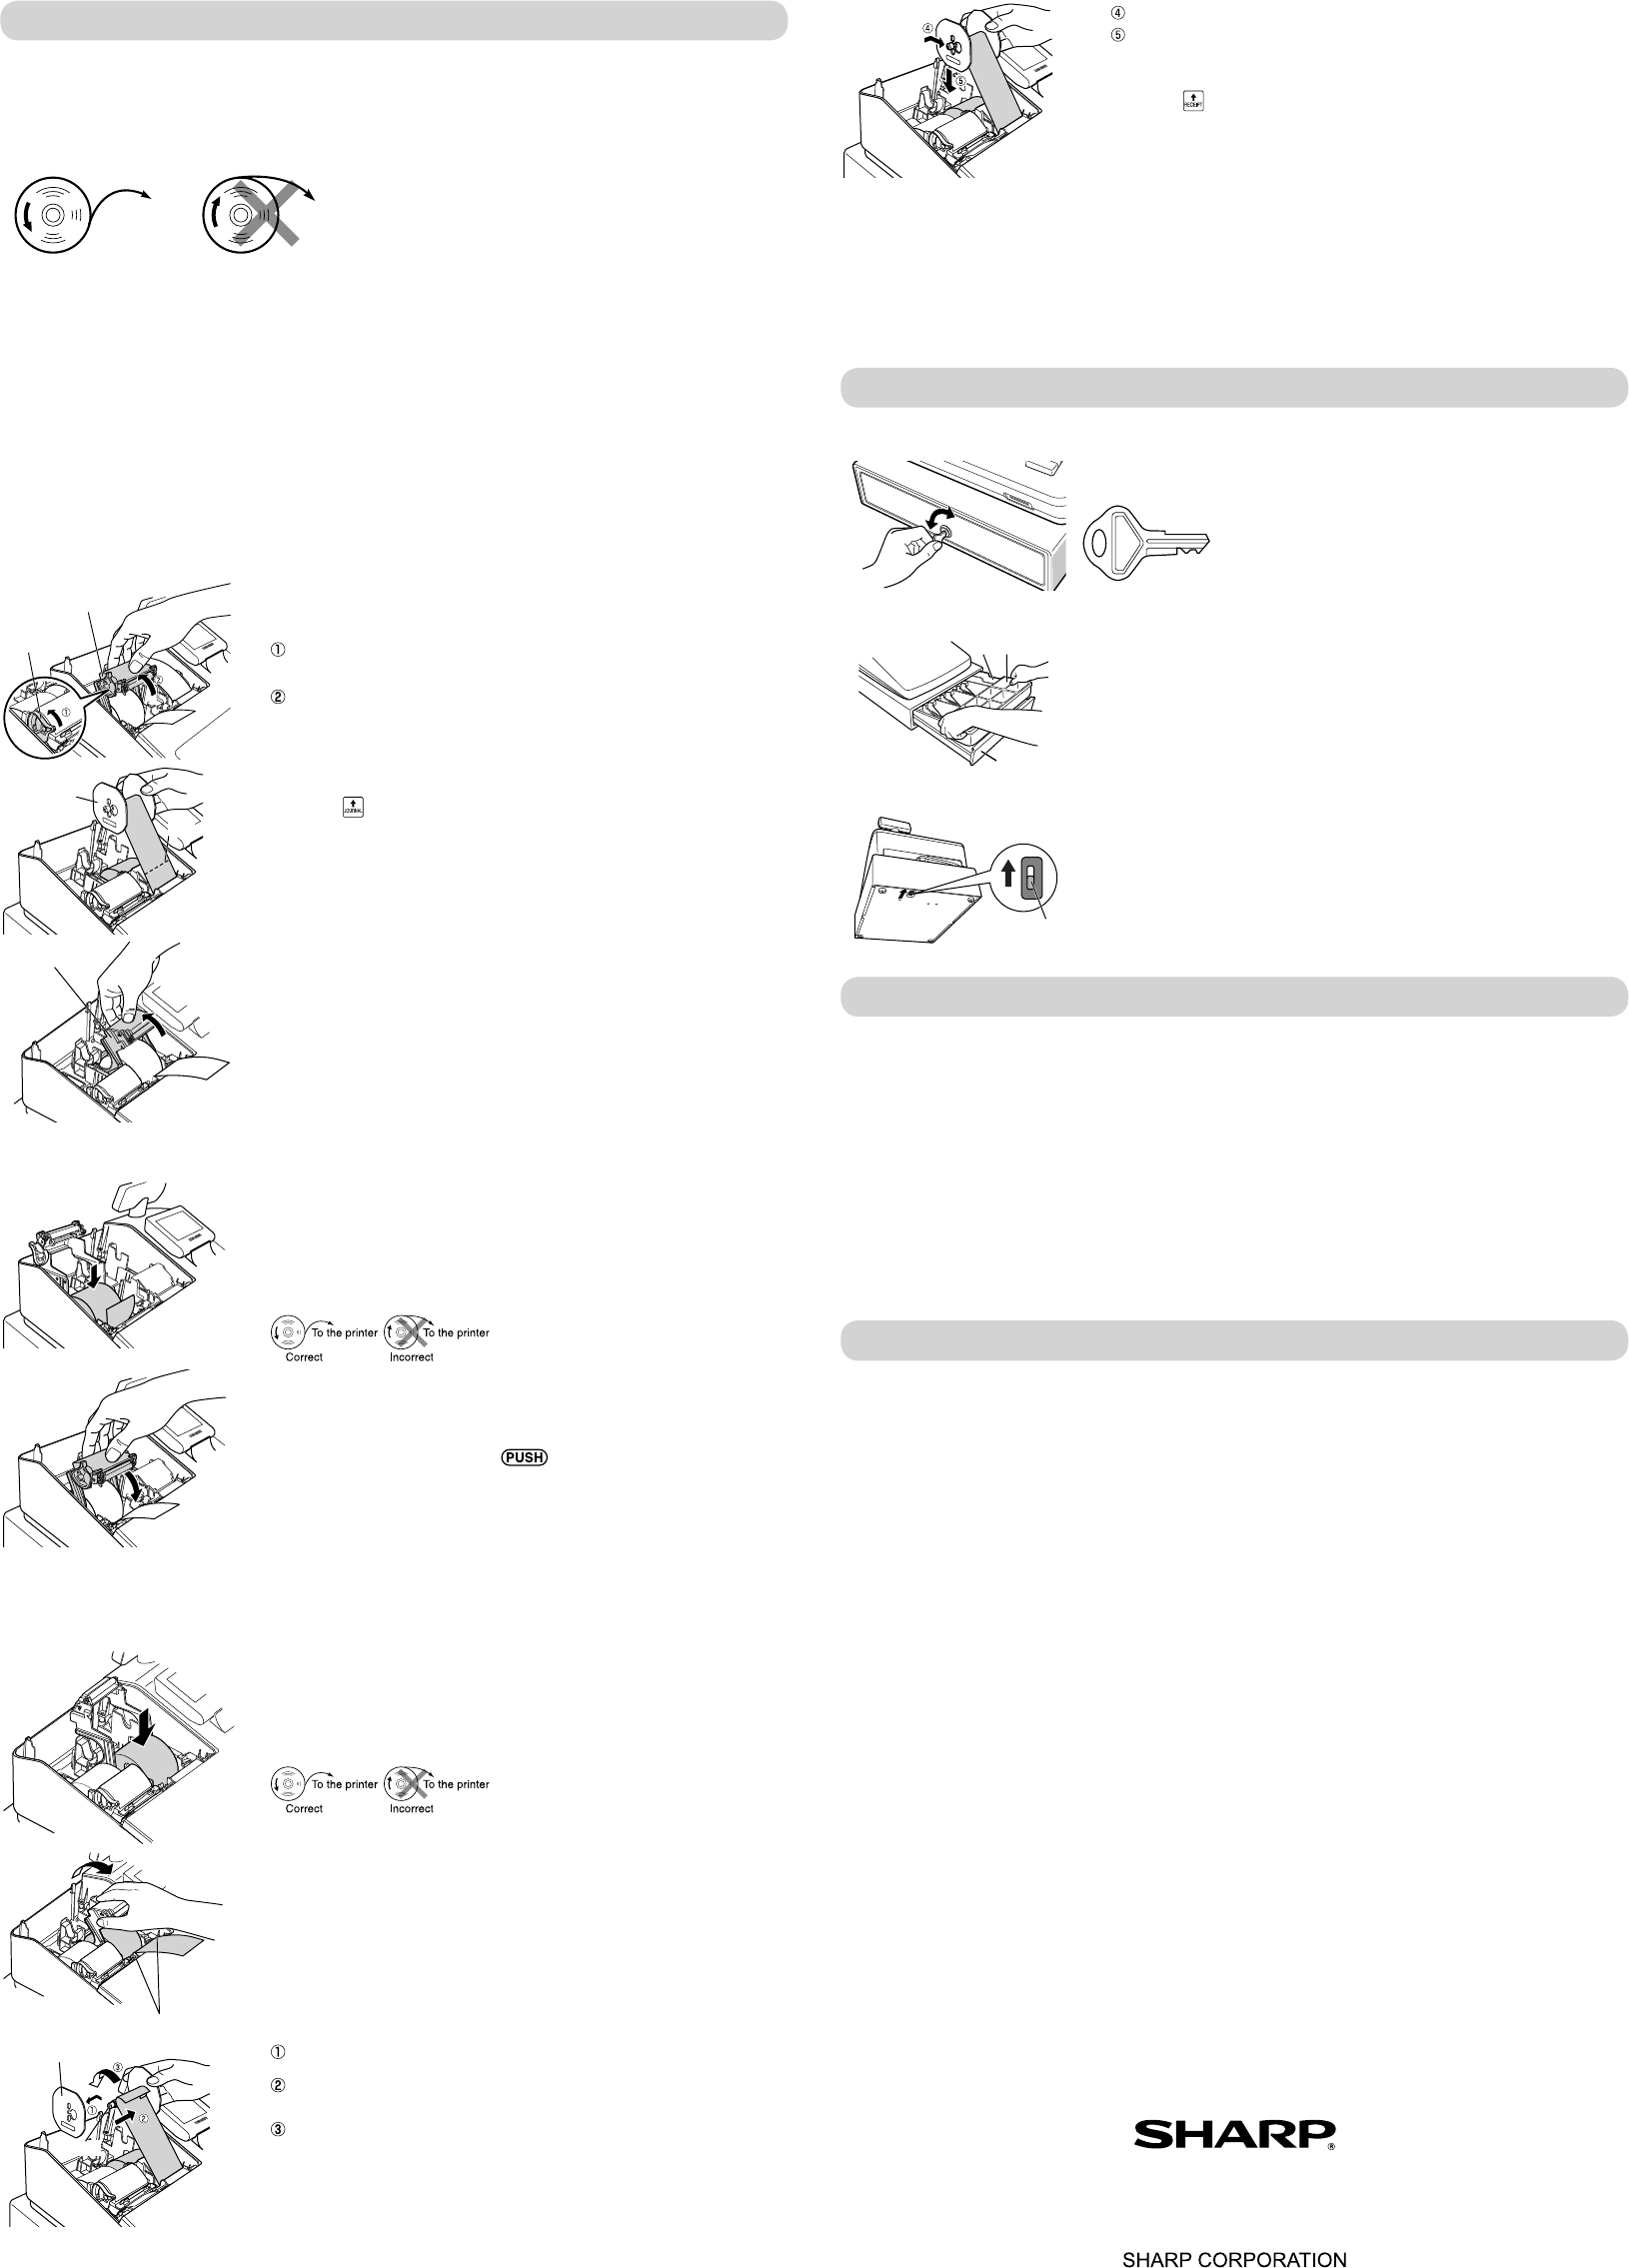
Replacing the Paper Rolls
The register can print receipts and journals. For the printer
paper rolls) provided with the register
•
•
(How to set the paper roll)
To the printer
Incorrect
To the printer
Correct
■
Recording paper specifi cations
Be sure to use paper rolls specifi ed by SHARP
The use of any other paper rolls than specifi ed could cause paper jamming, resulting in register malfunction.
Paper specifi cation
Paper width: 57.5 ± 0.5 mm
Max. outside diameter: 80 mm
Quality: High quality (0.06 to 0.08 mm thickness)
Paper tube: 18 mm
■
Removing the paper rolls
When a red dye appears on the paper roll, it is time to replace the existing paper roll. Replace the paper roll
with a new one. If you plan not to use your register for an extended period of time, remove the paper roll, and
store it in the appropriate place.
Print roller arm
Print roller
release lever
1.
Remove the printer cover
<Receipt side>
2.
will come up slightly
3.
Remove the paper roll from the paper roll cradle of the receipt side.
Cut
T
spool
<Journal side>
4.
Press the key to advance the journal paper until its printed part is out
of the way
5.
Cut the paper and remove the take-up spool from the bearing.
Print roller arm
6.
Lift up the print roller arm of the journal side.
7.
Remove the paper roll from the paper roll cradle of the journal side.
8.
Remove the paper holding plate of the take-up spool, and remove the
printed journal roll from the spool.
■
Installing the paper rolls
<Receipt side>
1.
Remove the printer cover and open the print roller arm of the receipt side
by following the steps in “Removing the paper rolls”.
2.
Set a paper roll in the paper roll cradle of the receipt side as per the
diagram.
3.
Feed the end of the paper along with the paper positioning guides as per
the diagram.
4.
While holding down the paper
receipt side, and push down the
mark on the arm until you hear a
click locking the arm.
D
If the print roller arm is not securely locked, printing is not done right. If this
problem occurs, open the arm, and close the arm as instructed above.
5.
W
D
Do not remove the excess paper until the receipt cutter stops completely
T
paper jamming.
<Journal side>
6.
Lift up the print roller arm of the journal side.
7.
Set a paper roll in the paper roll cradle of the journal side as per the
diagram.
Paper positioning guides
8.
While holding down the paper
journal side, and push down the arm until you hear a click locking the
arm.
Spool
Paper holding plate
9.
paper feed key to feed more paper if required.)
Specifi cations
Model:
ER-A41
Dimensions:
360(W) × 425(D) × 365(H)* mm
*
completely lowered, the height is 330 mm.
Weight:
Approx.12.0kg
Power source:
Offi cial (nominal) voltage and frequency
Power consumption:
Standby:
7.3W (230 to 240V
Operating:
28.1W (230 to 240V
Working temperatures:
0 to 40 ºC
Display:
Operator display: LCD display with tilt mechanism
192(W) × 80(H) dots
Customer display:
Printer:
T
T
Printing speed:
Approx. 15 lines/second
Printing capacity:
30 digits each for receipt/journal paper
Other functions:
•
•
•
function
Logo:
Graphic logo printing:
Size:
Area of black must be less than 35% of all area.
Logo message printing:
Logo message for the receipt
(max. 30 characters x 6 lines)
Paper Roll:
Width: 57.5±0.5 mm
Max. diam.: 80 mm
Quality: High quality (0.06 to 0.08 mm thickness)
Cash drawer:
5 slots for bills and 8 for coin denominations
Accessories:
Basic User Manual: 1 copy
Paper roll: 2 rolls
T
Paper holding plate: 1
Drawer lock key: 2
Standard key sheet: 1 (for ER-A421 only)
Programming key sheet: 1 (for ER-A421 only)
Fixing angle bracket: 1
The display does not illuminate.
• Is power supplied to the electric outlet?
• Is the power cord plug out or loosely connected to the
electric outlet?
• Is the register in screen-save mode?
The display is illuminated, but the whole machine
refuses entries.
• Is a cashier code assigned to the register?
• Is a clerk code assigned to the register?
• Is the register in the REG mode?
No receipt is issued.
• Is the receipt paper roll properly installed?
• Is there a paper jam?
• Is the receipt function in the “OFF” status?
• Is the print roller arm securely locked?
No journal paper is taken up.
• Is the take-up spool installed on the bearing properly?
• Is there a paper jam?
Printing is unusual.
• Are the printer head/sensor/roller clean?
• Is the paper roll properly installed?
Before Calling for Service
If you encounter any of the following problems, please read below before calling for service.
4000
Item entries
Clerk assignment
Displaying subtotal
Amount tendered
Finalizing the transaction
Key operation example
*
: indicate department keys.
1
1500
*
2300
*
SHARP ELECTRONICS (Europe) Ltd.
4 Furzeground Way, Stockley Park Uxbridge,
UB11 1 EZ, United Kingdom
6
Operator
In Case of Power Failure
When power is lost, the register retains its memory contents and all information on sales entries.
•
state of operation after power recovery
•
procedure after power recovery
In Case of Printer Error
If the printer runs out of paper
will not be accepted. Referring to “Replacing the Paper Rolls” in this chapter
proper position, then press the key
If the print roller arm comes up, the printer stalls, and “HEAD UP” will appear on the display
not be accepted. Push down the arm until it is securely locked, then press the
key
power failure symbol and resume printing.
Cautions in Handling the Printer and Recording Paper
■
Cautions in handling the printer
•
Dusty and humid places
Direct sunlight
Iron powder (A
•
•
■
Cautions in handling the recording paper (thermal paper)
• fi ed by SHARP
•
•
•
•
Exposure to high humidity and temperature
Exposure to the direct sunlight
Contact with glue, thinner or a freshly copied blueprint.
Heat caused by friction from scratching or other such means.
Contact with a rubber eraser or adhesive tape.
•
text with a photocopier
10.
take up excess slack in the paper
1
Replace the printer cover
12.
Press the key to make sure the paper end comes out of the printer
cover and clean paper appears.
D
If the paper end does not come out, open the printer cover
paper end between the paper cutter and the paper guide of the printer
cover
■
Removing a paper jam
1.
Remove the printer cover
2.
Lift up the print roller arm.
3.
Remove the paper jam. Check for and remove any shreds of paper that may remain in the printer
4.
Reset the paper roll correctly by following the steps in “Installing the paper rolls”.
Drawer Handling
■
Locking the Drawer
Develop the habit of locking the drawer when not using the register for any
extended period of time.
TL-1
T Insert the key into the drawer lock and turn it
90 degrees counter-clockwise.
T
90 degrees clockwise.
■
Removing the Drawer
Drawer
Till
Coin case
T
D
• T
leave it open at the end of the day
• Coin case is detachable.
■
Manually Opening the Drawer
Lever
In case of a power failure or if the machine is out of order
at the bottom of the machine and move it in the direction of the arrow to
open the drawer
lock key