- 14 -
8-6 MANAGING THE RECORDING LIST
The coloured keys A, B, C and D are used to manage the recording list.
8-6-1 Erasing a recorded programme or list
A (red key): To erase the selecte
It is impossible to erase the entire list if a rec
8-6-2 Accessing the complete list
The locked recorded p
list. The code to acces
8-6-3 Merging recordings
Press C (yellow key)
be merged. A confirmation window is d
the first recording and will adopt the name of the longest recording.
8-6-4 Renaiming a record
Press D key (blue k
Enter a new name using the alphanumeric k
letter A, press key 2 twice quickly for letter B, etc....).
8-6-5 Erasing a portion of a recording
Another function can be
• Erase a port
• Erase the portion of
• Erase the portion of
• Cut a recording into two parts.
- 15 -
To do this, select a recording from the recording list, read it and press at the desired location. Then press
the key to display the banner and for more information.
In CUT, se
• at begi : the part of the recording bet
selected place will be e
• in the mid : the part of the recording between the se
(index) and the next position will be erased. T
of the part to the erased,
, , and to the second marker
operation
,
,
and validate [in the middle]
the selected zon
• at end : the part of the recording between the selected place and the end will be erased.
• in two pa : the selected recording is cut into two parts that
recording name’.
8-7 SA
Connect your video recorder, for example, via the AUX Scart socket.
Select this input on your vid
Select play mode on the receiver and record mode on the
Then refer to your video recorder instruction manual for the procedure
- 16 -
9. PHOT
This equipment only exists for the PVR6600T version.
9-1 CARE INFORMA
The unit is designed to accept formamedia), MS (Memory Stick), MSPRO
(Memory Stick Pro), SD (Secure Digital), MMC (MultiMediaCard) and xD.
These ca
the card r
Only one ca
Don’t r
9-2 ST
You can access the photo editor by:
• inserting a memory card,
• pressing the key
on the remote control unit.
The photo player can only display phot
Photo m
Smart Media
TM
Card
SD Memory
MMC
Memory
Stick and
Memory
Stick PRO
DUO or
DUO PRO
with
adaptator
Microdrive
TM
&
Compact flash
TM
xD Picture Card
- 17 -
Function of the remote control unit keys in PHOTO MODE
FONCTION
Help
- 18 -
9-3 READING AND TRANSFERRING A PHOTO ALBUM FROM A
MEMOR
9-3-1 Creating and transferring the photo album
Insert the card. It then become
Press the C key (yellow) to copy the album to the hard disk.
You can copy the entire album stored on your card as a ne
place it in an album that already exists in your Photo editor. To
select the required destination with the arrow keys , , ,
and confirm.
If you decide to create a new album, it’s default name will be the date
when the oldest jpeg file
give it a different name, enhe alp
example, press key 2 for letter A, press key 2 twic
Of course, you
card’s folder will disappear from the photo album.
9-3-2 Reading the photo album
To read a photo on th
remote control unit
The player then disp
If the card does not
the photos and viewing them in the photo album.
You can go back to the list of ph .
- 19 -
9-3-3 Different photo viewing modes
Thumbnail mode:
The navigation keys a
can then display th .
Keys and are used to scroll forwa
the pages.
Key
is used to switch to Slideshow mode.
Photo full screen mode:
The navigation keys are used to scro
or manually forwards or backwards
picture and display the help bann . Press this key
again to remove this
Slideshow mode:
Press key in thumbnail mode to start slideshow mode. The photos
are displayed at a determined
settings, press the key . A SLIDESHOW SETTINGS screen is
displayed that can be used to cha
is used to access other functions
disappears after
information on the picture and
key
.
You can
at any time .
9-3-4 Importing a picture via the USB port
You can also connect a USB pictu
It is connected to
For USB data, all the files are viewed at the same level (the
will be read.
- 20 -
9-4 MANAGING ALBUMS
You can rename an album, read or edit information on this album, or delete an album.
The data on t
Press the A key (red) to delete an album.
Press the B key (green) to rename an album.
Enter a new name us
control unit (for example, press key 2 for letter A, press key 2 twice
quickly for letter B, etc.).
Press the key
to display or edit information on an album.
To access informat . You can now
edit the information on
enter the text required using the alphanumeric keypad on the remote
control unit (for example, press key 2 for letter A, press key 2 twice
quickly for letter B, etc.).
9-5 MANAGING PHOTOS
You can transfer photos be
and print them. When reading a photo card, o
functions are available
Press the D key (Blue) to
To select or unselect .
To select severa
to select the first photo and
group. All the photos betwee
key is used to add or remove photos in your selec
a new selection to your initial selection.
To transfer selec
pressing
To copy or move selecte
into another album or a new album that is created specifically for this purpose.
To delete one or more selected photos: Press
- 21 -
To rename a photo: Press then . Proceed in the same way as for re
“MANAGING ALBUMS”, page 20..
To sort photos :
Select the photos to move. Place the cursor to or . Press the key D.
The photos are moved
9-6 PRINTING
You can print a photo album on a printer (for example, SA
B. In this
9-6-1 Selecting the photos to be printed via the Receiver
Scroll through the photos on your Receiver.
Select the photos . The printer icon is
displayed on the picture to indicate that it is selecte
Unselect the photos by press .
Finally, connect the printer to USB port B. Th
of the receiver (The printer must manage the preselected files
Each time the Receiver is placed in standby,
9-6-2 Selecting the photos to be printed via a
Select your photos directly via th
PHOTO
PRINTER
Port B
- 22 -
10. EVER
10-1 SELECTING A TELEV
10-1-1 Using the keys and , or keys 0-9
Press th or to change c
unit to ac
It is possible t .
10-1-2 Using the channel list
Press the ke to displ to
It is possible t .
10-1-3 Channel information banner
Each time you
on the sc
The qual
It is
The banner
preferences
A Channel number and
B Name of programme
C Favourite list
D Number of audio tracks and subtitles
E AC3 audio
F Start time of programme
G Elapsed time
H End time of programme
I Current time
10-1-4 Extended information banner
If you want
programm
on your remote
Press ag or to delete the info
- 23 -
10-2 SELECTING A RADIO CHANNEL
If this service is
Press t
to switch
Press
to switch
10-3 ADJUSTING THE AUDIO VOLUME LEVEL
Volume: and .
Mute mode: Th .
The soun
10-4 CHANGING THE F
Press to display t
A new favour
10-5 TEMPORARILAUDIO LANGUAGES AND SUBTITLES
Press to displ
Press to dis
Press and to selec
Temporar
10-5-1 Audio language / sound track
Select the lan
10-5-2 Subtitle language
Select th
10-6 TELETEXT
If this service is
Press the on your re
To access th and .
10-7 TV / VCR SWITCH
Press the ke on your remo
television
- 24 -
10-8 ELECTRONIC PROGRAMME GUIDE
If this service is
Press the key t
Select a c
program
In the sa
Program
- 25 -
1
Only versio
A compu
The phot
on your
photos betw
To view th
standby.
When you unpl
in the menu bar
12. UPDA
The receiv
The system go
A welcome p
Then the “So
You can po
timeyou sw
Downloadin
The scre
The display
The user ca
Once the
After t t
programm
Port B
- 26 -
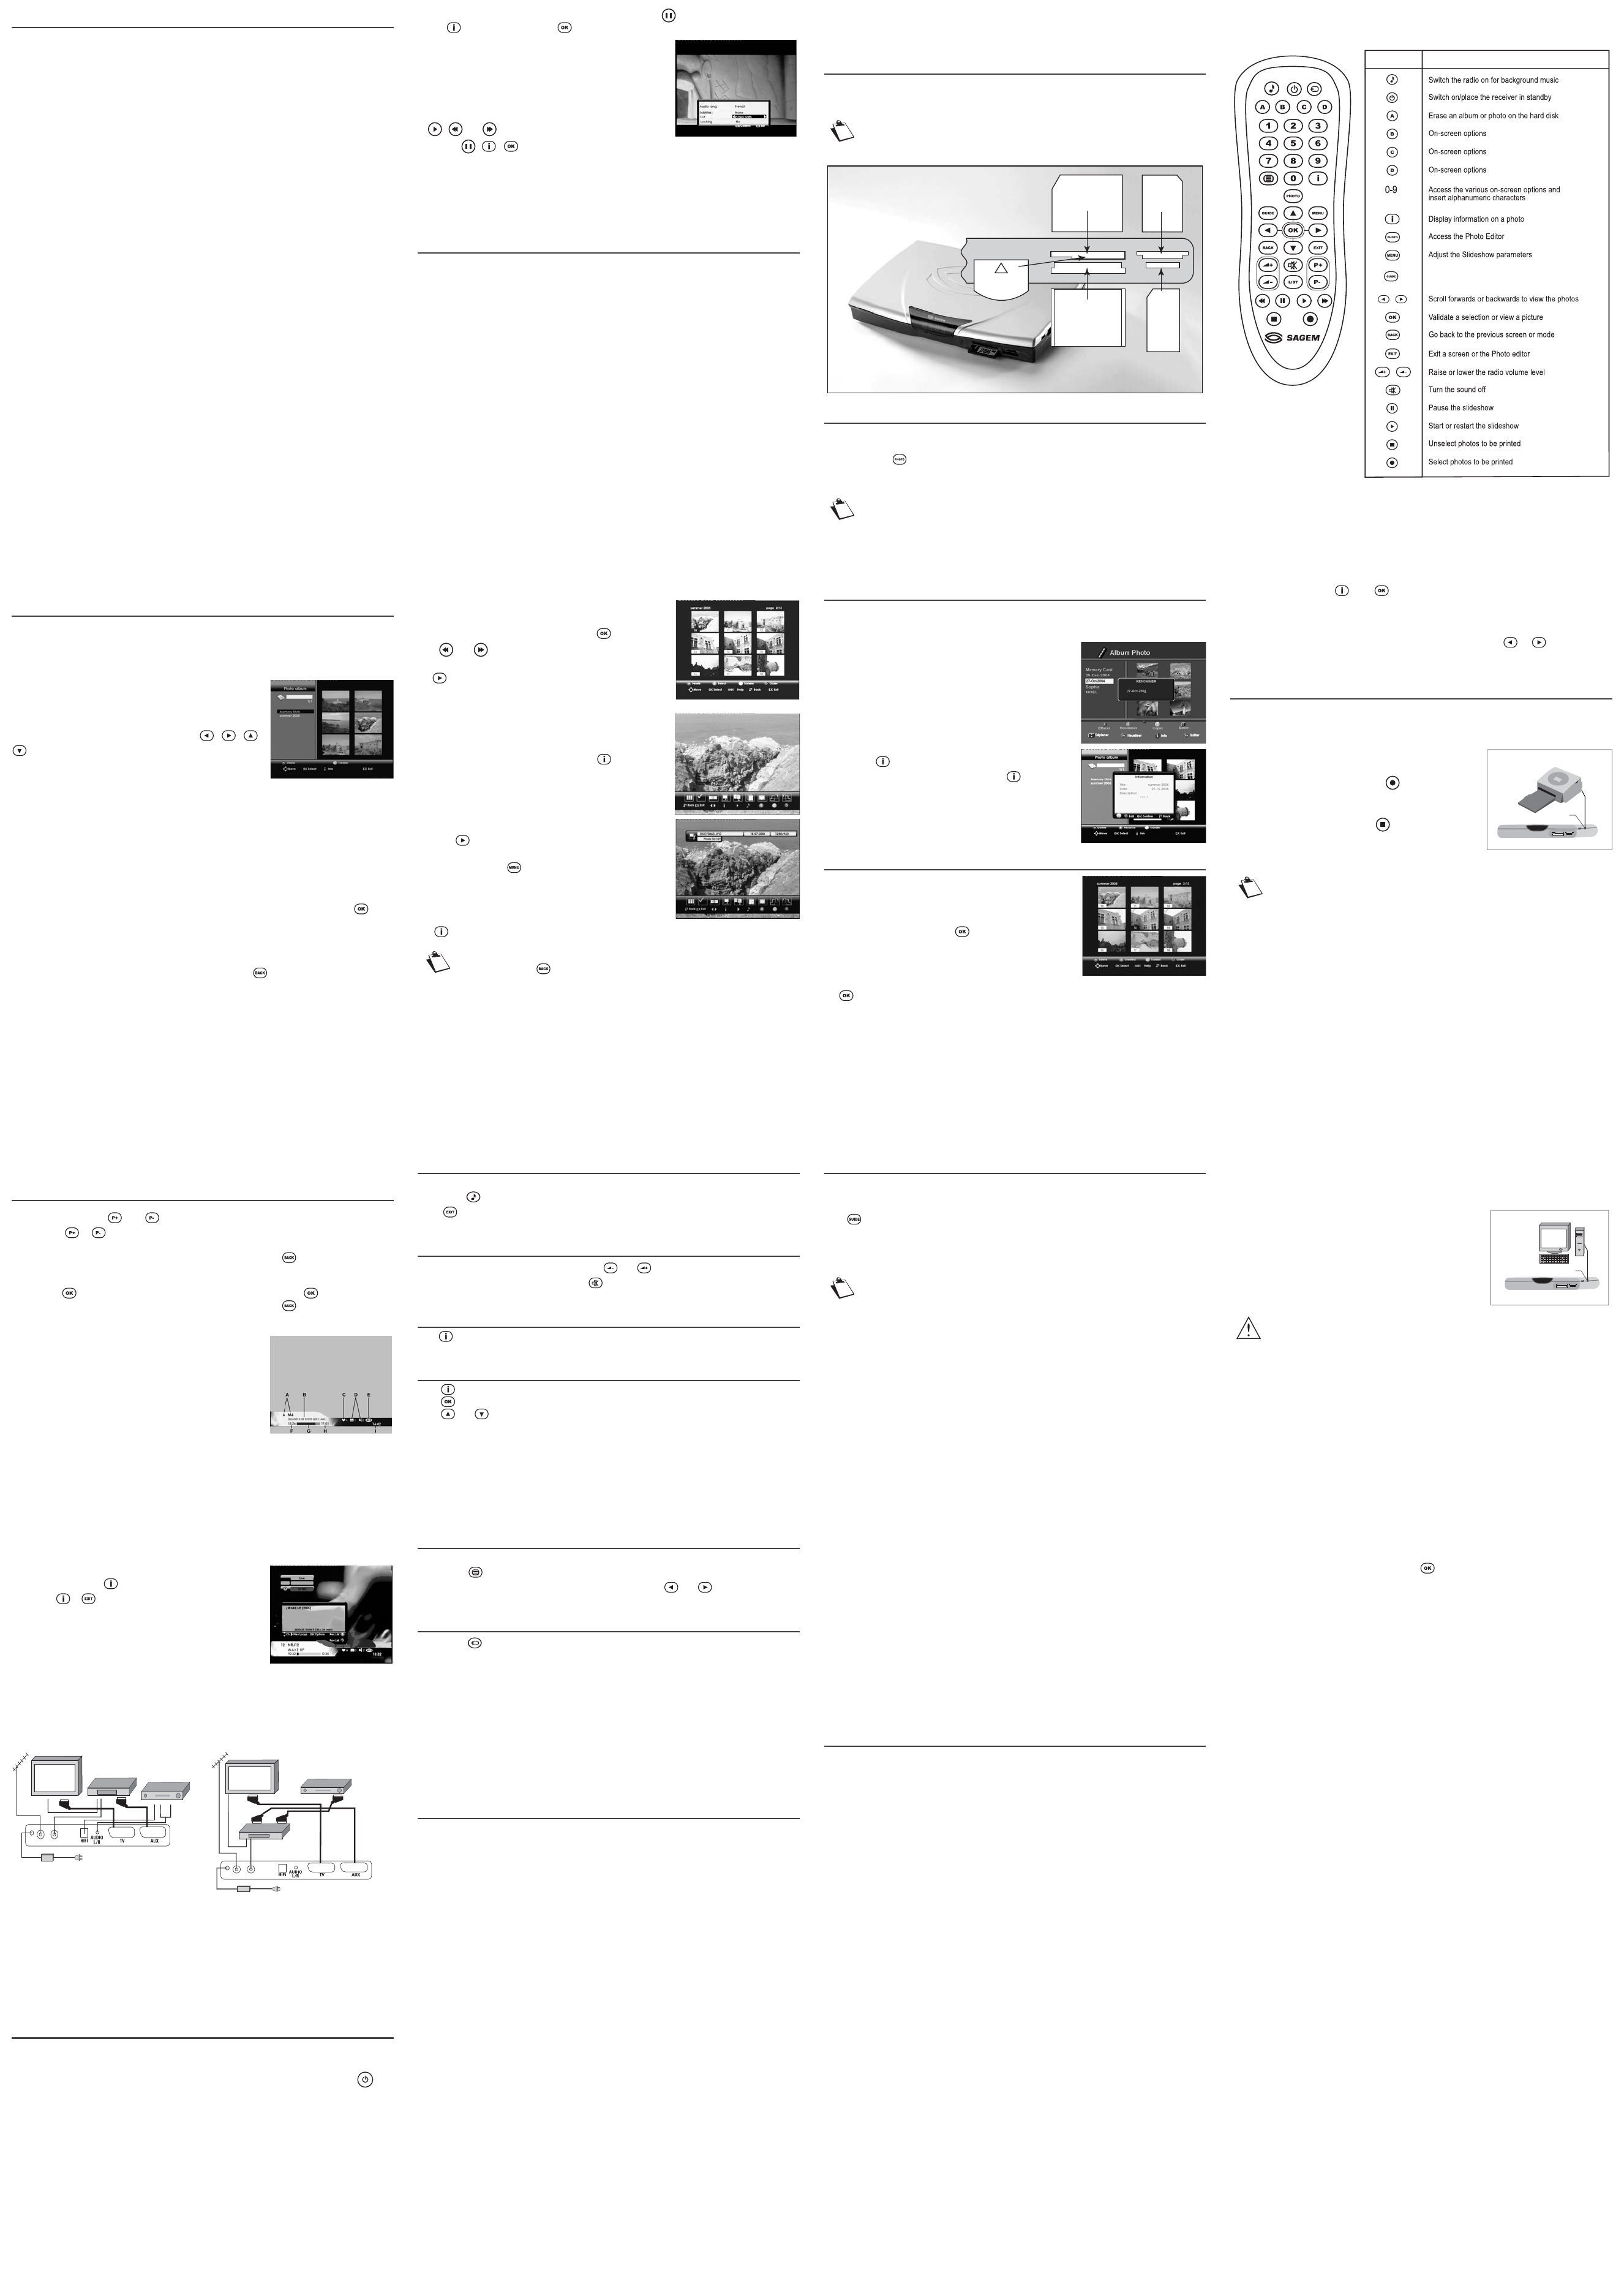
13. PERIPHERAL CONNECTIONS
14. REFERENCE
14-1 TROUBLESHOOTING
The remote control unit has
receiver.
Point the remote control unit towards the receiver.
Check the condition and orientatio
The receiver displ Take the receiv .
A black screen or an error message is
displayed.
Carry out a programme searc
Picture motion less or rec Check all the connections and start a pro
search again.
The receiver cannot fi Check that you are in a broadcast area
Readjust your antenna (cf. Quick I
The television does not switch to the re
when it leaves standby mode.
Check that your television is
socket and if req
your televi
No sound in "HOME CINEMA" mode on some
channels.
Check that you are conne
amplifier with
Connecting auxilia
recorder) fo
Connecting an audio amplifier, using a s
(Jack 3.5 mm to two RCA), or using a fibre optic
lead (IEC958). Fibre
to profit from a "HOME CINEMA" system.
Connecting auxiliary equip
recorder) for a
Connecting an analogue decod
socket.
- 27 -
14-2 SPECIFICA
*PVR 6600 photo only.
Black and white v
(VCR recording
Some recordings are not listed in the recording
list.
Check that AUX Scart signal is compat
VCR. Select PAL type.
Check that the record
will appear only in the full list see “Accessing the
complete list”, page 14.
Transmission Standar
DVB-T, MPEG 2, OFDM
Tuner
RF Input
Input Connector: IEC 169-2 female
RF input frequency range:
UHF 470-862 MHz (8 MHz BW)
VHF 174-222 MHz (8 MHz BW)
RF input level: -90 to -20
Input impedance: 75 Ohms
COFDM bandwidth:
Tuning step: 166.66 kHz
RF output
Output connector: IEC 169-2 ma
RF bypass: 47-862 MHz
Demodulator
COFDM modes supported: 2 k/8
Support: SFN
Modulation: QPSK, 16
Code rate: 1/2 to 7/8
Mode: Non-hierarchical
Guard interval: 1/4, 1/8, 1/16, 1/32
De-interleaver: 12x17 Forney
Error-correcting code: RS (204,188, 8)
Hard disk
Capacity/Recording :
40 GB, PVR 6240T up to 20 h
80 GB, PVR 6280T up to 40 h
160 GB, PVR 62160T up to 80 hours
80 GB, PVR 6680T up to 37 h
and 7.000 pictures
160 GB, PVR 66160T up to 75 hours
and 15.000 pictures
80 GB, PVR 7200T up to 40 h
160 GB, PVR 72160T up to 80 hours
Noise level (Typ): <30dBA
Microprocessor and memor
Processor: IBM Power PC(
252 MHz, 350 M
RAM: 32 MB
Flash memory: 2 MB
Demultiplexing/Descrambling
ISO/IEC 13818-1 standard compliant
Video receiver
MPEG-2 (ISO/IEC 13818-2)
Profile and level supported:
MP@ ML
Input rates: 1.5 to 15 Mbit/s
Aspect ratios: 4:3 and 16:9
Video Resolutions:
720x576, 704x576, 544x576,
480x576, 352x576, 352x288
Conversion:
Pan and Scan, Letterbox
Resizing and Zoom:
up/down (1/4, 1/16)
Audio Receiver
ISO/IEC 13818-3 standard compliant
MPEG-Layer I and II (Musicam Audio)
Mode: Mono, Stereo, Jo
Sampling frequencies: 32/44,1/48 kHz
A/V Input/Output
TV SCAR
RGB, CVBS, Audio stereo
AUX SCART
RGB input, CVBS, S-video output,
Audio analog
3.5 mm ste
Audio di
PCM stereo or AC3, IEC958 optical
Computer ports*
‘Host’ USB 2.0 connector (USB key)
‘Device’ USB 2.0 connector (PC,
Photo printer)
Photo card *
Standards supported:
Compact Flash I & II, Secure Digital
Smartmedia, MultiMediaCard,
Memory Stick, M
xD Picture Card
External power sup
AC: 220-240 V ~50 Hz
Output: 12 V DC 3.5A
Max power consumption : 18 W
(standby 9.5 W)
Front panel
1 seven-segment amber display
IR sensor: 38 kHz
Physical Specifi
Receiver:
Size (lxdxh): 315x230x45 mm
Weight: ~1.75 kg
Operating temperature: +5°C to
+40°C
Complete packaged receiver:
Weight: ~2.7 kg
Size (lxdxh): 247x236x80 mm
Storage temperature: -25°C to +65°C
Accessories
41-key remote control unit
Batteries: 2 x 1.5 V (AAA type)
1 Scart lead
External AC/DC adapter with power
cable
- 28 -
14-3 GUARANTEE
ATTENTION
In order to apply the guarantee, you should contact your dealer
or Sagem Communication helpdesk at 0905 77 48 081*.
Proof of purchase will be require
the dealer or Sagem Communication helpdesk will
If you bought your equipment from Sag
1) Sagem Commun
in the equipmen
defects are a result of faulty workmanship.
During this twelve-
however return th
address given by Sagem Communica
delivery slip. Unless the customer has conclud
which specifically pr
on the equipmen
The following
Except as ot
makes no representa
conditions implied by law are here
This guarantee does not affect the Customer's statutory rights.
2) Exclu
SAGEM shall have no liability un
• damage, defects break
- failure to pro
- an external cause to the equip
nature),
or
- modifications made without written approval of Sagem Communication, or
- a failure or neglect to maintain the equipment or inappropriate maintenance, or
- unsuitable operating conditions, particularly of temp
- repair or maintenance of the not au
- the removal and/or destruction of the label positioned on the fixation screw of the lower plastic cover,
• we
• damage due to insuf
• supply of new versio
• wo
Communication,
• malfunctions not resulti
use of the equip
- 29 -
• c
- problems related
malfunction of the lin
- transmission faults (for example poor geographical coveragsmitters, interference or poor line
quality),
- the local network fault (wiring, servers, workstation
• t
servicing not being carried out, se
* 0.15 £/min, tariff cost effective form 06/2