- Nettoyez ensuite les pièces détachées comme il est
indiqué dans la section "Nettoyage".
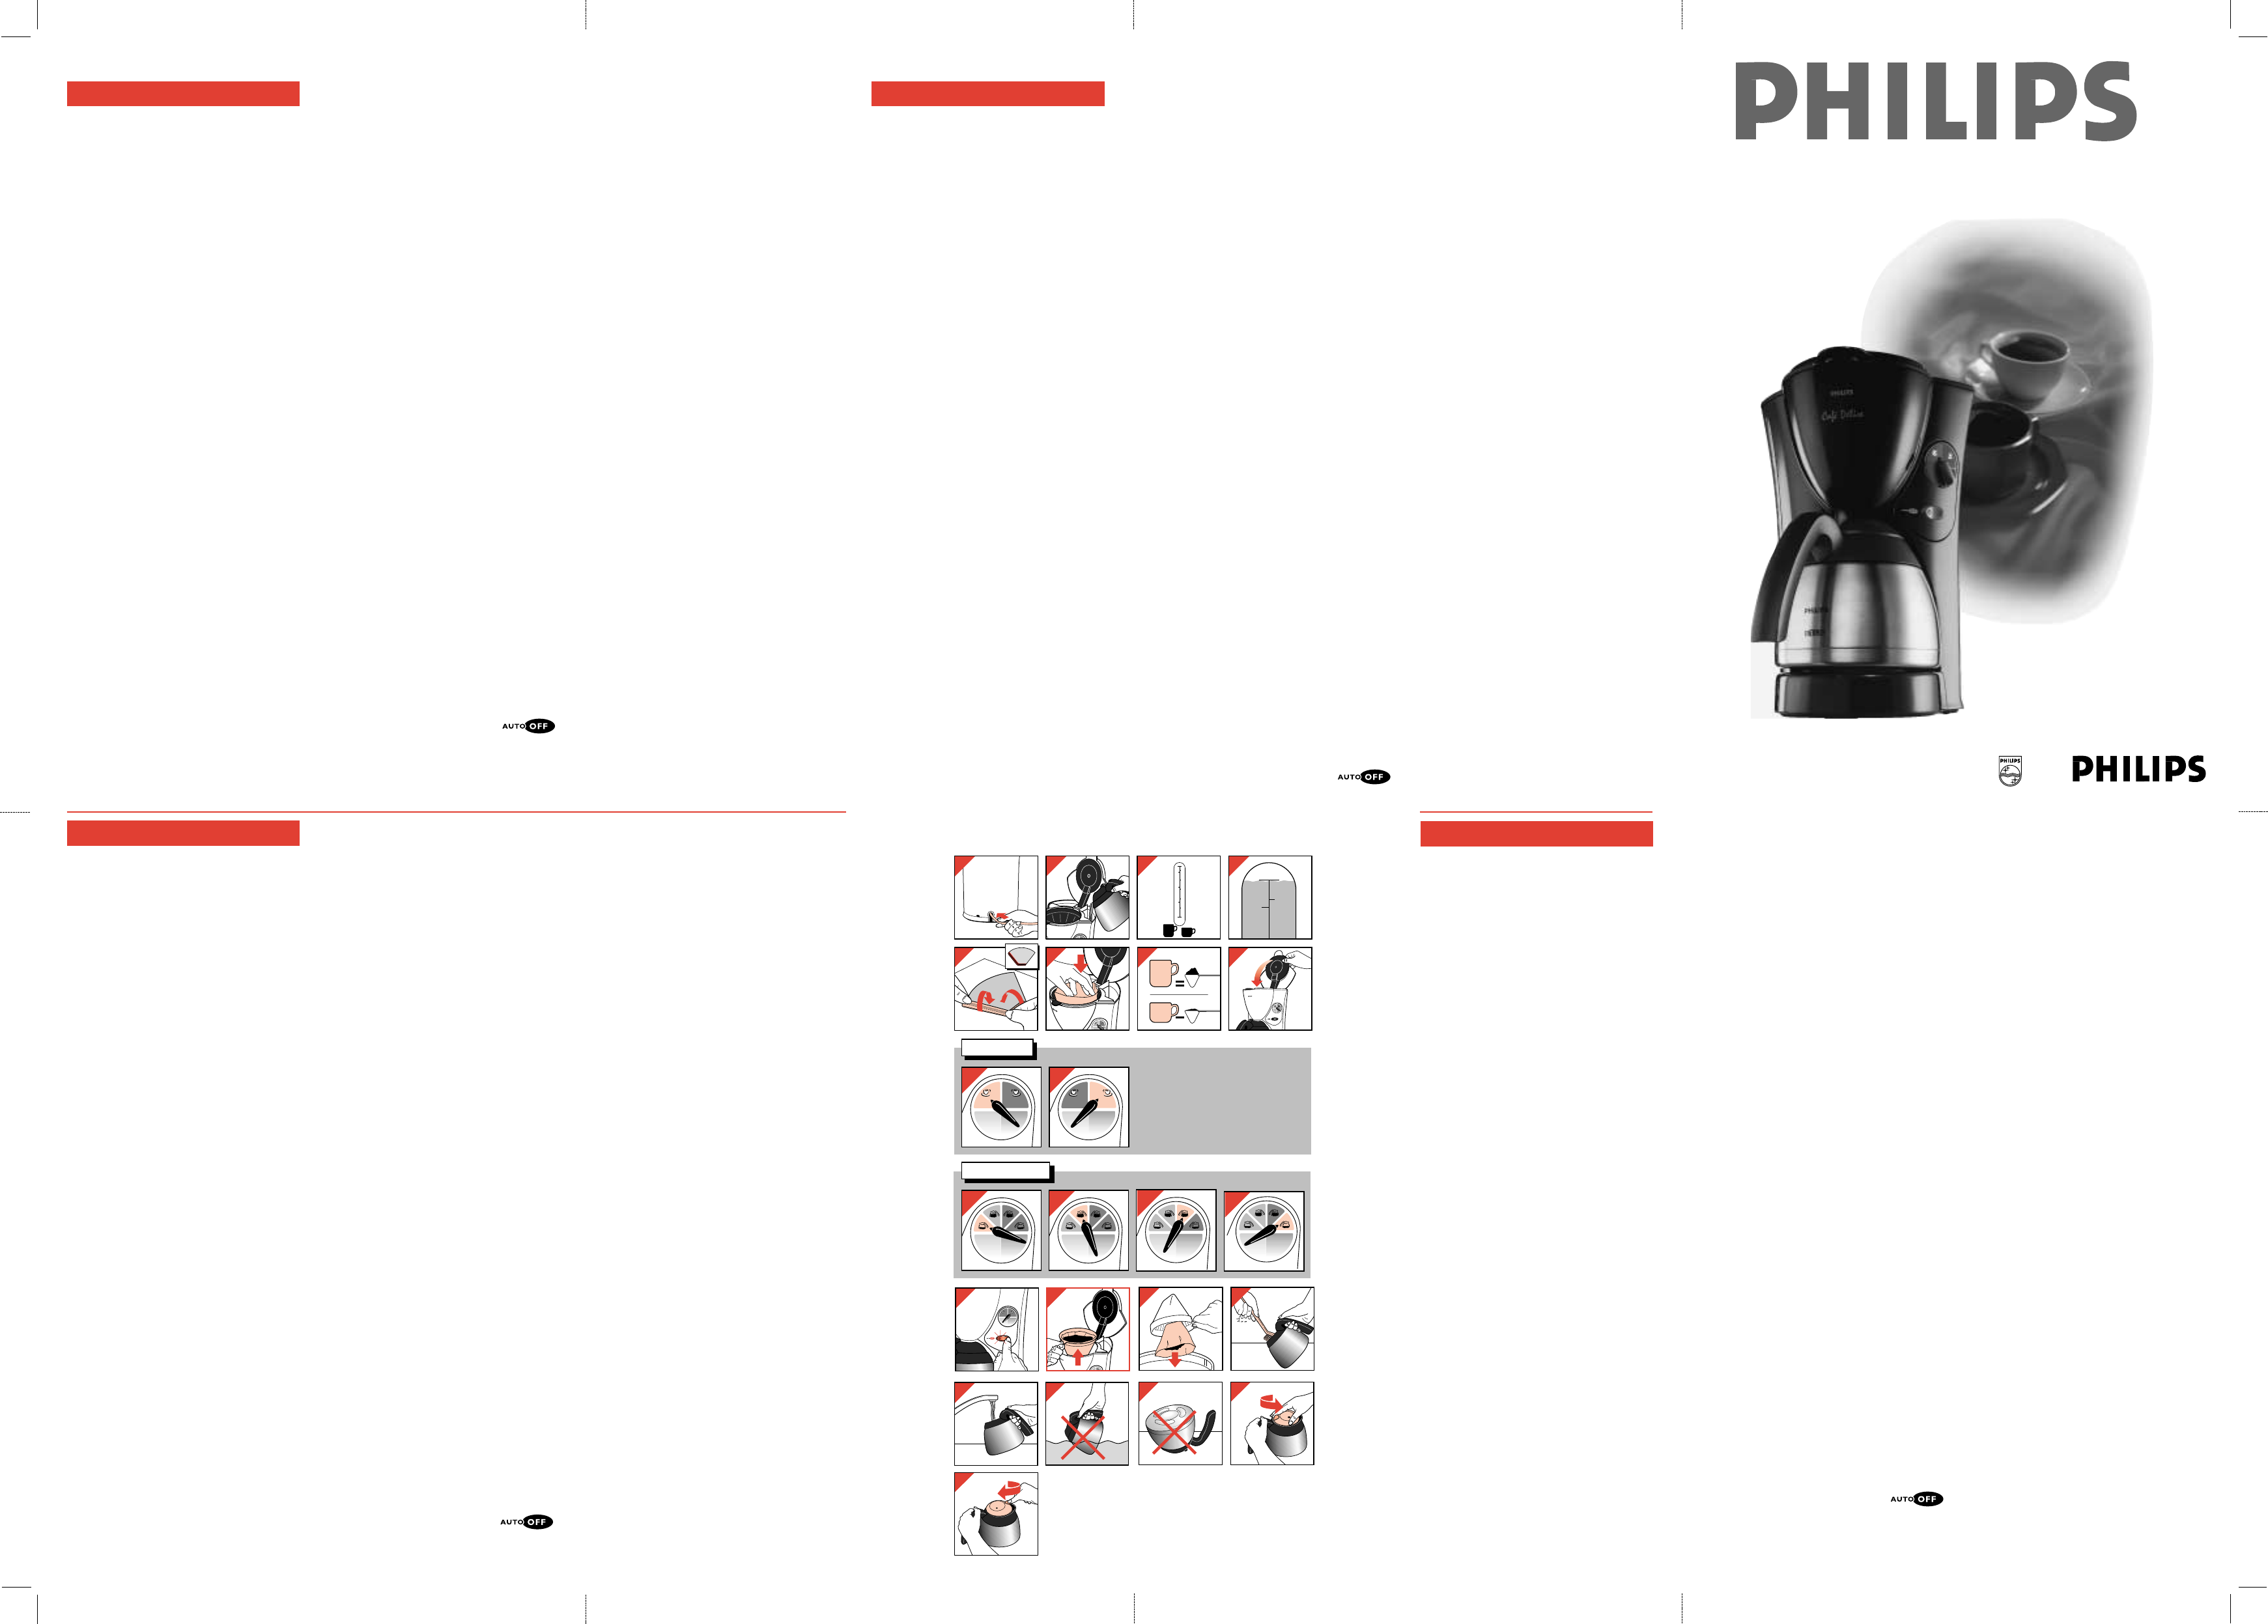
Pour faire du café : (fig. 2 - 10)
• Pour remplir le réservoir d'eau, n'utilisez que de l'eau
froide (fig. 2)
• Les repères de niveau à gauche correspondent à des
grandes tasses (120 ml).
Les repères de niveau à droite correspondent à des
plus petites tasses (80 ml). (fig. 3)
• Ne remplissez pas le réservoir d'eau au-delà de la
marque "MAX" (10 grandes tasses ou 15 petites
tasses). (fig.4)
• Utiliser un filtre en papier du type "1 x 4" ou "N° 4".
N'oubliez pas de plier les rebords afin d'éviter que le
filtre se déchire.
Certains modèles sont dotés de filtres permanents.
Les filtres en papier ne sont alors pas nécessaires.
- Pour de grandes tasses : remplissez une cuillère
doseuse bien pleine de café moulu (du type "filtre
rapide") par tasse.
Pour de petites tasses : une cuillère doseuse par
tasse. (fig. 7)
• Placez toujours le couvercle de la verseuse et
vissez-le bien avant de commencer à passer le
café. (fig. 8)
• Reglage à votre goût (HD 7612)(fig. 9a-b).
Pour donner un goût précis à votre café, le type du
café et le dosage sont des facteurs importants. Mais
le temps d'infusion a aussi son importance.
Un temps d'infusion plus long donne un goût robuste
et solide, tandis qu'un temps d'infusion court donne
un goût léger et aromatique.
En vous servant du sélecteur d'arôme, vous pouvez
adapter le café à votre propre goût :
a"Gold" - pour un café léger et aromatique. (fig. 9a)
b"Mocca" - pour un café fort et robuste. (fig. 9b)
- Mettez l'appareil en marche et la lampe témoin
s'allume. (fig. 10)
• Réglage suivant le goût personnel et la quantité
désirés
(types HD 7613) (fig. 9c-f).
En tournant le bouton une fois vous pouvez régler la
cafetière selon votre goût personnel (voir paragraphe
précedent), mais aussi suivant la quantité de café que
vous souhaitez obtenir.
a “GOLD” (Or) - pour 5 grandes tasses (ou 7 petites)
maximum de café doux, chargé d'arôme (fig. 9c).
b “GOLD” (Or) - pour plus de 5 grandes tasses (ou 7
petites) de café doux, chargé d'arôme (fig. 9d).
c “MOCCA” (Moka) - pour plus de 5 grandes tasses
(ou 7 petites) de café fort au goût intense (fig. 9e).
d “MOCCA” (Moka) - pour 5 grandes tasses (ou 7
petites) de café fort au goût intense (fig. 9f).
• "Anti-gouttes"
Une valve d'arrêt automatique empêche que le café
ne coule sur la plaque chauffante si la verseuse est
retirée quelque temps pendant la préparation du café
ou définitivement une fois le café entièrement passé.
• Arrêt automatique (HD7612,7613)
Pour votre confort, mais aussi par
mesure de sécurité, la cafetière s'éteint
automatiquement quand le café est passé.
Making coffee: (fig. 2 - 10)
• To fill the water tank use fresh cold water only. (fig.
2)
• The left hand side level indications correspond to
large cups (120 ml).
The right hand side level indications correspond to
smaller cups (80 ml). (fig. 3)
• Do not fill the water tank higher than indication
"MAX"(10 large cups / 15 small cups). (fig. 4)
• Use filter paper type “1x4” or “no. 4”. Do not forget
to fold the rims, to avoid tearing of the filter.
With some models a permanent filter is supplied.
Paper filters are then not required.
- For large cups: take one full (heaped) measuring
spoonful of ground coffee (“fast filter” type) for each
cup.
For smaller cups: one level measuring spoonful for
each cup. (fig 7)
• Always place the jug lid and screw it until tight
before you start brewing. (fig. 8)
• Setting to personal taste (HD 7612)(fig. 9a-b)
For the finite taste of your coffee, the type of
coffee and the dosage are important factors. But
also the brewing time matters greatly.
A longer brewing time gives a sturdy, robust taste,
whereas a short brewing time gives a soft,
aromatic taste.
Using the taste selector you can set the coffee
maker to your personal taste:
aGold - for soft, aromatic coffee. (fig 9a)
bMocca - for sturdy, robust coffee. (fig. 9b)
- Switch the appliance on, the light will go on.
(fig. 10)
• Setting to personal taste and volume (types
HD7613) (fig. 9c-f)
With one turn of the switch you can not only set
the coffee maker to your personal taste (see
previous section), but also to the quantity of coffee
you wish to make.
aGold - for maximum 5 large (or 7 small) cups of
smooth, aromatic coffee (fig. 9c).
bGold - for more than 5 large (or 7 small) cups of
smooth, aromatic coffee (fig. 9d).
cMocca - for more than 5 large (or 7 small) cups
of intense, robust coffee (fig. 9e).
dMocca - for maximum 5 large (or 7 small) cups
of intense, robust coffee (fig. 9f).
• “Drip-stop”
The automatic stop-valve ensures that no coffee
will drip on to the hotplate if the flask is removed
from the appliance for a moment during the
brewing process or if the flask is removed after
making coffee.
• Automatic shut-off (HD 7612/7613)
For your convenience, and also for
extra safety, the coffee maker will
switch itself off automatically after the coffee has
been made.
Cleaning: (fig. 11 - 14)
• Always remove the mains plug from the wall socket
before cleaning the appliance.
• Never immerse the appliance into water.
The appliance can be cleaned with a damp cloth.
• Wash the inner side of the thermos flask, using a
soft brush, hot water and detergent. (fig. 13)
After cleaning, rinse the thermos flask with fresh
hot water (do not clean in a dishwasher). (fig. 14)
Tip: To remove any subborn brown deposit,
just put a spoonful of soda with hot water into
the flask. Allow it to act for some time.
After this, you can easily wipe the deposit away
with the brush and your flask will be as bright and
shining as ever!
• The other removable items can be washed in hot
soapy water. Rinse with clean hot water and dry.
These items can also be cleaned in a dishwasher.
Opening / closing / removing the lid
To open: rotate the lid anti-clockwise half a turn.
(fig. 17)
Now you can pour out coffee.
To close: rotate the lid clockwise. (fig. 18)
If well-closed, the insulated jug will keep the coffee
hot and tasty for a long time.
To remove (for cleaning): rotate the lid anti-
clockwise until released.
Descaling
Descale your coffee maker regularly.
With normal use (two full jugs a day) the following
rule applies:
hardness up to 18 °DH (22.5 °Clarke) - 2 or 3 times
a year;
hardness over 18 °DH (22.5 °Clarke) - 4 or 5 times
a year.
Your water supply company can inform you about
the hardness of your water.
- Operate the appliance as described. However,
now use ordinary vinegar to fill the water tank
and do not fill the filter with ground coffee.
• When operating without ground coffee in the
filter, do not fill the water tank higher than the
marking for 9 large cups, otherwise the
thermos flask will flow over.
- After descaling, let the appliance work twice more
with only water to rinse away the vinegar and
scale remainders.
- Wash the thermos flask, lid and filter holder.
Replacing the mains cord
If the mains cord of this appliance is damaged, it
must be replaced by the original type only.
Please apply to your Philips dealer or to the Philips
organisation in your country for replacement.
Nettoyage : (fig. 11 - 14)
• Avant de nettoyer l'appareil, débranchez toujours la
fiche de la prise murale.
• Ne plongez jamais l'appareil dans l'eau.
L'appareil peut être nettoyé avec un chiffon humide.
• Lavez l'intérieur du réservoir isotherme avec une
brosse souple, de l'eau chaude et du détergent. (fig.
13)
Après le nettoyage, rincez la verseuse isotherme à
l'eau claire,chaude (ne la lavez pas dans un lave-
vaisselle). (fig. 14)
Conseil : pour éliminer les dépôts brunâtres, versez
une cuillerée de soude dans la verseuse avec de
l'eau chaude et laissez agir.
Il vous suffira alors d'éliminer le dépôt avec une
brosse et votre verseuse sera aussi brillante que
jamais !
Les autres pièces détachées peuvent être lavées
dans l'eau chaude savonneuse. Rincez-les avec de
l'eau claire chaude et séchez-les. Ces pièces peuvent
aussi être lavées dans un lave-vaisselle.
Ouverture, fermeture et retrait du couvercle
Pour ouvrir : tournez le couvercle d'un demi tour dans le
sens inverse des aiguilles d'une montre. (fig. 17)
Vous pouvez alors servir le café.
Pour fermer : tournez le couvercle dans le sens des
aiguilles d'une montre.(fig. 18)
Si elle est bien fermée, la verseuse peut garder le café
au chaud et plein d'arôme pendant quelques heures.
Pour retirer le couvercle (pour le nettoyage par exemple)
: tournez le couvercle dans le sens contraire des
aiguilles d'une montre jusqu'à ce qu'il soit libéré.
Élimination du dépôt calcaire
Débarrassez régulièrement votre cafetière du dépôt
calcaire.
En utilisation normale (deux pleines verseuses par jour),
appliquez la règle suivante :
- dureté de l'eau jusqu'à 18°TH - 2 ou 3 fois par an
- dureté de l'eau supérieure à 18°TH - 4 ou 5 fois par
an.
La société de distribution des eaux de votre région vous
indiquera la dureté de votre eau.
- Mettez votre appareil en marche comme indiqué,
mais remplissez le réservoir d'eau de vinaigre blanc
mais ne mettez pas de café moulu dans le filtre.
• Lorsque vous faites fonctionner l'appareil sans café
dans le filtre, ne remplissez pas le réservoir d'eau
plus haut que le repère des 9 grandes tasses : la
verseuse isotherme déborderait.
- Après cette opération, faites fonctionner l'appareil
deux fois avec seulement de l'eau pour éliminer le
vinaigre et les restes de calcaire.
- Lavez la verseuse isotherme, le couvercle et le porte-
filtre.
Remplacement du câble d'alimentation
Si le câble d'alimentation de cet appareil est
endommagé, il ne doit être remplacé que par un câble
d'origine.
Consultez votre revendeur Philips ou un Centre Service
Agréé.
English
Important
• Before connecting the appliance, please
check if the voltage indicated on the
appliance corresponds with the mains
voltage in your home.
• Do not place the appliance on a hot surface.
• Remove the mains plug from the wall
socket:
- if problems occur during making coffee;
- before cleaning the appliance.
• Do not allow the mains cord to come into
contact with hot surfaces.
• Use the appliance out of children's reach.
Prevent them from pulling the mains cord.
• Never use the appliance if the mains plug,
the mains cord or the appliance itself is
damaged.
• Do not disassemble the thermos flask.
• To prevent water from entering the thermos
flask:
- never immerse the flask in water or any
other liquid; (fig. 15)
- always place it in a normal (i.e. upright)
position. (fig. 16)
• If you have made coffee and wish to make
some more immediately, allow the appliance
to cool down for about four minutes. You
may then fill the water tank again.
• During brewing the lower section of the
appliance and the underside of the thermos
flask will become hot.
Thermos flask
Your appliance is equipped with an thermos flask,
which is provided with a stainless steel inner tube.
You can purchase a separate thermos jug from your
dealer or order it under type number:
- HD7930 (aubergine, HD 7612);
- HD7950 (black, HD7611 - HD7612/6).
- HD7958 (HD7612/7).
- HD7962 (zinc brown, HD7613).
Tip: preheating the jug with hot water will help to
keep the coffee hot after brewing.
Please note that coffee stays hot longer if you
prepare a full jug than if you prepare a smaller
amount.
Mains cord storage
Excess mains cord can be stored at the back of the
coffee maker. (fig.1)
Before first use
- Operate the appliance once without filling the filter
with ground coffee (see section: “Making coffee”).
When operating without ground coffee in the
filter, do not fill the water tank higher than the
marking for 9 large cups, otherwise the
thermos flask will flow over.
- Next, clean the removable parts as described in
section “Cleaning”.
Important
• Avant de brancher votre appareil, vérifiez que la
tension indiquée sur l'appareil correspond bien à
la tension de votre secteur.
• Ne placez pas votre appareil sur une surface
chaude.
• Débranchez la fiche de la prise murale :
- si vous constatez des problèmes pendant que
vous faites le café ;
- ou avant de nettoyer l'appareil.
• Ne laissez pas le câble d'alimentation entrer en
contact avec des surfaces chaudes.
• Placez l'appareil hors de la portée des enfants.
Veillez à ce qu'ils ne puissent tirer sur le câble
d'alimentation.
• N'utilisez jamais votre appareil si la prise, le câble
d'alimentation ou l'appareil lui-même sont
endommagés.
• Ne démontez pas la verseuse isotherme.
• Afin d'éviter que l'eau pénètre dans la verseuse
isotherme :
- ne plongez jamais le réservoir dans l'eau ou tout
autre liquide ; (fig. 15)
- posez-le toujours dans une position normale.
(fig. 16)
• Si vous avez fait du café et que vous désirez en
refaire, laissez l'appareil refroidir pendant environ
quatre minutes. Vous pourrez alors remplir de
nouveau le réservoir d'eau.
• Pendant que le café passe, la partie inférieure de
l'appareil et le dessous de la verseuse isotherme
deviennent très chauds.
La verseuse isotherme
Votre appareil est doté d'une verseuse isotherme dont le
manteau intérieur est en acier inoxydable.
Vous pouvez vous procurer une verseuse isotherme
séparée (en option) chez votre revendeur sous la
référence
- HD7930 (aubergine, HD7612);
- HD7950 (noire, HD7611 - HD7612/6).
- HD7958 (HD7612/7).
- HD7962 (Gris zinc, HD7613).
Le fait de préchauffer la verseuse avec de l’eau chaude
avant de remplir de café aidera à garder ensuite le café
chaud plus longtemps.
Merci de noter que le café restera chaud plus longtemps
si vous préparez une verseuse pleine que si elle ne
contient qu’une petite quantité.
Rangement du câble d'alimentation
Vous pouvez ranger la longeur de cordon superflue au
dos de la cafetière (fig. 1).
Avant la première utilisation
• Faites fonctionner l'appareil une première fois sans
remplir le filtre de café moulu (voir la section "Pour
faire du café").
Lorsque vous faites fonctionner l'appareil sans
café moulu dans le filtre, ne remplissez pas le
réservoir d'eau plus haut que le repère des 9
grandes tasses : la verseuse isotherme
déborderait.
Français
Deutsch
Wichtig
• Prüfen Sie vor Inbetriebnahme, ob die
Spannungsangabe auf dem Typenschild mit der
örtlichen Netzspannung übereinstimmt.
• Schließen Sie das Gerät nur an eine Schuko-
Steckdose an.
• Stellen Sie das Gerät nie auf eine heiße
Oberfläche.
• Ziehen Sie den Stecker aus der Steckdose,...
- wenn bei der Kaffeezubereitung Probleme
auftreten,
- bevor Sie das Gerät reinigen.
• Halten Sie das Netzkabel von heißen Oberflächen
fern.
• Halten Sie Kinder von dem Gerät fern. Achten Sie
darauf, daß sie es nicht am Netzkabel
herunterziehen können!
• Verwenden Sie das Gerät niemals, wenn der
Stecker, das Netzkabel oder das Gerät selbst
defekt oder beschädigt ist.
• Nehmen Sie niemals die Isolierkanne auseinander.
• Achten Sie darauf, daß kein Wasser in die
Isolierkanne eindringt:
- Tauchen Sie die Isolierkanne niemals in Wasser
oder andere Flüssigkeiten (Abb. 15).
- Stellen Sie die Isolierkanne immer aufrecht hin
(Abb. 16).
• Wenn der Kaffee fertig ist und Sie sofort neuen
Kaffee zubereiten wollen, so lassen Sie das Gerät
erst ca. 4 Minuten abkühlen. Danach können Sie
den Wasserbehälter wieder füllen.
• Während und nach der Kaffeezubereitung wird der
untere Teil des Geräts und der Isolierkanne heiß.
Die Isolierkanne
Ihr Gerät ist mit einer Isolierkanne ausgestattet, die
einen Edelstahleinsatz enthält. Sie können eine
zusätzliche oder Ersatz-Isolierkanne erhalten bei Ihrem
Händler unter der Type
- HD7930 (aubergine, HD7612).
- HD7950 (Schwarz, HD7611 - HD7612/6)
- HD7958 (HD7612/7).
- HD7962 (Zinkbraun, HD7613)
Hinweis: Der Kaffee bleibt länger heiß, wenn Sie die
Kanne vor der Zubereitung mit heißen Wasser
vorwärmen.
Der Kaffee bleibt länger heiß, wenn Sie eine volle Kanne
zubereiten. Eine kleine Menge kühlt schneller ab.
Unterbringung des Netzkabels
Überschüssiges Netzkabel läßt sich an der Rückseite
des Kaffee-Automaten in das Gerät zurückschieben
(Abb. 1).
Vor dem ersten Gebrauch
- Betreiben Sie das Gerät einmal mit klarem Wasser,
ohne Filter und ohne Kaffeemehl. Vgl den Abschnitt
"Kaffee zubereiten".
Füllen Sie den Wasserbehälter nie höher als bis
zur Markierung für 9 große Tassen, wenn Sie das
Le indicazioni poste a destra corrispondono invece a
tazze più piccole (80 ml.) (fig. 3).
• Non superate mai l'indicazione "MAX" riportata sul
serbatoio (10 tazze capienti / 15 tazze più piccole)
(fig. 4).
• Usate filtri in carta modello "1x4" o "n°4". Non
dimenticate di piegare i bordi, per evitare la rottura del
filtro. (fig. 5-6)
Con alcuni modelli viene fornito un filtro permanente:
in questo caso non sono necessari i filtri in carta.
- Per le tazze più capienti: prendete un misurino ben
colmo creando una montagnetta di caffè macinato per
ciascuna tazza.
Per le tazze più piccole: un misurino raso per
ciascuna tazza (fig. 7).
• Nota: Non dimenticate di chiudere bene il
coperchio prima di iniziare a preparare il caffè.
(fig. 8).
• Regolazioni in base alla quantità e al gusto
individuali (HD 7612)(fig. 9a-b).
Per ottenere una buona tazza di caffè, il tipo e la
quantità di caffè sono fattori fondamentali, ma non va
dimenticata l'importanza del tempo di infusione.
Un'infusione prolungata permette di ottenere un gusto
intenso e robusto mentre una più breve sviluppa un
aroma delicato e aromatico.
Utilizzando l'apposito selettore, potrete impostare
l'apparecchio in base ai vostri gusti personali:
aGold - per ottenere un caffè dall'aroma delicato e
aromatico (fig. 9a)
bMocca - per ottenere un caffè dall'aroma intenso e
robusto (fig. 9b)
Accendete l'apparecchio: si accenderà la spia (fig.
10).
• Regolazioni in base alla quantità e al gusto
individuali (modelli HD 7613) (fig. 9c-f).
Con un semplice giro dell'interruttore potrete
impostare l'apparecchio non solo in base ai vostri
gusti personali (vedere sezione precedente), ma
anche in base alla quantità di caffè che volete
preparare.
a Gold - massimo 5 tazze grandi (o 7 piccole) di
caffè delicato e aromatico (fig. 9c).
b Gold - oltre 5 tazze grandi (o 7 piccole) di caffè
delicato e aromatico (fig. 9d).
c Mocca - oltre 5 tazze grandi (o 7 piccole) di caffè
intenso e robusto (fig. 9e).
d Mocca - massimo 5 tazze grandi (o 7 piccole) di
caffè intenso e robusto (fig. 9f).
• Dispositivo anti-goccia
La speciale valvola automatica impedisce al caffè di
sgocciolare sulla piastra nel caso in cui la brocca
venga tolta per un attimo dall'apparecchio durante il
processo di infusione o dopo aver preparato il caffè.
• Dispositivo di spegnimento
automatico (HD 7612,7613)
Per una maggior praticità e sicurezza, l'apparecchio si
spegnerà automaticamente dopo aver preparato il
caffè.
Pulizia (fig. 11-14)
• Togliete sempre la spina dalla presa prima di pulire
l'apparecchio.
• Non immergete mai l'apparecchio nell'acqua.
Limitatevi a pulirlo usando un panno umido.
• Lavate l'interno del termos con acqua calda saponata
e una spazzola morbida (fig. 13)
Risciacquate quindi il termos sotto l'acqua calda
corrente (non in lavastoviglie!) (fig. 14).
Consigli: Per eliminare le eventuali macchie più
resistenti, riempite il termos con acqua calda nella
quale avrete aggiunto un cucchiaio di bicarbonato
e lasciate agire per alcuni minuti.
A questo punto, potrete facilmente eliminare le
macchie con l'aiuto di una spazzola morbida. Il vostro
termos sarà pulito e splendente, come nuovo!
• Gli altri accessori asportabili possono essere lavati
con acqua calda saponata. Risciacquateli poi con
acqua calda e asciugateli con cura. Questi accessori
possono essere lavati anche in lavastoviglie.
Come aprire/chiudere/togliere il coperchio
Per aprire: ruotate il coperchio in senso antiorario, di
mezzo giro (fig. 17).
A questo punto potete versare il caffè.
Per chiudere: ruotate il coperchio in senso orario (fig.
18).
Una volta chiuso il coperchio, la brocca manterrà a lungo
il caffè caldo e fragrante.
Per togliere (per le operazioni di pulizia): ruotate il
coperchio in senso antiorario fino a quando non risulta
sbloccato.
Come togliere il calcare
Ricordatevi di eliminare periodicamente il calcare dal
vostro apparecchio.
Con un uso normale (due brocche al giorno) valgono le
seguenti regole:
Durezza dell'acqua fino a 18°DH (22,5° Clarke) - 2 o 3
volte all'anno;
Durezza dell'acqua oltre 18°DH (22,5° Clarke) - 4 o 5
volte all'anno.
Per conoscere il grado di durezza dell'acqua nella vostra
zona, rivolgetevi a chi fornisce l'acqua potabile.
- Fate funzionare l'apparecchio come descritto,
riempiendo però il serbatoio con aceto, senza mettere
il caffè.
• Durante il funzionamento dell'apparecchio senza
caffè, non superate il livello corrispondente a 9
tazze (grandi) previsto sul serbatoio, per evitare
che l'acqua fuoriesca dal termos.
- Al termine dell'operazione, lasciate funzionare
l'apparecchio con sola acqua per un paio di volte, per
eliminare qualsiasi traccia di aceto e eventuali residui
di calcare.
- Lavate il termos, il coperchio e il porta-filtro.
Come sostituire il cavo di alimentazione
Nel caso in cui il cavo fosse danneggiato, dovrà essere
sostituito con un cavo speciale. Rivolgetevi al vostro
rivenditore di fiducia o al Centro di Assistenza Philips più
vicino.
IMPORTANTE
• Prima di collegare l'apparecchio verificate che la
tensione indicata sull'apparecchio corrisponda a
quella della rete locale.
• Non appoggiate l'apparecchio su superfici
bollenti.
• Togliete la spina dalla presa di corrente:
- nel caso di problemi durante la preparazione del
caffè;
- prima di pulire l'apparecchio.
• Fate in modo che il cavo non venga in contatto
con superfici bollenti.
• Tenete l'apparecchio lontano dalla portata dei
bambini e fate in modo che non tirino il cavo di
alimentazione.
• Non usate l'apparecchio se la spina o il cavo di
alimentazione risultano danneggiati.
• Non smontate il termos.
• Per evitare infiltrazioni d'acqua all'interno del
termos:
- non immergete mai il termos in acqua o in altri
liquidi (fig. 15);
- appoggiatelo sempre in posizione verticale (fig.
16).
• Se avete appena preparato il caffè ma ne volete
subito dell'altro, lasciate raffreddare l'apparecchio
per circa due minuti. A questo punto potrete
riempire nuovamente il serbatoio dell'acqua.
• Durante il funzionamento, la parte inferiore
dell'apparecchio e del termos diventeranno caldi.
Termos
L'apparecchio viene fornito con un termos provvisto di
un tubo interno in acciaio inox. Potrete acquistare un
altro termos direttamente presso il vostro rivenditore di
fiducia
- HD7930 (viola scuro, HD7612);
- HD7950 (nero, HD7611 - HD7612/6)
- HD7958 (HD7612/7).
- HD 7962 (Tortora, HD7613)
Consigli: preriscaldare la caraffa con acqua calda sarà
d’aiuto per mantenere il caffè caldo dopo l’infusione.
Il caffè si manterrà caldo più a lungo se preparerete una
caraffa piena invece che una piccola quantità.
Scomparto cavo di alimentazione
Il cavo di alimentazione in eccesso può essere riposto
sul retro dell'apparecchio (fig. 1).
Prima dell'uso
- Fate funzionare l'apparecchio senza riempire il filtro
con il caffè (vedere "Come preparare il caffè").
Durante il funzionamento dell'apparecchio senza
caffè, non superate il livello corrispondente a 9
tazze (grandi) previsto sul serbatoio, per evitare
che l'acqua fuoriesca dal termos.
- Pulite le parti asportabili come indicato nella sezione
"Pulizia".
Come preparare il caffè (fig. 2-10)
• Usate soltanto acqua corrente fredda per riempire il
serbatoio (fig. 2).
• Le indicazioni di livello poste a sinistra si riferiscono
alle tazze più capienti (120 ml.)
Italiano
Gerät ohne Kaffeemehl im Filter betreiben. Die
Isolierkanne läuft sonst über.
- Reinigen Sie danach alle abnehmbaren Teile. Vgl.
den Abschnitt "Reinigen".
Kaffee zubereiten (Abb. 2 bis 10)
• Füllen Sie den Wasserbehälter mit frischem, kaltem
Wasser (Abb. 2).
• Die linke Markierung entspricht großen Tassen (120
ml).
Die rechte Markierung entspricht kleinen Tassen (80
ml) (Abb. 3).
• Gießen Sie nicht mehr Wasser in den Behälter als bis
zur Markierung "MAX" (= 10 große bzw. 15 kleine
Tassen) (Abb. 14).
• Verwenden Sie Filtertüten Type "1x4" bzw. "Nr.4".
Vergessen Sie nicht, die Kanten zu falzen (Abb. 5).
Einige Modelle werden mit einem Dauerfilter geliefert.
Dabei ist keine Papier-Filtertüte erforderlich.
- Nehmen Sie einen gehäuften Meßlöffel Kaffeemehl
für jede große Tasse Kaffee;
für jede kleine Tasse nehmen Sie einen gestrichenen
Meßlöffel voll (Abb. 7).
Hinweis: Vergessen Sie nicht, den Deckel des
Geräts zu schließen, nachdem Sie den
Wasserbehälter und den Filter gefüllt haben!
(Abb. 8)
• Einstellen auf den persönlichen Geschmack (HD
7612)(Abb. 9a und 9b)
Der Geschmack des Kaffees wird sowohl durch die Wahl
der Kaffeesorte und die Dosierung des Kaffees als auch
durch die Brühzeit beeinflußt.
Eine kurze Brühzeit ergibt einen milder, aromatischen
Geschmack. Eine längere Brühzeit führt zu einem
intensiven, kräftigen Geschmack.
Durch Drehen des Schalters können Sie den Kaffee-
Geschmack nach Ihrem eigenen Belieben beeinflussen:
a Gold: milder, aromatischer Kaffee (Abb. 9a).
b Mocca: intensiver, kräftiger Kaffee (Abb. 9b).
- Schalten Sie das Gerät ein. Die Kontrollampe leuchtet
auf (Abb. 10).
• (Typen HD7613:) Einstellen auf Menge und
persönlichen Geschmack (Abb. 9c-f)
Durch Drehen des Schalters können Sie nicht nur den
Geschmack Ihres Kaffees wählen, sondern auch die
Menge, die zubereitet werden soll.
a Gold: maximal 5 große oder 7 kleine Tassen
milder, aromatischer Kaffee (Abb. 9c).
b Gold: mehr als 5 große oder 7 kleine Tassen
milder, aromatischer Kaffee (Abb. 9d).
c Mocca: mehr als 5 große oder 7 kleine Tassen
intensiver, kräftiger Kaffee (Abb. 9e).
d Mocca: maximal 5 große oder 7 kleine Tassen
intensiver, kräftiger Kaffee (Abb. 9e).
• "Tropf-Stop"
Der integrierte "Tropf-Stop" verhindert durch ein
Nachtropfventil, daß Kaffee auf die Warmhalteplatte
tropft, wenn die Kanne während oder nach der
Zubereitung aus dem Gerät genommen wird.
Abschalt-Automatik (HD7612,7613)
Zu Ihrer Bequemlichkeit und zu Ihrer
Sicherheit wird das Gerät automatisch ausgeschaltet,
sobald der Kaffee zubereitet ist.
Reinigen (Abb. 11 bis 14)
• Ziehen Sie vor jeder Reinigung den Netzstecker aus
der Steckdose.
• Tauchen Sie das Gerät niemals in Wasser.
Sie können es mit einem feuchten Tuch reinigen.
• Das Innere der Isolierkanne läßt sich mit einer
weichen Bürste und heißem Wasser reinigen, dem
Sie etwas Spülmittel zugefügt haben (Abb. 13).
Spülen Sie gründlich mit klarem, kaltem Wasser nach
(Abb. 14).
Die Isolierkanne ist für den Geschirrspüler nicht
geeignet.
Hinweis: Hartnäckige braune Ablagerungen in der
Isolierkanne beseitigen Sie, indem Sie einen
Teelöffel Soda, in heißem Wasser aufgelöst,eine
Weile einwirken lassen.
Danach können Sie die Isolierkanne mit klarem
Wasser und eine weichen Bürste auswaschen. Sie
wird strahlen wie neu!
• Die anderen abnehmbaren Teile können Sie in
heißem Wasser reinigen, dem Sie etwas Spülmittel
zugefügt haben. Sie sind auch für den Geschirrspüler
geeignet.
Handhabung der Isolierkanne
Öffnen: Eine halbe Umdrehung gegen den
Uhrzeigersinn (Abb. 17).
Schließen: Im Uhrzeigersinn drehen.
Deckel (zur Reinigung) abnehmen: Gegen den
Uhrzeigersinn drehen, bis sich der Deckel abnehmen
läßt.
Entkalken
Entkalken Sie das Gerät regelmäßig. Bei normalem
Gebrauch, d.h. bei Zubereitung von zwei vollen Kannen
täglich, je nach Wasserhärte:
• Bei Härtebereich 1 oder 2: zwei- oder dreimal im
Jahr
• Bei Härtebereich 3 oder 4: vier- oder fünfmal im
Jahr.
Ihre Wasserwerke geben Ihnen Auskunft; außerdem
müssen sie den Verbrauchern den zutreffenden
Härtebereich einmal jährlich in der Abrechnung mitteilen.
- Betreiben Sie das Gerät wie im Abschnitt "Kaffee
zubereiten" geschildert, füllen Sie den
Wasserbehälter jedoch mit Haushaltsessig oder
handelsüblichem Haushaltsentkalker, ohne
Filtertüte und Kaffeemehl.
Füllen Sie den Wasserbehälter nie höher als bis
zur Markierung für 9 große Tassen, wenn Sie das
Gerät ohne Kaffeemehl im Filter betreiben. Die
Isolierkanne läuft sonst über.
- Betreiben Sie das Gerät nach dem Entkalken noch
zweimal mit frischem, kaltem Wasser, um die Essig-
und Kalkreste zu entfernen.
- Spülen Sie danach gründlich die Isolierkanne, den
Deckel und den Filterhalter.
Ersatz des Netzkabels
Wenn das Netzkabel defekt oder beschädigt ist, muß es
durch ein original Philips Netzkabel ersetzt werden.
Wenden Sie sich an Ihren Philips-Händler oder die
Philips-Organisation in Ihrem Lande.
4222 001 77764www.philips.com
u