GB DE
10 15
T
T
ther
of the oven is recommended until the ther
switches of
in the center of the oven. This function is recommended for the
foods needing highest cooking temperatures or in ear
pots. When you want to cook your food heating it from bottom
turn the function knob to the symbol and to the symbol
when you want to heat the food from the top. With this cooking
one tray only
Wishing a more unifor
knob to the symbol favourable also when using more than
one tray
Forced convection baking
T
thermostat knob (fig. 2) to required temperature. With this function
more than on tray may be used at the same time because hot air
is forced by the fan around the food and between the trays and
also the temperature to be selected for cooking is 10-15% lower
than the corresponding value for traditional baking and the action
of the hot air will do more uniformly dried and crust your food.
When using one tray only the lower runner is suggested to be
used in order to have easier check by the oven window without
opening the door
are sufficient also for very sensitive items such as souf
whisked sponges) and the more commun foods may be cooked
from a “cold start”.
Cooking time
This MUL
cooking way for the most common international foods. Cooking
results are a matter of personal preference and may easily be
adjusted to follow individual requirements by slight changes to
the temperature or/and cooking time.
Using the grill
T
to grill without fan and to the symbol for fan assisted grilling.
FOR GRILLING TURN THE THERMOST
THE MAX. When switching on the grill the turnspit motor also will
star
cor
because the action of the hot air will more unifor
the heat will enter into the food more gradually by r
radiation of the grill. When use this function turn they knob on
200° ther
W
Always set the grill grid in the highest possible rack (but not too
close to the heating element: fatty foods get smoke and may star
a fire) place a pan in the lowest possible rack for collecting juice.
If a grease fir
a lid on the pan: NEVER THROW W
Defrost
T
knob (fig. 2) to the OFF position. Air at room temperatur
by the fan around the food for fast defr
Remember to place the food on a tray
defrosting and to r
before cooking.
Thermostat indicator lamp
This light is on when you turn the ther
of
on and of
Oven lamp
This light is always on with ever
knob (fig. 1). When needing the inside lighted up without any
heating element switched on turn the selector knob to the symbol
.
Grillgaren mit Luftumwälzung
Den Wählschalter in die Position stellen; den Ther
den gewünschten T
Heißluftgaren
Den Wählschalter in die Position stellen; den Ther
den gewünschten T
Auftauen
Den Wählschalter in die Position stellen. Auf diese Weise wird
das Gebläse eingeschaltet, das die Luft im Ofen umwälzt und das
Auftauen tiefgefror
(Abb. 1) in der Position den Ther
2) in die Position 0 stellen.
Leuchtanzeige Ofenthermostat
Erlischt, wenn der Ofen die gewünschte T
und schaltet sich immer dann ein, wenn der Ther
um die T
Ofenbeleuchtung
Während des Ofenbetriebs ist die Beleuchtung stets eingeschaltet.
Um die Beleuchtung bei ausgeschaltetem Ofen für die nor
Reinigung einzuschalten, den Wählschalter (Abb. 1) in die Position
stellen.
Herkömmliches Garen
Die Hitze kommt von oben und von unten; deshalb den mittleren
Einschub benutzen. Sollte zum Garen mehr Unter- oder Ober
er
Die herkömmliche Gar
die lange Gar
in Steingut- oder Por
Heißluftgaren
V
Ofenrückwand im Ofen ver
Zubereitung von mehr
Einschubebenen. Durch die geringe Luftfeuchtigkeit und die tr
ne Ofenluft keine Ger
Garen auf verschiedenen Einschubebenen er
gleichzeitige Zubereitung vieler verschiedener Gerichte und von
Garen mit dem Multifunktions-Ofen.
Mit dieser Ar
Heißluft und mit dem Grill optimal garen. Alle Kochar
bei vollständig geschlossenem Ofen ab.
Fig. 3
A
B
C
E
F
A
Using the rotisserie (see fig. 3)
Inser
corners of the pan taking car
must be placed on the left side of the pan. R
(balancing it properly to avoid unnecessar
and grip it securely with the forks. Inser
on the left suppor
Check always that the spit end is properly inser
and the rod "C" also, is pr
motor "F". We suggest for a better connection to turn the rod "C"
a little bit when inser
turning the selector knob to the symbol . For r
ther
A
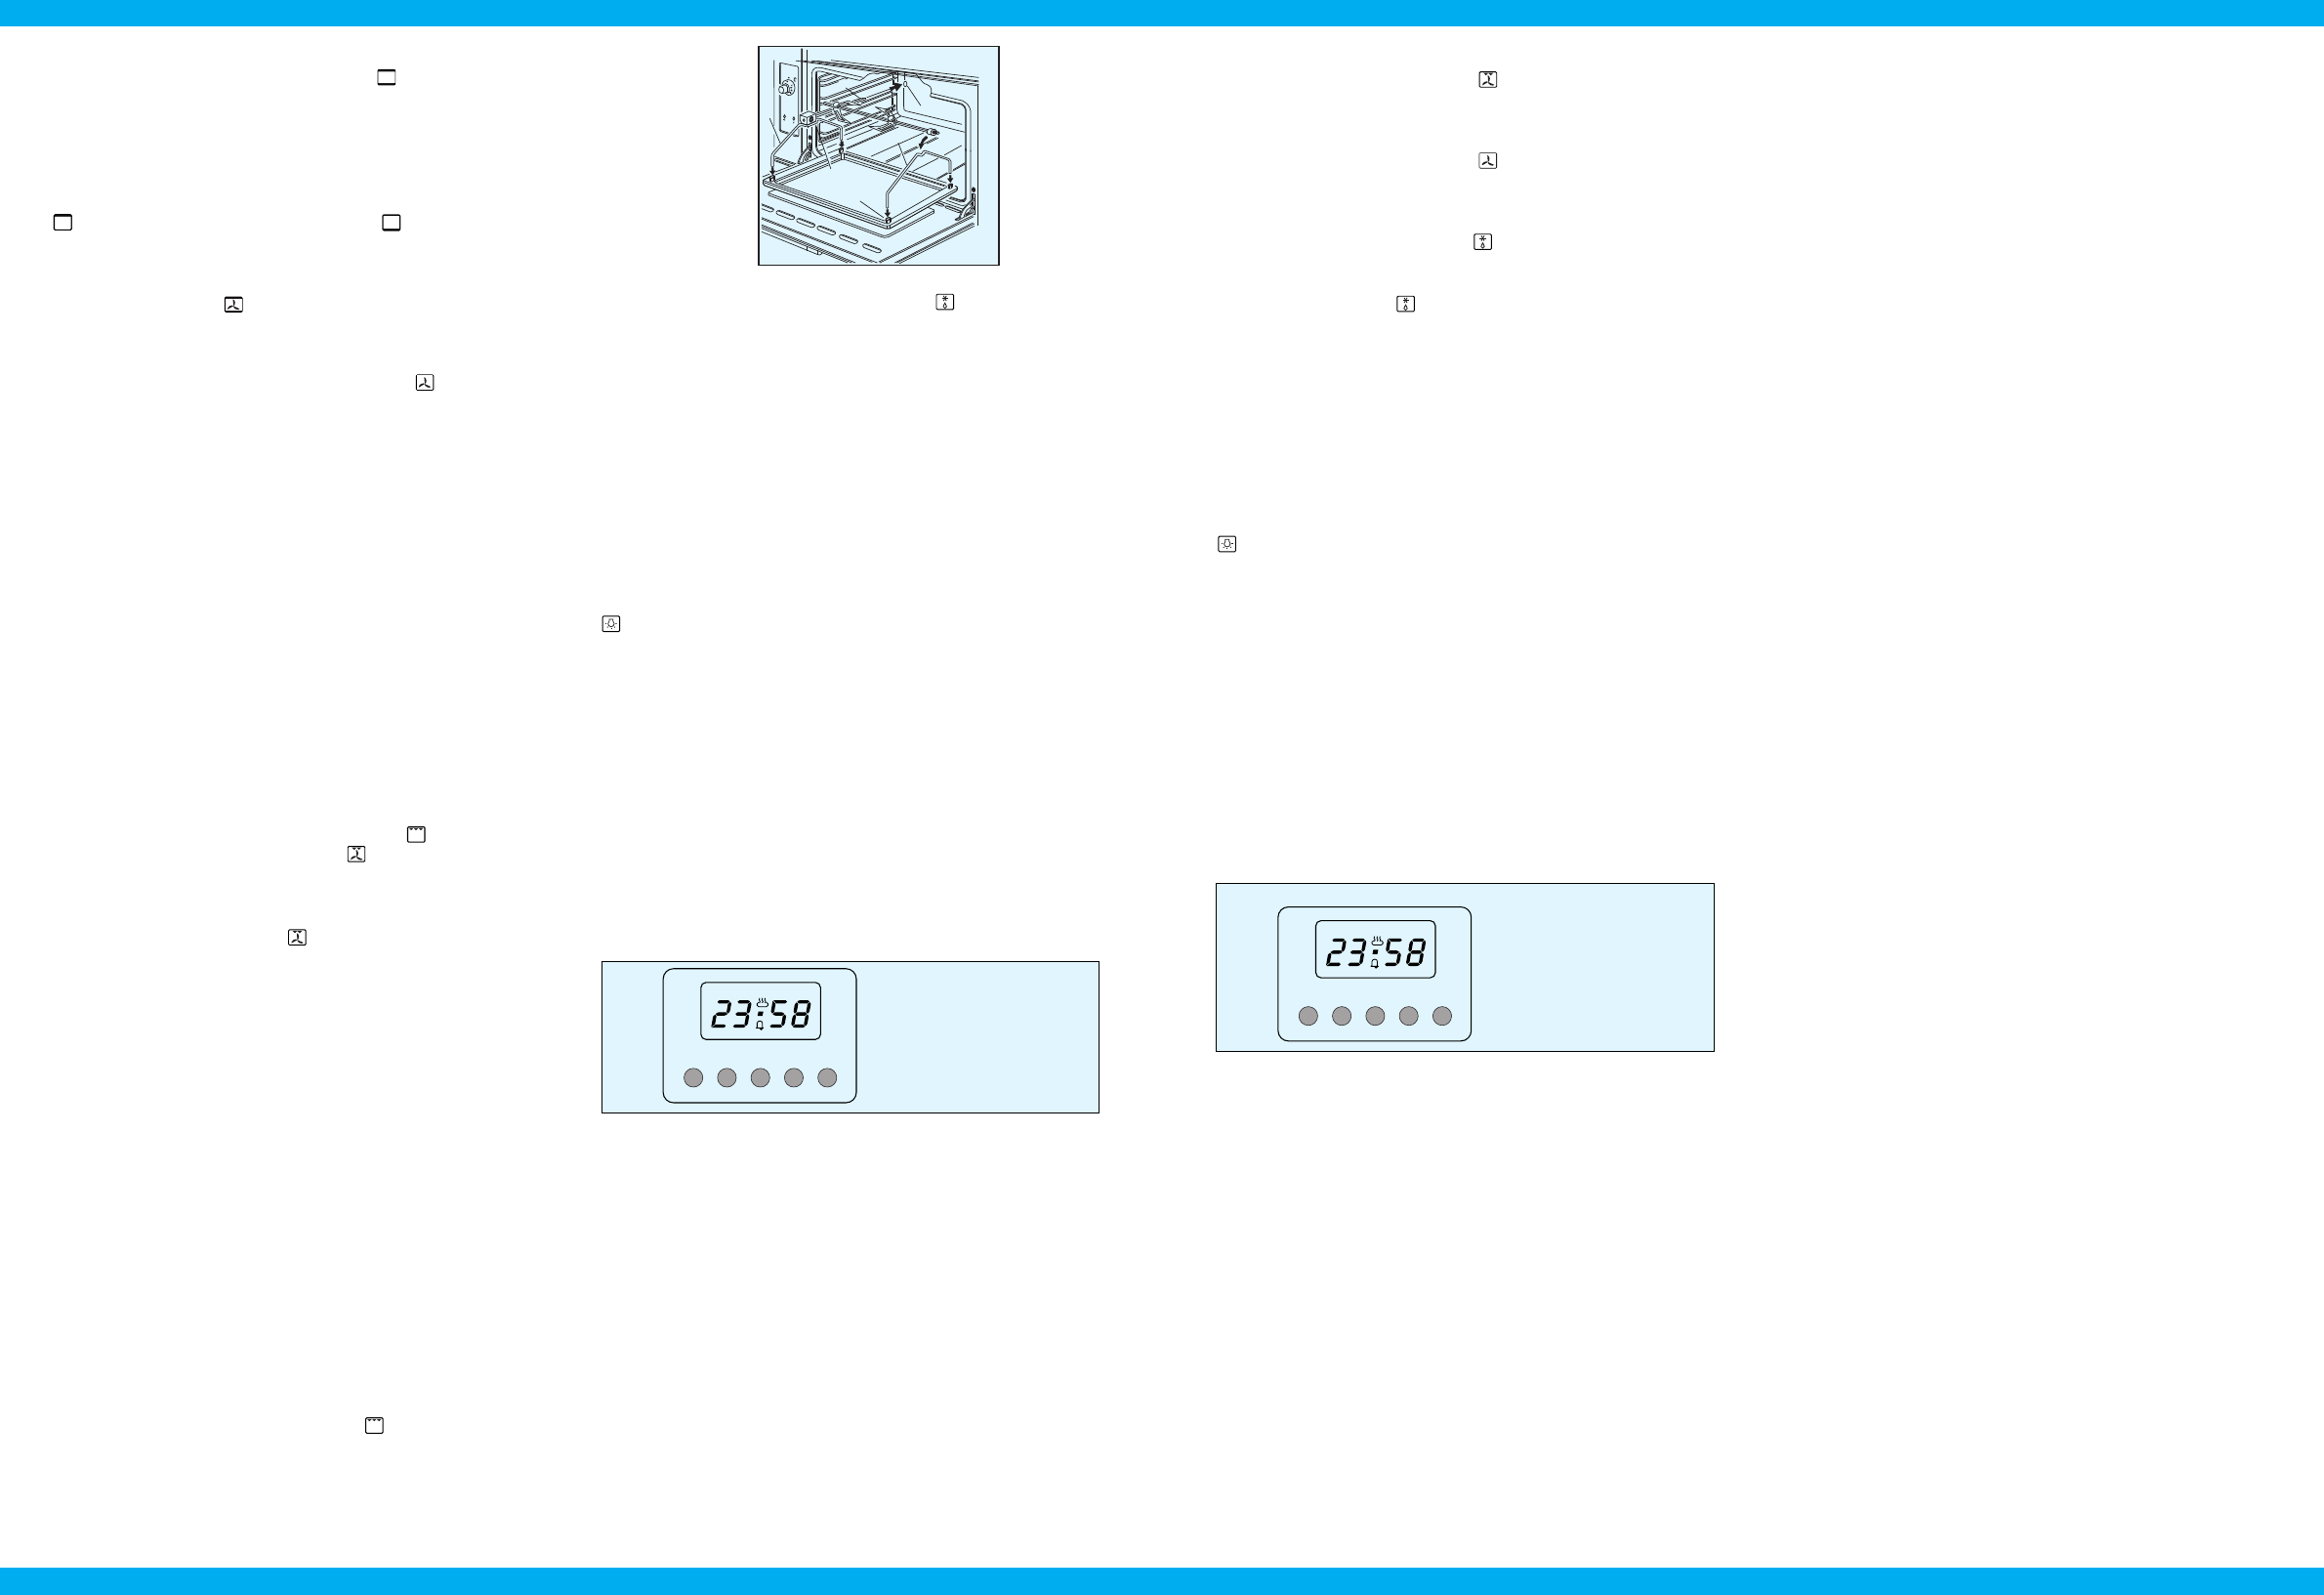
1 Minute timer
2 Cooking time
3 Cooking end
4 Subtract time
5 Add time
1 2 3 4 5
Fig. 5
A
die Ende der Backzeit mit der Uhr
T
akustische Signal und A blinkt.
Halbautomatischer Betrieb mit Ende der Backzeit
Drücken Sie die T
T
Symbole A und das T
Wenn die Ende der Backzeit mit der Uhrzeit über
das T
akustische Signal und das A blinkt.
Automatischer Betrieb
Drücken Sie die T
+/- die gewünschte Backdauer ein.
Es erscheint das Zeichen A.
Das Relais schaltet sich ein und das T
Wenn Sie die T
dem Display das nächstmögliche Ende der Backzeit.
Stellen Sie das gewünschte Ende der Backzeit mit den T
+/– ein. Das T
dem eingestellten Backbeginn übereinstimmt.
Nach Ablauf der automatischen Backzeit blinkt das Zeichen A.
Es er
T
Kur
Drücken Sie die T
den T
Wenn der Kurzzeitwecker eingestellt ist, erscheint das
Glockenzeichen. Nach Ablauf der eingestellten Zeit er
akustische Signal.
Akustisches Signal
Das akustische Signal (0,5 Hz) er
Weckzeit und der Backprogramme 7 Minuten lang. Um das Signal
auszuschalten, drücken Sie eine beliebige T
Programmbeginn und Kontr
Das Programm beginnt nach Einstellung der gewünschten Zeit.
Sie können die verbleibende Zeit in jedem Moment überprüfen,
indem Sie die entsprechende T
Programmier
Es liegt ein Programmier
zwischen dem Beginn und dem Ende der Backzeit liegt.
LED-SCHAL
(Abb. 5)
Eigenschaften
Uhr mit 24 Stunden, automatischem Programm und Kur
Funktionen
Backdauer
Kur
Manuelle Einstellung.
Anzeigen
4 Zif
und der Backzeiten.
„Dialogdisplay“, um den Status des Timers zu erkennen
Automatische Funktion = A
Backdauer und manuelle Bedienung = T
Kur
Abb. 5
A
1 Kur
2 Backdauer
3 Ende der Backzeit
4 Zeit rückwär
5 Zeit vor
Einstellung
Nach dem Drücken einer Funktionstaste können Sie die
gewünschte Backdauer mit den T
Geschwindigkeit der Zahlenanzeige hängt davon ab, wie lange
Sie auf die T
Wenn Sie eine Funktionstaste drücken und wieder loslassen,
erscheint die gewählte Funktion 5 Sekunden lang auf dem Display
Inner
beginnen. 5 Sekunden nach dem Loslassen der Funktionstaste
oder nach Ende der Einstellung erscheint auf dem Display wieder
die Uhr
sofor
Einstellung der Uhr
Drücken Sie gleichzeitig die T
Backzeit und stellen Sie die Uhr
diese Operation wird jedes vor
1 2 3 4 5
Der Fehler wird von einem akustischen Signal und dem blinkenden
A angezeigt.
Sie können den Fehler beheben, indem Sie die Backdauer oder
das Ende der Backzeit ändern.
Löschen eines Programms
Sie können ein Programm löschen, indem Sie die T
Bedienung drücken.
Nach Ablauf eines eingestellten Programms löscht sich dieses
automatisch.
Manuelle Bedienung
Wenn Sie gleichzeitig die T
das Symbol Automatisch und es erscheint das T
vor
Halbautomatischer Betrieb mit Backdauer
Drücken Sie die T
+/- die gewünschte Backdauer ein. Es erscheinen so die Symbole
Setting
After pressing a function button the time r
the +/- buttons.
The counting-up and counting-down speed increases when the
buttons are held down.
If a function button is just briefly touched and released, the selected
function is displayed for 5 seconds. Within this time setting may
be commenced.
Five seconds after releasing the function button or after setting
is completed, the display rever
When a programme has been set, it star
Selection of a function is accompanied by a sound signal.
Setting the time
Press the cooking time and the end time simultaneously
the time with +/- buttons.
This deletes any previously set pr
Manual use
By pressing simultaneously 2 and 3 buttons (the automatic
symbol will be erased), the saucepan symbol lights up.
This deletes any previously set pr
“LED” PROGRAMMER (Fig. 5)
Features
24 hours clock with automatic programme and minutes counter
Functions
Cooking time, cooking end time, clock, minutes counter
to be set up to 23 hours 59 minutes. Manual selection.
Display
4-figures, 7-segments diplay for cooking times and time of day
Display for identification of timer conditions:
Automatic setting = A
Time and manual use = saucepan symbol
Minutes counter = bell symbol