BA SC28X2_SC28X4pro MP; DE, GB - 22426 – 2008.03-02
*Within astro time switches
**Within standard (non-astro) time switches
***One-channel version
Instruction Manual (Site 2 / 2)
GB
Time switch (with Astro function)
müller SC 28.X2 pro / SC 28.X4 propaladin 172 4X2 pro / 172 4X4 pro
12. Cycle**13. Cycle options**
Program ->New program ->Channel A/B/C/D -> Cycle 1 - 4 -> …
For the cycle function it is possibile to enter a periodic switching time. The time switch acts as a recycling timer and switches between pulse (ON) and pause (OFF). The
max. value for pulse and pause is 9:59:59 h:mm:ss.
The cycle is not offered in the menu New program if you haven’t defined and activated a cycle. Once you have activated and defined at least one of the 4 different
cycles within submenu Cycle of menu Options (point 13), a switching time with cycle function is programmable.
After having defined and activated the cycle (point 13) please proceed with following programming instructions:
Switch to main menu / Enter-mode and using the -buttons choose the Program-menu then confirm by pressing .
Confirm sub-menu New program by pressing .
By using the -buttons select the desired channel for switching and confirm by pressing .
Pick the appropriate cycle using the -buttons and confirm by pressing .
Using the -buttons select which day or days of the week the cycle will be activated by selecting „Yes“ or „No“, then confirm each day by pressing .
Set the start time of the Cycle: Hours then confirm by pressing.Minutes thenconfirm by pressing.
Verify the entered switching time: If the flashing summary of the programming step is correct, confirm this by pressing . After confirmation you have the choice
between edit/delete and end which you select by pressing
If you want to continue programming, confirm next switchingby pressing .
To leave the programming menu select end.
The selected cycle is terminated (over-ridden) by a standard switching time (ON, OFF, Pulse) or the subsequent switching time of another cycle.`
Options ->Cycle ->Cycle 1 - 4 ->…
You have the possibility to define 4 different Cycles. For these purposes choose menu
Options and sub-menu Cycle. The different cycles can be acivated, defined or
deactivated (the max. value for pulse or pause is 9:59:59 h:mm:ss):
Choose menu Options and sub-menu Cycle and confirm with .
Select with -buttons one out of the 4 cycles (Cycle 1 – Cycle 4) and
confirm with .
Activate the cycle by changing No to Yes with -buttons and subsequent
confirming with .
Define duration of the pulse „on-time“ ( -> …).
Define duration of the pause „off time“ ( -> …).
Confirm End with .
The cycle is now offered within the programming menu.
Further applications of the cycle function in combination with: External Input
function (16) and/or Channel keys function (17)
14. Astro-function* 15. Astro-adjustments*
Program ->new program -> channel A/or B ->…
The astro function allows you to switch the whole year through in relation to sunset and sunrise, e.g. for illumination purposes (astro-
ON with sunset and astro-OFF with sunrise). The programming is made according to (8 / 9) with following difference:
Choose astro function astro ON and astro OFFrespectively(9F).
While programming an astro program step there will be no time (hh:ss) suggested (8H / 9H). Instead of this you have the possibility to
enter an offset. E.g. if you like to switch on the light 20 minutes before sunset would you enter an offset of minus 20 minutes
while programming astro ON.
Adjustment ->Astro ->…
The following options concerning the astro function are adjustable to satisfy your needs:
Position location: Adjust your geographical position with pre-defined choice of regions/countries and
cities.
Position coordinates: Adjust your geographical position with longitude, latitude and time zone.
Block Sunrise:Earliest possible point in time for the astro function (sunrise).
Block Sunset:Latest possible point in time for the astro function (sunset), e.g. switching on the light not later
than 10 p.m. even if sunset is later.
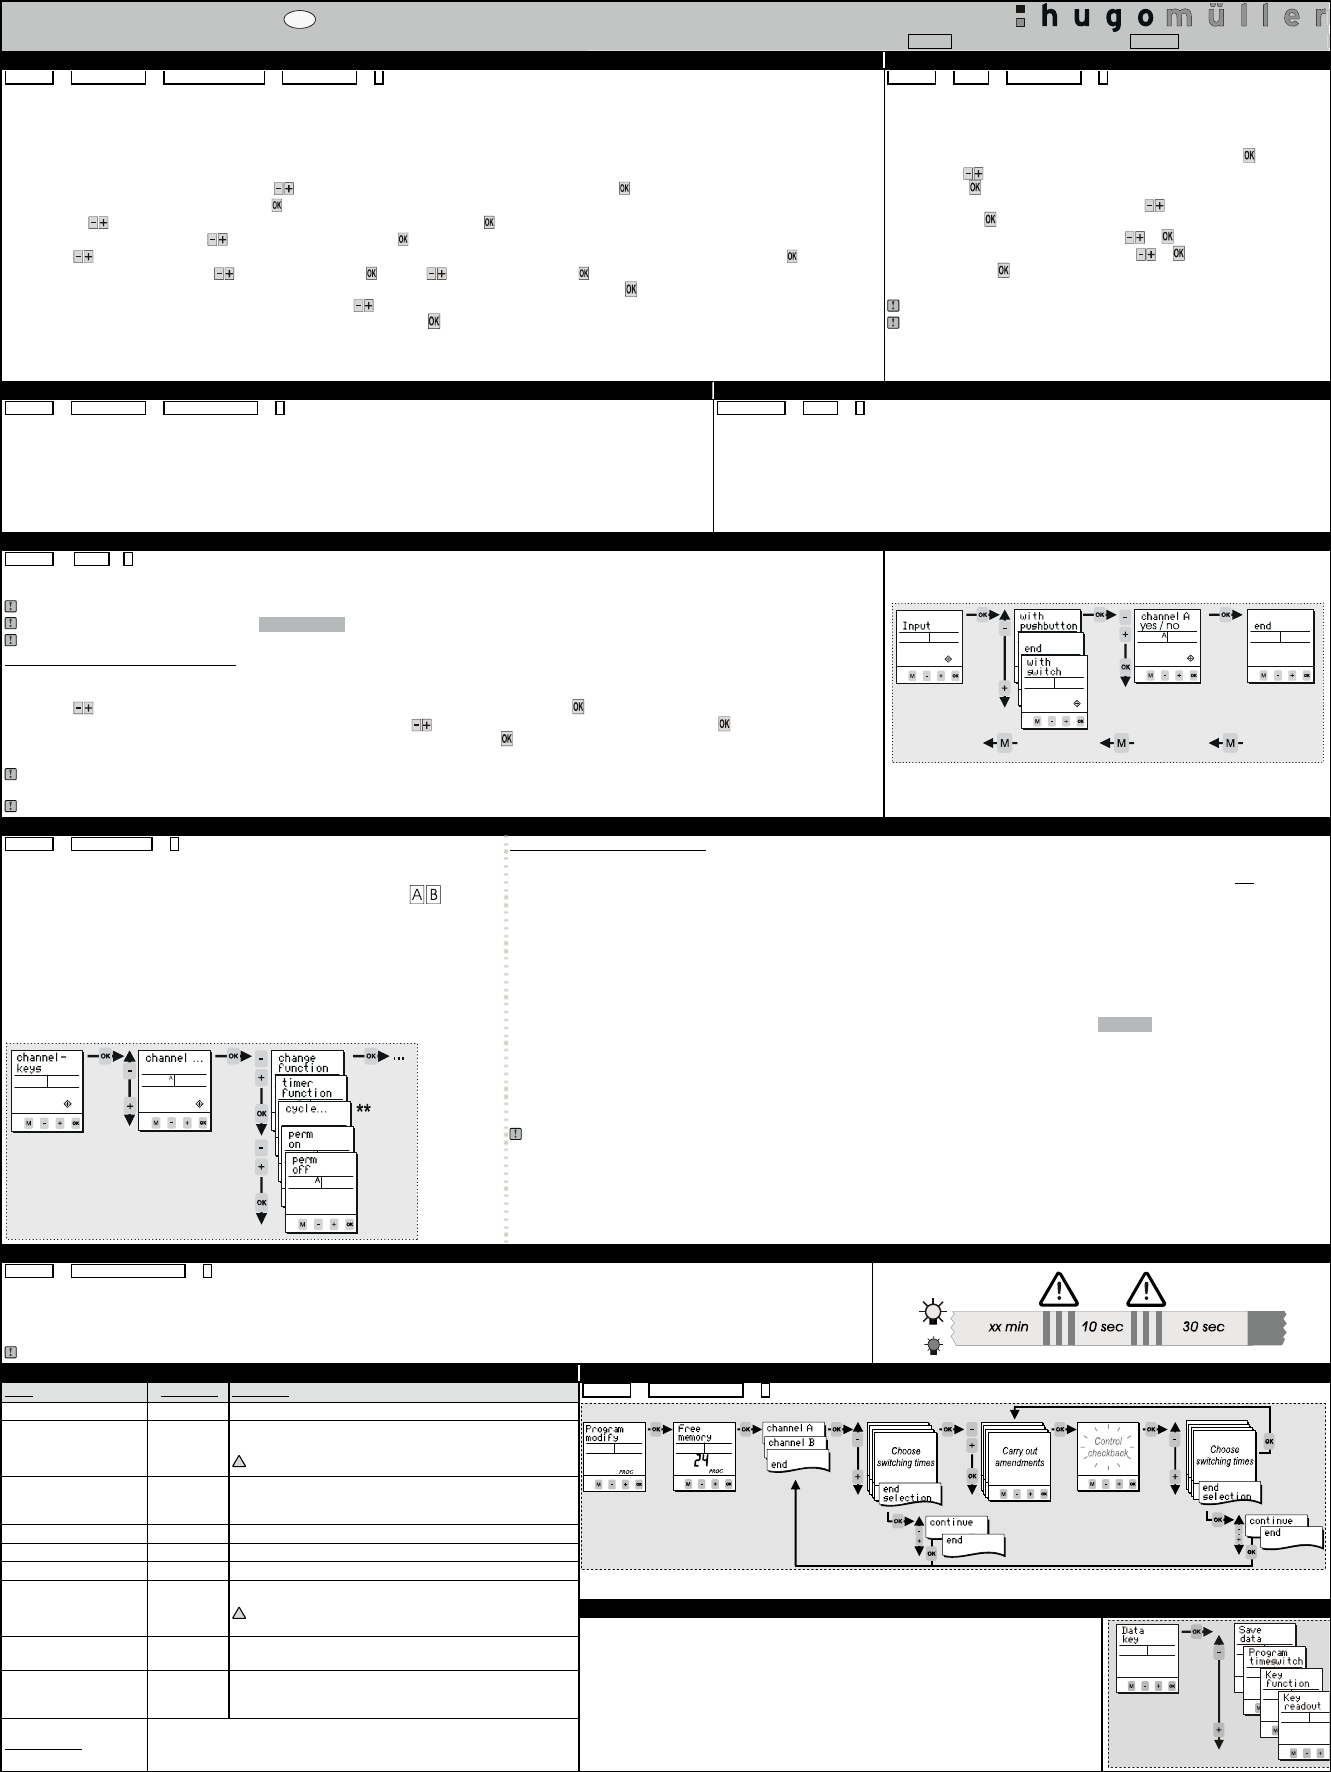
16. External Input ***
Options ->Input->…
The external input can be connected to a switched contact such as a push-button or light switch. Therefore you can activate and de-activate functions from a remote
location or automatically from a control system
For 35mm-devices: The external input is only featured on the one channel version.
To connect an external switch or push-button: Phase L 230V~
The resulting operation of the output channel, depending on the status of the external input is defined within menu Options and submenu Channel-keys
Functional options of the „external input“:
Within menu Options and submenu Input you have to define if a switch or a push-button-signal will be applied to the external input. Furthermore you can choose the
channel(s) which react to the external signal:
Using the -buttons select if you are connecting a pushbutton or a switch and confirm by pressing .
Select the channel(s) which will be controlled by the external signal with the buttons (channel … yes) and confirm by pressing . Channels which should not
be controlled by the external signal remain deactivated, confirm channel … no then press to confirm
Define a response function within menu Options and submenu Channel-keys (point 17). This function will be performed by the output channel when the external
input is activated!
The pre-defined (default) setting is the standard ‘Change function’ which changes the switching status from ON to OFF and vice versa.
17. Channel keys
Options ->channel-keys ->…
Within the Options menu you will find submenu channel-keys. Here you have the
opportunity to assign different response functions to the output channels.
These response functions will only be carried out when using the channel-keys of the time
switch (manual over-ride) or optionally when activating the channel with the external input. Thus,
a programmed switching time will be executed as usual, independent of the settings within this
channel-key-menu.
The correlation between the channel-keys and the channels is as follows:
channel A => channel key A (push-button “A” of the device)
channel B => channel key B (push-button “B” of the device)
…
Overview „channel-keys“ functions:
If you have assigned a specific response function to a channel, this switching function will occur if you push the channel-button on the front plate of the time
switch (or if the external input for this channel is activated and a signal is applied to the input, as explained under point 16). For each channel one out of the
following functions can be defined:
Change function (default setting): By pressing the channel key (or optionally using the external input) the switching status changes from ON to OFF or
OFF to ON. This corresponds to a standard manual over-ride of the channel.
Timer function: By pressing the channel key (or optionally using the external input) the Timer starts and the corresponding channel switches ON. After
the expiry of the Timer-time the channel switches OFF. If the channel receives another signal before the expiry of time the time switch reacts as follows:
After pressing the channel-button = Timer stops and the channel switches OFF.
Signal on the external input = Timer restarts/ Staircase lighting timer -> Resettable.
Cycle 1 – 4: By pressing the channel key (or optionally using the external input) the cycle function starts. Attention: This function is only available if
the cycle is activated and defined in advance within menu Options and submenu Cycle. Astro time-switches do not have the cycle feature!!!
Perm on: By pressing the channel key (or optionally using the external input) the channel switches permanently ON. This status remains active until the
channel key of the device is pressed again.
Perm off: By pressing the channel key (or optionally using the external input) the channel switches permanently OFF. This status remains active until the
channel key of the device is pressed again.
The Change function, Timer function and Cycle functions will be overridden by the regular switching program or by a manual over-ride!!!
18. Switchoff warning
Options ->Switchoff warning ->…
Within menu Options and submenu Switchoff warning the early warning switch off function can be activated and deactivated:
Warning No: The function remains inactive.
Warning Yes: The function is activated and the switch off is signalled in advance (For illumination purposes the warning is signalled by the flashing of the light
according DIN 18015-2 = warning to avoid sudden darkness).
An activated warning affects all channels and all OFF switching times
19. Additionaladjustments 20. Program modify
MenuMain menuApplication
Program query
Program
To query the programming steps and remaining memory locations
Program copy
Program
Copy from one channel to another. Memory of the channel won’t be
overwritten; the copied switching steps appear additionally.
!
Permanent by date function is not copied!
Program delete
Program
Deletion of switching time(s). The program for all channels, single
channels and single programming steps within on channel can be
deleted.
Date-Time
Adjustment
Adjustment of date and time
Summertime
Adjustment
Adjustment of the daylight saving time mode (ON/OFF)
Language
Adjustment
Choice of languages
Program ->Program modify ->…
Within Program modify each single switching time can be modified.
21. Data-key
Factory Defaults
Adjustment
Reset to the state of delivery.
!
Date, time and switching program will be lost!
Counter
Options
Displays the hour counter and pulse counter for each channel and
the time switch itself.
PIN-Code
Options
The time switch can be locked with a 4-digit PIN-Code. The code
can be adjusted, activated and deactivated. If you have forgotten
the Code please call customer service.
Reset-Function
Press all front keys for 2 seconds. The time switch is reset. The values for date and
time will be deleted and have to be re-entered. The switching program has not
been deleted!
With a Data-key following activities are possible:
Save data: Writes the data from the time switch into the memory of the Data-key.
Program timeswitch: Writes the data located inside the Key into the memory.
Key function: The time switch will solely apply programming steps from the Data-key. The
switching program of the time switch is suppressed.
Key readout: To query the switching program of the Data-key.
Gebruikershandleiding.com neemt misbruik van zijn services uitermate serieus. U kunt hieronder aangeven waarom deze vraag ongepast is. Wij controleren de vraag en zonodig wordt deze verwijderd.
Product:
Spelregels forum
Om tot zinvolle vragen te komen hanteren wij de volgende spelregels:
lees eerst de handleiding door;
controleer of uw vraag al eerder door iemand anders is gesteld;
probeer uw vraag zo duidelijk mogelijk te stellen;
heeft u een probleem en al geprobeerd om dit op te lossen, vermeld dit erbij aub;
heeft u een oplossing gekregen van een bezoeker dan horen wij dat graag in dit forum;
wilt u een reactie geven op een vraag of antwoord, gebruik dan niet dit formulier maar klik op de knop 'reageer op deze vraag';
uw vraag wordt direct op de website gezet; vermijd daarom persoonlijke gegevens in te vullen;
Belangrijk! Als er een antwoord wordt gegeven op uw vraag, dan is het voor de gever van het antwoord nuttig om te weten als u er wel (of niet) mee geholpen bent! Wij vragen u dus ook te reageren op een antwoord.
Belangrijk! Antwoorden worden ook per e-mail naar abonnees gestuurd. Laat uw emailadres achter op deze site, zodat u op de hoogte blijft. U krijgt dan ook andere vragen en antwoorden te zien.
Abonneren
Abonneer u voor het ontvangen van emails voor uw Paladin 172 4X2 pro - SC 28.X2 pro bij:
nieuwe vragen en antwoorden
nieuwe handleidingen
U ontvangt een email met instructies om u voor één of beide opties in te schrijven.
Ontvang uw handleiding per email
Vul uw emailadres in en ontvang de handleiding van Paladin 172 4X2 pro - SC 28.X2 pro in de taal/talen: Engels als bijlage per email.
De handleiding is 0,81 mb groot.
U ontvangt de handleiding per email binnen enkele minuten. Als u geen email heeft ontvangen, dan heeft u waarschijnlijk een verkeerd emailadres ingevuld of is uw mailbox te vol. Daarnaast kan het zijn dat uw internetprovider een maximum heeft aan de grootte per email. Omdat hier een handleiding wordt meegestuurd, kan het voorkomen dat de email groter is dan toegestaan bij uw provider.
Andere handleiding(en) van Paladin 172 4X2 pro - SC 28.X2 pro
Uw handleiding is per email verstuurd. Controleer uw email
Als u niet binnen een kwartier uw email met handleiding ontvangen heeft, kan het zijn dat u een verkeerd emailadres heeft ingevuld of dat uw emailprovider een maximum grootte per email heeft ingesteld die kleiner is dan de grootte van de handleiding.
Er is een email naar u verstuurd om uw inschrijving definitief te maken.
Controleer uw email en volg de aanwijzingen op om uw inschrijving definitief te maken
U heeft geen emailadres opgegeven
Als u de handleiding per email wilt ontvangen, vul dan een geldig emailadres in.
Uw vraag is op deze pagina toegevoegd
Wilt u een email ontvangen bij een antwoord en/of nieuwe vragen? Vul dan hier uw emailadres in.