Thank you for choosing our product. To ensure prolonged
use and optimum performance, please read this instruction
manual carefully and familiarize your-self with the terms of the
guarantee.
Please keep this Instruction Manual handy for future reference.
SAFETY PRECAUTIONS
Make absolutely sure to observe the demarcated contents
indicated below to prevent any possible physical danger and
property damage to you as well as other people concerned.
... A demarcation with this symbol represents
the contents assuming possibility for
death or serious injury when the product
is used in any manner different from given
instructions.
... A demarcation with this symbol represents
the contents assuming possibility of
causing human injury or material
damage only when a product is used
in any manner different from given
instructions.
IN HANDLING THE WATCH
(1) Water-resistance
Conditions of use
Type
Underwater operation
of crown and operation
of crown with drops of
water on it
Exposure to
small amounts of
water (face-washing,
rain, etc.)
Water sports
(swimming, etc.),
frequent contact with
water (car-washing,
etc.)
Skin diving
(air tanks are not used)
Scuba diving
(air tanks are used)
Mixed-gas Diving
(using helium gas)
Non water resistant
Without WATER
RESISTANT
(WATER RESIST)
××××××
Water resistant
watches
Water resistant for
daily life
WATER RESISTANT
(WATER RESIST)
×
××××
Reinforced water
resistance for
daily life I
WATER RESISTANT
(WATER RESIST)
50m (5bar)
×
×××
Reinforced water
resistance for
daily life II
WATER RESISTANT
(WATER RESIST)
100m (10bar)
200m (20bar)
×
××
Diver’s watches
Diver’s watch for
Air Diving
AIR DIVER’S
100m / 150m
200m
×
×
Diver’s watch for
Mixed-gas Diving
He-GAS DIVER’S
200m / 300m /...
×
* It is recommended that you use the watch correctly following the above-mentioned scope of usage after ascertaining water resistance precautions marked on the dial or
caseback.
WARNING
!
1 A watch with water resistance for daily life 30M (3 bar) can
be used during face-washing, etc. but cannot be used in an
environment in which it will be submerged in water.
2 A watch with reinforced water resistance for daily life I 50M
(5 bar) can be used while swimming, etc. but cannot be used
during any type of diving including skin diving.
3A watch with reinforced water resistance for daily life II 100M
or 200M (10 or 20 bar) can be used while skin diving, but
cannot be used while scuba diving using oxygen tanks or
saturation diving using helium gas, etc.
CAUTION
!
4Keep the crown pushed in at all times (in the normal position)
while using the watch. If the crown is the screwed-down type,
check that it is securely screwed down.
5 Do not operate the crown underwater, or while the watch is
wet. Water may enter the interior of the watch and defeat the
water resistance.
6 If your watch is non-water resistant, beware of splashes of
water (during face washing, rain, etc.) and sweat. If the watch
becomes wet from water or sweat, wipe the moisture off with
a dry, soft cloth.
7 Even with a water resistant watch for everyday use, avoid
directing strong jets of mains water onto the watch. Water
pressure above the limit can apply, which may defeat the
water resistance.
8 With a water resistant watch for everyday use, rinse sea
water off the case after exposure, then wipe it thoroughly to
avoid corrosion and other effects.
9The interior of the watch contains some amount of moisture,
which may cause fogging on the inside of the glass when
the outside air is cooler than the internal temperature of the
watch. If the fogging is temporary it causes no harm inside
the watch, but if prolonged, or if water enters the watch,
consult your place of purchase and do not leave the problem
untreated.
(2) Shock
1Be sure not to carry the watch when you
engage in strenuous sports, whereas playing
such light sports as golf, etc., will not adversely
influence the watch.
2Avoid a violent shock such as dropping the
watch on the floor.
(3) Magnetism
1If the watch is left at a location with strong magnetism for an
extended period of time, the components may be magnetized,
resulting in malfunction. Be careful.
2 The watch may temporarily speed up or slow down when
exposed to magnetism. Precision is restored when placed
away from magnetism. In such a case, reset the time.
(4) Vibration
The watch may lose precision if subjected
to strong vibrations such as from riding
motorcycles, using jackhammers, chain
saws, etc.
(5) Temperature
In environments below and above normal temperatures (5°C-
35°C), the watch may malfunction and stop.
CAUTION
!
Do not use the watch at high temperatures, such as in a
sauna. The watch may heat and cause burns.
(6) Chemicals, Gases, etc.
Utmost caution must be exercised when coming into contact
with gases, mercury, chemicals (paint thinner, gasoline, various
solvents, detergents containing such components, adhesives,
paint, drugs, perfumes, cosmetics, etc.), and so forth. Such
may cause discoloration of the watchcase, watchband, and
dial face. Discoloration, deformation, and damage to various
resin-based component parts may also occur.
(7) About accessory parts
CAUTION
!
Do not attempt to disassemble or modify the watch.
WARNING
!
CAUTION
!
WARNING
!
Store the bracelet/strap pin and other small parts out of the
reach of children.
If any small parts are swallowed, immediately contact a doctor.
(8) Allergic reactions
CAUTION
!
If you develop a skin rash or your skin becomes abnormally
irritated due to contact with the watch or strap, stop wearing
the watch immediately and consult a doctor.
(9) About “luminous light”
This watch has luminous light on the hands and dial.
The luminous light is a safe paint that stores sunlight and
artificial light without using any radioactive material, and
emits that light in a dark setting. As the paint discharges the
stored light, it will become dimmer over time. The amount of
light emitted and the time that light is emitted depends on
various factors when the light is stored, such as the shape of
the glass, the thickness of the paint, surrounding brightness
level, the distance from the watch to the light source, and the
light absorption level. Please note that when not enough light
energy is stored, the watch may emit weak light or emit light
for only a short time.
(10) Water resistant watchband
Some products employ leather and nylon bands on which a
special treatment to resist perspiration and water absorption
have been applied. Please understand that the water
resisting effect of this watchband can be lost depending on
the period and conditions of use.
HOW TO IDENTIFY THE CALIBER NUMBER
Check the caliber number by referring to the model number of
your watch or the case code on the watch’s case back.
1. Searching by 10-digit model number
Check the 10-digit model number on the guarantee supplied with
your watch. You can also see the number on the product tag
put on the watch. Its second and third digits indicate the caliber
number of your watch.
Example: If the model number is “AA00001B”, the caliber
number is “AA”.
2. Searching by the case code
See the case code on the case back of your watch.
The first two digits indicate the caliber number.
Case code
Case code
Example : When the case code is “AA00-C0”, the caliber
number is “AA”.
* The place of case code may vary and its letter size may be
small and difficult to see depending on the characteristics of
watches.
* The pictures and illustrations on this manual may differ from
the actual appearance of your watch but the function and
operation procedures are the same.
SPECIFICATIONS
CaliberNumber of jewelsDateDay of weekHand winding
Second hand halt
mechanism
Remark1*
AAF6922
○○○○
8:00P.M.-4:00A.M.
ABF4921
○○
––
8:00P.M.-4:00A.M.
ACF6722
○
–
○○
8:00P.M.-2:00A.M.
(1) Vibrations: 21,600 vibrations/1 hour
(2) Daily accuracy: +25 sec. to -15 sec.
(3) Running time: More than 40 hours
(4) Shock-proof bearings to protect the balance with hairspring from shocks.
The stated daily accuracy is in the following conditions:
• After 24 hours at room temperature with the mainspring wound fully and the dial facing up.
• Due to the characteristics of the automatic winding watch, the time may deviate from the stated “daily accuracy” depending on the following conditions: amount
of time the watch is worn each day, position of the watch, movement of your arm, winding condition of the mainspring.
• Determine the deviation from not just a day but a period of about a week.
Product specifications may change without notice, for improvement.
CAUTION
!
* Avoid setting the date during the time periods listed in “Remark1” above since the calendar changes during this time. If the date is set during this time period, the
date may not change or the watch may malfunction. Be sure to move the hour and minute hands away from this time period when setting the date.
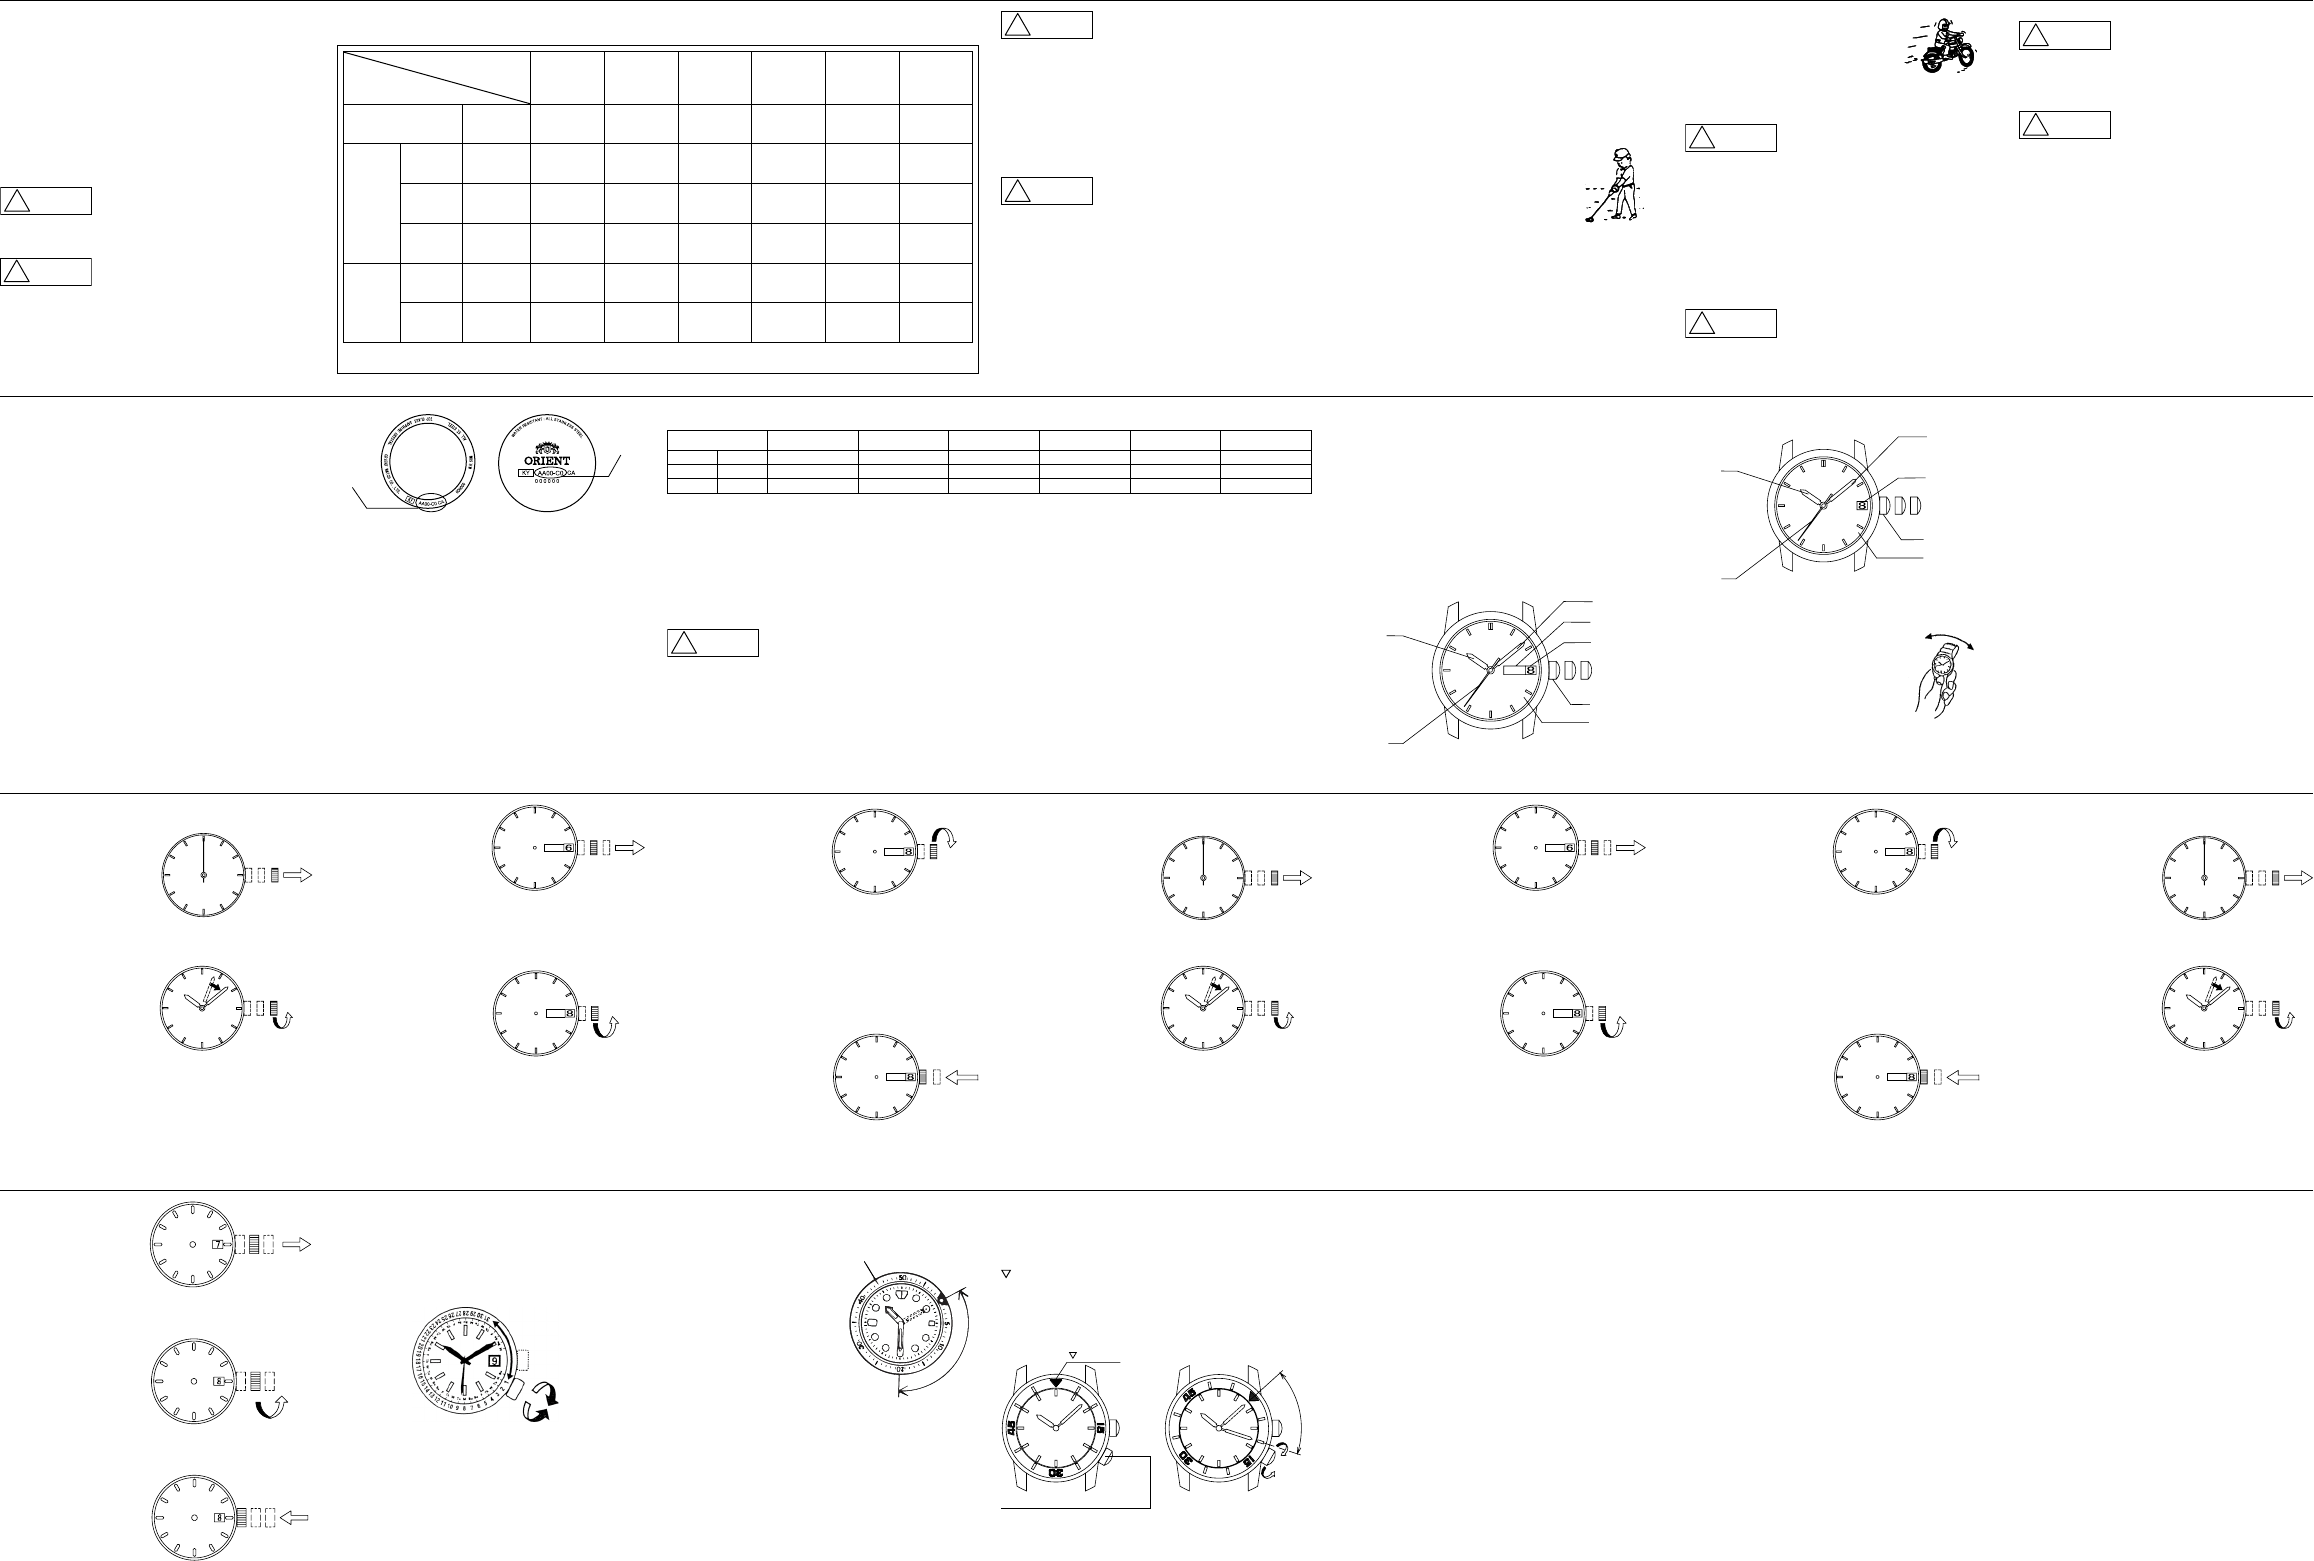
NAMES AND FUNCTIONS OF INDIVIDUAL
COMPONENT PARTS
A:Hour hand
E:
Date
B:Minute handF:Crown
C:Second handG:Dial
D:
Day of the week
1. Normal position
2. First click: Calendar setting
3. Second click: Time setting
<AA(F69), AB(F49)>
MON
B
D
C
E
F
1
2
3
<AC(F67)>
G
A
B
C
E
F
12
3
* The position of the crown, date indicator, or day of the week
window may be different, depending on the model.
AUTOMATIC WINDING MECHANISM
(1) The mainspring is wound by natural
movements of your arm when wearing the
watch on your wrist.
(2) If your watch stops, swing the watch back
and forth ten or more times to re-start the
second hand. After it starts moving, set the
date and time.
(3) This watch will run approximately 40 hours after it is fully
wound. If it is not wound enough, the watch may lose
accuracy. In order to maintain the watch’s accuracy, we
recommend wearing the watch at least 8 hours a day.
HAND WINDING MECHANISM
(1) The mainspring is wound up manually.
(2) To wind the spring, ensure that the crown is in its normal
position and slowly turn it clockwise.
Turning the crown counterclockwise will have no effect.
(3) When the watch is in the stopped state, the spring can be
wound sufficiently by rotating the crown approximately 30
times. Since the crown will rotate even when winding is
complete, wind the watch using the above number of turns
as a guide.
(4) This watch will run approximately 40 hours after the spring is
fully wound.
MODELS WITH SCREWED-DOWN CROWN
Depending on the model, you may not be able to pull the crown
out without unscrewing it (models with screwed-down crown).
Operate this type of watch as follows:
(1) Before setting the date and time, first turn the crown
counterclockwise to loosen the screw lock.
(2) After setting the date and time, turn the crown clockwise
while pressing in, until it stops turning to securely tighten the
screw.
HOW TO SET THE TIME & CALENDAR [AA(F69)]
(1) Pull out the crown to the
second click when the
second hand reaches the
12 o’clock position.
(The second hand stops.)
(2) Turn the crown
counterclockwise and set
the current time.
* When setting the time,
first bring the hand back
slightly earlier than the
actual time and then move
it forward to the actual
time.
* For the watch with a
calendar, make sure that
you set either a.m. or
p.m. without fail. The date
changes at [twelve o’clock
midnight].
Turn
counterclockwise
(3) Pull the crown out to the
first click.
* The crown on this watch
can be pulled out to either
of two clicks.
(4) Turn the crown
counterclockwise, and
set the date to that for the
current day.
SAT
Turn
counterclockwise
SAT
(5) Turn the crown clockwise to
set the day of the week to
the current day.
* This watch has a bilingual
day of the week function.
Turn the crown to select
the desired language.
The display languages
differ depending on the
model.
** Correcting the date at the end of the month
The date will have to be corrected for months that have 30
days, or those that have less than 30 days. After the date
switches over to the first day of the succeeding month, set
the date to the [First (1)].
(6) Push the crown back to the
normal position.
Turn clockwise
MON
MON
HOW TO SET THE TIME & DATE [AB(F49)]
(1) Pull out the crown to the
second click when the
second hand reaches the
12 o’clock position.
(The second hand dose not
stop.)
(2) Turn the crown
counterclockwise and set
the current time.
* When setting the time,
first bring the hand back
slightly earlier than the
actual time and then move
it forward to the actual
time.
* For the watch with a
calendar, make sure that
you set either a.m. or
p.m. without fail. The date
changes at [twelve o’clock
midnight].
Turn
counterclockwise
(3) Pull the crown out to the
first click.
* The crown on this watch
can be pulled out to either
of two clicks.
(4) Turn the crown
counterclockwise, and
set the date to that for the
current day.
SAT
Turn
counterclockwise
SAT
(5) Turn the crown clockwise to
set the day of the week to
the current day.
* This watch has a bilingual
day of the week function.
Turn the crown to select
the desired language.
The display languages
differ depending on the
model.
** Correcting the date at the end of the month
The date will have to be corrected for months that have 30
days, or those that have less than 30 days. After the date
switches over to the first day of the succeeding month, set
the date to the [First (1)].
(6) Push the crown back to the
normal position.
Turn clockwise
MON
MON
HOW TO SET THE TIME & CALENDAR [AC(F67)]
(1) Pull out the crown to the
second click when the
second hand reaches the
12 o’clock position.
(The second hand stops.)
(2) Turn the crown
counterclockwise and set
the current time.
* When setting the time,
first bring the hand back
slightly earlier than the
actual time and then move
it forward to the actual
time.
* For the watch with a
calendar, make sure that
you set either a.m. or
p.m. without fail. The date
changes at [twelve o’clock
midnight].
Turn
counterclockwise
(3) Pull the crown out to the
first click.
* The crown on this
watch can be pulled out
to either of two clicks.
(4) Turn the crown
counterclockwise, and
set the date to that for
the current day.
(5) Push the crown back to
the normal position.
Turn
counterclockwise
◆HOW TO SET THE MONTHLY CALENDAR
Some models come with a monthly calendar.
The monthly calendar can be used by turning the crown at the
4 o’clock position to set the rotating ring inside the watchcase
and aligning it with the day of the week that is printed on the dial.
Turn the crown to align the first day of the month to the
appropriate day of the week.
* Note that when setting the first day of the month, if the days at
the end of the month (31st, etc.) are aligned with the section
that does not have the days of the week printed on the dial (3
- 4 o’clock side), days of the week will not be indicated at the
end of the month.
USING THE ROTATING INDICATOR RING
Please notice that some models come with a rotating indicator
ring, which should be used properly.
Turn the ring by pointing the
mark to the minute-hand. While
certain time goes by, you can
measure the elapsed time from
the distance between minute-hand
and figures on the rotating indicator
ring. You can also set the
mark
as a desired time to remind you
how long time is still remain for an
appointment.
You cannot turn the ring reversely
since it comes with a protection
mechanism for preventing wrong operation by force or shock.
Figures on the ring could also help you to read the current time
easily.
* Depending on design, anti-reversely and 1 minute “click”
sound mechanism on rotating indicator ring does not apply to
some models.
Rotating bezel
E
l
a
p
s
e
d
T
i
m
e
HOW TO USE THE INTERNAL ROTATING
INDICATOR RING
Please notice that some models come with an internal rotating
indicator ring, which should be used properly.
Turn the crown for the internal rotating indicator ring to set the
- mark to the position of the minute hand.
The position of the internal rotating indicator ring to which the
minute hand is pointing after some time has elapsed indicates
the elapsed time.
Setting the mark to the desired time also allows you to know the
remaining time.
- mark
Crown for the internal rotating indicator
E
l
a
p
s
e
d
T
i
m
e
The above figure shows that 10 minutes have elapsed since
10:08.
* The positions of the crown and the appearance of the internal
rotating indicator ring may differ depending on the model.
Gebruikershandleiding.com neemt misbruik van zijn services uitermate serieus. U kunt hieronder aangeven waarom deze vraag ongepast is. Wij controleren de vraag en zonodig wordt deze verwijderd.
Product:
Spelregels forum
Om tot zinvolle vragen te komen hanteren wij de volgende spelregels:
lees eerst de handleiding door;
controleer of uw vraag al eerder door iemand anders is gesteld;
probeer uw vraag zo duidelijk mogelijk te stellen;
heeft u een probleem en al geprobeerd om dit op te lossen, vermeld dit erbij aub;
heeft u een oplossing gekregen van een bezoeker dan horen wij dat graag in dit forum;
wilt u een reactie geven op een vraag of antwoord, gebruik dan niet dit formulier maar klik op de knop 'reageer op deze vraag';
uw vraag wordt direct op de website gezet; vermijd daarom persoonlijke gegevens in te vullen;
Belangrijk! Als er een antwoord wordt gegeven op uw vraag, dan is het voor de gever van het antwoord nuttig om te weten als u er wel (of niet) mee geholpen bent! Wij vragen u dus ook te reageren op een antwoord.
Belangrijk! Antwoorden worden ook per e-mail naar abonnees gestuurd. Laat uw emailadres achter op deze site, zodat u op de hoogte blijft. U krijgt dan ook andere vragen en antwoorden te zien.
Abonneren
Abonneer u voor het ontvangen van emails voor uw Orient AB F49 bij:
nieuwe vragen en antwoorden
nieuwe handleidingen
U ontvangt een email met instructies om u voor één of beide opties in te schrijven.
Ontvang uw handleiding per email
Vul uw emailadres in en ontvang de handleiding van Orient AB F49 in de taal/talen: Engels als bijlage per email.
De handleiding is 2,51 mb groot.
U ontvangt de handleiding per email binnen enkele minuten. Als u geen email heeft ontvangen, dan heeft u waarschijnlijk een verkeerd emailadres ingevuld of is uw mailbox te vol. Daarnaast kan het zijn dat uw internetprovider een maximum heeft aan de grootte per email. Omdat hier een handleiding wordt meegestuurd, kan het voorkomen dat de email groter is dan toegestaan bij uw provider.
Uw handleiding is per email verstuurd. Controleer uw email
Als u niet binnen een kwartier uw email met handleiding ontvangen heeft, kan het zijn dat u een verkeerd emailadres heeft ingevuld of dat uw emailprovider een maximum grootte per email heeft ingesteld die kleiner is dan de grootte van de handleiding.
Er is een email naar u verstuurd om uw inschrijving definitief te maken.
Controleer uw email en volg de aanwijzingen op om uw inschrijving definitief te maken
U heeft geen emailadres opgegeven
Als u de handleiding per email wilt ontvangen, vul dan een geldig emailadres in.
Uw vraag is op deze pagina toegevoegd
Wilt u een email ontvangen bij een antwoord en/of nieuwe vragen? Vul dan hier uw emailadres in.