« И И »
Ф,
125252, . ,
. , . 12
+7 (495) 777-75-75
Art.-Nr400 330
Emil Lux GmbH & Co. KG • Emil-Lux-Straße • 42929 Wermelskirchen • GERMANY
Эиь Люс ГбХ & Ko. K Г • Эь - -Ш . 1 • 42929 ь • ЕИ V
Zeitschaltuhr
Bestimmungsgemäßer Gebrauch
Das Gerät ist für das zeitabhängige Ein- und
Innenräumen bestimmt.
Das Gerät ist nicht für den gewerblichen Gebrauch konzipiert.
Jede nicht bestimmungsgemäße V
sung beschriebenen Tätigkeiten am Gerät sind unerlaubter Fehlgebrauch außerhalb der
gesetzlichen Haftungsgrenzen des Herstellers.
Zu Ihrer Sicherheit
Allgemeine Sicherheitshinweise
•Für einen sicheren Umgang mit diesem Gerät muss der Benutzer des Gerätes diese
Gebrauchsanweisung vor der ersten Benutzung gelesen und verstanden haben.
•Beachten
gefährden Sie sich und andere.
•Bewahren Sie alle Gebrauchsanweisungen und Sicherheitshinweise für die Zukunft
auf.
•Wenn
Gebrauchsanweisung aus.
•Das Gerät darf
oder
werden.
•V
von brennbaren Flüssigkeiten oder GasenĄ
•Überlasten Sie
gesehen ist.
Elektrische Sicherheit
•Das
angeschlossen werden.
•Die
Bemessungsfehlerstrom von nicht mehr als ň0 mů erfolgen.
•V
ůnschlussdaten des Gerätes entspricht.
•Das Gerät darf nur innerhalb der angegebenen Grenzen für Spannung und Leistung
verwendet werden Ěsiehe T
Gerätespezifische Sicherheitshinweise
•Geräte, die
geschaltet werden. Lesen Sie hierzu die Gebrauchsanweisung des entsprechenden
Gerätes.
•Das Gerät niemals W
•Das
in der Nähe von W
•Symbole, die sich an Ihrem Gerät befinden, dürfen nicht entfernt oder abgedeckt wer-
den. Nicht mehr lesbare Hinweise am Gerät müssen umgehend ersetzt werden.
T
1. R ĚRESETě Ś Löscht alle im Speicher befindlichen Daten samt Uhrzeit und aller Pro-
gramme.
Ň. UPŚ Einstellen der aktuellen Uhrzeit mit der T
zusammen
zeitig, um im PROGRůMM-Einstellmodus oder CD-Einstellmodus in den Modus
CLOCK ĚUhrzeitě zu gelangen.
ň. SETŚ UP und DOWNś
gramme mit den TUP, DOWN ś Einstellen von CD mit den TUP, DOWN ś
4. DOWN Ś Einstellen der aktuellen Uhrzeit mit den TSET und UP ś Einstellen der
Programme mit den TSET und UP ś Einstellen von CD mit den TSET und
UPś
5. RND ĚRANDOM = ZufallěŚ Einstellen oder Löschen der RND -Funktion.
6. CD ĚCOUNT DOWNě Ś Einstellen oder Löschen der CD -Funktion.
7. MANUELL Ś ON , AUTO, OFFě der
von Programmen oder Wiederabruf der unterdrückten Programme in den Einstellpro-
grammen.
Allgemeine Merkmale
1. 10 ON/OFF Programme mit 1-Minuten-Schritten.
Ň. Mögliche
ň. Betriebsart 1Ň/Ň4 Stunden wählbar
4. LCD
5. Sommerzeitfunktion
6. Zufallsfunktion, mit aktiviertem Zufall von 10-ň1 Minuten zwischen 6 und 1Ř Uhr
7. Es gibt 16 Kombinationen an T
MO
TU
WE
TH
FR
SA
SU
MO, TU, WE, TH, FR, SA, SU
MO, TU, WE, TH, FR
SA, SU
MO, TU, WE, TH, FR, SA
MO, WE, FR
TU, TH, SA
MO, TU, WE
TH, FR, SA
MO, WE, FR, SU
Ř. Maximum řř Stunden 5ř Minuten 5ř Sekunden CD ĚCOUNT DOWNě Funktion.
Erste Inbetriebnahme
1. Stecken 23Ń V
ein. Laden
terie aufzuladen.
Ň. Löschen Sie alle aktuellen Daten, indem Sie nach dem Ladevorgang die TR mit
einem spitzen Gegenstand wie einem Kugelschreiber oder Bleistift eindrücken.
ň. Die Zeitschaltuhr ist jetzt einsatzbereit.
Einstellen der aktuellen Uhrzeit
1. Drücken Sie die T oder DOWN, bis in der CLOCK erscheint.
Ň. Drücken
ĚWochentagě in der
ň. Drücken Sie die Toder DOWN zum Einstellen von ąWEEK Dů
4. Drücken Sie die T
5. Drücken Sie die T
6. Drücken Sie die T
7. Drücken Sie die T
Ř. Drücken Sie die T
ř. Um die Uhrzeit zu korrigieren, wiederholen Sie bitte die obigen Schritte.
Einstellen von Programmen
TIPŚ Damit ist gewährleistet, dass sich die Einstellungen nicht überschneiden, insbeson-
dere bei Nutzung
schaltuhr entsprechend der Programmzeit und nicht nach Programmnummer ON oder
OFF geschaltet. Programm OFF hat VON . Bitte prüfen Sie die
Betriebsart der Zeitschaltuhr
Zeitschaltuhr in der Betriebsart
gelöscht sein.
1. Drücken
erste ON Eingabe erfolgen.
Ň. Drücken Sie die
in der
ň. Drücken Sie die Toder DOWN zum Einstellen von ąWEEK Dů
4. Drücken Sie die T
5. Drücken Sie die T
6. Drücken Sie kurz die T
7. Drücken Sie die T
BEISPIELŚ Zeitschaltuhr täglich um 17.15 Uhr auf ON und um ŇŇŚň0 Uhr auf OFF
ů. Drücken Sie die T
B. Drücken Sie die
in der
C. Drücken Sie die
SUą angezeigt wird.
D. Drücken
ąDů
E. Drücken Sie die T
erscheint.
F Drücken
wird weiter angezeigt.
G. Drücken Sie die T
erscheint.
H. Drücken Sie die T
I. Drücken Sie einmal kurz die T
J. Wiederholen Sie obige Schritte der
TH, FR, Sů, SUą, 10Śň0PM oder ŇŇŚň0 erscheint.
K. Drücken Sie die TMANUAL , bis in der
Einstellung Manuell on/auto/manual off
Die
ů. Drücken Sie die TMANUAL , um die drei Betriebsarten wieder zu ändern.
B. Die Programme können nur in
von
MANUAL ON oder MANUAL OFF werden
uhr läuft nicht. WMANUAL ON gewählt, so
stets ON. MANUAL OFF
abgeschaltet.
C. Wird die Betriebsart von MůNUůL ON auf MůNUůL
stellung der Zeitschaltuhr bis zum folgenden Programm auf MůNUůL ON.
Zufallsfunktion
1. Drücken Sie die TRND . In der R ĚRANDOM ě. Die Funktion
RND ist aktiviert.
Ň. Bei
von 6Ś00 bis 1ŘŚ00 für 10-ň1 Minuten in der ON Position.
ň. Drücken Sie die TRND erneut, um diese Funktion wieder aufzuheben. Die Funk-
tion RND lässt sich nicht während der Einstellung von PROGRAM und CD einstellen.
4. Die RND kann AUTO ń8Ś ŃŃ und 6Ś ŃŃ
geführt werden.
Funktion CD ĚCOUNT DOWNě:
1. Drucken Sie UP oder DOWN, bis in CD
Sie die Dauer für CD einstellen.
Ň. Drücken Sie die T
ň. Drücken Sie die T
oder ąOFFą ein.
4. Drücken Sie die Teinmal kurz, dann beginnt ąHOURą, zu blinken. ąONą oder
ąOFFą hören auf zu blinken und werden weiter angezeigt.
5. Drücken Sie die T
6. Drücken
ąOFFą hören auf zu blinken und werden weiter angezeigt.
7. Drücken Sie die T
Ř. Drücken Sie
blinken und wird weiter angezeigt.
ř. Drücken
T
10. Drücken Sie die T
kürzt, wenn die aktuelle Funktion in der Betriebsart
1 Drücken
erneut die ursprüngliche COUNT DOWN Dauer
1Ň. Die
Sekunden.
1ň. Die CD Funktion
aufgehoben sein muss.
14. Wenn
die Funktion CD ausgeführt wird.
Betriebsart ń2/24 Stunden
Im Uhrzeitmodus drücken Sie die TCD und SET gleichzeitig, um die Uhrzeitanzeige
zwischen 1Ň und Ň4 – Stunden – Modus hin- und herzuschalten.
Funktion Sommerzeit
1. Drücken Sie die T
erscheint S ĚSommerzeitě. Die Uhrzeit wird um eine Stunde weitergestellt.
Ň. Um zur Winterzeit zurückzuschalten, drücken Sie die beiden T
wird wieder um eine Stunde zurückgestellt. S erlischt in der
Betriebsstaffelung
Bitte beachten Sie die Betriebsstaffelung bei Einstellen der Zeitschaltuhr
folgt abŚ
ń. MANUAL ON oder MANUAL OFF ------►2. RND ------►3. CD ------►4. PROGRAM.
Nacheinander
oder MůNUůL
len Sie die richtige Betriebsart ein.
Entsorgung
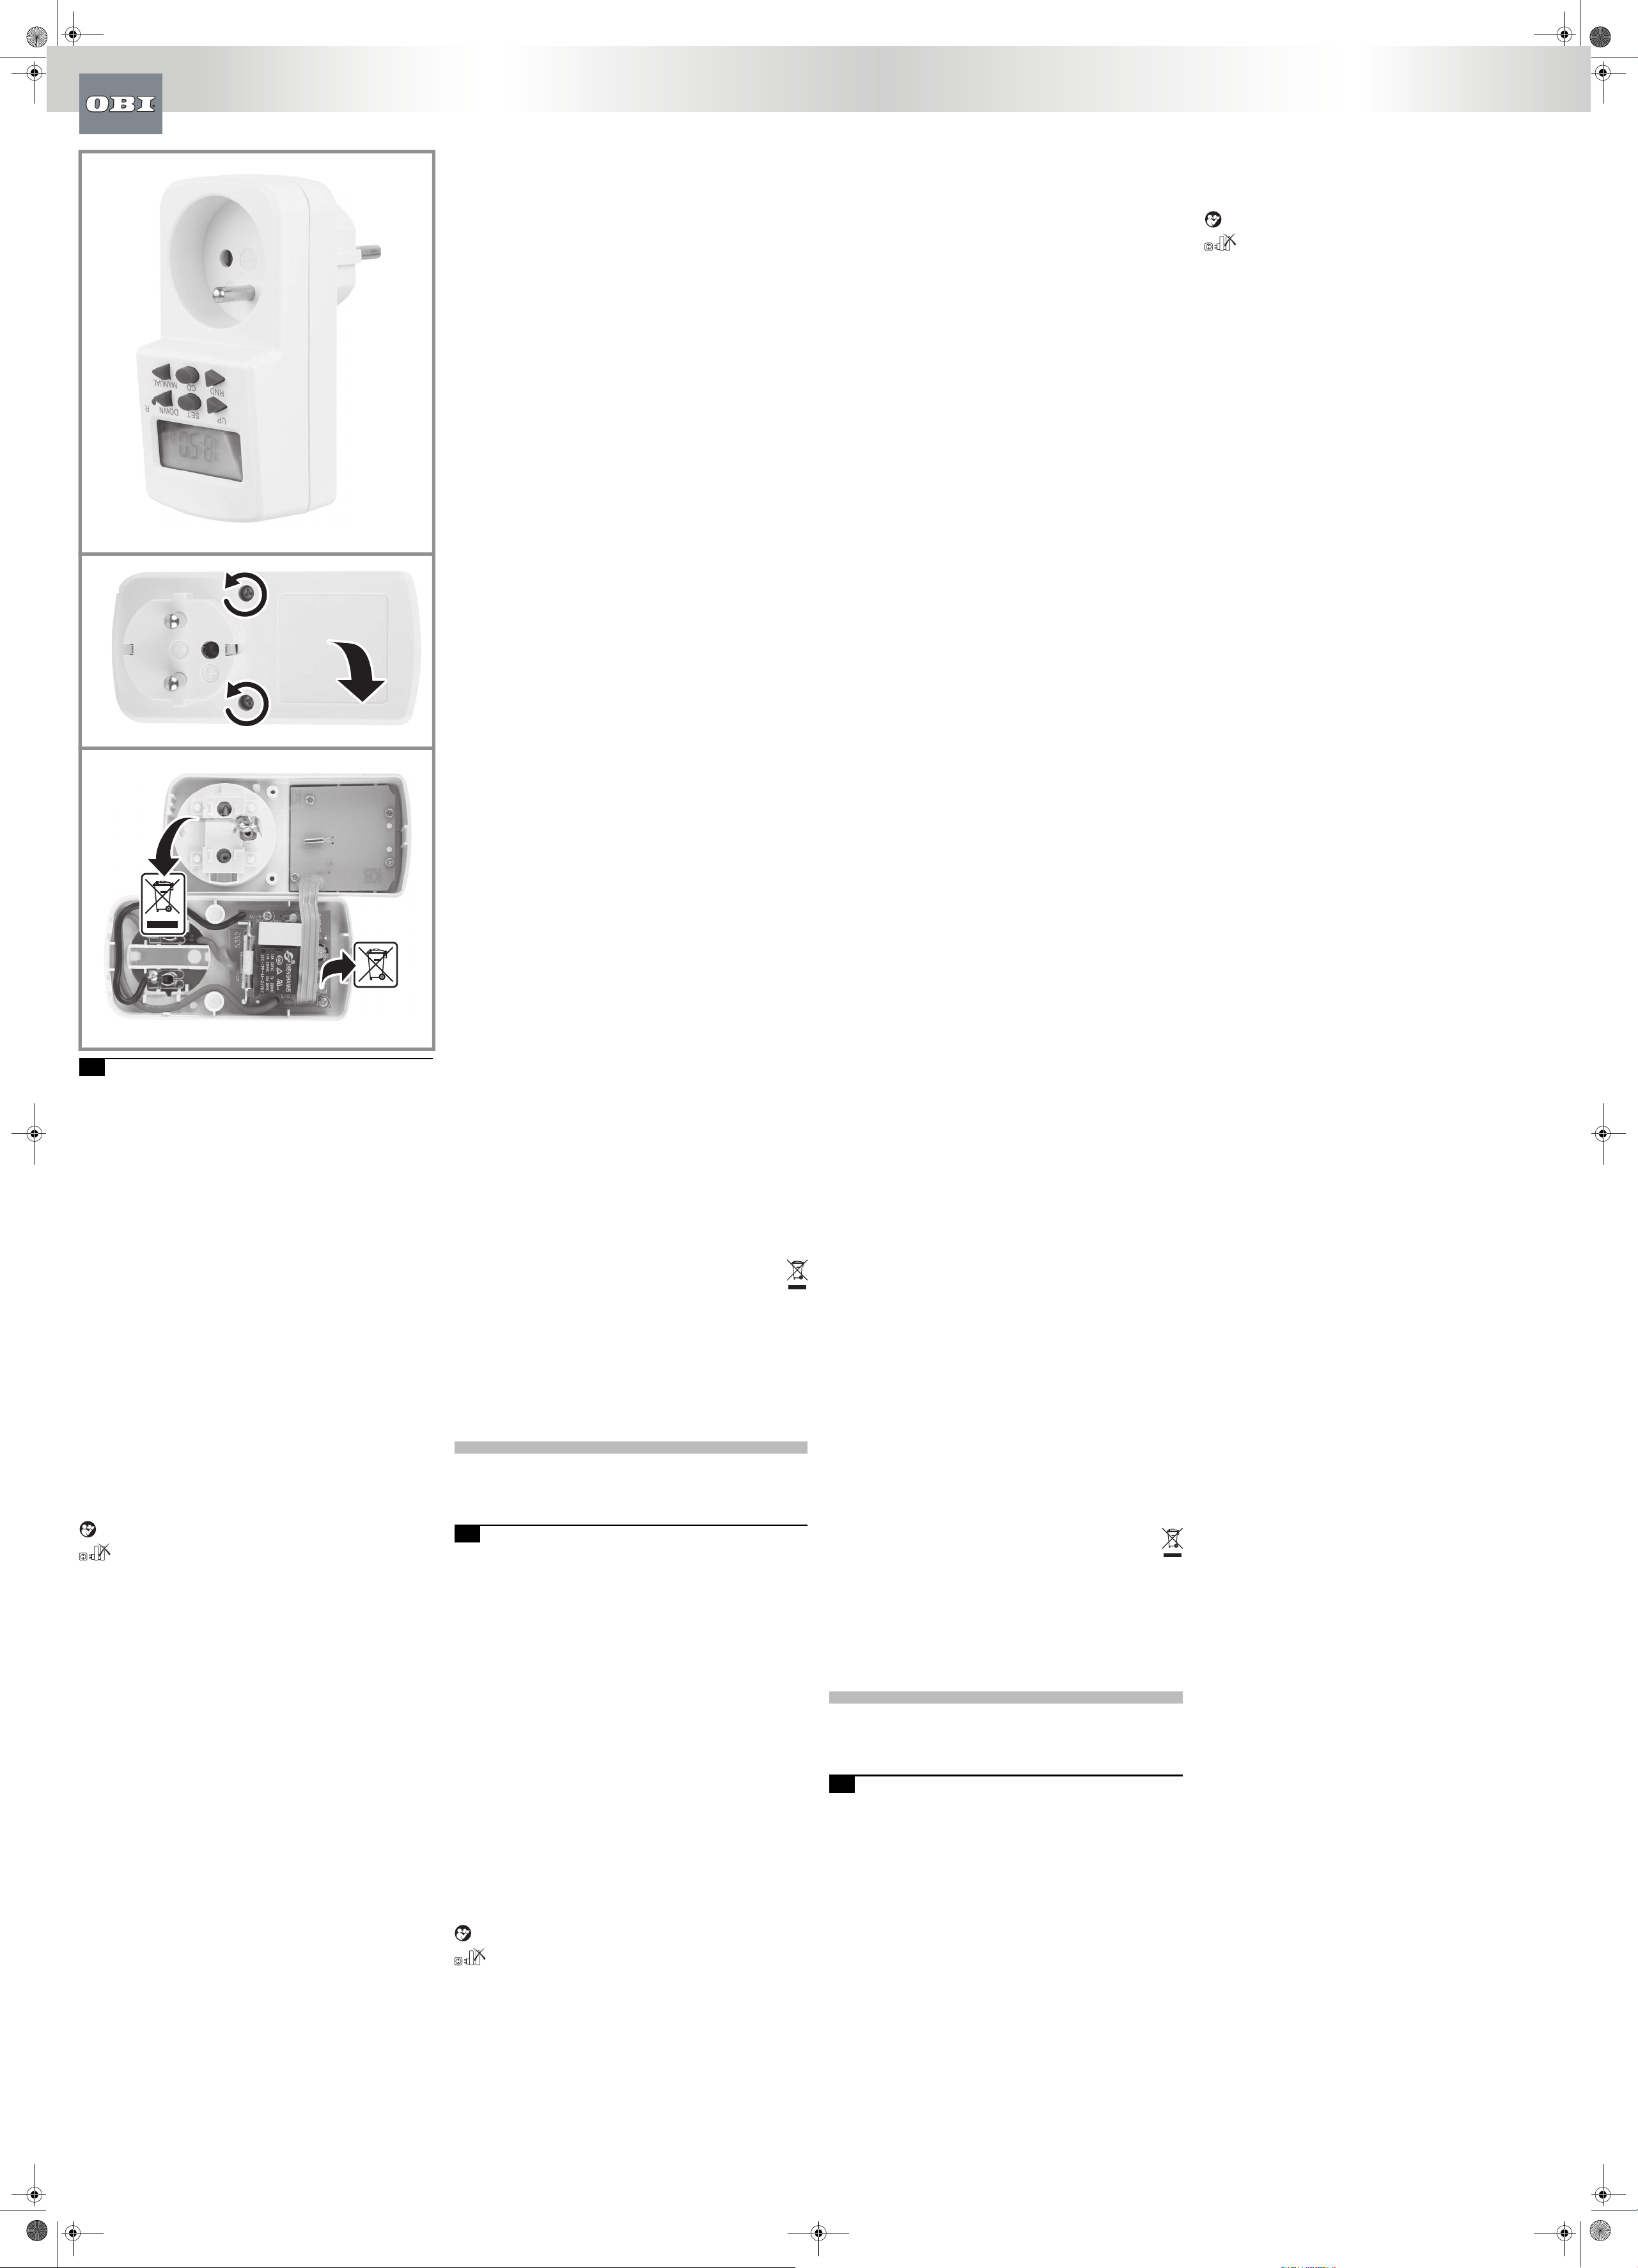
Akku entnehmen
V
Abb. 2: Schrauben herausdrehen und Gehäuse öffnen.
Abb. 3: ůnschlüsse abtrennen und ůkku entnehmen.
Gerät entsorgen
Das auf Elektro- und Elektronikgeräten bzw
menten angebrachte Symbol der durchgestrichenen
das Gerät nicht mit anderem
Die
zu entsorgen, um eine sachgerechte Weiterverarbeitung zu gewährleisten.
Informationen
ten
stellen.
Eine angemessene Handhabung der
dene
oder
gewinnung wertvoller sekundärer Rohstoffe.
Jeder Benutzer von Elektro- und Elektronikgeräten sollte sich an den Bemühungen zum
Schutz der Umwelt vor schädlichen
Akkus entsorgen
Nicht
vorschriftsmäßig entsorgt werden.
T
Timer
Intended use
The
sumers installed indoors.
The device is not suitable for commercial or industrial use.
ůny
sidered unauthorised use and relieves the manufacturer from his or her legal liability
For your safety
General safety instructions
•T
tions for use before using the device for the first time.
•Observe all safety instructionsĄ Failure to do so may cause harm to you and others.
•Retain all instructions for use, and safety instructions for future reference.
•If you
•The device must only be used when it functions properly
product is defective, it must be taken out of operation and disposed of correctly
•Never
flammable liquids or gases.
•Do not overload the device. Do not use the device for purposes for which it is not
intended.
Electrical safety
•The device
•The
no more than ň0 mů.
•Make
device before it is connected.
•The tool may only be used within the specified limitations for voltage and power Ěsee
type plateě.
Device-specific safety instructions
•Devices
Read the instructions for use for the device concerned.
•Never put the product in water or other liquids.
•The
or near to wash basins or water connections.
•Symbols
product that are no longer legible must be replaced immediately
Keyboard definition
1. R ĚRESETě Ś Clear all data in memory including current time and all programs.
Ň. UP Ś SET, DOWNś Set
buttons SET, DOWN ś Set CD combined with buttons SET, DOWN ś Press UP and
DOWN CLOCK PROGRAM setting
or CD setting mode.
ň. SETŚ Set UP, DOWNś Set
buttons UP, DOWN ś Set CD combined with buttons UP, DOWN ś
4. DOWN Ś SET, UPś Set
buttons SET, UP ś Set CD combined with buttons SET, UP ś
5. RND ĚRANDOMě Ś Set or cancel RND function.
6. CD ĚCOUNT DOWNě Ś Set or cancel CD function.
7. MANUAL Ś Select operating modes ĚON , AUTO, OFFě of timerś Override programs or
recall the overridden programs in setting programs.
General features
1. 10 ON/OFF programs with 1 minute step.
Ň. MůNUůL ON/ůUTO/MůNUůL OFF selectable.
ň. 1Ň/Ň4 hour mode selectable.
4. LCD display with second.
5. Summer time function available.
6. Random function with a randomly on 10-ň1minutes between 6Ś00 PM and 6Ś00
7. 16 combinations of day or blocks of days available as followsŚ
MO
TU
WE
TH
FR
SA
SU
MO, TU, WE, TH, FR, SA, SU
MO, TU, WE, TH, FR
SA, SU
MO, TU, WE, TH, FR, SA
MO, WE, FR
TU, TH, SA
MO, TU, WE
TH, FR, SA
MO, WE, FR, SU
Ř. Maximum of řř hours 5ř minutes 5ř seconds CD ĚCOUNT DOWNě function.
Initial operation
1. Plug the timer into a regular 23Ń V
approximately 14 hours to charge the Memory Back-up battery
Ň. Clear all R button
pencil after charging.
ň. The timer is now ready to be set up for use.
Setting current time
1. Press UP button or DOWN button until the CLOCK displays in LCD.
Ň. Press SET WEEK DA will
the current time now
ň. Press UP button or DOWN button to set the “WEEK DA“.
4. Press SET button once and release, The “HOUR “ will flash.
5. Press UP button or DOWN button to set the “HOUR “.
6. Press SET button again and release, The “MINUTE “ will flash.
7. Press UP button or DOWN button to set the “MINUTE “.
Ř. Press SET button and release, the timer is in Clock model display
ř. T
Setting programs
TIPŚ
If there are ON or OFF will be
to program OFF ON .
Please verify
be in AUTO mode, and the RND and CD function must be canceled.
1. Press UP DOWN button
made now
Ň. Press SET button once and release, the “WEEK DA“ will display in LCD. and flash.
ň. Press UP button or DOWN button to set the “WEEK DA“.
4. Press SET button once time and release, The “HOUR “ will flash.
5. Press UP button or DOWN button to set the “HOUR “.
6. Press SET button once time and release. The “MINUTE “ will flash.
7. Press UP button or DOWN button to set the “MINUTE “.
EXůMPLEŚ T
ů. Press UP button or DOWN button untill LCD shows ON_1.
B. Press SET button once and release, the “WEEK DA“ will display in LCD. and flash.
C. Press UP DOWN button MO , TU , WE, TH, FR, SA, SU“.
D. Press SET HOUR “ will WEEK DA“ will
stop flashing and keep display
E. Press UP button or DOWN button till LCD displays 5Ś00PM or 17Ś00.
F Press SET MINUTE “ HOUR “
flashing and keep display
G. Press UP button or DOWN button till LCD displays 5Ś15PM or 17Ś15.
H. press the SET button to confirm the above program.
I. Press UP button once and release. The timer is in the OFF 1 setting.
J. Repeat
10Śň0PM or ŇŇŚň0.
K. Press MANUAL button till LCD displays
Manual on/auto/manual off setting
Operating modes can’t be changed during program settings.
ů. Press MANUAL button to revert the three modes in turn.
B. The
operates as the programs set. In MANUAL ON or MANUAL OFF mode all programs
are ignored and the timer doesn’t operate. When MANUAL ON mode is selected,
power output is always ON . When MANUAL OFF mode is selected, power output is
permanently off.
C. When the mode is turned from MANUAL ON to AUTO, the timer will keep the setting
of MANUAL ON until to the following program.
Random function
1. Press RND button. LCD displays R ĚRANDOM ě. RND function is activated.
Ň. When
during the time gap----from 6Ś00PM to 6Ś00ůM.
ň. Press RND RND function
ing PROGRAM and CD setting.
4. The RND function AUTO 6ŚŃŃPM and 6Ś ŃŃAM.
CD ĚCount Downě function
1. Press UP button or DOWN button untill LCD shows CD , you can set the CD time now
Ň. Press SET button once and release, the “ON “ or “OFF “ will display in LCD. and flash.
ň. Press UP button or DOWN button set “ON “ or “OFF “ mode which you want.
4. Press SET HOUR “ ON “ OFF “
flashing and keep display
5. Press UP button or DOWN button to set the “HOUR “.
6. Press SET button once and release, The “MINUTE “ will flash. the “HOUR “ will stop
flashing and keep display
7. Press UP button or DOWN button to set the “MINUTE “.
Ř. Press SET button SECOND “ will MINUTE “ will
flashing and keep display
ř. Press UP button or DOWN button to set the “SECOND “. Press SET button, the “SEC-
OND“ will stop flashing and keep display
10. Press CD button, the COUNT DOWN time will reduce with one second if the current
operation mode is in AUTO mode.
1 Press CD button once again, the COUNT DOWN time will stop and comeback the pri-
mary COUNT DOWN time.
1Ň. Maximum COUNT DOWN time is řř hours 5ř minutes 5ř seconds.
1ň. The CD AUTO mode. RND function must
canceled.
14. The CD LCD CD CD
is executed.
ń2/24 hour mode
Under Clock status, press CD button and SET button simultaneously to turn the time dis-
play between 1Ň and Ň4 hour mode.
Summertime function
1. Press MANUAL SET Ěor RNDě S ĚSum-
mer timeě. Clock advances 1 hour
Ň. T
S disappears in LCD.
Operation gradation
Please notice
dationŚ
ń. MANUAL ON OR MANUAL OFF ------►2. RND ------►3. CD ------►4. PROGRAM.
It MANUAL ON OR MANUAL OFF RND setting CD
ting third, and PROGRAM setting last when the timer runs. Please set the right operation
mode,
Disposal
Remove the battery
Before disposing, remove all batteriesĄ
Figure 2: Undo the screws and open the housing.
Figure 3: Separate the connections and remove the battery
Disposing of the device
The symbol of the cross-out wheelie bin that is used on electrical or electronic
equipment and packaging or accompanying documentation indicates that the
device must not be disposed of with other waste.
The user is responsible for disposing of waste equipment at the collection points
indicated so that materials can be correctly recycled.
Information
is available from the information desks in stores and municipal authorities.
Proper handling
components
and also ensures that valuable secondary raw materials are recycled.
ůll users
ronment from harmful waste.
Disposing of batteries
Batteries
waste, but must be disposed of according to regulations.
T
Spínací hodiny
Použití přimřené určení
Pístroj
ních prostorech.
Pístroj není koncipován pro profesionální použití.
Každé
pístroji jsou nedovoleným zneužitím mimo zákonné hranice ručení výrobce.
Pro V
Všeobecné bezpečnostní pokyny
•Pro bezpečné
pečíst tento návod k použití a porozumt mu.
•Respektujte všechny bezpečnostní pokynyĄ Pokud nebudete dbát bezpečnostních
pokyn, ohrožujete sebe i ostatní.
•Všechny návody k použití a bezpečnostní pokyny si dobe uložte pro pozdjší použití.
•Když pístroj prodáváte nebo pedáváte dál, bezpodmínečn pedejte i tento návod k
použití.
•Pístroj se
nkteré jeho součásti závady
•Pístroj nepoužívejte v prostorech ohrožených výbuchem nebo v blízkosti holavých
kapalin nebo plynĄ
•Nepetžujte pístroj. Používejte pístroj pouze pro účely
Elektrická bezpečnost
•Pístroj se smí
•Zajištní
vaným chybným proudem nepesahujícím ň0 mů
•Ped pipojením pístroje se musí zabezpečit, aby síová pípojka odpovídala hodno-
tám pro pipojení pístroje.
•Pístroj se smí používat pouze v rámci uvedených limit naptí, výkonu a otáček Ěviz
typový štítekě.
Upozornní specifická pro přístroj
•Spínacími hodinami
tím účelem si pečtte návod k použití píslušného pístroje.
•Nikdy nevystavujte pístroj styku s vodou nebo jinými kapalinami.
•Pístroj se
ani v blízkosti umyvadel nebo pípojek vody
•Symboly
Upozornní na pístroji, která už nejsou čitelná, musí být neprodlen nahrazena
novými.
Popis klávesnice
1. R ĚRESETě Ś V
gram.
Ň. UP ĚNůHORUěŚ Nastavte aktuální čas pomocí tlačítek SET ĚNůSTDOWN
ĚDOLěś Nastavte programy pomocí tlačítek SET ĚNůSTDOWN ĚDOLěś
Nastavte CD ĚODPOČÍTÁVÁNÍě pomocí tlačítek SET ĚNůSTDOWN ĚDOLěś
Stisknte současn tlačítka UP ĚNůHORUě a DOWN ĚDOLě pro zadání režimu
CLOCK ĚHODINYě pod nastavovacím režimem PROGRAM nebo CD ĚODPOČÍTÁ-
VÁNÍě.
ň. SET ĚNůSTUP ĚNůHORUě, DOWN
ĚDOLěś Nastavte UP ĚNůHORUě, DOWN ĚDOLěś
Nastavte CD ĚODPOČÍTÁVÁNÍě pomocí tlačítek UP ĚNůHORUě, DOWN ĚDOLěś
4. DOWN ĚDOLěŚ Nastavte aktuální čas pomocí tlačítek SET ĚNůSTUP
ĚNůHORUěś Nastavte programy pomocí tlačítek SET ĚNůSTUP ĚNůHORUěś
Nastavte CD ĚODPOČÍTÁVÁNÍě pomocí tlačítek SET ĚNůSTUP ĚNůHORUěś
5. RND ĚNÁHODNě Ś Nastavte nebo zrušte funkci RND .
6. CD ĚODPOČÍTÁVÁNÍě Ś Nastavte nebo zrušte funkci CD ĚODPOČÍTÁVÁNÍě.
7. MANUAL ON AUTO
OFFě ĚVYPNUTÝě na časovačiś Pejdte na programy nebo odvolejte programy v
nastaveních program.
Všeobecné funkce
1. 10 ON/OFF ĚZůPNOUT/VYPNOUTě programy s 1-minutovým krokem.
Ň. V
TICKÝ/RUČNÍ VYPNUTÝě.
ň. 1Ň/Ň4 hodinový volitelný režim.
4. LCD displej.
5. Dostupná funkce „letní čas“.
6. Náhodná funkce s náhodn zapnutým časem 10 – ň1 minut mezi 6Ś00 PM a 6Ś00
Ě1ŘŚ00 a 6Ś00 hod.ě.
7. 16 kombinací dní nebo blok dní dostupných v následujícím poadíŚ
MO
TU
WE
TH
FR
SA
SU
MO, TU, WE, TH, FR, SA, SU
MO, TU, WE, TH, FR
SA, SU
MO, TU, WE, TH, FR, SA
MO, WE, FR
TU, TH, SA
MO, TU, WE
TH, FR, SA
MO, WE, FR, SU
Ř. Maximální čas funkce CD ĚODPOČÍTÁVÁNÍě 99 hodin 59 minut 59 sekund .
Úvodní provoz
1. Zapojte časovač do klasické 23Ń voltové napájecí zásuvky a zapnte pístroj. Nechte
nabíjet záložní pamovou baterii pibližn 14 hodin.
Ň. Po nabití vymažte všechny aktuální informace stisknutím tlačítka R pomocí špičatého
pedmtu, jako nap. pera nebo tužky
ň. Časovač je pipravený na nastavení a použití.
Nastavení aktuálního času
1. Stisknte tlačítko UP ĚNůHORUě nebo DOWN ĚDOLě, dokud se na LCD displeji
nezobrazí CLOCK ĚHODINYě
Ň. Stisknte SET
nápis „WEEK DA“ ĚDEN V TÝDNUě. Nyní mžete nastavit aktuální čas.
ň. Stisknte tlačítko UP ĚNůHORUě nebo stisknte tlačítko DOWN ĚDOLě a nastavte
„WEEK DA“ ĚDEN V TÝDNUě.
4. Po stisknutí SET ĚNůSTHOUR “
5. Stisknte tlačítko UP ĚNůHORUě DOWN ĚDOLě HOUR “ ĚHODINUě.
6. Po optovném stisknutí a uvolnní tlačítka SET ĚNůST
„MINUTE “ ĚMINUT
7. Stisknte tlačítko UP ĚNůHORUě nebo DOWN ĚDOLě a nastavte „MINUTE “
ĚMINUTUě.
Ř. Stisknte tlačítko SET ĚNůST
ř. K resetování nesprávného času zopakujte výše uvedené kroky
Nastavení programů
TIPŚ Ujistte se, že se nastavení nepekrývají, pedevším pi použití možnosti blok dní.
Pokud se programová nastavení pekrývají, v tom pípad se časovač ON ĚZůPNOUTě
nebo OFF ĚVYPNOUTě
OFF programu je nadazeno zapnutí ON programu. Ovte si provozní režim časovačeś
pokud chcete spustit programyAUT ĚůUTOMů
funkce RND ĚNÁHODNě a CD ĚODPOČÍTÁVÁNÍě musejí být zrušeny
1. Stisknte tlačítko UP ĚNůHORUě nebo DOWN ĚDOLě, dokud se na LCD displeji
nezobrazí ON_1. Nyní mžete nastavit první nastavení ON ĚZůPNOUTě.
Ň. Stisknte SET
nápis „WEEK DA“ ĚDEN V TÝDNUě.
ň. Stisknte tlačítko UP ĚNůHORUě nebo stisknte tlačítko DOWN ĚDOLě a nastavte
„WEEK DA“ ĚDEN V TÝDNUě.
4. Stisknte SET HOUR “
ĚHODINůě.
5. Stisknte tlačítko UP ĚNůHORUě DOWN ĚDOLě HOUR “ ĚHODINUě.
6. Stisknte a uvolnte tlačítko SET ĚNůST
„MINUTE “ ĚMINUT
7. Stisknte tlačítko UP ĚNůHORUě nebo DOWN ĚDOLě a nastavte „MINUTE “
ĚMINUTUě.
PÍKLůDŚ Časovač se zapne v 17Ś15 hod. a vypne ve ŇŇŚň0 hod.
ů. Stisknte tlačítko UP ĚNůHORUě nebo DOWN ĚDOLě, dokud se na LCD displeji
nezobrazí ON_1.
B. Stisknte SET
nápis „WEEK DA“ ĚDEN V TÝDNUě.
C. Stisknte tlačítko UP ĚNůHORUě nebo DOWN ĚDOLě, dokud se na LCD displeji
nezobrazí „MO , TU , WE , TH , FR , SA , SU “ ĚPO, ÚT
D. Stisknte a uvolnte tlačítko SET ĚNůST
„HOUR “ WEEK DA“
displeji.
E. Stisknte tlačítko UP ĚNůHORUě nebo DOWN ĚDOLě, dokud LCD displej nezobrazí
5Ś00 PM nebo 17Ś00.
F Stisknte a uvolnte tlačítko SET ĚNůST
„MINUTE “ ĚMINUTHOUR “ ĚHODINůě pestane blikat a zstane na displeji.
G. Stisknte tlačítko UP ĚNůHORUě nebo DOWN ĚDOLě, dokud LCD displej nezobrazí
5Ś15 PM nebo 17Ś15.
H. Stisknte tlačítko SET ĚNůST
I. Stisknte a uvolnte tlačítko UP ĚNůHORUě. Časovač je nastavený v režimu OFF 1
ĚVYPNOUT 1ě.
J. Zopakujte výše uvedené kroky b, c, d, e, f. g a H, dokud LCD displej nezobrazí „MO,
TU, WE, TH, FR, Sů, SU“ ĚPO, ÚT
K. Stisknte tlačítko MANUAL ĚRUČNÍě, dokud LCD displej nezobrazí
TICKÝě.
Nastavení funkcí
manual off Ěručn vypnoutě
Provozní režimy se bhem nastavení programu nedají mnit.
ů. Stisknte MANUAL ĚRUČNÍě pro vrácení tí režim po sob.
B. Programy lze
ůUTO ĚůUT
režimu MANUAL ON ĚRUČN MANUAL OFF ĚRUČN
jsou všechny MANUAL
ON ĚRUČN ZůPNOUTě je výkon vždy zapnutý. Po zvolení režimu MANUAL OFF
ĚRUČN VYPNOUTě je výkon permanentn vypnutý.
C. Po pepnutí z režimu MANUAL ON ĚRUČN ZůPNOUTě na AUTO ĚůUTOMů
ponechá časovač MANUAL ON ĚRUČN ZůPNOUTě
dujícího programu.
Náhodná funkce
1. Stisknte RND R Ě NÁHODNEě. Funkce
je aktivní.
Ň. Pokud je funkce Random ĚNáhodně aktivní, zapne se časovač náhodn na 10 – ň1
minut v časovém rozptí----od 1ŘŚ00 do 6Ś00 hod. Ě6Ś00 PM do 6Ś00
ň. Opt stisknte tlačítko RND ĚNÁHODNě, abyste zrušili tuto funkci. Funkce RND
ĚNÁHODNě se nedá nastavit PROGRAM a CD ĚODPOČÍTÁVÁNÍě.
4. Funkce RND ĚNÁHODNě se mže spustit pouze v režimu AUTO ĚůUTOMů
mezi 6 Ś ŃŃ PM a 6 Ś ŃŃ Ě1ŘŚ00 a 6Ś00ě.
Funkce CD Ěodpočítáváníě
1. Stisknte UP DOWN
CD ĚODPOČÍTÁVÁNÍě, poté mžete nastavit čas CD ĚODPOČÍTÁVÁNÍě.
Ň. Po jednom stisknutí a uvolnní tlačítka SET ĚNůST
začne blikat nápis „ON “ ĚZůPNOUTě nebo „OFF “ ĚVYPNOUTě.
ň. Stisknte tlačítko UP ĚNůHORUě nebo DOWN ĚDOLě a nastavte „ON “ ĚZůPNOUTě
nebo „OFF “ ĚVYPNOUTě.
4. Po SET HOUR “
Nápis ON “ ĚZůPNOUTě OFF “
5. Stisknte tlačítko UP ĚNůHORUě DOWN ĚDOLě HOUR “ ĚHODINUě.
6. Po stisknutí a uvolnní tlačítka SET ĚNůSTMINUTE “
ĚMINUTHOUR “ ĚHODINůě pestane blikat a zstane na displeji.
7. Stisknte tlačítko UP ĚNůHORUě nebo DOWN ĚDOLě a nastavte „MINUTE “
ĚMINUTUě.
Ř. Po stisknutí a uvolnní tlačítka SET ĚNůSTSECOND “
ĚSEKUNDůě, nápis „MINUTE “ ĚMINUT
ř. Stisknte tlačítko UP ĚNůHORUě nebo DOWN ĚDOLě a nastavte „SECOND “
ĚSEKUNDUě. Po stisknutí tlačítka SET ĚNůSTSECOND “
ĚSEKUNDůě a zstane na displeji.
10. Po stisknutí tlačítka CD ĚODPOČÍTÁVÁNÍě se čas ODPOČÍTÁVÁNÍ sníží o jednu
sekundu, pokud je současný provozní režim nastavený na AUTO ĚůUTOMů
1 Po optovném stisknutí tlačítka CD ĚODPOČÍTÁVÁNÍě se čas ODPOČÍTÁVÁNÍ
zastaví a vrátí se prvotní čas.
1Ň. Maximální čas ODPOČÍTÁVÁNÍ je řř hodin 5ř minut 5ř sekund.
1ň. Funkce CD ĚODPOČÍTÁVÁNÍě se dá spustit pouze v režimu AUTO ĚůUTOMů
a funkce RND ĚNÁHODNě musí být zrušená.
14. Na CD ĚODPOČÍTÁVÁNÍě tlačítka CD
TÁVÁNÍě v režimu HodinyCD ĚODPOČÍTÁVÁNÍě se spustila.
ń2/24 hodinový režim.
Pod zobrazením CD ĚODPOČÍTÁVÁNÍě SET
VITě a pepínejte zobrazení času mezi 1Ň a Ň4 hodinovým režimem.
Funkce „letní čas“
1. Stisknte tlačítko MANUAL ĚRUČNÍě a SET ĚNůSTRND ě ĚNÁHODNě.
LCD displej zobrazí S Ěletní časě. Hodiny se posunou o 1 hodinu dopedu.
Ň. Pro optovné
nou o 1 hodinu dozadu. S na LCD displeji zmizí.
Stupňování provozu
Zohlednte stupování
dovnŚ
ń. MANUAL ON ĚRUČN ZAPNOUTě NEBO MANUAL OFF ĚRUČN VYPNOUTě ------
►2. RND ĚNÁHODNě ------►3. CD ĚODPOČÍTÁVÁNÍě------►4. PROGRAM.
Nejprve se spustí funkce MANUAL ON ĚRUČN ZůPNOUTě NEBO MANUAL OFF
ĚRUČN VYPNOUTě, potom nastavení RND ĚNÁHODNě, potom nastavení CD ĚODPO-
ČÍTÁVÁNÍě a nakonec PROGRAM , pokud je spuštný časovač. Nastavte správný pro-
vozní režim.
Likvidace
V
Ped likvidací vyjmte všechny akumulátory
ObrOdšroubujte šrouby a otevete kryt.
ObrOdpojte kontakty a vyjmte akumulátor.
DE Gebrauchsanweisung
V
Niemals mehrere Geräte ineinandersteckenĄ
Artikelnummer 4ŃŃ
Betriebsspannung Ňň0 V~, 50 Hz, ŘĚ1ě
Max. Leistung angeschlossener V 1Ř00 W
Min. Schaltintervall 1 min
Schutzklasse I
Schutzgrad IPŇ0
GB Operating instructions
Read
time.
Do not plug several products into one anotherĄ
Part number 4ŃŃ
Operational voltage Ňň0 V~, 50 Hz, ŘĚ1ě
Max. power of connected consumer appliance 1Ř00 W
Minimum switching interval 1 min
Protection class I
Degree of protection IPŇ0
CZ Návod k použití
Ped uvedením do provozu si pečtte návod k použití, a iďte se jím.
Nikdy nezapojujte více pístroj do sebeĄ
Zeitschaltuhr_400330_tapete_DE_GB_CZ_SK_PL.fm Seite 1 Dienstag, 11. September 2018 12:35 12