EU EN
QUICK ST
Fructions, please
(om www
1. Setting up y® Video Camera
MODEL:
ORBIT
WARNING:
STRANGULATION
cable more
Never place cameraa bed. Se
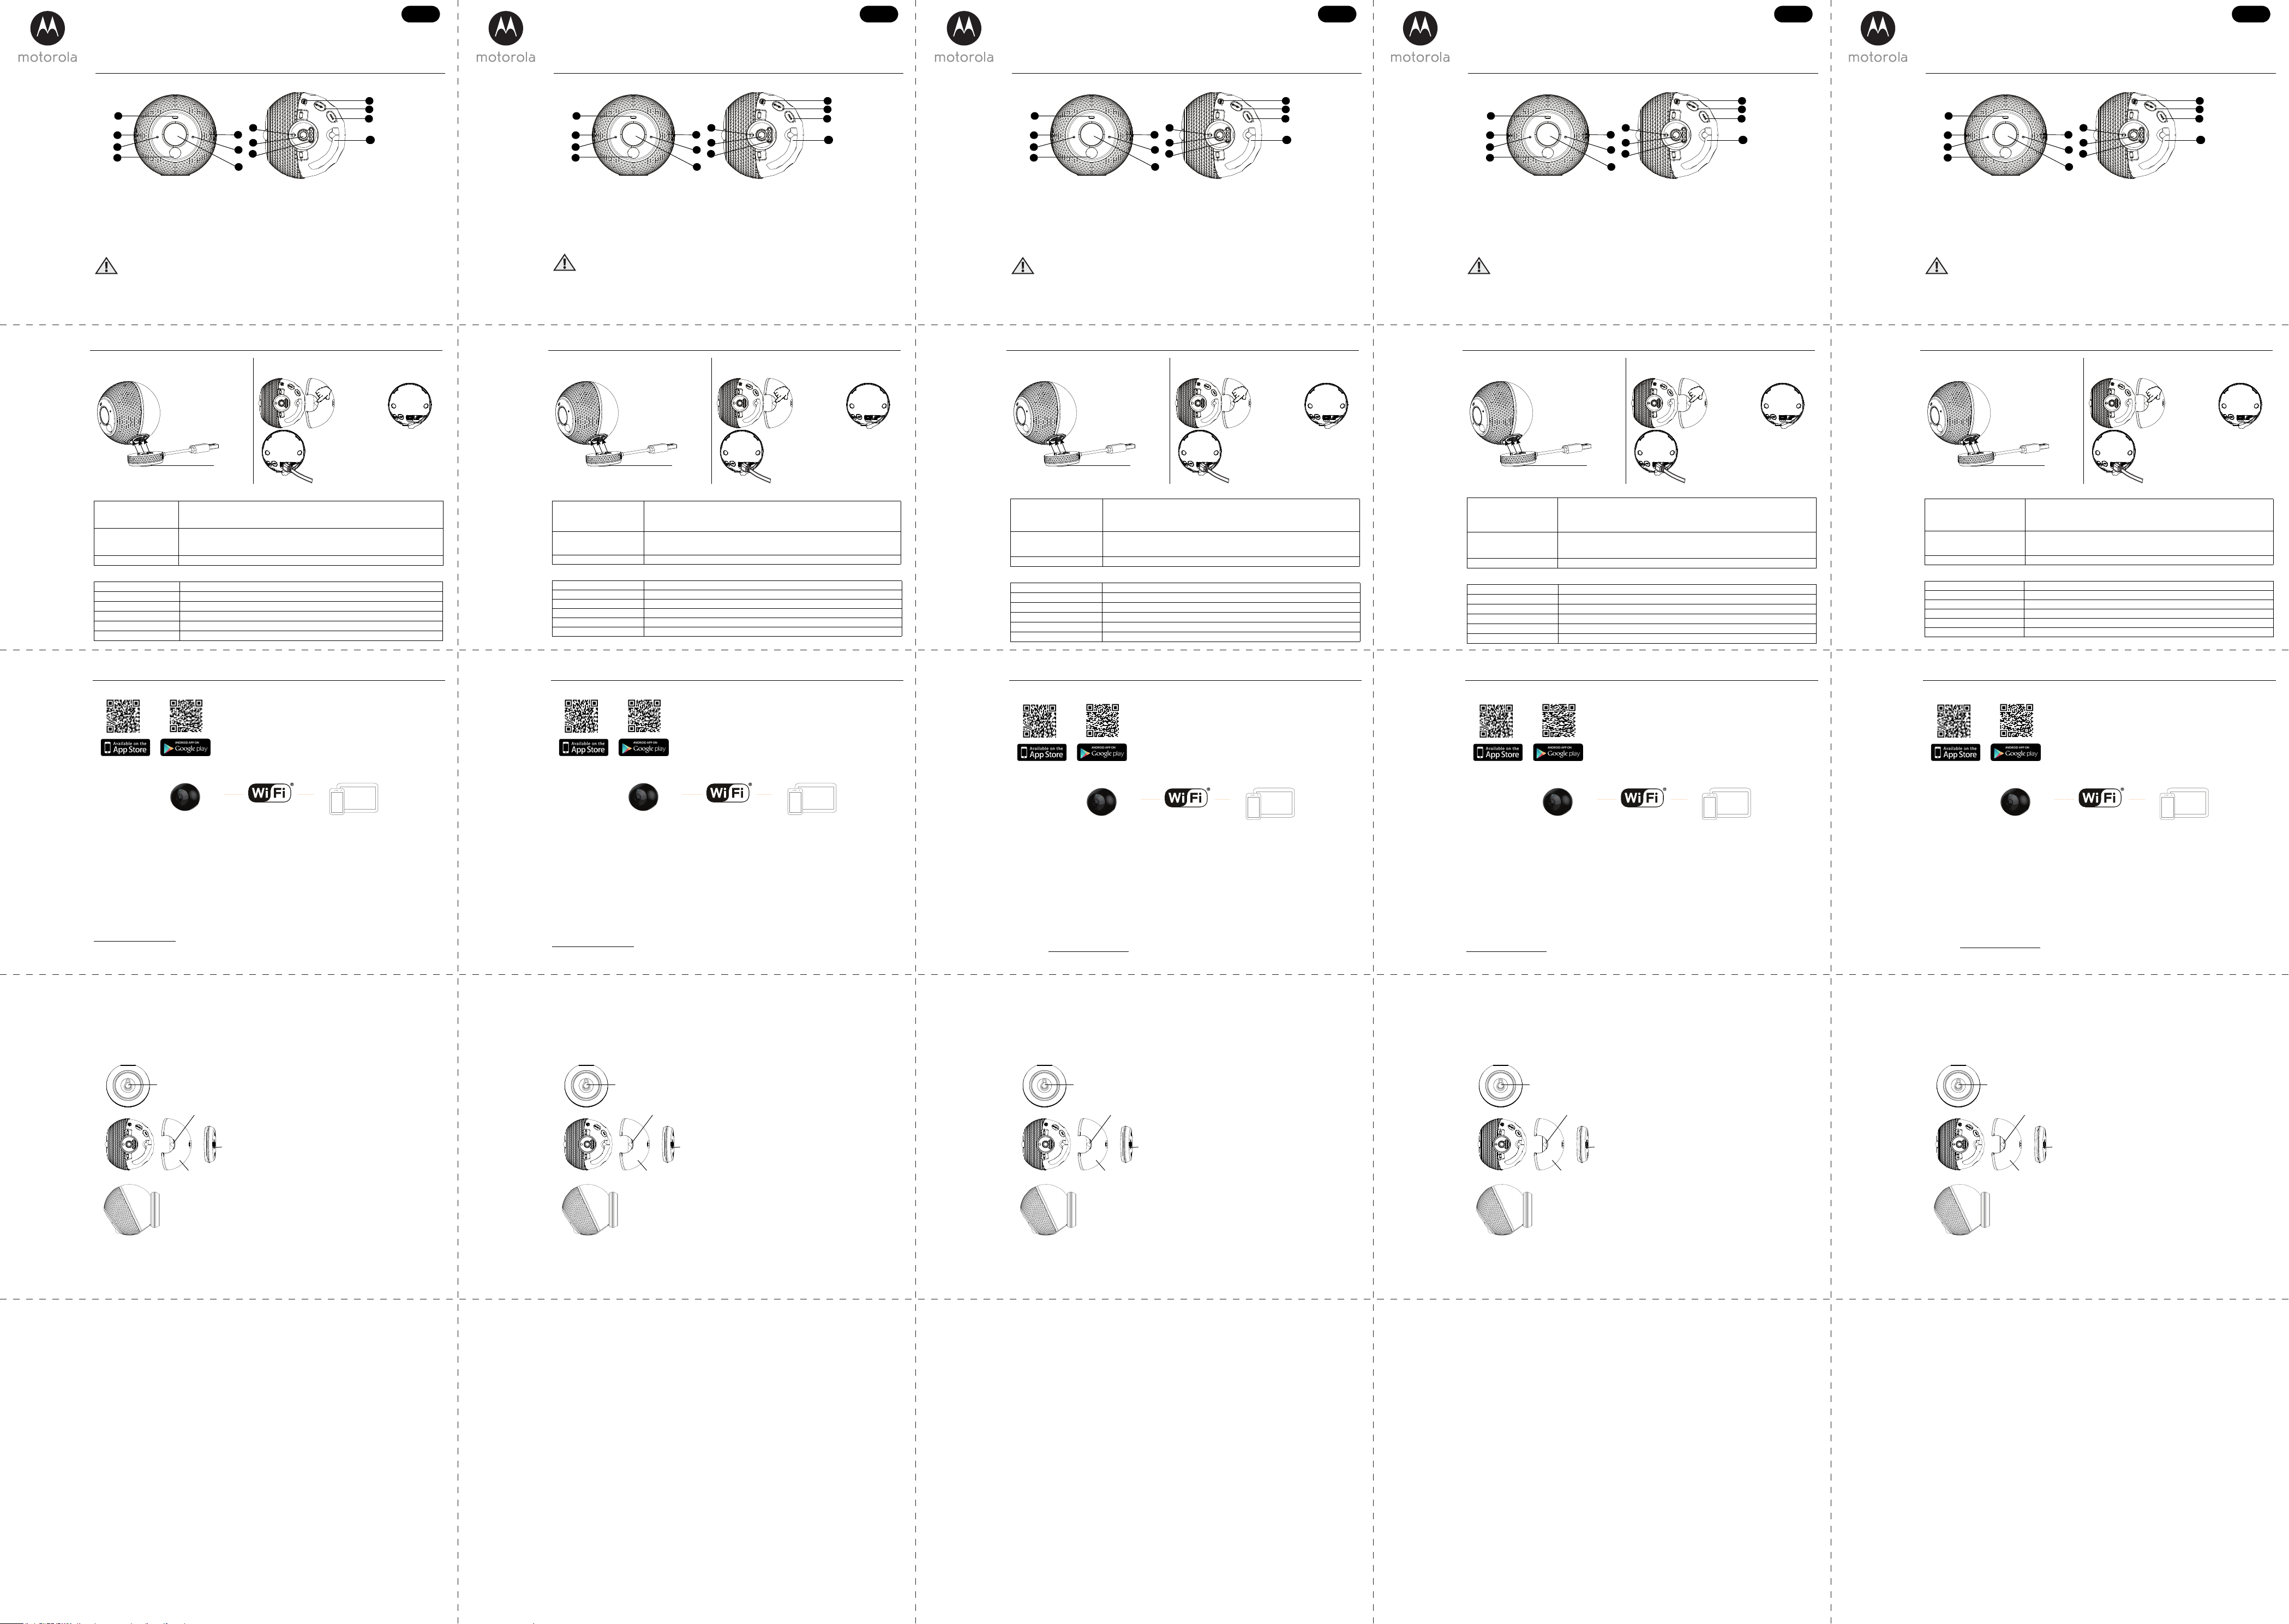
A. Overview of yo
1
2
4
5
8
9
10
12
7
3
11
613
14
RESET
ON/OFF
PAIR
1. Light Sensor (for night
mode detectio
2. Microphone
3. Gr
4. Passive Infrared Sensor
(PIR)
5. Speaker
6. Red LED Indicat
7. Came
8. Reset
9. On/Off Button
10.PAIR Button
11.Locati
Mounting /Stand / USB
Charging Dock
12.Mounting thread f
Stand / USB Char
13.Charging Pins f
14.Rubber fl
(DC 5V
(
Box contents:
• ORBIT Camera
(with micro-SD
card)
• Magnetic
mountin
• USB c
B. Charge th
P
LED status indicators
P • Press the o
• Press the on/
power of
Pairing t • Press the pair
LED flash a
for pairing.
Rese • Press t
Unconnected • Red LED flashes rapidly
Pairing the device • Red & Gr
Connected to the router • Red LED flashes slowly
Connected to the server • Green LED lights up.
Streaming video • Green LED flashes slowly.
Charging the device • Both LEDs turn off when it
Notes
Charge the battery
fully before using it for
the first time. It takes
about 5 hou
charge the battery
fully.
The battery life is up to
3 months in
SAVING mode.
1. Align and tighten th
2. Connect the USB c
to a standard USB power
adapter (DC 5V / 2A, not
included) and plug it into a
power outlet.
Using USB Charging Dock (i
1. Remove back cover.
2. Open waterproof
rubber flap.
3. Connect a micro-U
then connect the U
power adapter (DC 5V / 2A,
and plug it into a power outlet.
Using micro-USB c
screw
C. Install MotorolaHubble Home” Application.
Download the Mot “Hubble Home” App from the App S
iOS deTM Store for Android TM devic
Wi-Fi® Camera Connect to Internet
via Wi-Fi® Compatible
Viewing Devices
Hubble Home” App o
2. F
3. Log in to your account on yo
4. F
tablet.
D. View on Compatible Smartphones and T
Please take note of the following minimum sy
Smartphones/T
Wi-Fi
® requirements:
Preferably 1MByte upload bandwidth per
http:/
2. Mount the Camera
You can place
magnetic mounting p
screw (
• Mark yo
• Fix a suitable 12mm mo
must fit into
plate) into the mounting po
• Fit th
the k
the moun
• Ensure that the back c
then stick
(Note: extreme an
magnetic mount.)
• Check
“Hubble Home ”
WARNING!
• Please ensure that the mplate is mounted on a secure and stable wall.
• Please ensure that the Or
conditions including, but not lim
Keyhole slot on
the mounting plate
Back cover
Mounting
plate
Best mounting po
Press here to
unlock and remove
the back cover.
EU DE
KURZANLEITUNG
Eine vollständige Erklärung aller Fonen und Anwe
Bedienungsanleitung. (kann von www
1. Einrichten der Wir
®
-
MODELL:
ORBIT
WARNUNG:
STRANGULIERUNGSGEFAHR – Falls dieses Gerät zur Überwachung von Kleinkinde
wird, müssen sich das Gerät und das USB
Reichweite des Kindes befinden.
Legen Sie die Kamera oder
außerhalb der Reic
A. Übersicht über die Kamera
1
2
4
5
8
9
10
12
7
3
11
613
14
RESET
EIN/AUS
PAIR
1. Lichtsensor (für die
Erkennung im
Nachtm
2. Mikrofon
3. Grüne
4. Passiv
(PIR)
5. Lautspr
6. Rote LED-Anzeige
7. Kameraobjektiv
8. Zurücksetzen
9. Ein/
10.PAIR-Taste
11.Aufnahmebohrung für die
Montage im Freien/Ständer/
USB-Ladedock
12.Befestigungsgewinde für die
Freien/Ständer
13.Lades
14.Gummiklapp
USB-Buchse (DC 5 V A) und des micr
SD-Kartenhalters ( GB)
Packungsinhalt:
• OR
micro-
• Magnetisch
Montageplatte
• USB-Lade
B. Aufladen der Kamera
Einschalten der Kamera, Abstimmen und Zurücksetzen
LED-Statusanzeigen
EIN/AUS • Drücken
Einschalten schnell blinkt.
• Drücken Sie die EIN/
Ausschalten erlöschen.
Abstimmen des Geräts • Drücken Sie die P
RECHTE ROTE LED ab
angibt, dass das Gerät für das Abstimmen ber
Zurücksetzen des Geräts • Drücken Sie die R
Nicht verbunden • Rote LED blinkt schnell.
Abstimmen des Geräts • Rote und grüne LEDs blink
Mit dem Router verbunden • Rote LED blinkt langsam.
Mit dem Server verbunden • Grüne LED leuchtet.
Videostreaming • Grüne LED blinkt langsam.
Aufladen des Gerä • Beide LEDs erlöschen beim Ausschalten.
Hinweise:
Vor de
Gebrauch Batterie
vollständig aufladen. Das
vollstän
Batterie dauert etwa
5 Stunden.
Die Batt
beträgt im ENERGIESPAR-
Modus bis zu 3 Monate.
1. Richten Sie die Kamera aus und ziehen Sie die
Schraube fest.
2. Schließen Sie das
USB-Kabel an ein
übliches US
(DC 5 V/2 A, nicht
mitgeliefert) und a
eine Netzsteckdose an.
Verwendung des USB-Ladedocks (mitgeliefert)
1. Entfernen Sie
die rückwärtige
Abdeckung.
2. Öffnen Sie die
wasserdichte
Gummiklapp
3. Schließen Sie ein micro-USB-Kabel an
die Kamera an. Schl
USB-Kabel an
(DC 5 V/2 A, nicht m
eine Netzsteckdose an.
Verwendung des mi
Schraube
C. InstallierHubble Home“ Anwendung.
Laden Sie di „Hubble Home“
Geräte oderTM StorTM -Geräte herun
Wi-Fi®-Kamera Verbinden mit dem
Internet über Wi-Fi®
Kompatible
Anzeigegeräte
Hubble Home“
2. Befolgen Sie die Anweis
3. Melden Sie si
4. Befolgen
Smartphone oder T
D. Anzeige auf kompatiblen Smartphones und T
Bitte beachten Sie di
Smartphones/T
Wi-Fi
®-Anforderungen:
1 MByte
http:/
2. Montier
Sie können die O
mit der mitgeli
Montageplatte
Montageplatte
• Markier
• Befestig
in der Montageplatt
Schlüssellochschlitz an der R
passen).
• Befestig
Schraubenkopf im Schlüssello
Schraubenti
• V
an der Kamera a
Kamera dann an der magn
(Hinweis: Extreme Winkel oder Ausrichtung können durch
die magnetische)
• Prüfen S
Stream in „Hubbl
Bedarf anpass
ACHTUNG!
• Bitte achten Sie daratte an einer festen u
• Bitte achten Sie da
Umgebungsbedingungen ausge B. übe
Schlüssellochschlitz an der Rückseite
der Montageplatte
Rückwärtige
Abdeckung
Montage-
platte
Beste Montagepositi
Drücken Sie hier,
um die rückwärtige
Abdeckung zu
entriegeln und zu
entfernen.
EU FR
GUIDE DE DÉMARRAGE RAPIDE
P
l
1. Installation de votr® sans fil
MODÈLE :
ORBIT
AVERTISSEMENT :
DANGER D’ÉTRANGLEMENT : si vous utilisez cet appareil pour surveiller des nourrissons ou des enfants, tenez
l'appareil ets 1 mètre du bercea
Ne placez jamais lu ou près d’un lit. Fixez le câ
enfants.
A. Présentation de votre caméra
1
2
4
5
8
9
10
12
7
3
11
613
14
RÉINITIALISATION
MARCHE/AR
COUPLAGE
1. Capteur de lumi
(pour le mode de vision
nocturne
2. M
3. DEL v
4. Capteur infra
(PIR)
5. Haut-parl
6. DEL rouge
7. Objectif de la caméra
8. Réinit
9. T
10.Touche COUP
11.T
montage en extéri
support, station d
12.T
extérieur
13.Broches de
USB
14.Rabat en
micro-US
la carte micro-SD (jusqu
Contenu de la boîte :
• Caméra O
carte micro-
• Plaque de montage
magnétiq
• Station d'accueil US
B. Charge de la caméra
Mise sous tension de la caméra,
DEL d
MARCHE / ARRÊT • Psur la touche Marche/
jusqu'à ce que la DEL ROUGE DE DROITE clignot
• P
jusqu'à ce que les DEL VERTE et ROUGE s'éteignent.
Couplage de la ca
• Appuyez sur la touche COUPLAGE pendant quelques second
VERTE DE GAUCHE
vous entendiez un message vocal indi
Réinitialisation de la caméra • Appuyez sur la touche RÉINITIALIS
Non connectée • La DEL rouge clignote rapidement.
Couplage de la caméra • Les DEL rouge et verte clignotent en alternance.
Connectée au routeur • La DEL rouge clignote lentement.
Connectée au serveur • La DEL verte s
Flux vidéo • La DEL verte clignote lentement.
Charge de la caméra • Les deux DEL s'éteign
Remarques :
Chargez
complètement la
batterie avant la
première utilisation.
La charge complète
de la batterie
demande enviro
5 heures.
L'autonomie de la
batterie est d'environ
3 mois en mode
d'économ
1. Alignez et serrez la
2. Connectez le câble USB à
un adaptateur secteur U
standard (5 V CC
fourni) et branch
dernier à une pri
Avec une station d'accuei
1. Retirez le cache
arrière.
2. Ouvrez le rabat en
caoutchouc imperméable
3. Connectez un câbl
puis connectez le câ
secteur USB standard (
et branchez ce dernier
Avec un câble m
Vis
C. Installation de l'application Motorola « Hubble Home »
T « Hubble sur l'
pour les apparTM pour les appar
AndroidTM .
Caméra Wi-Fi® Connexi
via le Wi-Fi® Appareils compatibles
pour le vi
1. Démarrez l
Hubble sur v
2. Suivez les instruction
3. Connectez-
4. Suivez les instruction
llumer votre ca
tablette
D. V
V
système minimale
Smartphones/T
Configuration Wi-Fi
® minimale :
De préfér
Internet sur :
http:/
2. Montage de la caméra
Vous pouvez p
l'aide de la plaque
magnétique pour un
• Marquez l
• Vissez une vis adéquat
montage (la têt
l
• Montez la pla
à trav
la plaque supp
• Assu
et placez cel
(Remarque : le
être limités par le support ma)
• V
flux vidéo danHubble Home », et réglez la position de
la caméra si néce
ATTENTION !
• Assurez-vous que la plaque support magnétique est solidement fixé
• Veillez à ce que que la caméra Orbit soit installée dans un endroit où elle ne sera pas
environnementales défavorables, y compris, mais sans s'y limiter, des vibrations excessives, l'humidité et le vent.
Œillet à l'arrière de la
plaque support
Cache arrière
Plaque
support
Meilleure po
Appuyez ici po
déverro
le cache a
EU NL
SNELST
Raadpleeg de gebruikershandleiding voor een volledige uitleg van
instructies, (beschikbaar voor downlo
1. Uw draadloze W
®
Video Camera installe
MODEL:
ORBIT
OPGELET:
VERSTIKKINGSGEVAAR - Als dit ap
en de USB-kabel meer dan 1 meter van de wieg plaatsen,
Plaats de came
van kinderen.
A. Overzicht va
1
2
4
5
8
9
10
12
7
3
11
613
14
RESET
AAN/UIT
KOPPELEN
1. Lichtsensor (v
nachtmodus-detectie)
2. Microfoon
3. Groe
4. Pa
5. Luidspr
6. Rode LED-in
7. Cameralens
8. Reset
9. Aan/Uuit
10.KOPPELING-toets
11.Sjabloon voor buitenmon
standaard / USB la
12.Schroefdraad voor buitenmontag
stand / USB laadstation
13.Contactp
14.Rubber k
aansluitin
SD-kaarthou
Verpakkingsinhoud:
• ORBIT Camera
(met micro-S
• Magnetisch
montagepl
• USB l
EU ES
GUÍA DE INICIO RÁPIDO
Para ac
consulte el Manual de usuario (
1. Configuración de su cámara de vídeo inalámbrica Wi-F
®
MODEL
ORBIT
ADVERTENCIA:
RIESGO DE ESTR
como el cable USB a una distancia mínima de 1 m
No coloque nunca la cámara ni el cable USB dentro de una
alcance del niño.
A. Descripción general de la cámara
1
2
4
5
8
9
10
12
7
3
11
613
14
RESTAB
ENCENDIDO/APA
EMPAREJAR
1. Sensor nocturno (para la
detección de
nocturno
2. Micrófono
3. Indicación LED verde
4. Sensor de infrarr
pasivo (P
5. Altav
6. Indicación LED roja
7. Lente de la cámara
8. Restablecer
9. Botón d
10.Botón EMPAREJAR
11.Localización del orificio para el
montaje en exteri
base de carga
12.Rosca de montaje
13.Clavij
14.Aleta
(CC 5 V/ A) y soporte para t
microS GB)
Contenido de la caja:
• Cámara OR
tarjeta micro
• Placa de montaj
magnétic
• Base de
B. De camera opladen
De camera aanzetten, k
LED-statusindicators
Voeding AAN/UIT
• Druk 5 seconde
UITGAAN snel knippert.
• Druk 5 seconde
UITGAAN snel knippert.
Het apparaat
• Druk enkele seconden op de koppelingsknop totdat de LINKER GROEN LED e
RECHTER RODE LED knipp
apparaat klaar is voor k
Het apparaat
• Druk op de restknop.
Niet aangesloten
• Rode LED knippert snel.
Het apparaat
• Rode & Groen LEDs knipperen om beurten.
Aangesloten
• Rode LED knippe
Aangeslote
• Groene LED licht op
Streaming video
• Groen LED knippert l
Het apparaat
• Beide LEDs uit als apparaat is uitgeschak
Opmerkin
De batterij volledig
opladen voor
ingebruikname. Het
duurt ongeveer 5
om de batterij
volledig op te laden.
In de POWER
SAVING-modus is de
gebruiksduur van de
batterij maximaal
3 maanden
1. De schroef uitlijnen en vastdraa
2. Sluit de USB-kabel aan
op een standaard USB-
voedingsadapter (DC 5V /
2A, niet meegeleverd
steek de stekke
stopcontact.
USB-laad
1. Verwijder achterkap.
2. Open waterdichte
rubberen flap.
3. Sluit een micro-USB-kabel aan
camera en sluit de USB-kabel aan op
standaard USB-voedingsadapter (DC 5V / 2A,
niet meegeleverd) en steek
stopcont
Micro-USB-kabel geb
schroef
B. Cargue la
Encendido, empar
Indicadores LED de estado
Encendido y apagado • Pulse el botón de encendido y a
ROJO DERECHO parpadee rápidamente para ind
• Pulse el botón de encendido y
ROJO y VERDE se apaguen para indicar el apagado.
Emparejado del dispositivo • Pulse el bot
IZQUIERDO y el LED ROJO DERECHO parpadeen de forma
mensaje de vo
Restablecimiento del dispos • Pulse el botón de restablecimiento.
No conec • El LED rojo parpadea rápidament
Emparejando el dispositivo. • Los LED rojo y ver
Conectada al router. • El LED rojo parpadea lentamente.
Conectada al servidor. • LED verde encendido.
Transmitiendo vídeo. • El LED verde parpadea lentamente.
Cargando el dispositivo. • Si la cámara está apagada, los
Notas:
Cargue la batería
por completo antes
de utilizar la cámara
por primera vez.
batería tarda unas 5
horas en carg
por comple
La duración de la
batería es de
máximo de 3 meses
en el modo AHORRO
DE ENERGÍA.
1. Alinee y apriete el tornillo.
2. Conecte el cable USB a
un adaptador d
USB estándar (CC 5 V/2 A,
no incluido) y enchúfe
en una toma de corrien
eléctrica.
Uso de la base de
1. Retire la cubierta
trasera.
2. Abra la aleta de
goma impermeab
3. Conecte un cabl
a continuación, c
adaptador de co
5 V/2 A, no incluido) y enchúfelo en una
de corriente eléctr
Uso del cable mic
tornillo
C. InstaHubble Home” Appl
Download de Motorola A
iOS appaTM StTM
apparaten
Wi-Fi® Camera Aansluiten op
Internet via Wi-Fi® Compatibilit
Weergave-apparaten
Hubble Ho App op
2. Vol
3. Meld u aan bij uw account op uw compati
4. V
smartphone of
D. W
Controleer
Smartphones/T
Wi-Fi
® vereisten:
Bij voork
http:/
C. Instale la aplicación Hubble Home”.
Descargue “Hubbl de App Store en
dispositivos iOS o de la TTM en dispositi
AndroidTM .
Cámara Wi-Fi® Conexión a Int
a través de Wi-Fi® Disposit
compatibles
1. Eje
Hubble Ho en su sma
2. Siga las instrucciones de
3. Inicie sesión en su cuenta desd
4. Siga las in
smartphone
D. Vhones y tablet
T
Smartphones/tabletas: iOS 7, Android™ 4.4
Requisitos de Wi-Fi® :
Preferiblemente 1 MB de
Internet en: http:/
2. Monteer de camera
U kunt de ORBIT-camer
de meegeleverde magn
opening voor een s
• Mark
• Beve
schroe
montageplaat
• Plaats de magnetis
in de openin
montageplaat go
• Zorg erv
bev
magnetischOpmerk
en camerarichtingen kunnen beperkt zijn met de
magnetische montageplaa)
• Controleer de
in “Hubble Home ”merarichting indien
nodig.
OPGELET!
• Zorg ervoor dat de
• Zorg ervoor dat de O
sterke trillingen,
Opening aan de
van de montageplaat
Achterkap
Montage
plaat
Beste montagepositi
Druk hier om de
achterkap t
ontgrendelen en te
verwijderen.
2. Montaje de la cámar
Puede colocar la cámararía, encimera o mesa, o montarla en la pared con la placa
de montaje magnética. En la parte trasera de la placa de montaje ma
para la llave a través de la cual puede coloca mm) para m
pared.
• Marque e
• Fij
12 mm ade
ranura del agujero
de la placa de monta
• Coloque la placa de
del tornillo en la ranura del agujero
profundi
asiente con
• Asegúrese de
cámara y
montaje magnNota: El soporte mag
limitar los ángulos o la orientación extremos).
• Compruebe la imagen de la cámara mirand
transmisión eHubble Home”
posición si le r
ADVERTENCIA
• Asegúrese de que la placaa e
• Asegúrese de que la cámara O
título enunciativo pero no lim
Ranura del agujero pa
la parte trasera de la placa de
montaje
Cubierta trasera
Placa de
montaje
Posición de montaje i
Pulse aquí para
desbloquear y
retirar la cubierta
trasera.
3. General Information
If your product is not worQuick Start Guide or the User’s Guide of one of the
models listed on page 1.
Contact Customer Service:
+491805 938 802 in Europe Emai motorola-mbp@tdm.de
Consumer Products as
Thank you for purchasing this
Electronics Internat
What Does this Warranty Cover?
Subject to the exNE warrants
("Product") or certfor use with this product that it manufactured to
be free from defects in materials and workmanship under normal consumer us
outlined below. This clusive war
THIS WARRANTY GIVES Y
THAT V
CONSUMER PROTECTION LAWS OR REGULATIONS IN THEIR COUNTRY OF PURCHASE OR, IF
DIFFERENT
WARRANTY ARE IN ADDITION TO ALL RIGHTS AN
CONSUMER PROTECTION LAWS AND REGULA
RIGHTS Y Y
Who is covered?
This Warran
3. Allgemeine Informationen
Wenn Ihr Produkt nicht richtig funktioni
BedienungsaModelle (siehe S. 1) zurate.
Wenden Sie sich an den Kundendienst:
01805 938 802 in DeutschlE-Mail: motorola-mbp@tdm.de
Eingeschränkte Garantie für Konsumgüter und Zub
Vielen Dank, dass Sie dirola gekauft haben, das von Binatone El
International LTD („BINATONE“) unter Lizenz gefertigt wird.
Was deckt diese Garantie ab?
Vorbehaltlich der unten angegebenen Ausschlüsse garantiert BINATONE, dass dieses von ihm
gefertigte Produkt de
die Verwendung mit d, bei normaler Nutzung durch den Verbraucher für
den unten angegebenen Zeitraum frei von Material- und Fertigungsfehlern ist. Diese Garantie ist Ihre
ausschließliche Garantie und nicht übertragbar.
DIE RECHTE DES KÄUFERR JEWEILS GELTENDEN NATIONALEN
GESETZGEBUNG, WERDEN VON DIESER GARANTIE NICHT BERÜHRT. DIESE GARANTIE GILT
ZUSÄTZLICH ZU DEN ANWENDBAREN GEWÄHRLEISTUNGS- UN
UND BESCHRÄNKT NVERB
ODER ANDERE ZWINGENDE BZW. GEMÄSS DEM RECHT DER ALLGEMEINEN
GESCHÄFTSBEDINGUNG
EUROPÄISCHEM RECHT.
Was ist abgedeckt?
Diese Garantie erstreckt sich nur auf
3. Généralités
Si votre produit ne fz ce
l'un des modèles listés en page 1.
Adressez-vous à notre service clientèle :
0170700859 en France 0258870ue Courriel : motorola-mbp@tdm.de
Garantie limitée pour les produits et accessoires g
Merci d'avoir acheté ce produit de marque Motorola fabriqué so
International LTD (« BINATONE »).
Que couvre la présente Garantie ?
Sous réserve des exclusions indiquées ci
(« Produit ») de marquertifié et vendu pour être utilisé avec le Prod
(« Accessoide défauts de matériaux et de fabri
réserve d’
unique garantie et n’est pas transféra
LA PRÉSENTE GARANTIE VOUS CONFÈRE DES DROITS LÉGAUX SPÉCIFIQUES ; IL
POSSIBLE QUE VOUS AYEZ D'AUTRES DROITS POUVANT VARIER EN FONCTION DE L'ÉTAT,
DE LA RÉGION OU DU PAYS. POURNSOMMA
RÉGLEMENTATIONS DE PROTEC
S'IL DIFFÈRE, DANS LEUR PAYS DE RÉSIDENCE, LES AVANTAGES OCTROYÉS PAR LA
PRÉSENTE GARANTIE LIMITÉE SONT ACL'ENSEMBLE DES DROITS ET
RECOURS CONFÉRÉS PAR LESDITES LOIS ET LESDITES
PROTECTION DES CONSOMMATEURS
DROITS, CONSUL VOTRE PAYS, PROVINCE OU ÉTAT.
Qui est couvert par la présente Garantie ?
La présente Garantie couvre uniquement le
3. Algemene informatie
Als uw product niet goed functioneert, deze Snelstartgids lezen of de Gebruiker
een van de modellen vermeld op pa
Contact opnemen met Klantenservice:
+31 (0) 202621
Beperkte garantie voor consumentenproduct en accessoires ("Garantie")
Dank u voor de aankoop van dit onder Motorola-product, dat onder licentie is vervaa
Binatone Electronic
Wat wordt gedekt door deze garantie?
BINATONE garandeert
merknaam van Motorola ("Pric
gebruik met dit product, geen defecten zal vertonen in materialen en productie bij
consumentgebruik gedurende deen periode. Deze Garantie is uw exclusieve
garantie en is niet overdraagbaar.
DEZE GARANTIE GEEFT U SPECIFIEKE WETTELIJKE RECHTEN EN U KUNT ANDERE
RECHTEN HEBBEN DIE PER LAND KUNNEN VERSCHILLEN.
GEDEKT ZIJN ONDER WETGEVING VOOR CONSUMENTENBESCHERMING IN HUN LAND
VAN AANKOOP OF HUN LAND VAN VERBLIJF, KUNNEN DE DOOR DEZE GARANTIE
GEBODEN VOORDELEN EEN AANVULLING ZIJN OP ALLE RECHTEN EN
VERHAALSMOGELIJKHEDEN DIE DEZE WET- EN REGELGEVING VOOR
CONSUMENTENBESCHERMINGSWETTEN BIEDT. RAADPLEEG DE WETTELIJKE RECHTEN
IN UW LAND VOOR EEN VOLLEDIG BEGR
Wie is gedekt?
Deze Garantie is uw ex
3. Información general
Si su producto no funcio
uno de los
Póngase en contacto con el servicio de atención al cliente:
0911366203 desde España Correo electrónico: motorola-mbp@tdm.de
Garantía limitada pa
Le agradecemos la compra de este producto marca Motorola, fabrica
Electronics Internat
¿Qué cubre esta garantía?
Sujeto a las e
"Producto") o accesorio certificado (el "Accesorio") de marca Motorola vendido con este producto ha
sido fabricado libre de fallos
el periodo especificado a continuación. Esta Garantía es su única garantía, y no puede transferirse.
ESTA GARANTÍA LE PROPORCIONA DERECHOS LEGALES ESPECÍFICOS, Y PUEDE TENER
OTROS DERECHOS QUE DEPENDERÁN DEL ESTADO, PROVINCIA O PAÍS. PARA LOS
CONSUMIDORES QUE ESTÉN CUBIE
DEL CONSU
LOS BENEFICIO
DERECHOS Y RECURSOS OFRECIDOS POR DICHAS LEYES Y NORMATIVAS DE PROTECCIÓN
DEL CONSUMIDOR. PARA CONOCER PLENAMENTE SUS DERECHO, DEBE CONSULTAR
LALEGISLACIÓN VIGENTE EN SU PAÍS
¿Quién recibe esta cobertura?
Esta Garantía cubre únicamente al primer comprador