INTRODUCTION
The Alarm is operated using a 4 digit PIN Code with the
keypad on the front of the alarm.
The Alarm Unit is fitted along the opening edge of a
door/window with the Magnet fixed to the door/window
and the Alarm unit fitted to the frame or the other way
around When the protected door or window is opened
the magnet is removed from the Alarm Unit and an
alarm will be generated, (if the system is in Alarm or
Chime Mode).
The system has 2 operating modes: ALARM and
CHIME. Chime Mode is a low security feature that will
produce a door
triggered. In Alarm Mode the device will produce a
constant high volume alarm sound when triggered.
Safety: Always follow the manufacturers advice when
using power tools; steps, ladders etc. and wear
suitable protective equipment (e.g. safety goggles)
when drilling holes etc.
Before drilling holes in walls, check for hidden
electricity cables and water pipes, the use of a cable/
pipe locater may be advisable if in doubt.
When using ladders, ensure that they are positioned on
a firm stable surface at the correct angle and suitable
secured before use.
The use of ear defenders is advisable when working in
close proximity to the Siren due to the high sound level
produced by this device.
Do not use in wet locations.
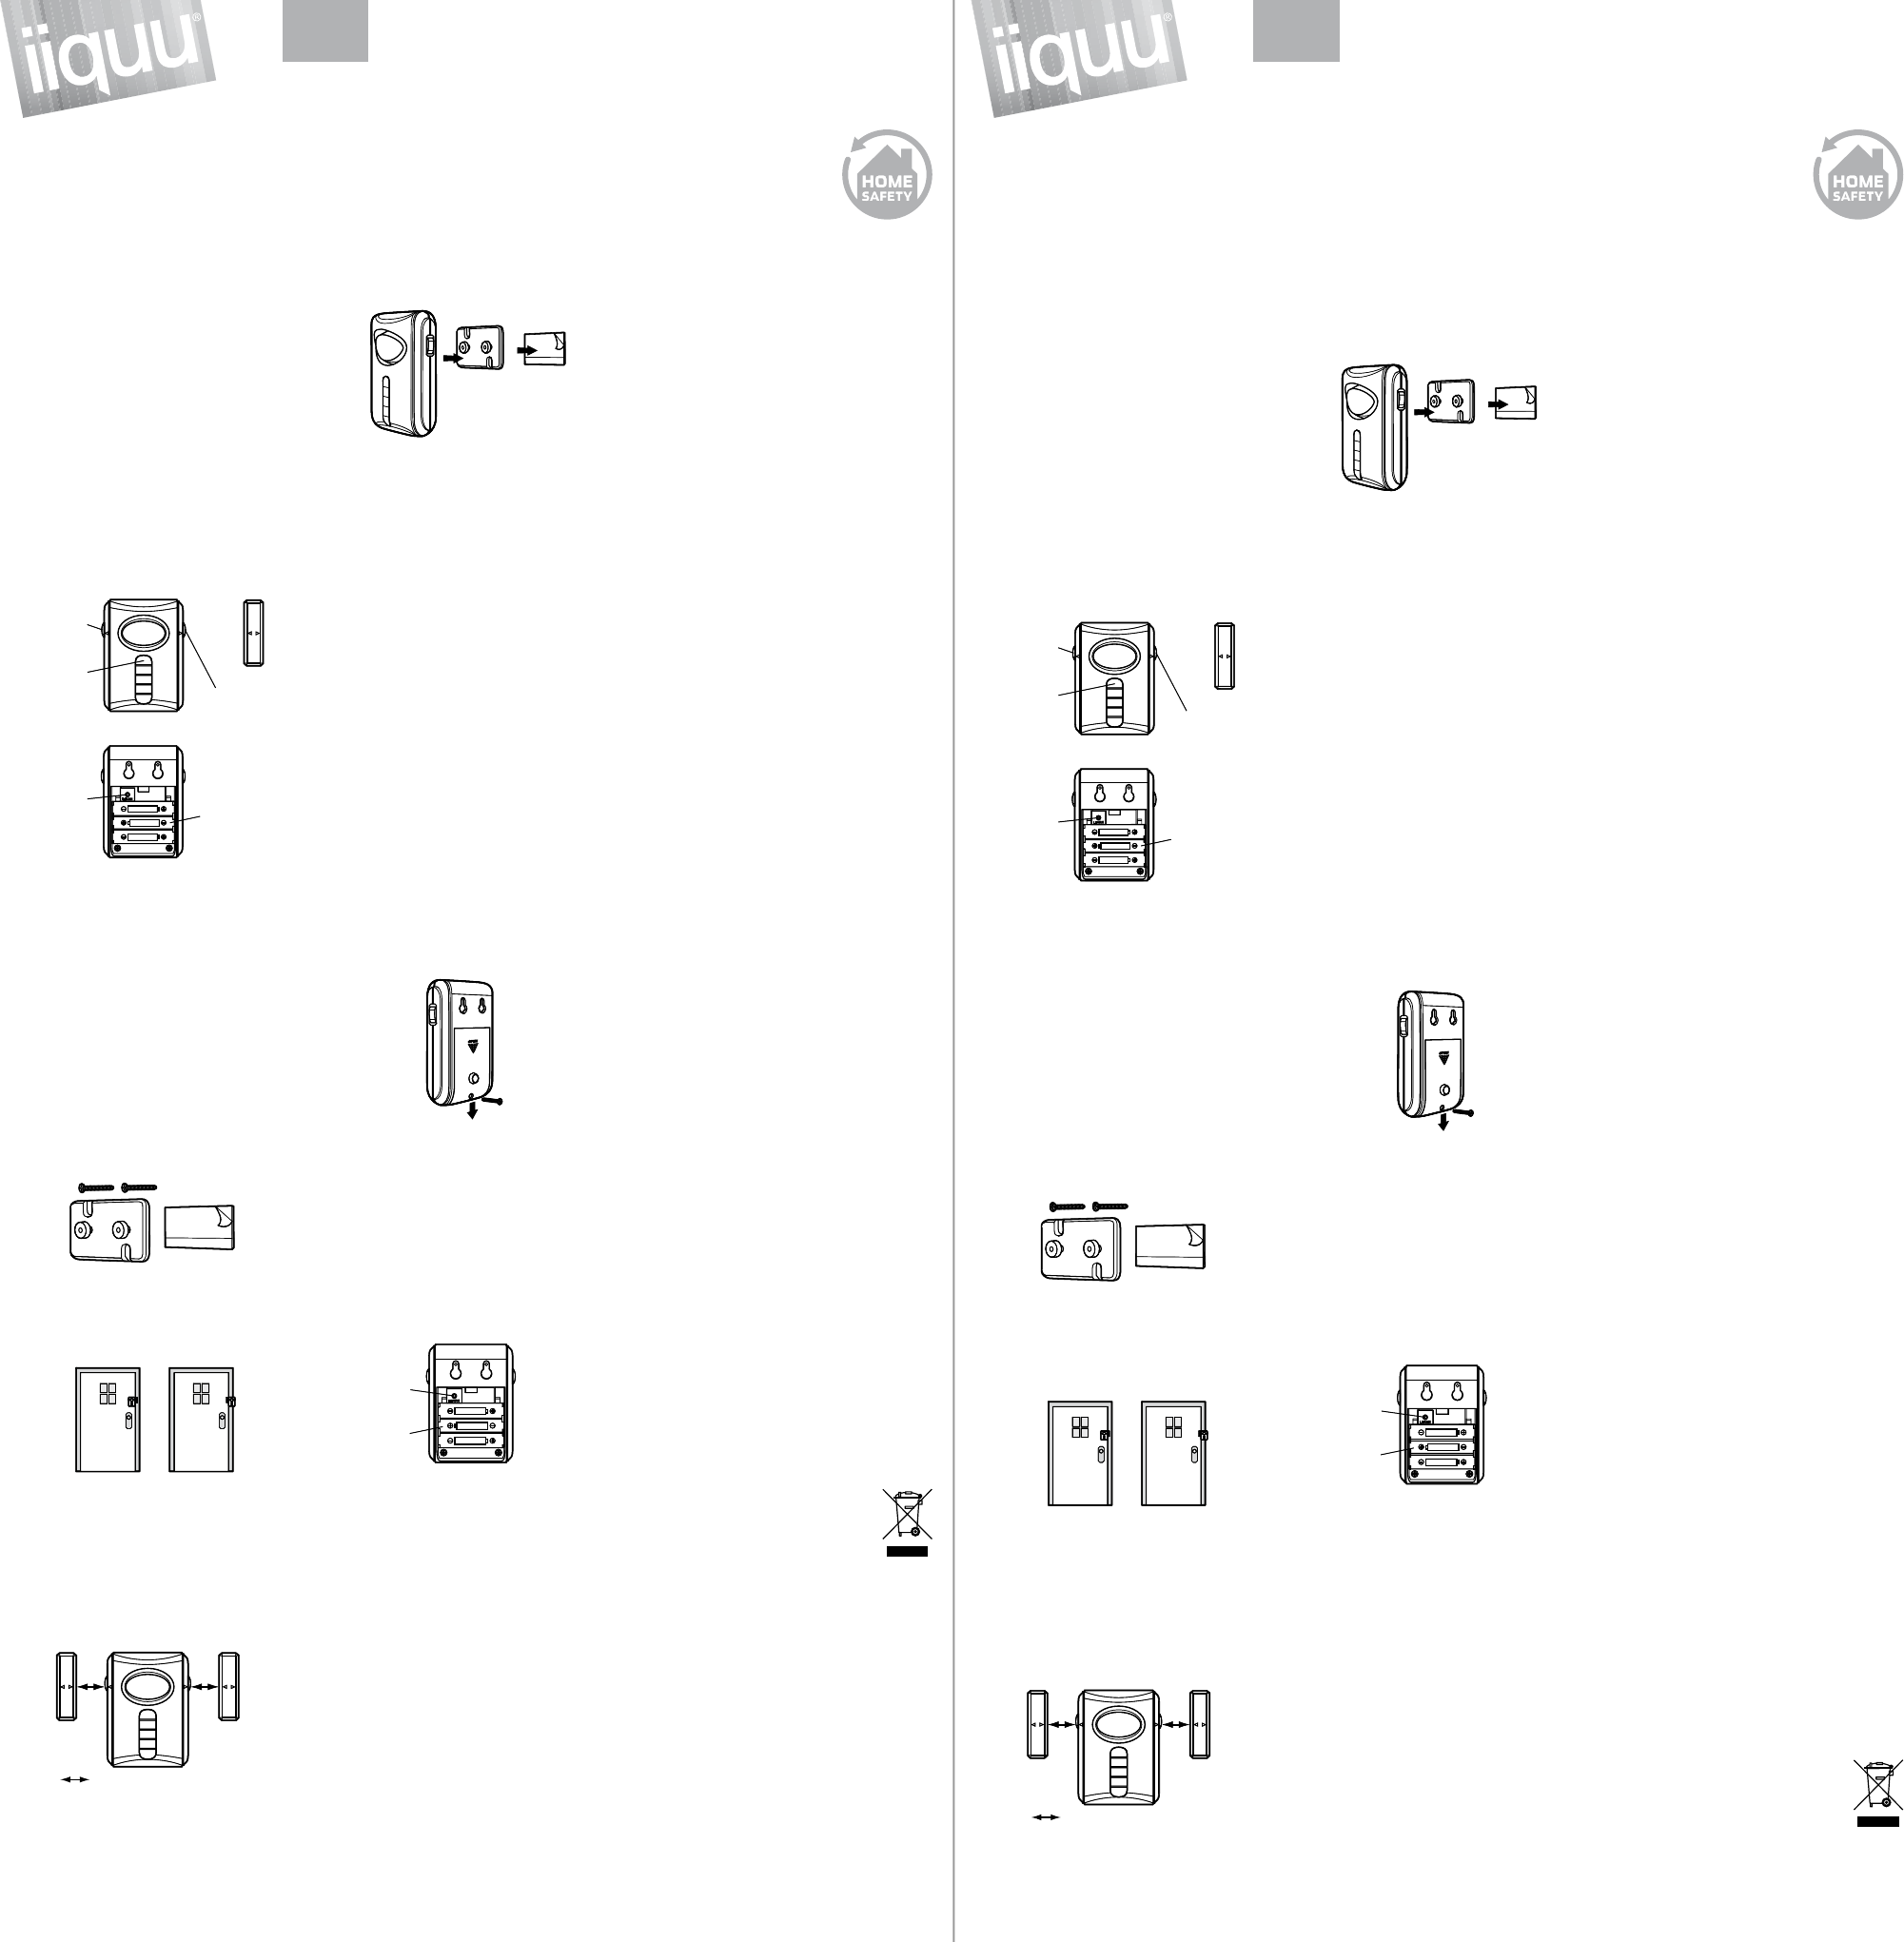
INST
1. Select your desired location for the alarm. The alarm
is designed to mount to the door frame or to the
door itself.
Use either the provided screws (for permanent
mounting) or double-sided tape (for temporary
mounting). The recommended location is the back
of the door
frame. Mounting the alarm to the door ensures that
the alarm will not be damaged by opening and
closing the door
Note: The magnets may be mounted to either side
of the alarm as long as the arrowsline up.
Important: Whether mounting to the door/window
or door/window frame, the gap distance between
the alarmand magnet must be 12mm or less.
2. Attach the mounting plate to the back of the alarm.
Peel the protective covering from one side of the
double-sided tape and then apply to the mounting
plate. Remove the protective covering from the back
of the double-sided tape and lightly mount the alarm
in the desired position. Make sure that the surface
INLEIDING
Het alarm wordt bediend via een 4-cijferige persoonlij-
ke code ingevoerd op het toetsenpaneel aan de
voorkant van het alarm.
Het alarm wordt gemonteerd aan de zijde waaraan de
deur/het raam opent. De magneet wordt vastgezet op
de deur/het raam en het alarm wordt op het kozijn of
andersom. Als de beveiligde deur of raam wordt
geopend, wordt de magneet verwijderd van het alarm
en zal er een (alarm)signaal klinken (als het systeem
zich in alarm- of deurbelmodus bevindt).
Het systeem heeft 2 bedieningsmodi: ALARM en
CHIME (deurbelmodus). De deurbelmodus (chime)
heeft een lage beveiligingseigenschap en produceert
het geluid van een deurbel als deur of raam geopend
wordt. In de alarmmodus produceert het alarm een
constant luid signaal als deur of raam geopend wordt.
V Volg steeds het advies van de fabrikant bij
het gebruik van gereedschap; trapjes, ladders enz. en
draag de juiste beschermingsmiddelen (bv
-
bril) bij het boren van gaten enz.
Controleer alvorens gaten in de mur
verborgen elektriciteitskabels en waterleidingen
aanwezig zijn. Het gebruik van een kabel-/leidingzoeker
wordt aanbevolen bij twijfel.
Zorg er bij het gebruik van ladders voor dat deze
geplaatst worden op een vaste, stabiele onder
met de juiste invalshoek en dat ze goed beveiligd zijn
vóór gebruik.
Het gebruik van gehoorbescherming is aan te raden als
u in de nabijheid van het alarmsignaal werkt omwille
van het hoge geluidsvolume dat door dit toestel
geproduceerd wor
Niet gebruiken in vochtige omgevingen.
INST
1. Kies de gewenste locatie voor het alarm. Het alarm
is ontworpen voor montage aan het deur/raamkozijn
of aan de deur/het raam zelf.
Gebruik ofwel de meegeleverde schroeven (voor
permanente montage) of de dubbelzijdige tape (voor
tijdelijke montage). De aanbevolen locatie is de
binnenkant van de deur/het raam met de magneet
gemonteerd op het deur/raamkozijn.
Montage van het alarm op de deur zorgt ervoor dat
het alarm niet beschadigd kan worden door het
openen en sluiten van de deur
Opmerking: De magneten kunnen gemonteerd
worden aan beide kanten van het alarm, maar de
pijlen moeten op elkaar afgestemd zijn.
Belangrijk: Zowel bij montage aan de deur/ het
raam als bij montage aan het deur/raamkozijn moet
de afstand tussen het alarm en de magneet 12 mm
of minder zijn.
2. Maak de montageplaat vast aan de achterkant van
het alarm. T
van de dubbelzijdige tape en breng deze kant aan
op de montageplaat.
you are mounting to is clean and dry
results, clean the mounting surface with a mixture of
50% isopropyl alcohol and 50% water
Do not apply firm pressure until location is final.
Note: When mounting to a door frame, the
mounting plate mounts off-centre to the left or right
in order to position the alarm closest to the edge of
the door
3. Using double-sided tape, lightly attach the magnet
to the opposite edge next to the alarm. Line up the
arrows of the alarm and the magnet. Ensure the
distance between the two pieces is 12 mm or less.
T
switch to CHIME and open the door
sounds, then the gap distance is correct. If it does
not sound, move either the alarm or magnet closer
so that gap distance is 12 mm or less.
4. Once you have confirmed the correct positioning of
the magnet and alarm, light the alarm off the
mounting plate and apply firm pressure dir
the plate itself. Once secured, reattach the alarm to
the mounting plate.
5. Apply firm pressur
position as well.
INST
The keypad controlled door alarm requir
batteries.
1. Remove screw fr
located on back of the unit. Slide off the door in the
direction of the arrow
2. Insert three AAA batteries noting the polarity
diagram inside the battery compartment.
3. Replace battery compartment cover and secure
screw
LOW BA
The alarm unit has a low battery circuit. When the
batteries reach a low level, the indicator light will flash
slowly
CREA
The keypad allows you to set a personal 4-digit code
for arming and disarming the alarm.
1. Remove the screw fr
door located on back of the unit.
Slide off the door in the direction of the arr
2. Press the LEARN button; the r
the alarm will blink for 15 seconds. During this time,
input your 4-digit code. A beep will confirm each
input. The unit will flash a green light 3 times to
confirm the new 4-digit code has been saved.
3. Replace battery compartment door and secure
screw
OPERA
1. Locate the ALARM/CHIME switch on the right side
of the alarm unit.
2. Slide switch to ALARM position.
3. Choose HOME or AW
unit.
Home Mode:
In HOME mode, the alarm will sound when the gap
between the alarm and the magnet is greater than
12mm (i.e. the door is opened).
Away Mode:
In AW
before the unit is armed. The alarm’
V
de dubbelzijdige tape en monteer het alarm
eenvoudig in de gewenste positie. Zorg ervoor dat
de oppervlakte waarop u het alarm monteert zuiver
en droog is. V
montage-oppervlakte met een mengeling van 50%
isopropyl alcohol en 50% water
Niet stevig aandrukken als de locatie nog niet
definitief is.
Opmerking: Bij montage aan een deurkozijn moet
de montageplaat van het midden weg naar links of
rechts worden gemonteer
mogelijk bij de hoek van de deur te plaatsen.
3.
Breng de magneet door middel van dubbelzijdige tape
eenvoudig aan op de tegenoverliggende hoek naast
het alarm. Stem de pijlen van het alarm en de magneet
op elkaar af. Zorg ervoor dat de afstand tussen de
twee stukken 12 mm of minder is. Om de afstand te
testen, schuift u de ALARM/CHIME-schakelaar naar
CHIME (deurbelmodus) en opent u de deur
belgeluid is, dan is de afstand juist. Als er geen
belgeluid is, breng dan ofwel het alarm of de magneet
dichter zodat de afstand 12 mm of minder is.
4. Zodra u de juiste plaatsing van de magneet en het
alarm heeft bevestigd, tilt u het alarm uit de
montageplaat en drukt u de montageplaat zelf
stevig aan. Zodra deze vastzit, brengt u het alarm
opnieuw aan op de montageplaat.
5. Druk de magneet stevig aan om de plaatsing
hiervan ook vast te zetten.
DE BA
Het alarm heeft drie AAA batterijen nodig .
1. V
batterijvak aan de achterkant van het alarm. Schuif
het deksel eraf in de richting van de pijl.
2. Stop er drie AAA-batterijen in en houd rekening met
het polariteitschema in het batterijvak.
3. Plaats het deksel van het batterijvak terug en draai
de schroef vast.
WAARSCHUWINGSLAMPJE VOOR
LEGE BA
Het alarm heeft een lege-batterij-circuit. Als de
batterijen bijna leeg zijn, knippert het waarschuwings
-
lampje langzaam.
EEN PERSOONLIJKE ALARMCODE
AANMAKEN
Via het toetsenpaneel kunt u een persoonlijke
4-cijferige code instellen voor het in- en uitschakelen
van het alarm.
1. V
batterijvak aan de achterkant van het alarm. Schuif het
deksel in de richting van de pijl.
2. Druk op de LEARN-knop; het rode lampje op de
voorkant van het alarm knippert gedurende 15
seconden. V
in. Elke invoer wordt bevestigd door een pieptoon.
Er knippert 3 keer een groen lampje op het alarm
om te bevestigen dat de nieuwe 4-cijferige code is
opgeslagen.
3. Plaats het deksel van het batterijvak terug en draai
de schroef vast.
GEBRUIK IN DE ALARMMODUS
1. Zoek de ALARM/CHIME-schakelaar aan de
rechterkant van het alarm.
2. Schuif de schakelaar naar de positie ALARM.
3. Kies HOME (thuis) of AW
linkerkant van het alarm.
Thuismodus (home):
In de modus HOME (thuis) weerklinkt het alarm als de
afstand tussen het alarm en de magneet groter is dan
12 mm (bv
flash red quickly
activated and has begun the 45 second count down.
The delay allows time for you to leave the protected
area without triggering the alarm. When returning to the
protected area, ther
to enter the 4-digit code before the alarm will sound.
Arming the Alarm:
1. Arm the alarm by entering your 4-digit code. When
the 4-digit code is entered correctly the unit will
flash a green light once.
Note: if the 4-digit code is entered incorrectly
unit will sound a higher tone and flash red 3 times.
Disarming the Alarm:
1. Enter your 4-digit code to disarm the alarm.
When the fourth digit of your code is entered, the
unit will respond with 2 tones and will flash a green
light twice.
2. Enter the correct code anytime after the alarm has
sounded to deactivate.
Note: When testing, a cloth can be used to cover
the alarm to reduce risk of hearing damage.
Incorrect code
If an incorrect code is entered, the unit will sound a
louder beep and will flash red 3 times. Re-enter the
correct code after the light stops flashing.
OPERA
1. Locate the ALARM/CHIME switch on right side of
the alarm unit.
2. Slide the switch to CHIME mode.
Activating the Chime:
1. The chime will sound immediately if the distance
between the alarm and magnet is greater than
12mm (i.e. the door is opened).
Deactivating the Chime:
1. T
switch to the ALARM position.
MAINTENANCE
T
dampened with water and wipe dry
chemical agents as this may damage and discolor the
unit.
Warning:
Risk of personal injury
• Prolonged exposure to alarm sir
permanent hearing loss.
Battery Warning:
• Remove batteries before storing the Alarm for
extended periods.
• Batteries may leak harmful liquids or ignitable
materials or explode causing injury and product
damage.
• Do not mix old and new or other battery types.
• Replace all batteries at the same time.
• Replace fully discharged batteries immediately
For indoor use only; do not use in wet locations.
TROUBLE SHOOTING
Alarm Unit not operating
• Alarm not operating - Batteries low
incorrectly fitted.
• Incorrect User Access Code entered.
Magnetic Contact not operating
• Gap between contact and magnet is more than
12mm when the door/window is closed.
• Arrows on magnet and alarm unit not in line.
DISPOSAL AND RECYCLING
At the end of their useful life the packaging and
product should be disposed of via a suitable Recycling
Centre.
Do not dispose of with your normal
household waste.
DO NOT BURN.
Afwezigheidsmodus (away):
In de modus AW
45 seconden voordat het alarm wordt geactiveer
rode waarschuwingslampje van het alarm knippert snel
om u te laten weten dat het alarm geactiveerd is en dat
de aftelling van 45 seconden begonnen is.
De vertraging geeft u de tijd om de beveiligde zone te
verlaten zonder dat het alarm afgaat. Bij terugkeer naar
de beveiligde zone is er een vertraging van 30
seconden om u de tijd te geven om de 4-cijferige code
in te voeren alvorens het alarm afgaat.
Het alarm inschakelen:
1. Schakel het alarm in door uw 4-cijferige code in te
voeren. Als de 4-cijferige code juist is ingevoerd,
knippert het groene waarschuwingslampje van het
alarm één keer
Opmerking: Als de 4-cijferige code fout wordt
ingevoerd, zal het alarm afgaan met een hogere
toon en knippert het rode waarschuwingslampje
3 keer
Het alarm uitschakelen:
1. V
schakelen. Als het vierde cijfer van uw code is
ingevoerd, antwoordt het alarm met 2 tonen en
knippert het groene waarschuwingslampje
tweemaal.
2. Als het alarm afgaat, voer dan de juiste code in om
het uit te schakelen.
Opmerking: V
worden om het alarm te bedekken en zo het risico
op gehoorschade te beperken.
Foute code
Als er een foute code wordt ingevoerd, zal het alarm
een luidere pieptoon laten horen en zal het r
waarschuwingslampje 3 keer knipperen. V
opnieuw de juiste code in nadat het lampje stopt
met knipperen.
GEBRUIK IN DE BELMODUS (CHIME)
1. Zoek de ALARM/CHIME-schakelaar aan de
rechterkant van het alarm.
2. Schuif de schakelaar naar de CHIME-modus
(deurbelmodus).
De deurbelmodus inschakelen:
1. Het deurbelgeluid klinkt onmiddellijk als de afstand
tussen het alarm en de magneet groter is dan 12
mm (bv
De deurbelmodus uitschakelen:
1. Om de deurbelmodus uit te schakelen schuift u de
ALARM/CHIME-schakelaar naar de positie ALARM.
ONDERHOUD
Om de behuizing van het alarm te reinigen gebruikt u
een zachte enigszins vochtige doek en veegt u het
alarm droog. Gebruik geen chemische middelen want
deze kunnen het alarm beschadigen en doen
verkleuren.
Waarschuwing:
Risico op persoonlijk letsel
• Langdurige blootstelling aan het alarmsignaal kan
permanente gehoorschade veroorzaken.
Waarschuwing in verband met de batterijen:
• V
tijd op te slaan.
• Batterijen kunnen schadelijke vloeistoffen of
ontvlambaar materiaal lekken of ontploffen,
waardoor letsels en productschade kunnen
ontstaan.
• Meng geen oude en nieuwe batterijen of
verschillende batterijtypes.
• V
• V
Enkel voor gebruik binnenshuis; niet gebruiken in
vochtige omgevingen.
PROBLEEMOPLOSSING
Het alarm werkt niet
• Batterijen leeg, bijna leeg, ontbreken of onjuist
geplaatst.
• Onjuiste gebruikerstoegangscode ingevoerd.
Het magnetische contact werkt niet
• De afstand tussen het contact en de magneet is
meer dan 12 mm als de deur/het raam gesloten is.
• De pijlen op de magneet en het alarm zijn niet op
elkaar afgestemd.
WEGGOOIEN EN RECYCLEN
Aan het einde van hun levensduur moeten
de verpakking en het product weggegooid
worden via een geschikt recyclecentrum.
Niet wegwerpen bij uw gewone huishou
-
delijke afval.
NIET VERBRANDEN.
Home /
Away switch
Indicator
light
Learn
button
Magnet
Alarm /
chime
switch
Battery
compartment
Mounting plate
Double sided
tape
Screws
Distance must be 12mm or less
Alarm
Mounting
plate
Double sided
tape
Learn
button
Battery
compartment
T
Thuis/afwezig-
schakelaar
Waarschuwings-
lampje
Learn-
knop
Magneet
Alarm/chime-
schakelaar
Batterijvak
Montageplaat
Dubbelzijdige tape
Schroeven
De afstand moet 12 mm of minder zijn
Alarm
Montageplaat Dubbelzijdige
tape
Learn-
knop
Batterijvak
T
DOOR DOOR
ALARM/DOORBELL SOUNDS WHEN DOOR/ ALARM/DEURBELGELUID GAA
Installation and Oper Installatie- en bedieningsinstructies
These instructions should be r Deze instructies moeten be
voor toekomstige r
UK NL
Home /
Away switch
Indicator
light
Learn
button
Magnet
Alarm /
chime
switch
Battery
compartment
Mounting plate
Double sided
tape
Screws
Distance must be 12mm or less
Alarm
Mounting
plate
Double sided
tape
Learn
button
Battery
compartment
T
Thuis/afwezig-
schakelaar
Waarschuwings-
lampje
Learn-
knop
Magneet
Alarm/chime-
schakelaar
Batterijvak
Montageplaat
Dubbelzijdige tape
Schroeven
De afstand moet 12 mm of minder zijn
Alarm
Montageplaat Dubbelzijdige
tape
Learn-
knop
Batterijvak
T
Home /
Away switch
Indicator
light
Learn
button
Magnet
Alarm /
chime
switch
Battery
compartment
Mounting plate
Double sided
tape
Screws
Distance must be 12mm or less
Alarm
Mounting
plate
Double sided
tape
Learn
button
Battery
compartment
Thuis/afwezig-
schakelaar
Waarschuwings-
lampje
Learn-
knop
Magneet
Alarm/chime-
schakelaar
Batterijvak
Montageplaat
Dubbelzijdige tape
Schroeven
De afstand moet 12 mm of minder zijn
Alarm
Montageplaat Dubbelzijdige
tape
Learn-
knop
Batterijvak