HOW TO USE THE H2O MOP
®
ULTRA
™
1) Attach a Mop Pad such as (Microfiber Cloth or Disposable Pad (Optional Item) or
Microfiber Ultra Cloth-Optional Item)
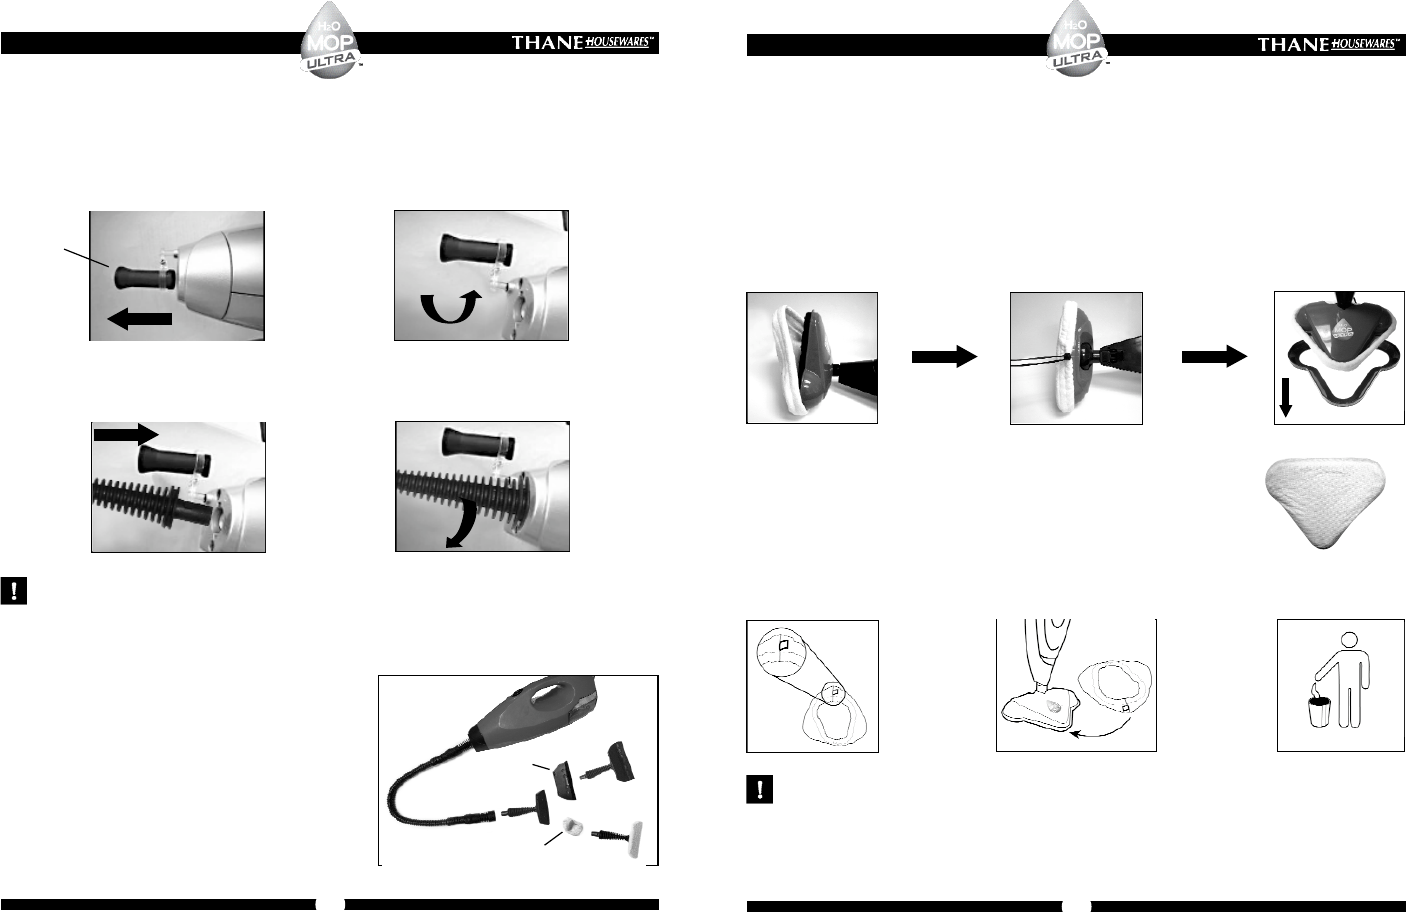
• If using the Microfiber Cloth (Part 20)
1. Attach the Microfiber Cloth, (Part 20) to the Mop Head (Part 16) as illustrated in Fig. 1.
2. Wrap the drawstring around the Mop Head and tighten it up as illustrated in Fig. 2.
3. When using the H2O Mop
®
Ultra
™
on carpet surfaces; place the mop head (with microfiber or disposable pad in place)
on top of the carpet glider (part 21) as illustrated in Fig. 3. Do not attempt to use the H2O Mop
®
Ultra
™
on carpet/rug
surfaces without the carpet glider in place. Never use the carpet glider on surfaces that are prone to scratching.
Microfiber cloth care:
• Machine wash 60 ºC (140 ºF)
• Do not bleach
• Do not use softener
• If using the Disposable Pad (Optional Item)
1. Locate the label on the Disposable Pad as illustrated in Fig. 1.
2. Attach the Pad to the Mop Head, the label on the front of the pad should go
on the front of the Mop Head as illustrated in Fig. 2.
3. Dispose the Pad after use, Fig. 3.
NOTE:
The Disposable Pad fits tight to the mop head so it stays in place during use and it is designed for one time use only.
Never use the disposable pad or microfiber pad if the cloth has any noticeable holes, abrasions or other forms
of degradation. By using a damaged pad or cloth, streaking and possible scratching of the floor surface may occur.
U S E R ’ S G U I D E
5
Fig. 2 Fig. 3Fig. 1
U S E R ’ S G U I D E
12
HOW TO USE THE ACCESSORIES
(OPTIONAL ITEMS)
To attach the Extension Hose (Part 8) and the Jet Nozzle (Part 7) follow these instructions:
a) Pull adapter (Part 23) out of channel
c) Align Jet Nozzle or the Extention Hose to line up with
the corresponding slots inside the channel opening
NOTE:
To remove or replace attachments, rotate the attachment counter-clockwise and pull out.
The Jet Nozzle (Part 7) can be connected to the Hand-Held Steamer (Part 13) directly or through the Extension
Hose (Part 8).
To use the Window Cleaning Kit (Part 1) attach the Window
Cleaning Kit to the Extention Hose (or dirctily to the hand-held
stemear)
To use the Fabric Tool, remove the Squeegee from the Window
Cleaning Kit and attach the cleaning Cloth (Part 3)
NOTE: When working with the Window Cleaning Kit and the Fabric
Tool we reccomend using the Extension Hose for maximum
accessibility.
Adapter
d) Push Jet Nozzle or the Extention Hose in the
channel until it reaches the end, then turn clock-wise
to lock it in place
Fig. 2 Fig. 3Fig. 1
b) Turn adapter (Part 23) to ensure channel
opening is accessible
Squeegee
Cleaning Cloth