U S E R ’ S G U I D E
4
HOW TO ASSEMBLE
THE H2O MOP
®
ULTRA
™
6) Slide Handle Tube (Part 3)
down into H2O Mop
®
Ultra
™
Body (Part 8) until it clicks in.
3) Attach Mop Head (Part 16) to
the H2O Mop
®
Ultra
™
Body (Part
8) by inserting the Swivel Joint
(Part 17) into the designated
hole in the H2O Mop
®
Ultra
™
Body
(Part 8) as illustrated.
NOTE: To remove the Handle Tube (Part 3) Press the
Button and pull up the Handle Tube as illustrated.
1) Remove Mop Head
locking Clip (Part 15)
located at the bottom of
the H2O Mop
®
Ultra
™
Body
(Part 8) as illustrated.
4) Put back the Mop Head
locking Clip (Part 15) to
lock in the Mop Head.
Button
U S E R ’ S G U I D E
13
HOW TO USE THE ACCESSORIES
(OPTIONAL ITEMS)
CONTINUED
To use the Round Brushes (Part 4), Triangle Brush (Part 5),
Scoop Nozzle (Part 6) and the Angle Nozzle (Part 9)
attachments follow these instructions:
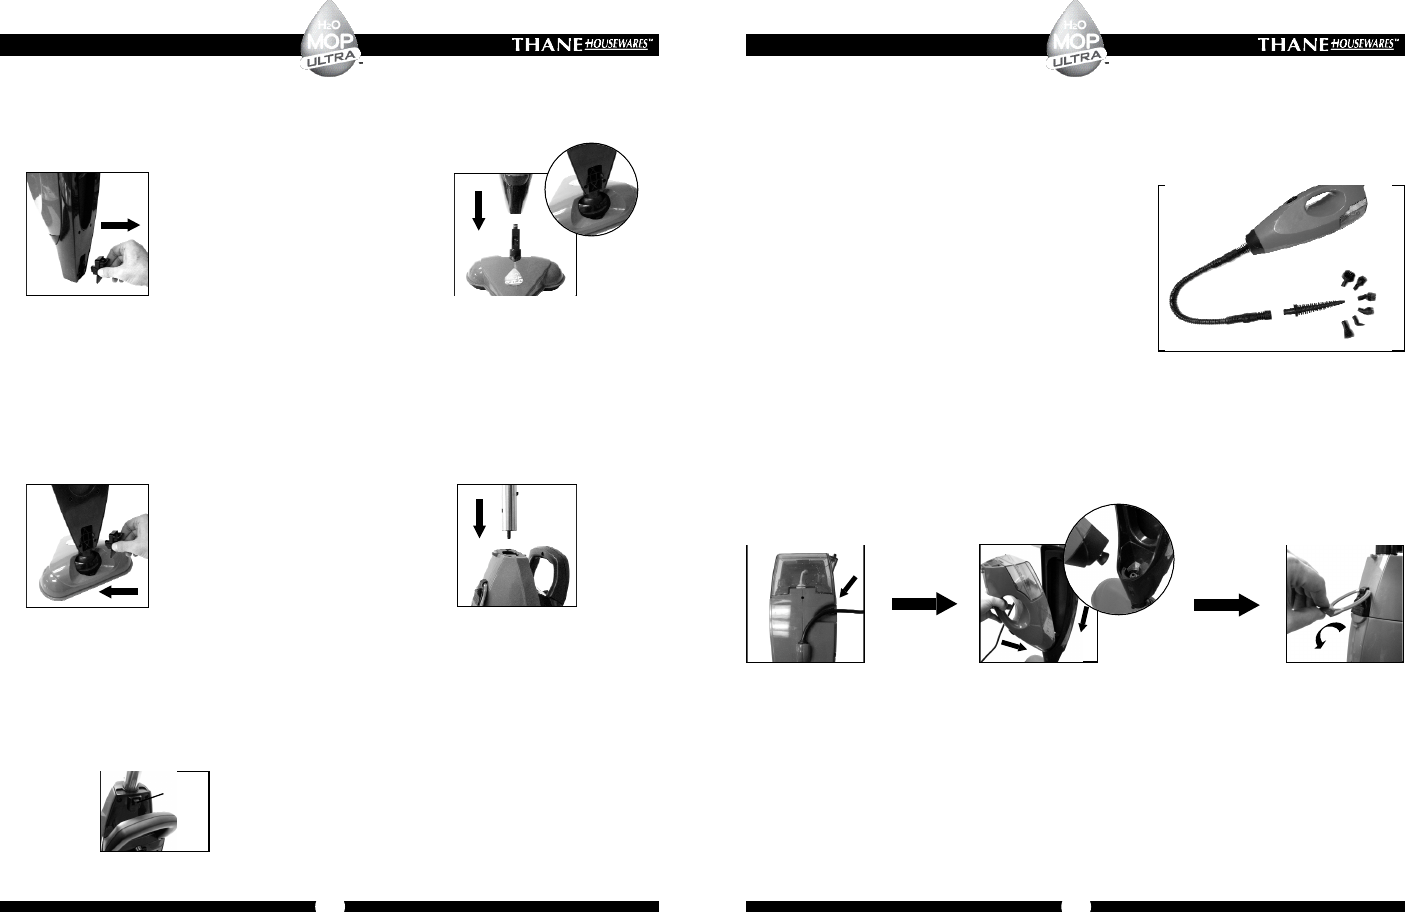
1. Attach the Extention Hose to the Hand-Held Steamer.
2. Attach the Jet Nozzle to the Extention Hose.
NOTE: You can attach the Jet Nozzle directly to the Hand-Held
Steamer without using the Extention Hose but for better accessibility
we reccomend attaching the Jet Nozzel to the Extention Hose.
3. Attach the desired attachement to the Jet Nozzle.
To attach the Hand-Held Steamer back to the H2O Mop
®
Ultra
™
Steamer Body:
Remove all attachments
1) Insert the Power Cord in the clip on the side of the Hand-Held Steamer Body.
2) Align and insert the adaptor on the Hand-Held Steamer with the nozzle at the H2O Mop
®
Ultra
™
Body.
3) Push the Hand-Held Steamer against the H2O Mop
®
Ultra
™
body until it clicks in place.
4) Lock the Hand-held Steamer by turning back the Hand-Held Steamer Body lock down.
AFTER USE
1) Unplug Power Cord (Part 18) from outlet.
2) Allow Mop Pad to cool down and carefully remove Mop Pad (Part 20) from Mop Head (Part 16), as Mop Pad
could still be hot.
3) Any water remaining in the Water Tank (Part 9) should be emptied prior to appliance storage.
4) Let any water (remained as a product of condensation) drain from the steam nozzle prior to storing the appliance.
5) Wrap Power Cord around Cord Holder (Part 3).
6) Wipe all surfaces of the H2O Mop
®
Ultra
™
Steamer with a soft cloth. Store in a protected, dry area.
7) Mop Pad can be machine washed in hot water. Disposable pads are designed for one time use.
2) Remove the Hand-Held Steamer from
the H2O Mop
®
Ultra
™
Body as follows:
a) Unlock the Hand-Held Steamer Body
(Part 13) by lifting up the Hand-Held
Steamer Body Lock (Part 7)
b) Push the Hand-Held Steamer Release
button up (Part 6).
c) Detach the Hand-Held Steamer Body out.
5) Attach the Hand-Held Steamer to
the H2O Mop
®
Ultra
™
Body and lock in
place using the Hand-Held Steamer
Body Lock (Part 7).