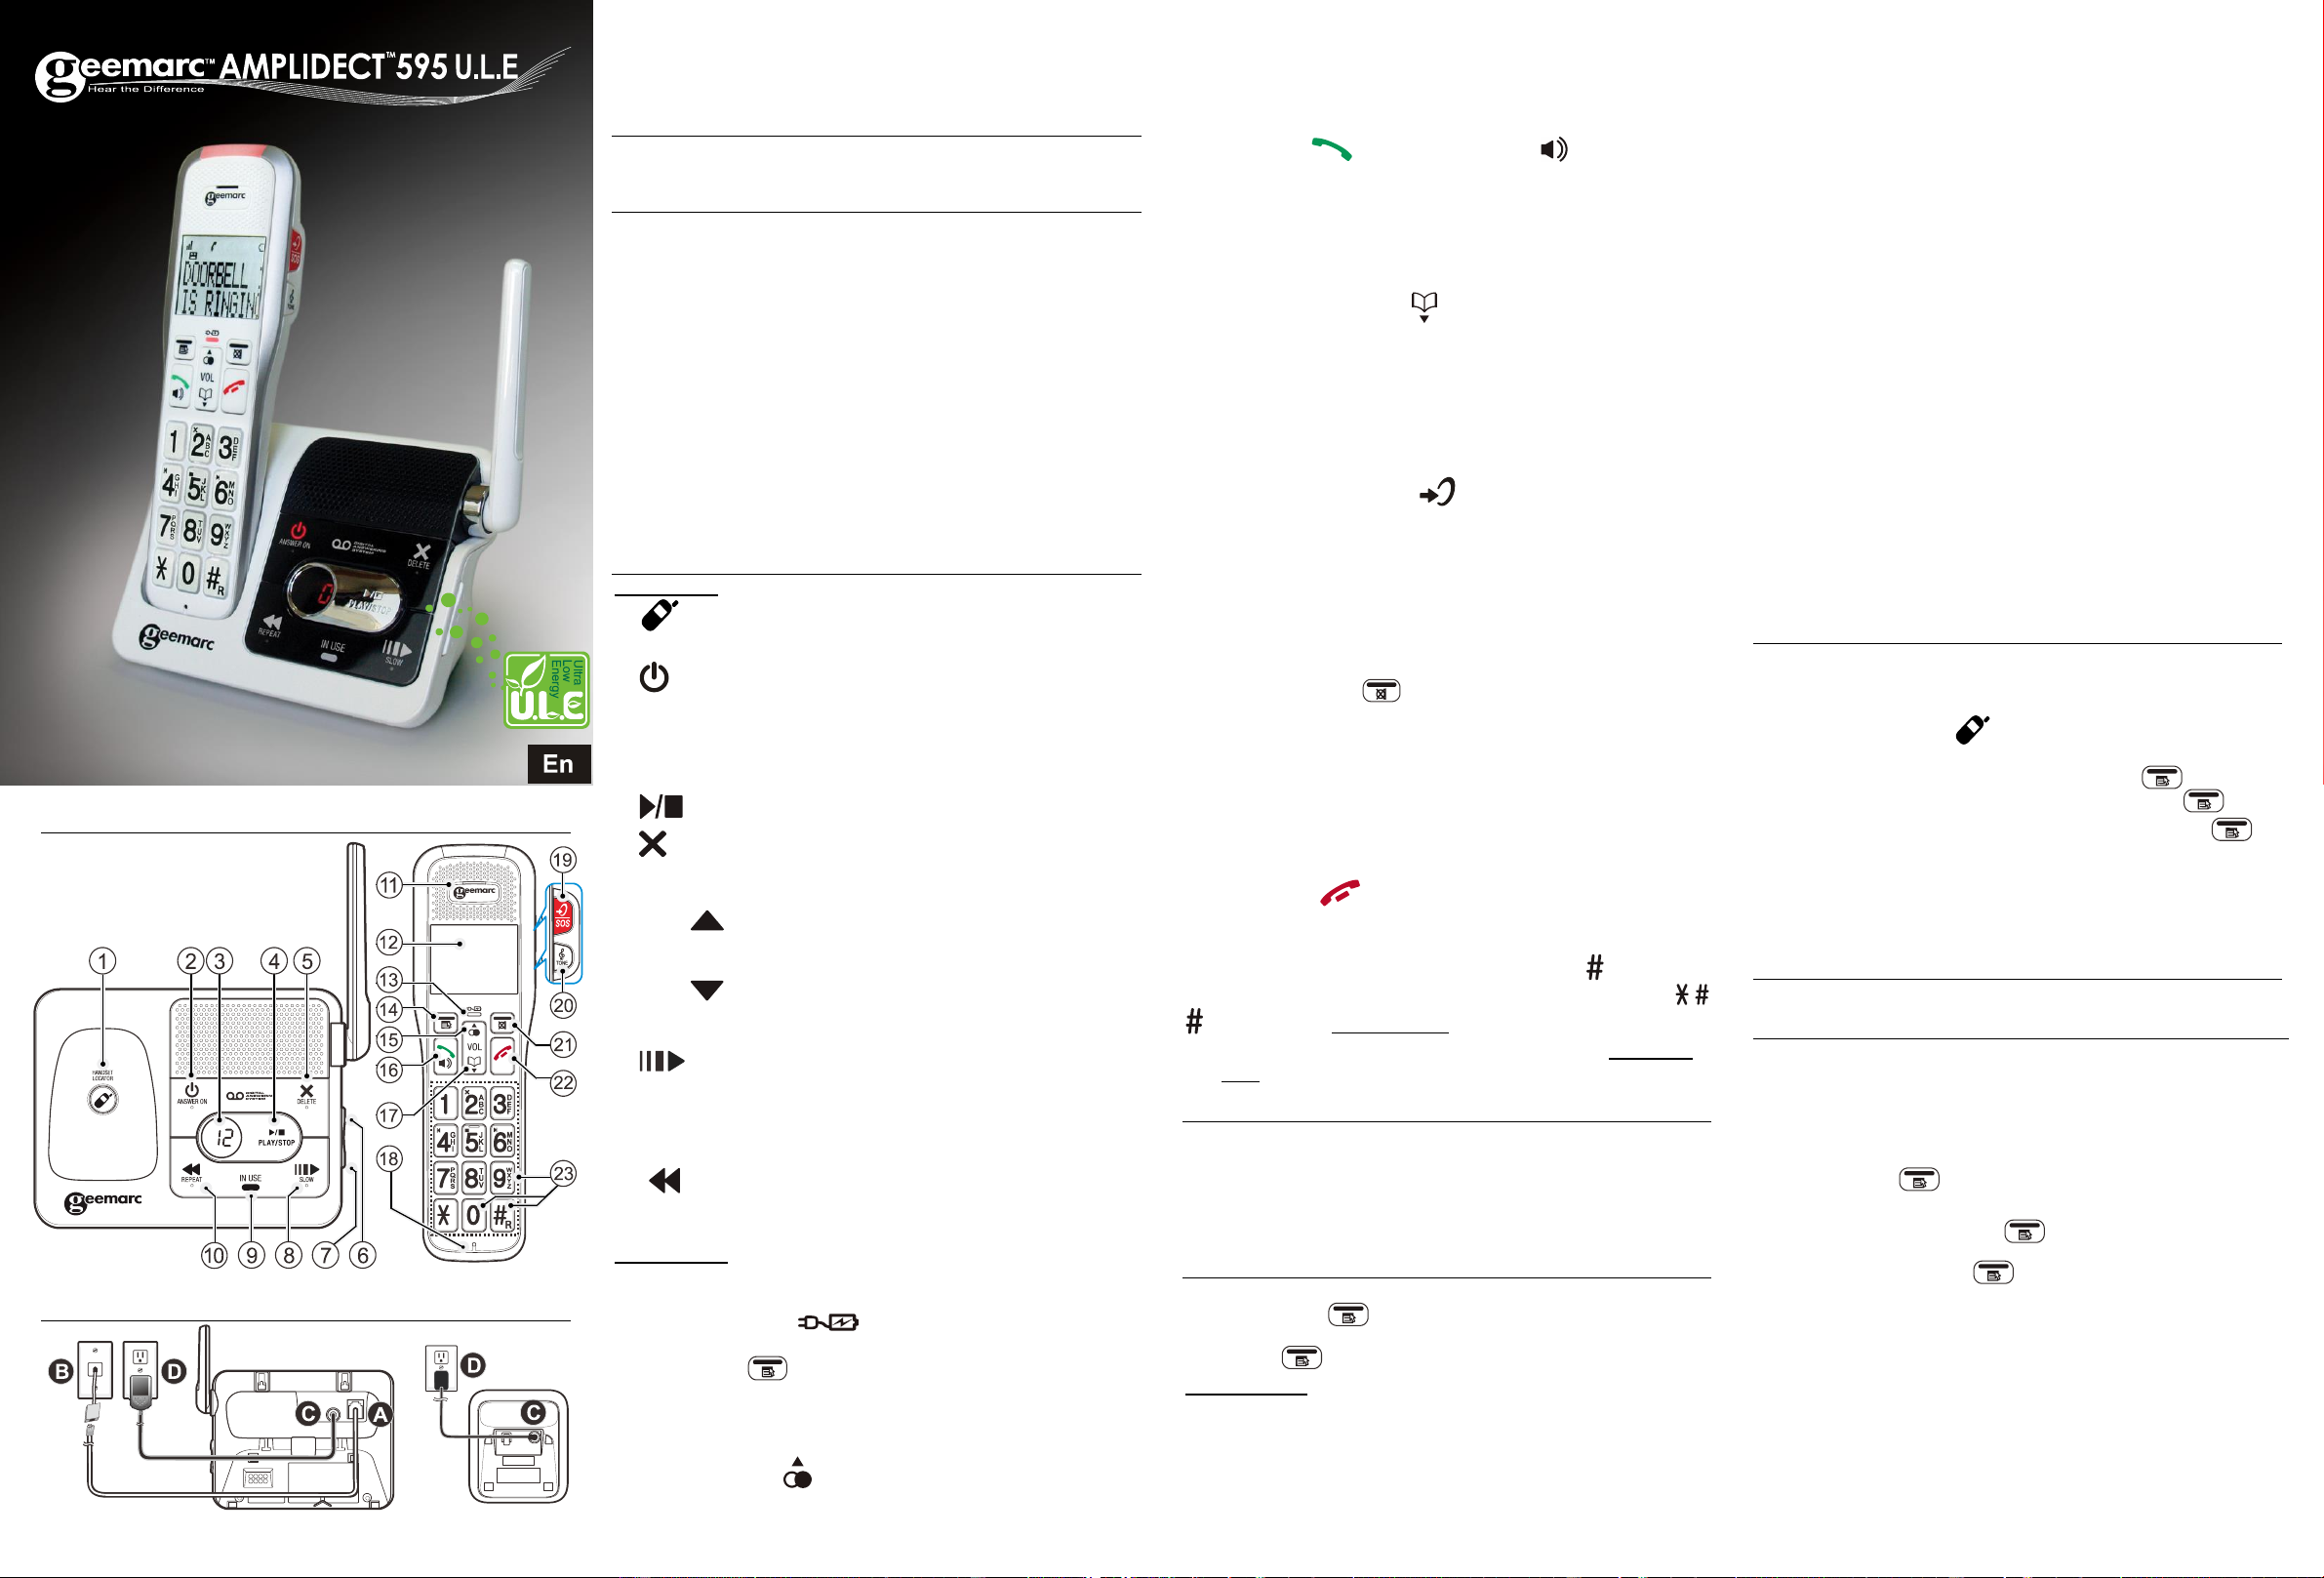
QUICK USER GUIDE
Base / Handset
Connection base
!!! Please refer to our website: www.geemarc.com for an up to
date user guide, as there may be important updates and
changes you need to be aware of !!!
PACKAGE CONTENTS
1 Telephone base, 1 cordless Handset, 1 power adapter, 1 Telephone
line cord, 3 NiMh batteries, 1 Quick user guide.
INSTALLATION
Connecting the telephone
Connect the telephone cable to the telephone line socket (A) and to
the telephone wall socket (B).
Connect the power adapter jack to the base (C) then connect the
power adapter plug to the mains power (D).
Note: Use only the power adapters supplied with the phone.
Connecting the battery
Slide the battery cover downwards.
Install the 3 batteries into the socket as indicated, matching correct
polarity (+,-).
Align the cover flat against the battery compartment, and then slide
it upwards until it clicks into place.
Charging the batteries
Charge the batteries for at least 16 hours when charging for the first
time.
OVERVIEW
Base
1. /HANDSET LOCATOR
While the phone is idle, press to page all handsets.
2. /ANS ON
Press to turn the built-in answering system on or off.
The system will flash to show that there is a new message.
3. MESSAGE COUNTER
Display the number of messages recorded.
4. /PLAY/STOP : Press to start or stop message playback.
5. /DELETE
Press to delete the message currently playing.
Long press to delete all old messages when the phone is not in use.
6. VOL ( )
During message playback, press to increase the listening volume.
While in idle mode, press to increase the base ringer volume.
7. VOL ( )
During message playback, press to decrease the listening volume.
While in idle mode, press to decrease the base ringer volume.
8. /SLOW
During message playback, press the key to slow the listening speed.
9. IN USE
ON when handsets are in use, or when the answering system is
answering an incoming call.
10. /REPEAT
During message playback , press to repeat a message.
Press twice to play the previous message.
Handset
11. EARPIECE
12. LCD DISPLAY
13. CHARGE LIGHT ( )
Continuously on when the handset is charging in the charger.
14. MENU/OK ( )
In idle mode: Press to access the main menu.
In sub-menu mode: Press to confirm the selection.
During a call: Press to access Intercom / Phonebook / Redial list /
Call log.
15. UP/CALL LIST ( )
In idle mode: Press to access the redial list.
In menu mode: Press to scroll up the menu items.
In phonebook list/redial list/call list: Press to scroll up the list.
In editing mode: Press to move the cursor one character to the left.
During a call: Press to increase the listening volume.
During ringing: Press to increase the ringer volume.
16. TALK ON ( ) SPEAKERPHONE ( )
In idle/pre-dial mode: Press to make a call in earpiece mode.
In phonebook/redial list /call list: Press to make a call to the selected
entry in the list in earpiece mode.
During ringing: Press to answer a call in earpiece mode.
On line: Press again to pass in speakerphone mode. Press again to
switch to earpiece mode.
17. DOWN/PHONEBOOK ( )
In idle mode: Press to access the phonebook.
In menu mode: Press to scroll down the menu items.
In phonebook list/redial list/call list: Press to scroll down the list.
In editing mode: Press to move the cursor one character to the right.
During a call: Press to decrease the listening volume.
During ringing: Press to decrease the ringer volume.
18. MICROPHONE
19. VOLUME BOOST/SOS ( /SOS )
During a call: Press to activate/deactivate the VOLUME BOOST
function.
In idle mode: Press and hold for 3 seconds to enter the emergency
calling sequence set in your handset.
In call mode: press and hold for 2 seconds to stop the emergency call.
20. TONE
During a call: press this key to increase the high frequency or the
low frequencies.
21. CANCEL/MUTE ( )
In main menu mode: Press to go back to idle screen.
In sub-menu mode: Press to go back to previous menu.
In editing/pre-dial mode: Press to delete a character/digit.
In editing/pre-dial mode: Press and hold to delete all the characters /
digits.
During a call: Press to mute/resume the microphone.
During ringing: Press to silence the handset ringer.
In idle mode: Press to intercom another handset.
22. TALK OFF ( )
During a call: Press to end a call and go back to idle screen.
In menu/editing mode: Press to go back to idle screen.
23. ALPHANUMERIC KEYPAD, STAR (0), HASH ( R)
In pre-dial or editing mode: Press to insert a digit / character / / .
R during a call: Press and hold to make a Flash (Recall).
0 key in idle/pre-dial mode/number editing mode: Press and
hold to insert a pause.
FIRST USE OF YOUR HANDSET
After you have inserted the batteries, the display asks you to select
your language with the keys ▼/▲(15/17), Press MENU/OK (14) to
valid, ten enter the date with the keypad and validate by pressing
MENU/OK (14).
Enter the correct hour with the keypad and validate by pressing
MENU/OK (14).
MENU SETTING
The phone settings are always set in the same manner:
Press MENU/OK (14) button to open the main menu. Then use
the ▼▲buttons to select an entry and confirm it by pressing the
MENU/OK (14) button.
Handset
CALL LOG
►VIEW LIST
Under entry: DETAILS ►ADD TO PB ► ADD TO BL► ADD TO PM
► DELETE ►DELETE ALL
PHOTO MEM: M1 to M4
PHONEBOOK
►ALL►SPEED DIAL►VIP
Under entry: ►ADD ►VIEW ►EDIT ► DELETE ►DELETE ALL ►
ADD VIP ► ADD TO PM ► ADD TO SD ► STATUS
CALL BLOCK
BLACK LIST (under entry: ►ADD ►VIEW ► EDIT ►DELETE ►
DELETE ALL ► ADD TO PM ► STATUS) ► SETTING (BLOCK
MODE ►W/O NUM)
INTERCOM: ►HANDSET*►BASE►ALL
BS SETTINGS
►BS RINGER ►RING VOLUME ►FLASH TIME ►FIRST RING
HS SETTINGS
►RING SETUP ►TONE SETUP ►AUTO BOOST►TEXT LANG
►DATE & TIME ►REGISTER ►DEFAULT
SET SOS: SOS NUMBER ►SOS MSG►SOS LANGUAGE
REMINDER
►ON/OFF (ALARM 1 TO 10)
►(ONCE/DAILY/MON-FRI/SAT-SUN)
TLK DIGITS: ►ON ►OFF
ANS. SYS.
►PLAYBACK ►DEL OLD ►MEMO ►TAM ON/OFF
►SET TAM (TAM LANG► CALLSCREEN, TAM MSG, ANS. DELAY,
RECORD TIME, REMOTE ACC, CHANGE PIN► MSG ALERT)
SET DEVICE : CHECK SIGNAL►DOORBELL
DEVICES : DOORBELL►ALERTER (STATUS)►LOG►RENAME
HANDSET REGISTRATION
Note: Handset and base station are pre-registered.
Up to four handsets can be registered to a single base station.
Registering a handset
On Base: press and hold /HANDSET LOCATOR(1) on the base
until you hear a beep to enter the registration mode.
At the same time On Handset: Press MENU/OK (14) Use▼▲
(15/17) to select HS SETTING and Press MENU/OK (14).
Use ▼▲(15/17) to select REGISTER, Press MENU/OK (14)
and REGISTERING will be displayed.
After a short delay, if the registration is successful, there will be a
confirmation beep, and the handset display will go back to idle mode
with the new handset number shown. The base display will also go
back to idle mode.
INTERCOM
See the user guide of the additional handset
ADDITIONNAL DEVICES
You can also register up to 4 handsets, 3 doorbells and severals alerters
on the AD595 ULE. All the devices are connected/registered in factory,
if these are included in the package, no need to register any device.
If you should pair one doorbell or alerter, please read the user guide of
your device.
SET DEVICE
Press MENU/OK (14) and ▲/▼ to select SET DEVICES.
CHECK SIGNAL:
DOORBELL: Press MENU/OK (14) and on the doorbell button
to check the quality of the signall.
ALERTER: Press MENU/OK (14) to check the quality of the signal.
DOORBELL:
This function is to set:
CHIME: In this function, you can set the doorbell melody and volume
when you press the doorbell button.
RECORD?: Set ON to record the conversation with the doorbell.
DBELL DVRT :
This function allows you to transfer the doorbell alert at one phone
number set in manual or automatic.
DVRT MODE: allows to activate the function in manual, automatic or
OFF.
PRESET NUM: allows you to enter the phone number for transfer..