5
6. Press and hold the lock-off button (J) on the switch-
box, then squeeze one of the Start/Stop levers
towards the upper handle (K).
7. Continue to squeeze the start/stop lever towards the
upper handle and release the lock-off button.
8. When the lawnmower has reached full speed gently
lower it onto the lawn.
• NOTE: There are two start/stop levers fitted. Either
one can be used for starting the lawnmower.
• IMPORTANT: Do not use the start/stop levers
intermittently
To Stop your Lawnmower
1. To prevent a ring being cut in your lawn and to clear
any residual grass in the collection chute, tilt your
lawnmower slightly (H).
2. Release the pressure on the Start/Stop lever.
Starting and Stopping cont...
K
1. Start mowing the edge of the lawn nearest to the
power point so the cable is laid out on the lawn
you have already cut.
2. Cut your grass twice a week during the growing
season, your lawn will suffer if more than a third of
its length is cut at one time.
Do Not Overload Your Mower: Mowing long thick grass may
cause the motor speed to drop, you will hear a change in the
motor sound. If the motor speed drops you may overload your
lawnmower which may cause damage. When mowing in long
thick grass a first cut with the cutting height set higher will help
reduce the load. See Adjusting the Cutting Height.
How to Mow
X
✓
blade bolt
blade
cutting
height
spacers
MAXI-
MUM 3
fan
Remember : for best grass collection, always mow in a straight line, do not swing the lawnmower from side to side
Note : If a trail of grass is left by your lawnmower this indicates that your cutting height needs to be raised or the
grassbox is full. If the grassbox is full, empty is as described in "Removing and emptying the grassbox". Fit the
grassbox, start the lawnmower and mow over the grass trail to collect any residual grass.
The Micro Compact uses an advanced belt drive system,
between the motor and the blade which improves cutting
power and flotation in all conditions. Due to the high turning
force (Torque) which this motor develops, a light squeak
may be heard when the machine is started, this is quite nor-
mal and will not effect the performance of the product.
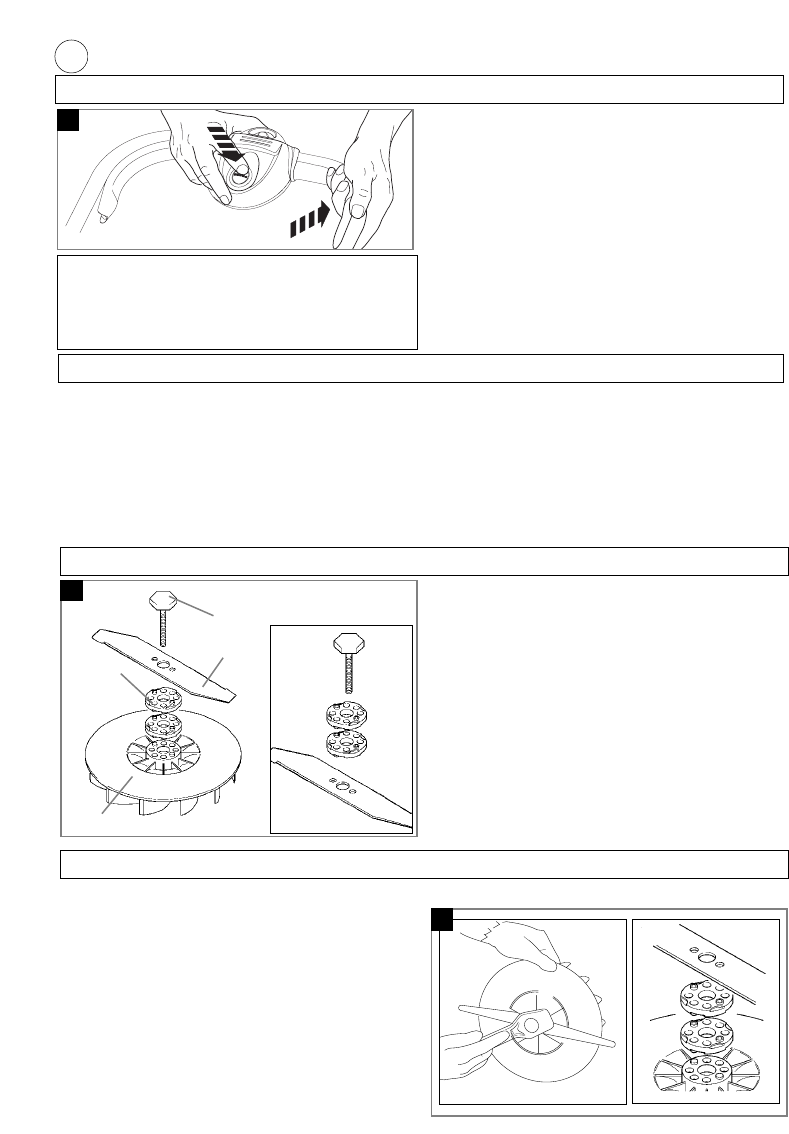
Adjusting the Cutting Height
Always handle the blade with care - sharp edges
could cause injury. USE GLOVES. Never use more
than 3 Cutting Height Spacers. Spacers must only
be fitted between the blade and the fan and NEVER
between the blade and the bolt.
1. Remove the blade bolt, and blade as described in
Removing the Blade and Fan.
2. For a Lower Cut - Add spacers to a maximum of 3.(L)
3. For a Higher Cut - Take spacers away.
4. Refit the blade as described in Fitting the Blade and Fan.
Removing the Blade and Fan
1. To remove the blade bolt, hold the fan firmly and with
the spanner provided loosen the blade bolt by turning
it anti-clockwise (M).
2. Remove the blade bolt, blade, spacers, fan and insert.
3. Inspect for damage and clean as necessary.
• Renew your metal blade after 50 hours mowing or 2
years whichever is the sooner - regardless of condition.
L
• If the blade is cracked or damaged replace it with
a new one. Never use a blade bolt if the insulated
head is damaged cracked or missing.
1. Ensure the insert and fan are located correctly.(M)
2. Place the spacers onto the fan ensuring the peg have
located into the holes.(M)
3. Place the blade onto the spacers ensuring the pegs
have located into the holes on the blade and ensuring
the blade is positioned as illustrated in Figure M.
• IMPORTANT Ensure that the statement written
on the blade ‘This side facing’ is facing toward
you when you fit the blade.
4. Place the blade bolt through the centre hole of the blade.(M)
5. Tighten down clockwise by hand.
6. Hold the fan firmly and tighten the blade bolt with the
spanner provided. (M)
M
Fitting the Blade and Fan