510176
5
Verklein
Vergroot
Pagina terug
1/8
Pagina verder
4
WARNING! STOP THE LAWNMOWER AND WAIT
UNTIL THE BLADE HAS STOPPED ROTATING
BEFORE ADJUSTING THE HANDLE.
NOTE! REMOVAL OF LOWER HANDLE FIXING
PINS IS NOT REQUIRED
TO ADJUST THE HAN-
DLE
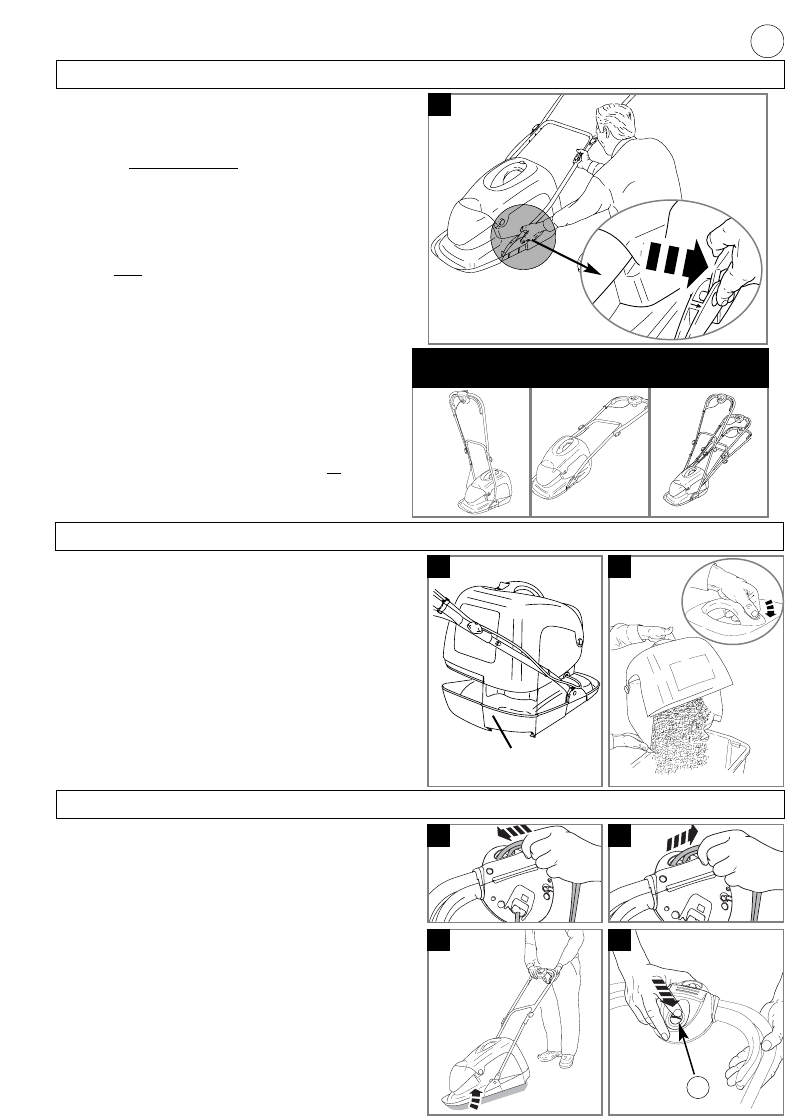
TO ADJUST THE HANDLE (C)
1. Hold handle as illustrated.
2. Take the weight of the handle with your right hand...
3. ...then grip the lower part of the handle with your left
hand...
4. ...and pull
the lower handle towards you with your left
hand.
5. Move to forward or down position as required.
HANDLE IN FORWARD POSITION
Follow procedure described in "TO ADJUST THE HAN-
DLE" and push handle forward until it stops.
HANDLE IN DOWN POSITION
Follow procedure described in "TO ADJUST THE HAN-
DLE" and move handle downward until it stops.. NOTE -
The handle does not rest flat on the ground.
HANDLE IN OPERATING POSITION
Adjustment is not required to move the handle to
the operating position
Simply pull down from the forward position or
lift up
from the down position until the handle is in the most
comfortable operating position.
Handle Adjustment
C
Fitting the grassbox
IMPORTANT! Before using your lawnmower - make
sure the grassbox is securely located inside the lip
on the hood indicated in figure D.
Removing and Emptying the grassbox
Stop the lawnmower and wait until the blade has
stopped rotating BEFORE removing the grassbox.
1. Hold the grassbox by the moulded handle recess
and support grassbox base with the other hand.
2. Move grassbox to emptying site and press release
button to open grassbox as in figure E.
3. Ensure the grassbox is clean BEFORE closing and
refitting the grassbox.
The grassbox should be in the closed position
prior to fitting.
Grassbox
FORWARD
POSITION
OPERATING
POSITION
DOWN
POSITION
lip on the
hood
D E
PULL
LOWER
HANDLE
Starting and Stopping
F G
To Start your Lawnmower
1. Form loop in mains cable and push the loop
through the slot as illustrated in picture (F)
2. To secure, position loop over the hook and pull the
cable back through the slot as illustrated in picture (G).
3. Connect plug to mains.
4. Move handle to the mowing position.
5. To prevent a ring being cut in your lawn and to
clear any residual grass in the collection chute, tilt
your lawnmower slightly (H).
The switchbox is provided with a lock-off button
(J1) to prevent accidental starting.
H J
1
5

Hulp nodig? Stel uw vraag in het forum

Spelregels

Misbruik melden

Gebruikershandleiding.com neemt misbruik van zijn services uitermate serieus. U kunt hieronder aangeven waarom deze vraag ongepast is. Wij controleren de vraag en zonodig wordt deze verwijderd.

Product:

Bijvoorbeeld antisemitische inhoud, racistische inhoud, of materiaal dat gewelddadige fysieke handelingen tot gevolg kan hebben.

Bijvoorbeeld een creditcardnummer, een persoonlijk identificatienummer, of een geheim adres. E-mailadressen en volledige namen worden niet als privégegevens beschouwd.

Spelregels forum

Om tot zinvolle vragen te komen hanteren wij de volgende spelregels:

Belangrijk! Als er een antwoord wordt gegeven op uw vraag, dan is het voor de gever van het antwoord nuttig om te weten als u er wel (of niet) mee geholpen bent! Wij vragen u dus ook te reageren op een antwoord.

Belangrijk! Antwoorden worden ook per e-mail naar abonnees gestuurd. Laat uw emailadres achter op deze site, zodat u op de hoogte blijft. U krijgt dan ook andere vragen en antwoorden te zien.

Abonneren

Abonneer u voor het ontvangen van emails voor uw Flymo Micro Compact 300plus bij:


U ontvangt een email met instructies om u voor één of beide opties in te schrijven.


Ontvang uw handleiding per email

Vul uw emailadres in en ontvang de handleiding van Flymo Micro Compact 300plus in de taal/talen: Engels als bijlage per email.

De handleiding is 0,5 mb groot.


U ontvangt de handleiding per email binnen enkele minuten. Als u geen email heeft ontvangen, dan heeft u waarschijnlijk een verkeerd emailadres ingevuld of is uw mailbox te vol. Daarnaast kan het zijn dat uw internetprovider een maximum heeft aan de grootte per email. Omdat hier een handleiding wordt meegestuurd, kan het voorkomen dat de email groter is dan toegestaan bij uw provider.

Andere handleiding(en) van Flymo Micro Compact 300plus

Flymo Micro Compact 300plus Gebruiksaanwijzing - Nederlands - 12 pagina's


Uw handleiding is per email verstuurd. Controleer uw email

Als u niet binnen een kwartier uw email met handleiding ontvangen heeft, kan het zijn dat u een verkeerd emailadres heeft ingevuld of dat uw emailprovider een maximum grootte per email heeft ingesteld die kleiner is dan de grootte van de handleiding.

Er is een email naar u verstuurd om uw inschrijving definitief te maken.

Controleer uw email en volg de aanwijzingen op om uw inschrijving definitief te maken

U heeft geen emailadres opgegeven

Als u de handleiding per email wilt ontvangen, vul dan een geldig emailadres in.

Uw vraag is op deze pagina toegevoegd

Wilt u een email ontvangen bij een antwoord en/of nieuwe vragen? Vul dan hier uw emailadres in.


Info