PUSH
BATTERY PAC K TO RELEASE.
Use t
Never di
Do not us
Never co
Do not op
FOR B ATTE RY
CHARG
DC IN 9
B
A
T
T
.
O
U
T
POW E R CH A R GI NG
DVDs
[8cm/12cm disc]
Icons Used on DVDs
Sample lcons
Audio CDs
[8cm/12cm disc]
Note
• When playing back a CD-G (karaoke) or CD EXTRA disc, the audio portion will be played,
but the graphic images will not be shown.
Title, Chapter and T
• DVDs are divided into titles and chapters.
If the DVD has more than one movie on it,
each movie is a separate title. Titles are
divided into smaller sections called chapters.
• Audio CDs are divided into tracks . Each
song is usually one track.
Note
• Numbers identify each title, chapter, and track on a disc. Most discs have these numbers
recorded on them, but some do not.
Notes on Unauthorized Discs
• Y
from outside your geographic area (refer to Region Management Information above), or
made for business purposes.
Language selections for audio
Language selections for subtitles
Screen aspect ratio
Multiple camera angles
Region code indicator
Using the Remote Control
• Point the remote control at the REMOTE
SENSOR located on the unit.
• When using this unit in very bright light, the
infrared REMOTE CONTROL SENSOR may
not work properly
• The recommended effective distance for using
the remote control is about 16 feet (5 meters).
Please LOCATE the INCLUDED accessories.
• T
http://www.1800customersupport.com.
Remote control with battery ................................................................................. x 1
AC adapter ............................................................................................................ x 1
Car power adapter ................................................................................................ x 1
Rechargeable battery ........................................................................................... x 1
Audio/Video cable .................................................................................................
BA
When the battery becomes weak, the operating
distance of the remote control will be greatly
reduced and you will need to replace the battery.
Note: If the remote control is not going to be used
for a long time, remove the battery.
TO CHANGE THE REMOTE CONTROL
B
1. Open the battery door.
2. Insert one CR2025 (3V) size battery
REMOTE CONTROL REFERENCE GUIDE
Remote Control
Unit
1 Read Instructions - All the safety and
operating instructions should be read before
you use the unit.
2. Keep the Instructions - The safety and
operating instructions should be kept for
future reference.
3. Pay Attention to Warnings - All warnings
on the unit and in this user’s manual should
be followed.
4. Follow Instructions - All operating and use
instructions should be followed.
5. Water and Moisture - This unit should not
be used near water or liquids- for example,
near a bathtub, sink, wet basement,
swimming pool, lake or ocean, beach, or
similar places where there is
a chance that the unit may
come into contact with water
or liquid.
6. Carts and Stands - This unit
should only be used with a
cart or stand that is recommended by the
manufacturer. If this unit is placed on a
cart, it should be moved with care. Quick
stops, excessive force, and uneven
surfaces may cause the cart to overturn.
7. Wall or Ceiling Mounting - This unit is not
designed to be mounted to a wall or ceiling.
8. Ventilation - This unit should be situated so
that its location or position does not interfere
with its proper ventilation. For example, the
unit should not be used on a bed, sofa, rug,
or similar soft surface which may block the
ventilation openings. The unit should also
not be built-in to a book case or cabinet, as
that may impede the flow of air through the
ventilation openings.
9. Heat - This unit should be situated away
from heat sources such as radiators, heat
registers, stoves, or other items (including
amplifiers) that produce heat.
Remove the
PLASTIC sheet
before USING
the Remote
Control.
Region Management Information
Region Management Information: This unit is designed and manufactured to respond to the Region
Management Information that is encoded on DVDs. If the Region number printed on the DVD
does not correspond to the Region number of this unit,it cannot play that disc.
The region number of this unit is 1.
10. Power Sources - The appliance should be
connected to a power supply only of the
type described in these instructions or as
marked on the unit.
11. Grounding or Polarization - Do not try
to defeat the grounding or polarization
safeguards built into the unit.
1 Powercord Protection - Power cords
should be routed so that they are not likely
to be walked on or pinched by items placed
on or against them. Pay particular attention
to cords at plugs, power outlets, and the
point where the cord exits the unit.
13 Cleaning - This unit should be cleaned
only as recommended by the
manufacturer.
14. Nonuse Periods - The power cord should
be unplugged from the wall outlet when the
unit will not be used for a long period of
time.
15. Drops and Spills- Care should be taken
so that objects do not fall on this unit, and
liquids are not spilled on or in the unit
through openings in its enclosure.
16 Damage Requiring Service - This unit
should be serviced by qualified personnel
when:
A. The power cord or plug has been
damaged; or
B. Objects have fallen on, or liquid has
been spilled into the unit; or
C.The unit has been exposed to rain; or
D.The unit does not appear to operate
normally or there is a noticeable change in
its performance; or
E. The unit has been dropped, and/or the
enclosure damaged.
1 Servicing - Y
service this unit beyond what is described
in these instructions. All other servicing
should be referred to qualified personnel.
WARNING:
Do not dispose of the battery in a fire or it
may leave and/or explode.
CAUTION:
Danger of explosion if battery is incorrectly
replaced. Replace only with the same or
equivalent type.
1 BRIGHTNESS switch
Adjusts the lightness or darkness of the
screen color.
Screen switch
WIDE : Wide screen
NORMAL : Normal screen
2 VOLUME + / - controls
Adjusts the volume up(+) and down (-).
MENU button
Enter and exit the main DVD menu.
P
Press to pause playback of a disc. Each
time you subsequently press the P
button the picture advances one frame at
a time. Press the PLA
button to resume
playback at normal speed.
3 VIDEO OUT jack
AUDIO OUT (L/R) jack
LINE OUT (VOL MAX) jack
Adjust the VOLUME to MAX when
connecting the unit to another device.
4 Headphone jacks
5 Cursor (
, , , ) buttons
Use to move between selections on a menu
screen and adjust certain settings.
ENTER button
Confirm selections on a menu screen.
6)
PREV button
Press PREV to go back to the previous
chapters /tracks. Press and hold
PREV
button to begin fast scan. Four speeds are
available.
NEXT button
Press
NEXT button to advance chapters
/ tracks. Press and hold NEXT button to
begin fast scan. Four speeds are available.
7)
STOP button
Stop playing a disc.
PL
Press to start or resume playing a disc.
8 B
9 POWER ON indicator
When the POWER ON / OFF switch is in
the ON position, the light will illuminate.
1 Remote sensor
Receives the remote control signal.
1 Disc Door
Lift the door to open the DVD door.
Close door by gently pushing down.
1 DC IN 9V-12V / Car Plug 12V jack
Connect the car plug or AC adapter.
1 POWER ON/OFF switch
IMPORT
INSTRUCTIONS
DISC FORMA
Disc Function or Operation that is Not Available
When the symbol appears on the screen, it indicates that the function or operation you have
selected is not available at that time. This occurs because the DVD manufacturer sets the specific
functions of DVDs. Certain functions may not be available on some DVDs. For more information,
refer to the documentation provided with the DVD.
ACCESSORIES
REMOTE CONTROL
1 TV MODE button
When the STOP button has been pressed,
this feature allows you to select TV shape
format. Pan Scan, Letter Box or Wide-
screen will be toggled by pressing this
button once.
2)
STOP button
Stop playing a disc.
PLAY button
Start or resume playback a disc.
PAUSE button
Press once to pause playback. Press
subsequently to advacne the DVD one
frame at a time.
3)
PREV button
Move back through titles, chapters or
tracks on a disc.
4)
/ SEARCH buttons
SEARCH: Fast reverse playback.
SEARCH: Fast forward playback.
5 MEMORY button
When the STOP button has been pressed,
this feature is used to enter the number
of a chapter or track which you wish to
save in memory.
6 Cursor (
, , , ) buttons
Use to move between selections on a
menu screen and adjust certain settings.
ENTER button
Confirm selections on a menu screen.
7 Number (0 - 9) buttons
Use when creating programs and entering
a password. Also use to select a CD track
directly.
8 SETUP button
When a DVD is stopped, brings up the
unit’s SETUP menu.
REPEAT A-B button
Perform point-to-point repeat playback on
a DVD or CD.
REPEAT DISC button
Repeat a DVD chapter or title.
Repeat a CD track of the entire disc.
9 SUBTITLE button
Select one of the subtitle languages
programmed on a DVD (if available).
RETURN button
Return to the normal operation after using
the SETUP menu of a DVD.
1 AUDIO button
Select one of the audio sound tracks on a
DVD (if more than one is available) or
select the audio output mode on a CD.
1 ANGLE button
Switches between multiple camera angles
when the DVD you are playing has been
programmed with multiple camera angles.
1 DISPLAY button
Show status information on the screen.
13)
NEXT button
Move forward through titles, chapters or
tracks on a disc.
1 GOTO button
Skip directly to a location on a DVD.
1 MENU button
Enter and exit the main DVD menu.
2
2
2
1.
2.
1.
2.
LB
SUBTITLE/
RETURN
M
6
5
4
9 0
3
2
ENTER
MEMORY
DISPLAY
AUDIO
MENU
PREV
SEARCH
GOTO
TV MODE
STOP
NEXT
PAUSE
PLAY
ANGLE
SETUP
A-B DISC
REPEAT
1
2
3
4
5
6
7
8
9
10
11
12
13
14
15
Chapter 1 Chapter 1 Cha
Track 1 T T Track 4 Track 5
The unit can playback
Cautions:
• The included AC adapter are for
use with this unit only
them with other equipment.
• When the unit is not going to be
used for long time, disconnect the
AC adapter from the outlet.
• Whenever the AC adapter is
plugged in to a power outlet,
electricity is running through the
unit, even when the power switch
is turned off.
A. Using the AC adapter
This AC adapter operates on AC 100V - 120V.
POWER SUPPL
B. Using the Car power adapter
The included car power adapter is designed for use with vehicles that have a 12V, negative ground
electrical system.
Cautions:
• Use only the included 12V car power adapter. Use of any other 12V car power adapters could
damage the unit.
• The 12V car power adapter included is for use with this unit only
equipment.
• In the interest of traffic safety
• When the inside of the cigarette lighter socket is dirty with ashes or dust, the plug section may
become hot due to poor contact. Be sure to clean the cigarette lighter socket before use.
• After use, disconnect the car power adapter from both the unit and cigarette lighter socket.
• If the unit is not properly attached to a vehicle, it may become airborne in the event of an
accident and cause damage, injury
• Check your local traffic laws for rules governing the use of video devices in vehicles before
using this unit in your vehicle.
LEFT SIDE
OF UNIT
TO AC
OUTLET
1
TO DC IN 9V-
12V JACK
2
CAR POWER
ADAPTER
LEFT SIDE
OF UNIT
1
TO CAR PLUG
- 12V JACK
2
TO THE CIGARETTE
LIGHTER SOCKET
WARNING
• Unplug the car power adapter
from the cigarette lighter socket
when not in use.
• Do not use in vehicles with 24V
electrical systems.
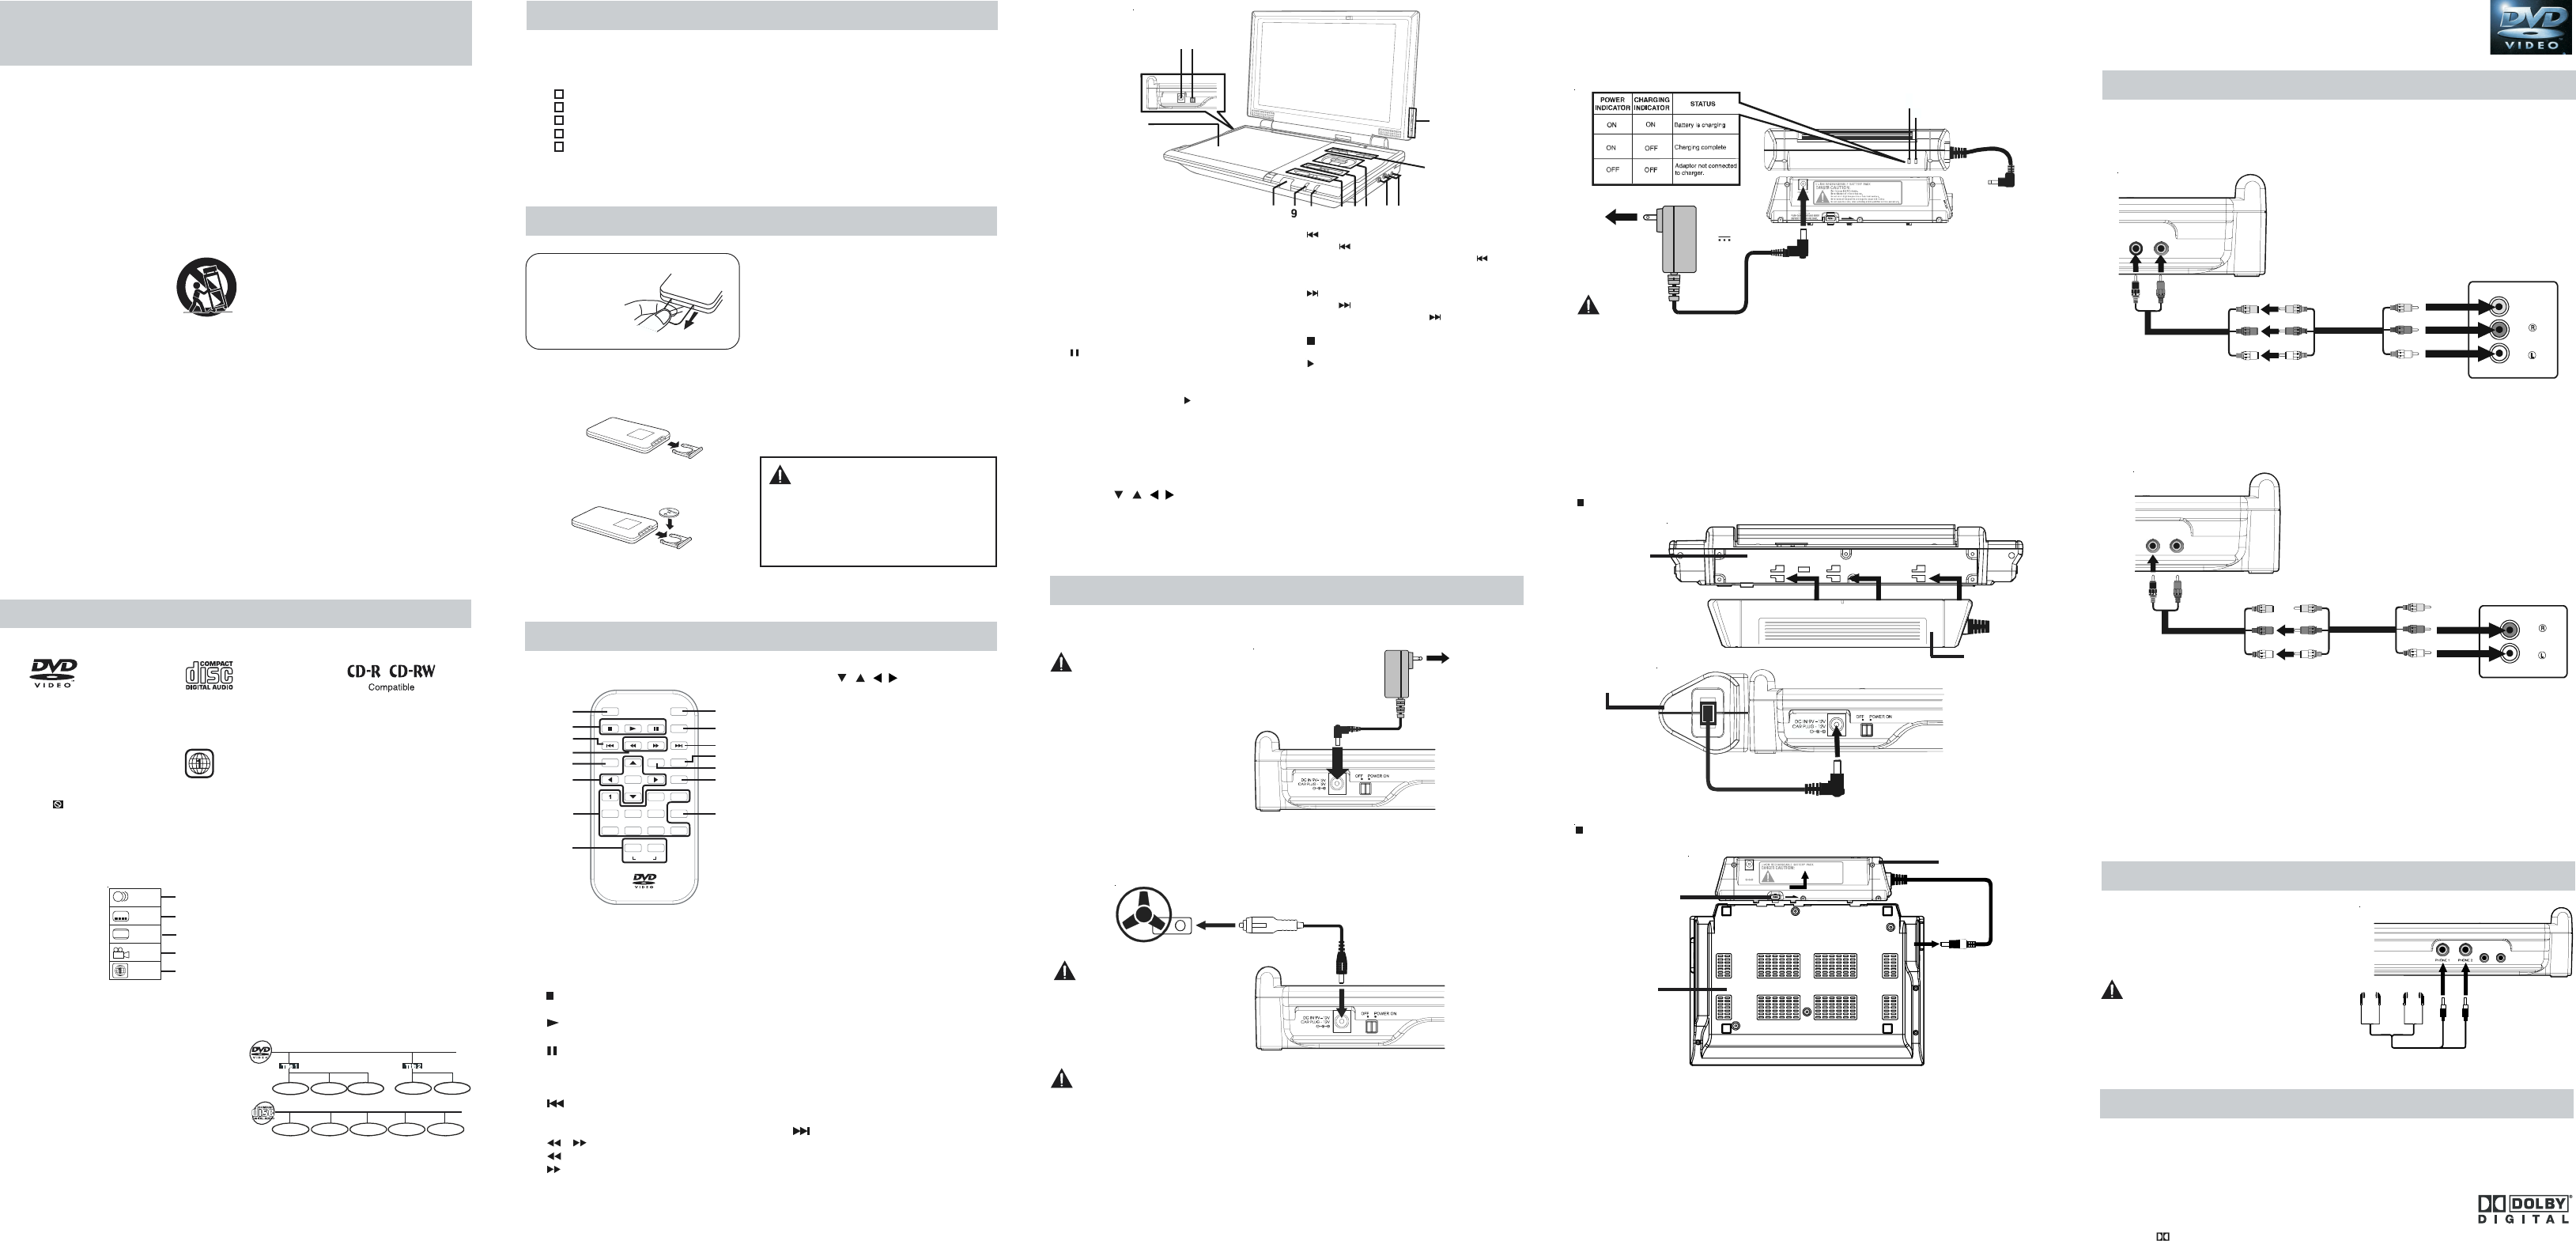
C. Using the rechargeable battery
• Charge the rechargeable battery before using it for the first time. The normal charging time
should be completed at least 4-5 hours. The green charging light will go out when the battery
becomes fully charged.
• The rechargeable battery is suitable when adapting the unit for portable use and when it is
convenient for you to enjoy the unique functions of the unit out of doors.
• Cannot be charged by car power adapter.
• Recharging is complete when charging indicator goes out. Unplug the AC adapter, then
unplug the rechargeable battery
T
Warnings:
• The rechargeable battery cannot be recharged either by using the 12V car-plug or when the
unit is ON.
Caution:
• The included
equipment.
• When the unit is not going to be used for a long time, disconnect the AC Adapter from the
AC outlet.
• Whenever the AC adapter is plugged in to a power outlet, electricity is running through the
unit, even when the power switch is turned off.
• Do not short-circuit the terminals on the battery
Disconnecting the Rechargeable Battery from the unit.
Push the button to
disconnect the
RECHARGEABLE
BA
Condition and attention:
• When battery is low, unit will stop operating.
• During playback, if the battery is low
and blink. When this occurs, you should recharge the battery
• Do not short-circuit the terminals.
• Recharge the battery when you are ready to use it again.
• While using the rechargeable battery
to 35°C (95°F).
• T
• Never dispose the battery in fire or water
• Do not open the rechargeable battery
• Detach the rechargeable battery when not in use. (Even if the unit is off, it still uses some
power. This can completely discharge the battery and cause it to malfunction.)
BOTTOM OF
THE UNIT
RECHARGEABLE
BA
(Li-ion 7.4V 3600mA)
2
1
TO "ADAPTOR IN"
JACK
TO AC
OUTLET
RECHARGEABLE
BA
3
INST
RECHARGEABLE
BA
REAR OF
UNIT
CHARGING indicator
POWER indicator
TO "DC IN 9V-12V /
CAR PLUG-12V"JACK
LEFT SIDE OF UNIT
4
RECHARGEABLE
BA
RECHARGEABLE
BA
T
1. Slide the POWER ON/OFF switch on the left side of unit to the
POWER ON position.
2. The DVD logo (start-up picture) will appear on the screen.
SOUND SYSTEM
Dolby Digital
Dolby Digital is a technology developed by Dolby Laboratories. Soundtracks encoded in Dolby
Digital can reproduce from one to 5.1 discrete channels of excellent quality audio.
The unit automatically recognizes the Dolby Digital bitstream and provides a downmix suitable
for two-channel listening. An additional Dolby Digital decoder is required
for reproduction of the discrete multi-channel soundtracks available on
many DVDs.
Manufactured under license from Dolby Laboratories.
'Dolby' and
the double-D symbol are trademarks of Dolby Laboratories.
A. Connecting the unit to a TV
• If your TV has Audio/Video inputs, you can connect the unit to your TV using the included
Audio/Video cable.
• Y
• Put down the TFT cover when the playback mode is chosen.
Watching a DVD on your TV
1. Turn on the unit.
2. Turn on the TV and follow the instructions provided with it to play the DVD.
Note: Please use the correct Audio/Video cable.
B. Connecting to an amplifier or stereo receiver
This unit can play Dolby Digital, but only in two channels.
Analog connection
Notes:
• Y
is working.
• Make sure to use the correct Audio/Video cable, connecting the plugs incorrectly may
cause a weak signal.
• If you have a stereo VCR, make sure you set it to stereo mode.
• Due to copyright protection, DVD movies cannot be copied. If you copy a DVD movie onto
a videotape, the resulting copy will be unclear
by a defective DVD system.
Listening to another audio equipment
1. Turn on the Unit.
2. Turn on your audio equipment and follow the instructions included with it to select the
AUDIO IN function.
CONNECTIONS
AUDI
OUT
VIDEO
OUT
AUD
IN
(No need to
connect the
Yellow video plug)
(Red)
(White)
RIGHT SIDE
OF UNIT
To
AUDIO
OUT
Jack
AUDIO/VIDEO CABLE
(included)
AUDIO/VIDEO
CABLE
AMPLIFIER OR
STEREO RECEIVER
Using Headphones/Earphones
• Turn down the volume before connecting, and
then adjust the volume level.
• When either headphones/earphones are
connected, no sound will be output from the
unit's speakers.
Caution:
• Avoid listening to sound at levels which may
be harmful to your ears.
Note:
• When headphones are connected to the unit,
the speakers are automatically disabled.
CONNECTING OTHER EQUIPMENT
HEADPHONES / EARPHONES
(3.5mm diameter plug)
AUD IO
OUT
VIDEO
OUT
RIGHT SIDE OF UNIT
E - 2 E - 3 E - 4 E - 5 E - 6
AC ADAPTER
(DC
9V 1.5A)
1
2
3
4
5
7
11
12
13
8
10
VIDEO
IN
AUD
IN
AUDI
OUT
VID
OUT
(Yellow)
(Red)
(White)
RIGHT SIDE
OF UNIT
T
Jacks
AUDIO/VIDEO CABLE
(included)
AUDIO/VIDEO
CABLE
TV
DC IN 9V
CAR PLUG 12