Hereby
Par la présent
Company:
Entreprise:
Address:
Adresse:
declare that the f
déclare que le dispositif suivant :
Product name:
Nom du produit:
Product type:
T
Joseph van Oosterum, CE
DECLARA
TE-Group NV
Kapelsestr
DREAMLED LL400
LASE R LEIG HT
conforms with the following safety requirements of the directives 2014/30/EU,
2014/35/EU, 2011/65/EU and 2014/53/EU. Conformity is guaranteed by the
CE-symbol.
est con forme aux exigence s de sécuri té sui van te de s direc ti 2014 /30/E U
2014/ 35/EU, 2011/65/EU t / 53/EU. La conformité est garanti par le mbole C
This product has been tested against following standards and specifications,
applying versions valid in October2016.
Ce produit a été testé par rapport aux normes et spécifications suivantes,
appliquant les versions valides en Octobre 2016.
EN55015
EN61547
EN61000
EN60598
EN62493
EN301489
EN60509
EN300220
IEC60825-1
ILLUSTRA
Illustration II
USER’S MANUAL
---------------------- Manual/LL400LaserLEDlight/10-16/V01 -------------------------
Copyright © DreamLED
Illustration I
Illustration IV
Illustration V
DFR
LL
P
See Illustration I
The DreamLED Laser LED Light consists of:
1) Laser Light
2) 7 meter XL
3) Mounting bracket for wall mount
4) T
5) Ground stake for ground installation
6) RF remote control + batteries
SAFETY PRECAUTIONS
• Do not install when it is raining.
• Make sure you switch off the power before installation!
•
Make sure that the power wiring comes from a circuit with a suitable fuse or circuit breaker
• Make sure that there are no objects within a range of 100 cm from the Laser LED Light.
• Do not attempt repairs yourself, it is dangerous!
• If the unit is not properly installed or operated DreamLED
®
cannot accept liability
IMPORT
Some countries may require xed installation
Please check the laws and requirements in your country-
minum, consult with an electrician about proper wiring methods. Before proceeding the
installation, TURN OFF THE POWER TO THE LIGHTING CIRCUIT
BREAKER OR FUSE BOX TO
MOUNTING
A. W - See illustration II
For
1.8~2.5m. Remove the mounting bracket from the Laser LED Light. Drill the wall and
screw the bracket onto the wall using suitable wall plugs and screws (not included).
Check
bracket.
B. GROUND MOUNT - See illustration III
Fix the ground stake to the bracket of the Laser light
it into the ground.
C. T - See illustration IV
Fix the
it on a solid and even surface, like a table, oor…
Notes:
• For outdoor installation: a location under eaves is preferable.
• Avoid installation on objects that can move/shrink/expand …
• When light does not turn on when using the ON/OFF button of the RF remote con-
trol: make sure you made a correct “power connection”, check the load and make
sure there is 100~230V power
are inserted and placed correctly observing the correct polarity
• Consult your local service agent concerning safety
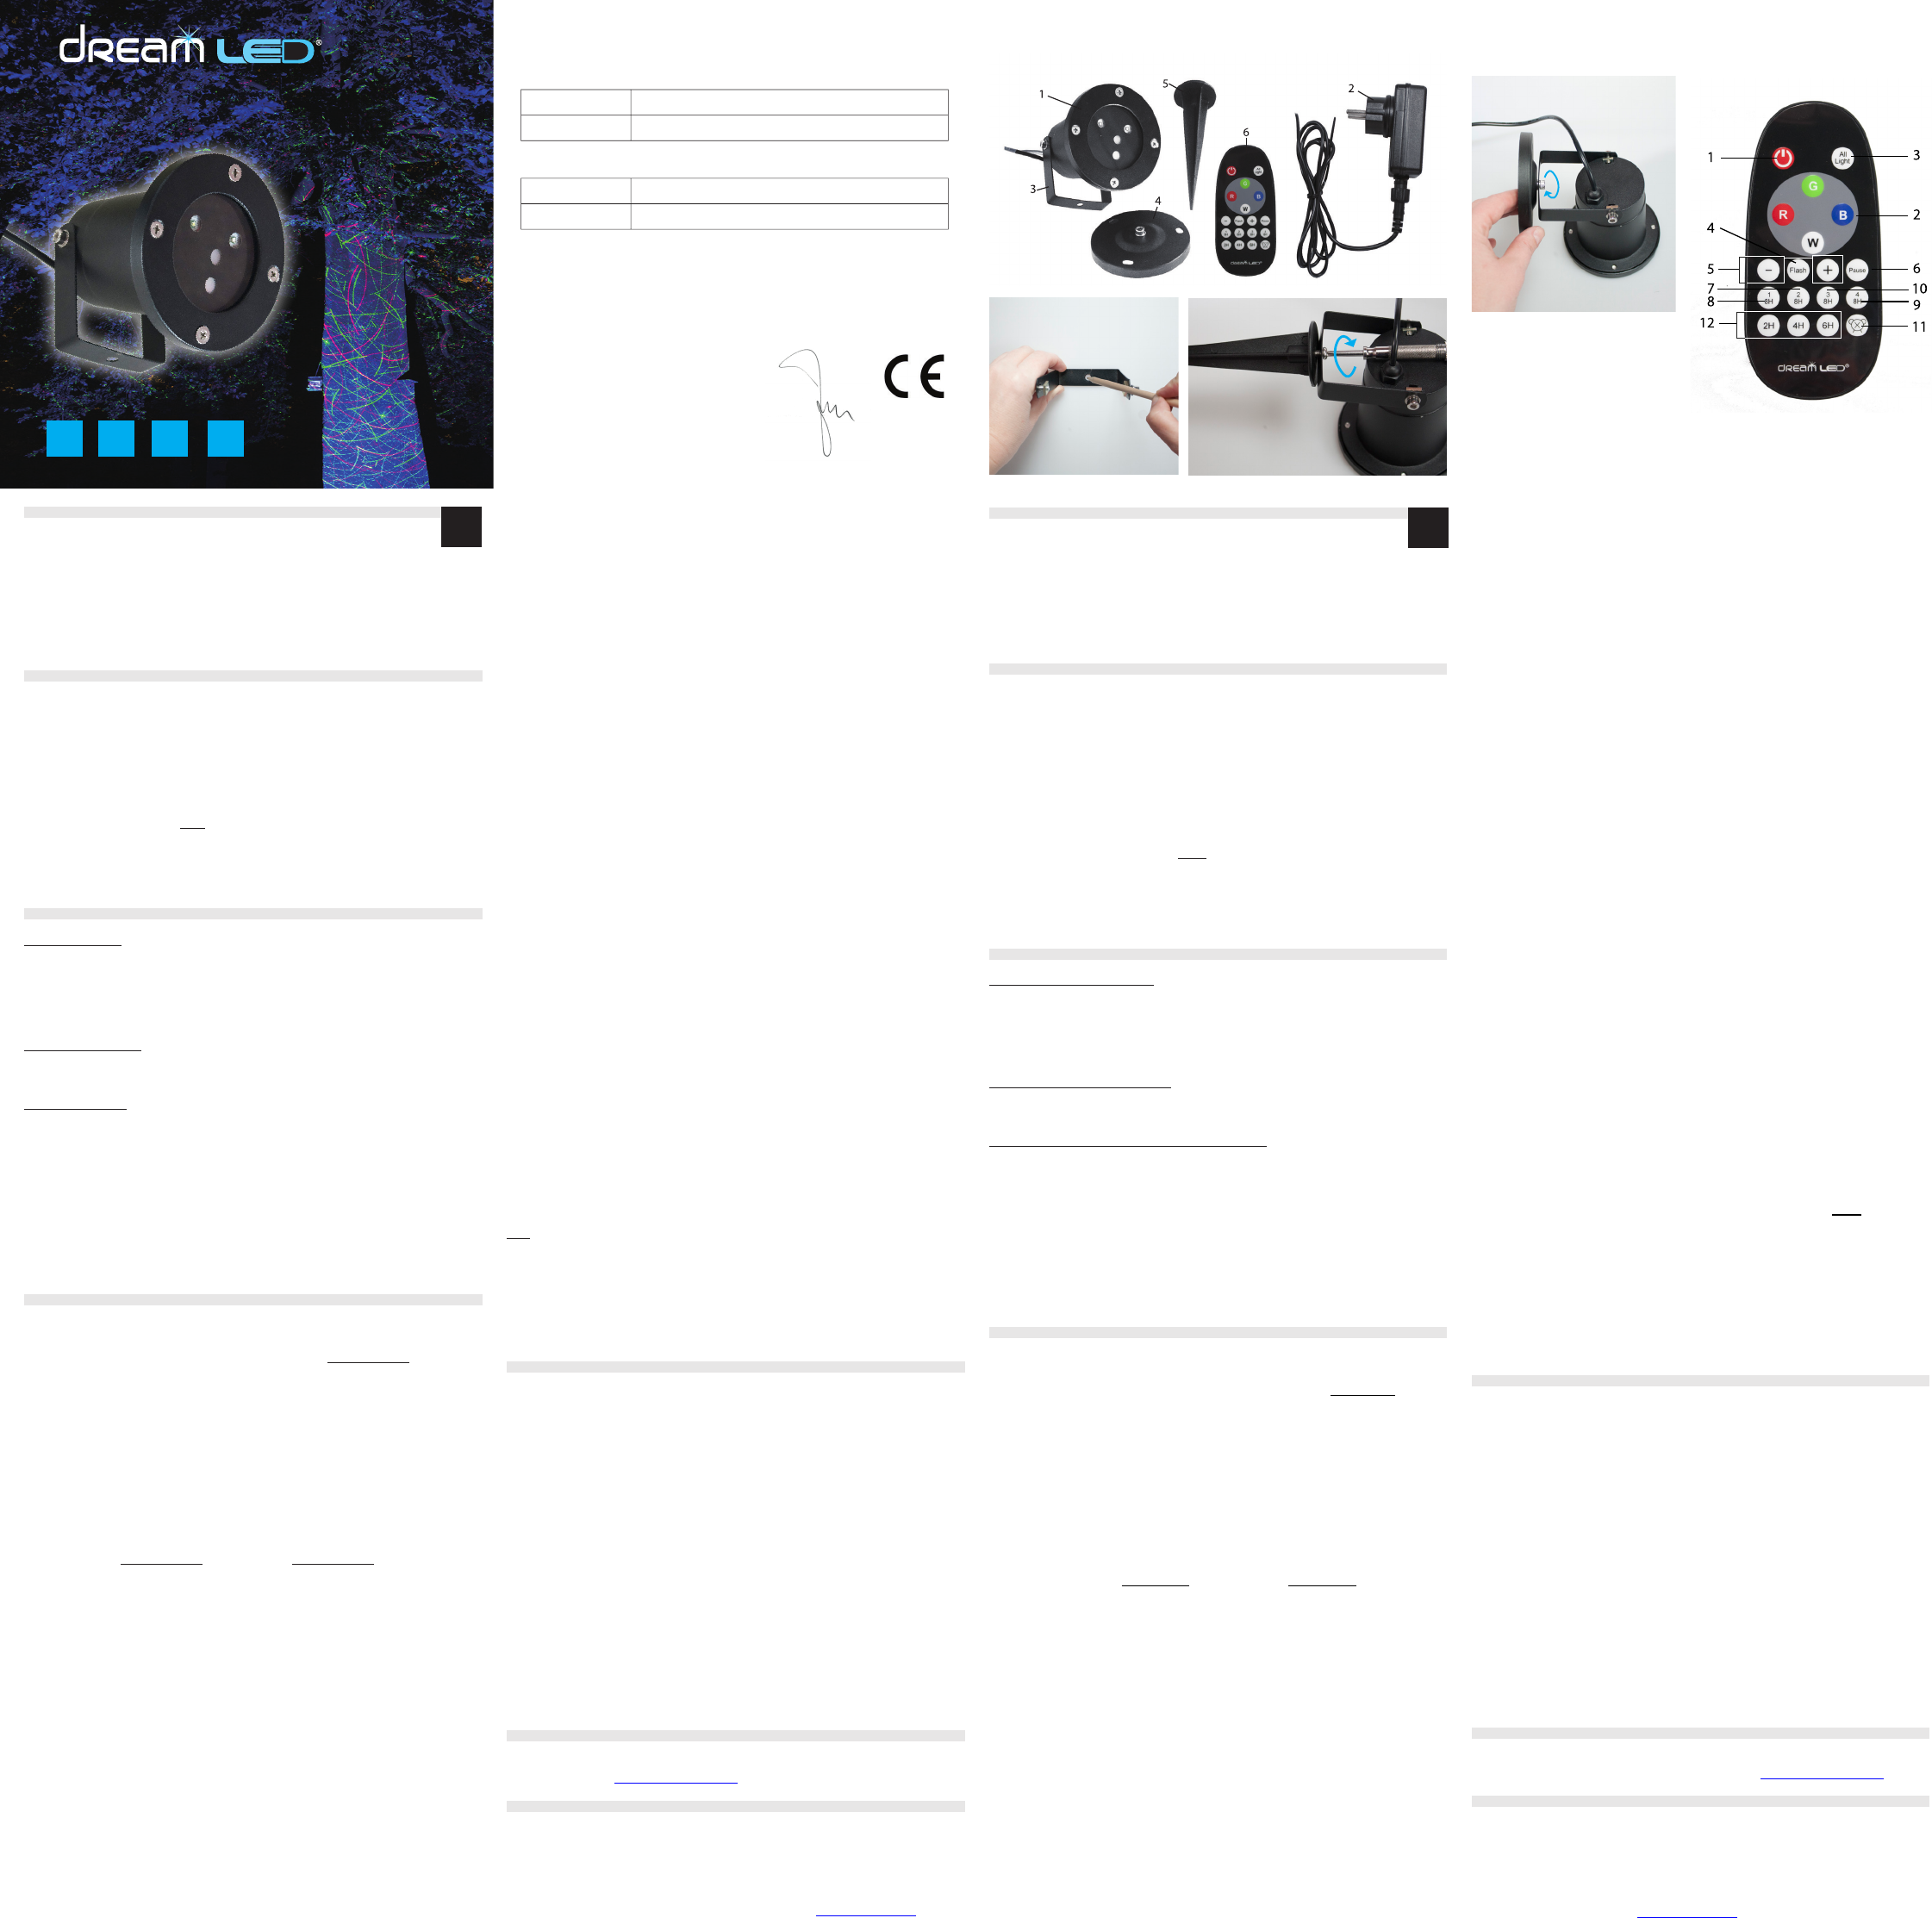
DESCRIPTION OF THE REMOTE CONTROL
See illustration V
1. ON/OFF: T
When the light is turned ON for the rst time, it shows lighting mode 1, as following:
• Green + Red + Blue light ON dynamic for 10s
• Red + Blue light ON dynamic for 5s
• Green + Blue light ON dynamic for 5s
• Red light ON dynamic for 5s
• Green light ON dynamic for 5s
2. Main colors: Red (laser), Green (laser), Blue (Cree XPE LED) & White (Cree XPE LED)
* In each lighting mode, the Red, Green and Blue light can be turned ON/OFF by
pressing this button.
* If you
the button of the color that you don’t need. For example, if you only
the laser moving in green & red colors, you should press the blue button.
* White: When white light is turned ON, all other lights are off
3. All Light: First lighting mode 1 (dynamic), then lighting mode 2 (static)
4. Flash: Switch between ash mode and static mode (2)
5. - / +:
is activated
6. Pause: Pause the chosen light effect
7. Lighting mode 1, 8H:
• Green + Red + Blue light ON dynamic for 10s
• Red + Blue light ON dynamic for 5s
• Green + Blue light ON dynamic for 5s
• Red light ON dynamic for 5s
• Green light ON dynamic for 5s
• Green + Red + Blue light ON dynamic for 3s
• Red + Blue light ON dynamic for 3s
• Green + Blue light ON dynamic for 3s
• Red light ON dynamic for 3s
• Green light ON dynamic for 3s
-> This sequence will be repeated and will turn off automatically after 8 hours
8. Lighting mode 2, 8H:
• Green + Red + Blue light ON static for 10s
• Red + Blue light ON static for 5s
• Green + Blue light ON static for 5s
• Red light ON static for 5s
• Green light ON static for 5s
Illustration III
GB
• Green + Red + Blue light ON static for 3s
• Red + Blue light ON static for 3s
• Green + Blue light ON static for 3s
• Red light ON static for 3s
• Green light ON static for 3s
=> This sequence will be repeated and will turn off automatically after 8 hours
9. Lighting mode 3, 8H:
• Green + Red + Blue light ON dynamic, ashing slowly for 10s
• Red + Blue light ON dynamic ashing slowly for 5s
• Green + Blue light ON dynamic ashing slowly for 5s
• Red light ON dynamic ashing slowly for 5s
• Green light ON dynamic ashing slowly for 5s
• Green + Red + Blue light ON dynamic ashing slowly for 3s
• Red + Blue light ON dynamic ashing slowly for 3s
• Green + Blue light ON dynamic ashing slowly for 3s
• Red light ON dynamic ashing slowly for 3s
• Green light ON dynamic ashing slowly for 3s
=> This sequence will be repeated and will turn off automatically after 8 hours
10. Lighting mode 4, 8H:
• Green + Red + Blue light ON dynamic, ashing quickly for 10s
• Red + Blue light ON dynamic ashing quickly for 5s
• Green + Blue light ON dynamic ashing quickly for 5s
• Red light ON dynamic ashing quickly for 5s
• Green light ON dynamic ashing quickly for 5s
• Green + Red + Blue light ON dynamic ashing quickly for 3s
• Red + Blue light ON dynamic ashing quickly for 3s
• Green + Blue light ON dynamic ashing quickly for 3s
• Red light ON dynamic ashing quickly for 3s
• Green light ON dynamic ashing quickly for 3s
=> This sequence will be repeated and will turn off automatically after 8 hours
11. Clock: Cancel the timer settings
12. 2H/4H/6H: Light will be turned off automatically after 2H/4H/6H
Note:
• 2x Flash
& buttons 7 till 10.
• 3x Flash conrmation for each button press or for function conrmation of button 1
& 12.
• Memory function: the last selected settings will be saved when turning OFF the light
with the remote control but not with your house light switch (see note below). When
the light is turned on again, it will show and use the last selected timer & setting.
Time setting
For lighting mode
then switch OFF
for 8 hours the next day at the same time.
If you want to use the light for a shorter time period, please press the clock button (1
rst, then press 2H / 4H / 6H (12). When the light
desired button, the timer is set correctly for the selected setting.
Note:
The timer works for 24h each day
be ON for the timer to work correctly
house
the remote control.
SPECIFICA
Laser RED: 100mW
Laser GREEN: 30mW
Laser Class: II <1mw single beam
Laser points and area: More than 1000 & up to 60 m
2
Laser pre-heating function: Y
LED BLUE: 3W
LED WHITE: 3W 6500K, 120 Lumen CREE XPE
LED life: >25.000 hours
CRI White: Ra>85
Beam Angle:
RF Remote: 433Mhz 18 keys (2x 1.5V
RF Remote distance: 10~15 m
Input voltage: 1
Output: 12V 2.0A
T
Laser / Led Housing: IP65
EU
Color: Black powder coated
Working
SUPPORT
For more information, technical questions and return requests concerning this product,
you should contact: support@dream-led.eu .
GUARANTEE
Copyright © DreamLED
®
. DreamLED
®
is a registered trademark of TE-Group NV The
DreamLED
®
brand stands for superior product quality and outstanding customer ser-
vice. That is why DreamLED
®
warrants this product against all defects in material and
workmanship for a period of two (2) years from the date of original purchase of the
product. guarantee and the DreamLED
®
under this warranty can be downloaded from the website: www
VERP
Zie afbeelding I
De DreamLED Laser LED Light bestaat uit:
1)
2) 7 meter XL
3) Montagebeugel voor wandmontage
4) V
5) Grondpin voor plaatsing in de grond
6) RF-afstandsbediening + batterijen
VEILIGHEIDSMAA
• Installeer het apparaat niet als het regent.
• Schakel de stroom uit voordat u de installatie aanvangt!
• Zorg ervoor dat de bedrading afkomstig is van een stroomcircuit met een geschikte
zekering of een stroomonderbreker
• Zorg ervoor dat er zich geen objecten binnen een bereik van 100 cm van de Laser
LED Light bevinden.
• Probeer niet om zelf reparaties uit te voeren.
• Bij ongeoorloofd gebruik of slechte installatie aanvaardt DreamLED
®
geen enkele
aansprakelijkheid.
BELANGRIJK
Sommige landen vereisen dat de vaste installatie van dit product door een erkend
elektricien gebeurt. Controleer de wetten en voorschriften hierover in uw land.
de bedrading in uw huis van aluminium is, dient u met een elektricien de correcte
aansluitingsmethoden te bespreken. IN ELK GEV
VERLICHTINGSCIRCUIT
UIT TE SCHAKELEN OM ELEKTRISCHE SCHOKKEN TE VOORKOMEN.
MONT
A. MONT - Zie illustratie II
V
een hoogte tussen 1.8~2.5m. V
Boor een gat in de wand en schroef de beugel op de wand met geschikte pluggen en
schroeven (niet meegeleverd). Controleer of de beugel stevig gemonteerd is tegen de
muur en plaats de lamp terug in de beugel.
B. BEVESTIGING IN DE GROND - Zie illustratie III
Bevestig de grondpin aan de bevestigingsbeugel van de Laser light met de
meegeleverde schroef en steek de pin in de grond.
C. PLAA - Zie illustratie IV
Bevestig de voet op de beugel van de laser lamp met behulp van de meegeleverde
schroef en plaats deze op een stevige en vlakke ondergrond, zoals een tafel, vloer ...
Opmerkingen:
• Voor buitenopstelling: een locatie onder de dakrand geniet de voorkeur
• Vermijd installatie op objecten die kunnen bewegen / krimpen / uitzetten...
•
afstandsbediening: zorg ervoor dat u een juiste stroombekabeling hebt uitgevoerd,
de lading correct is en het voltage 100-230V bedraagt. Controleer ook of de
batterijen in de afstandsbediening correct geplaatst werden, rekening houdend met
de juiste polariteit.
• Raadpleeg uw plaatselijke service-agent i.v
BESCHRIJVING V
Zie illustratie V
1. ON / OFF: Zet de Laser LED Light
Als de lamp voor de eerste keer wordt ingeschakeld, toont deze lichtmodus 1, als volgt:
• Groen + rood + blauw licht
• Rood + blauw licht
• Groen + blauw licht
• Rood licht
• Groen licht
2. Hoofdkleuren: Rood (laser), Groen (laser), Blauw (Cree XPE LED) & Wit (Cree XPE LED)
*
door op deze knop te drukken.
* Als
knop te drukken van de kleur die u niet nodig heeft. Bijvoorbeeld, als u de laser
enkel wilt laten bewegen in groen en rood, moet u op de blauwe knop drukken.
* Wit:
3. All Light: Tlichtmodus 1 (dynamisch), dan lichtmodus 2 (statisch)
4. Flash: Wisselt tussen ash-modus en statische modus (2)
5. - / +: Past de snelheid van het gekozen lichteffect aan als “All Light” modus of modus
1/3/4 geactiveerd is
6. Pause: Pauzeert het gekozen lichteffect
7. Lichtmodus 1, 8H:
• Groen + rood + blauw licht
• Rood + blauw licht
• Groen + blauw licht
• Rood licht
• Groen licht
• Groen + rood + blauw licht
• Rood + blauw licht
• Groen + blauw licht
• Rood licht
• Groen licht
=> Deze reeks wordt herhaald en zal automatisch uitschakelen na 8 uren
8. Lichtmodus 2, 8H:
• Groen + rood + blauw licht
• Rood + blauw licht
• Groen + blauw licht
• Rood licht
• Groen licht
• Groen + rood + blauw licht
• Rood + blauw licht
• Groen + blauw licht
• Rood licht
• Groen licht
=> Deze reeks wordt herhaald en zal automatisch uitschakelen na 8 uren
9. Lichtmodus 3, 8H:
• Groen + rood + blauw licht
• Rood + blauw licht
• Groen + blauw licht
• Rood licht
• Groen licht
• Groen + rood + blauw licht
• Rood + blauw licht
• Groen + blauw licht
• Rood licht
• Groen licht
=> Deze reeks wordt herhaald en zal automatisch uitschakelen na 8 uren
10. Lichtmodus 4, 8H :
• Groen + rood + blauw licht
• Rood + blauw licht
• Groen + blauw licht
• Rood licht
• Groen licht
• Groen + rood + blauw licht
• Rood + blauw licht
• Groen + blauw licht
• Rood licht
• Groen licht
=> Deze reeks wordt herhaald en zal automatisch uitschakelen na 8 uren
1Klok : annulleert de tijdsinstellingen
12. 2H/4H/6H : Licht wordt automatisch uitgeschakeld na 2H / 4H / 6H
Opmerking:
• 2x knipperen: bevestiging
en toetsen 7 tot 10.
• 3x knipperen: bevestiging voor elke op knop of voor de van
toetsen 1
• Geheugenfunctie: de laatst geselecteerde instellingen worden opgeslagen bij
het uitschakelen van de lamp d.m.v
lichtschakelaar van uw huis (zie opmerking hieronder). W
aangezet, zal deze de laatste geselecteerde timer & instellingen tonen en gebruiken.
Tijdinstelling
V
en schakelt vervolgens uit. De lamp zal dan UIT blijven gedurende 16 uur en start
de volgende dag automatisch opnieuw op hetzelfde tijdstip en blijft opnieuw aan
gedurende 8 uur
Als u de lamp voor een kortere periode wenst te gebruiken, drukt u eerst op de “Klok”
toets (1 en vervolgens op 2H / 4H / 6H (12). Wanneer de lamp 3x snel knippert
na het indrukken van de gewenste toets, werd de timer correct ingesteld voor de
geselecteerde instelling.
Opmerking:
De timer werkt 24 uur per dag, wat betekent dat de stroom voor de verlichting
altijd ingeschakeld moet zijn om de timer correct te laten werken.
onderbroken/ uitgeschakeld wordt dmv de lichtschakelaar van uw huis, gaan de
timerinstellingen verloren en moeten deze opnieuw ingesteld worden met behulp van
de afstandsbediening.
SPECIFICA
Laser Rood: 100mW
Laser Groen: 30mW
Laser klasse: II <1 mW enkele straal
Laser punten en omgeving: Meer dan 1000 en tot 60 m
2
Laser voorverwarmingsfunctie: Ja, voor lage temperaturen
LED Blauw: 3W
LED Wit: 3W 6500K, 120 Lumen CREE XPE
LED levensduur: > 25.000 uur
CRI Wit: Ra> 85
Stralingshoek: 120 °
RF-afstandsbediening: 433 MHz 18 toetsen (2x 1.5V
RF afstand: Max 15 m
Input V
Output: 12V 2.0A
T
Laser / LED Behuizing: IP65
EU
Kleur: Zwart poeder-gecoat
Bedrijfstemperatuur: -10 ~ 40 ° C
KLANTENONDERSTEUNING
V
product dient u rechtstreeks contact op te nemen met support@dream-led.eu .
GARANTIE
Copyright © Dreamled
®
. Dreamled
®
is een gedeponeerd handelsmerk van TE-
Group NVDreamled
®
staat voor producten van superieure kwaliteit en
een uitstekende klantenservice. Daarom garandeert Dreamled
®
dat dit product vrij is
van materiaal- en fabricagefouten gedurende een periode van twee (2) jaar na de
oorspronkelijke aankoopdatum van het product. De voorwaarden van deze garantie
en de omvang van de verantwoordelijkheid van Dreamled
®
onder deze garantie kunt u
downloaden vanaf de website: www.
NL