www
1. GET S
SIMcard,memorycar
Removetheba
Be care
ngernails when you r
the baery cov
or twist the baery c
ex
damaged.
Insert the SIM card (r
GB
Remov
already inst
SIM card by g
into the holder
contacts ar
downwar
corner is placed as shown on
the drawing. T
scrat
on the SIM card. This device accepts mini SIM or 2FF SIM
card.
If you hav
adhesive tape on the e
it out.
InserttheSDcard(oponal)
The device works with or without a SD car
Locate the SD c
to the right unl it “
posion. Place the card in the compartmen
on the drawing. Mak
downwar
the lid to the le unl it “
type: microSD
Insertthebaeryandr
baerycov
Insert the baery by sliding it int
the baery compartmen
the contacts f
the right. Replace the ba
c
3. CALLS
Mak
1. Enter the phone number including the area c
Delete with
Clear
.
2. Press to dial. Press
Abort
to cancel the call.
3. Press to end the call.
Note! For in
+
befor
country code f* twice for the
internaonal pr
+
.
Callfromthephonebook
1. Press
Name
to open the phonebook.
2. Use
UP
to scroll thr
quick search by pr
rst le
3. Press
Opons
â
Call,
alternavely to dial
the selected entry
Back
to return t
Receiv
1. Press to answer
Reject
to reject the c
Alternately to reject the c
2. Press to end the call.
Callopons
During a call the selecon buons ( ) give access to
addional funcons.
Owner numbers
The phone number assigned to your SIM car
Owner number if this is allowed by the car
select to add addional numbers.
Fixeddial(FDN)
Y
card. The lis
PIN2-code.
Note! A passwor
your service provider t
7. CALL L
Received, missed, and dialled c
call log. 20 calls of each type can be s
mulple calls relat
recent c
1. Press to nd your call log.
2. Use
UP
to
=
Receivedcall
=
Dialledcall
=
Missedcall
3. Press to dial, or
Opons
for the a
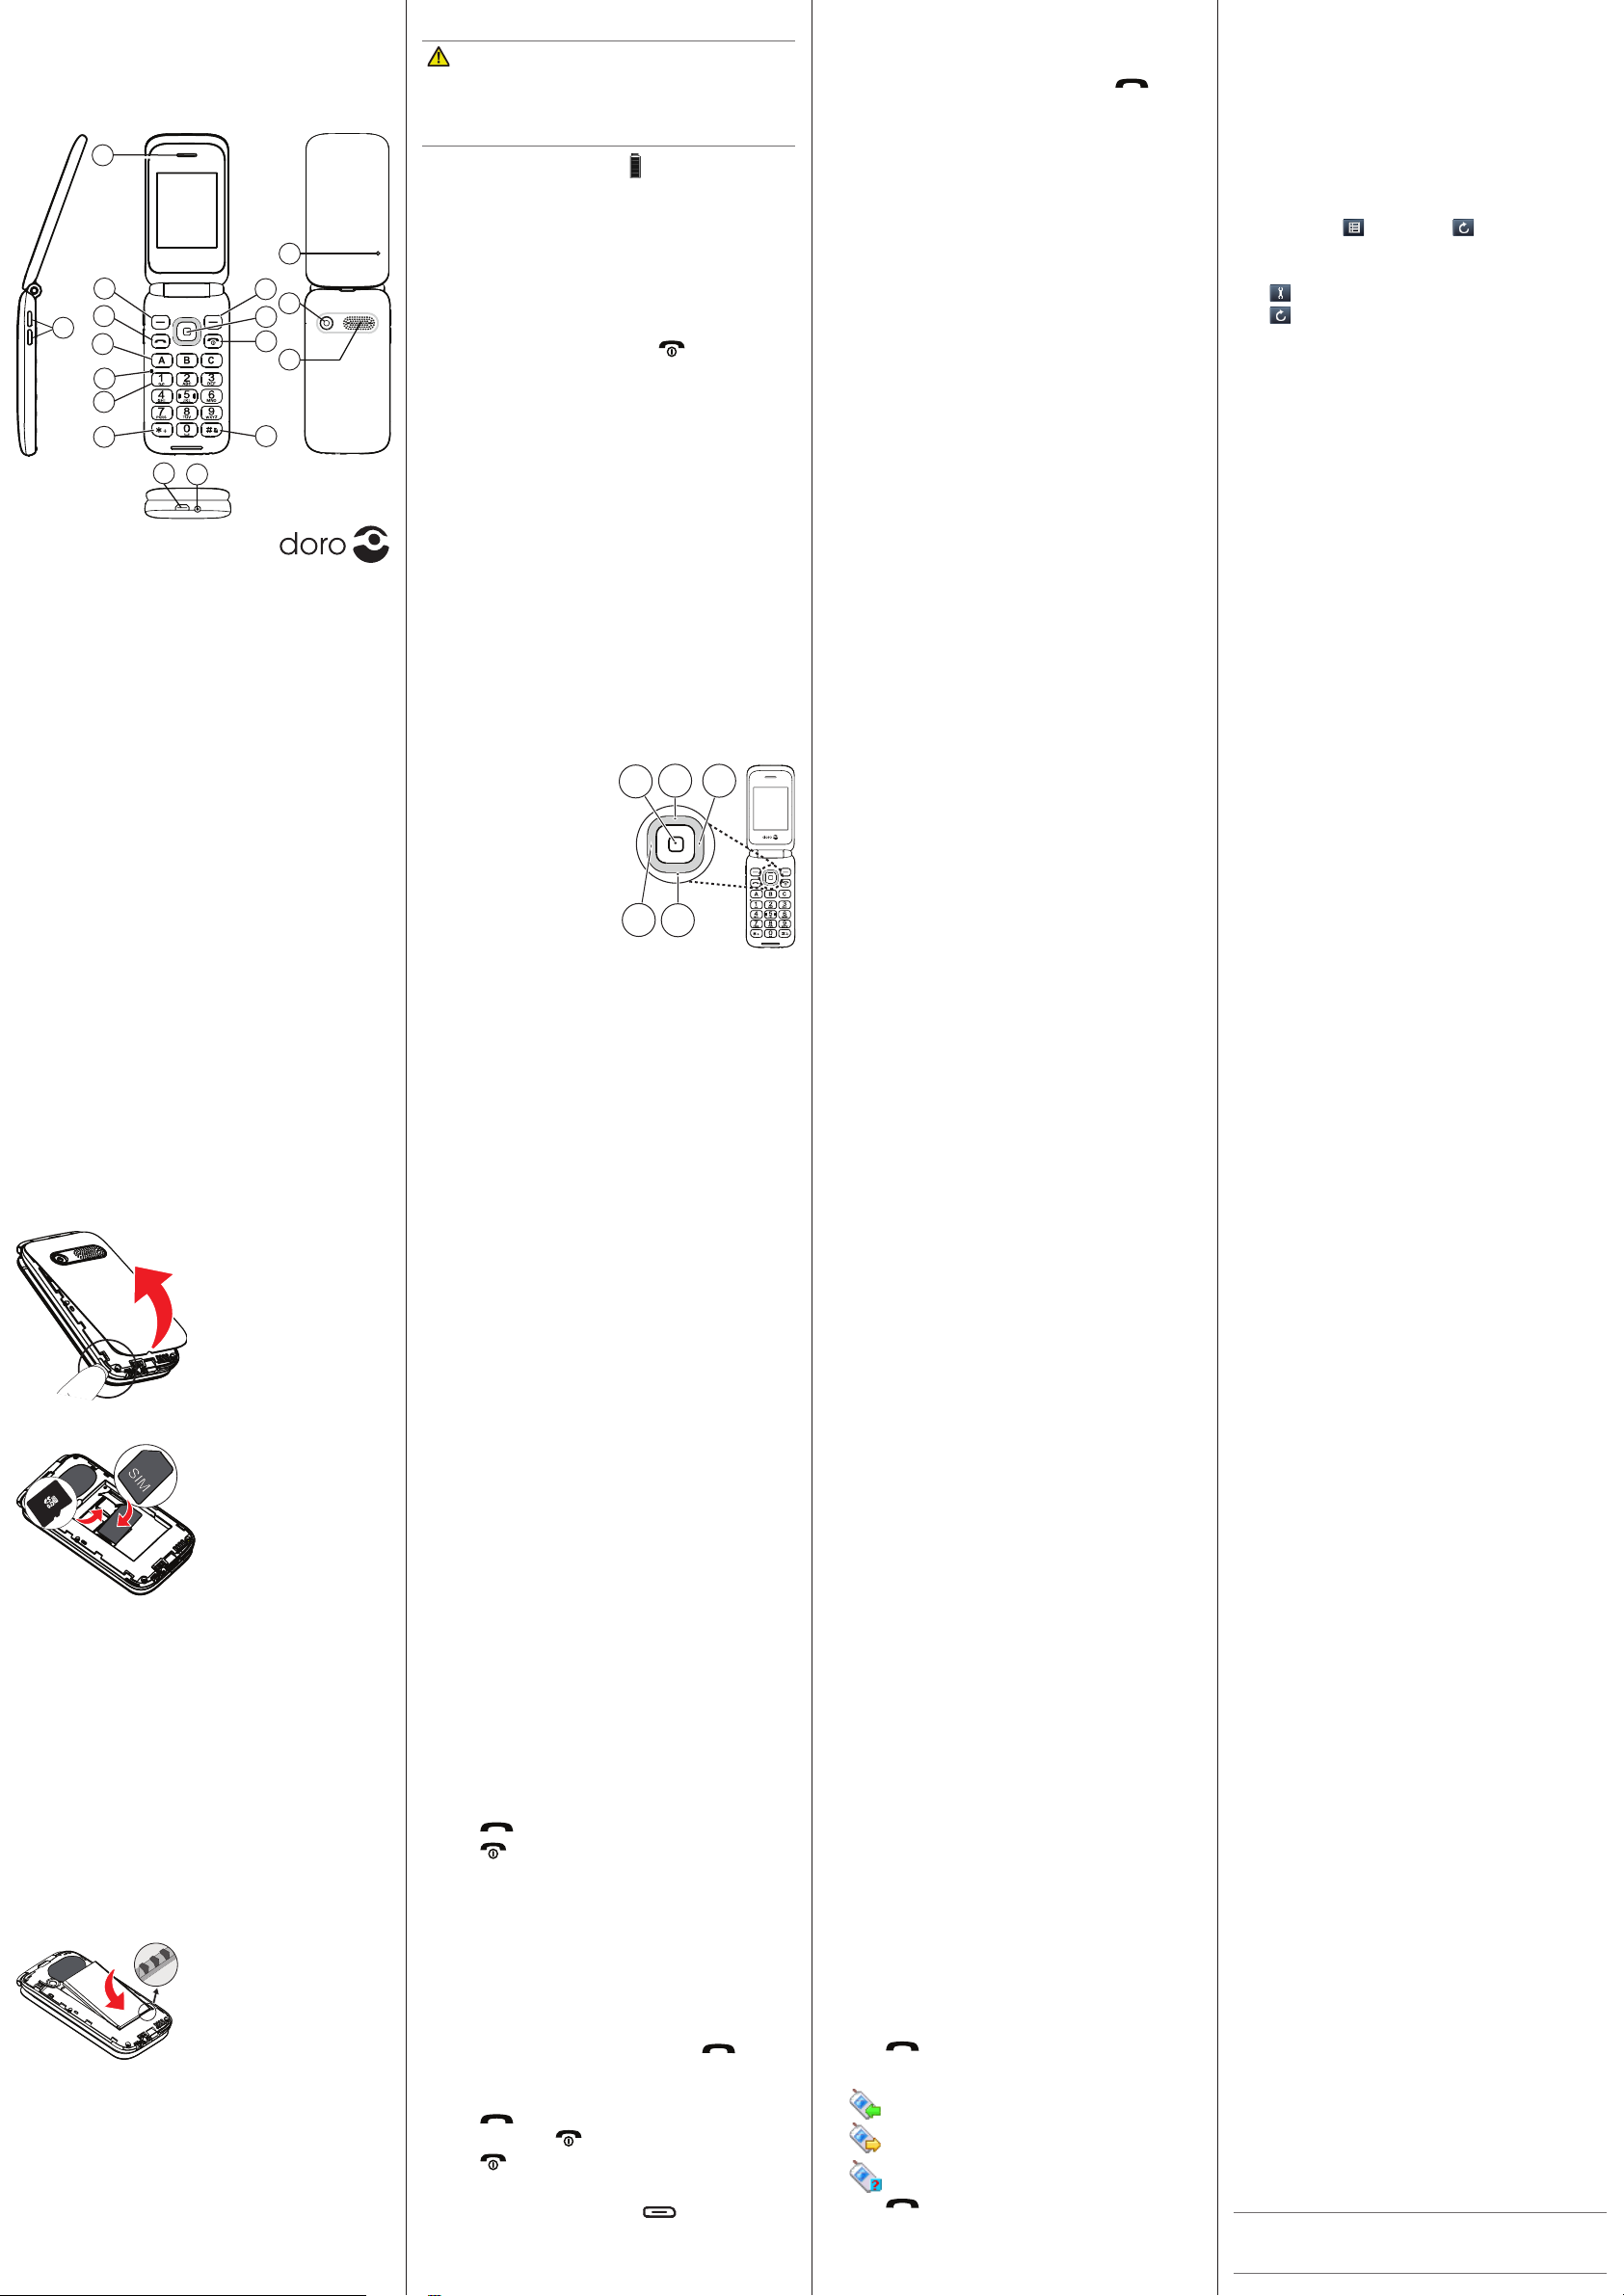
Primo
Manual
1. Earpiece
2. V
3. Le selecon
4. Call buon
5. Memory k
6. Microphone
7. V
8. Interna
Symbols
9. Charging sock
(micro-USB)
10. Headset sock
11. Input method/Silent
12. End call and
Pow
13. Navig
14. Right selecon
15. Indicator
16. Camera
17. Loudspeak
Charge the phone
CAUTION
Only use baeries, char
been approved f
Connecng other accessories may be danger
invalida
When the baery is running low is displayed and a
warning signal is heard.
Connect the mains adapter to a w
charging sock
Alternavely c
the phone and to a USB port on a computer
2. GET T
T
1. Press and hold the
Endcall
buon on the phone to
turn it on/o
2. If the SIM card is v
(Per
Input PIN
is displayed.
Enter the PIN code and pr
OK
. Delete with
Clear
.
Note! If PIN and PUK codes wer
SIM card, please con
Tip: It is recommended t
lm from the displa
Remain: #
shows the number of PIN a
more a
PINblocked
is displayed. The SIM
card mus
Unblocking Key).
1. Enter the PUK code and c
OK
.
2. Enter a new PIN c
OK
.
3. Re-ent
OK
.
Navig
E
D
• Press (A) to c
Alternavely pr
buon
OK
.
• Press (A) fr
open the phone menu.
Alternavely pr
selecon buon
Menu
to
access the phone menu.
Press the buons: B (UP) , C
(RIGHT), D (LEFT) ,
E (DOWN), to scr
Shorcuts
The navig
standby:
B Camera
C Messaging
D User proles
E Alarm
Enter t
• Press a numerical k
charact
the next char
• Press * f
desired charUP and press
OK
to select.
• Use navig
• Press # to cy
V
Use the side buons to adjust the sound v
call. The volume level is indic
Silent
Silent is a x
ring tone disabled.
• Press and hold # to acv
Phone indicat
LED light on the phone will:
• ash green when you ha
call. Aer r
ashing will stop.
• steady gr
• ash red when the ba
• steady r
4. SOS CALLS
As long as the phone is switched on, it is alwa
to place an SOS call by ent
number for y .
5. MESSA
Creat
picture messages
1. Press
Menu
â
Messages
â
Writ
â
T
message/Mulmediamessage.
2. Writ
Opons
.
3. If you wan
Add picture/
4. When ready
Opons
â
Send to
and select
recipient fr
(AddfromPhobook)
.
Alternavely
Enter r
to add recipient
manually and press
Done
.
5. Y
press
Opons
.
6. When done, press
Opons
â
Send
.
T
• Press
Menu
â
Messages
â
Messagesengs
â
T
message/Mulmediamessage
.
Inbox/Dr
1. Press
Menu
â
Messages.
2. Select
Inbox/Dr
/
Sent messages
.
3. Select the wanted messag
4. Press
Opons
to view the av
6. PHONEBOOK
The Phonebook in the phone can stor
Add cont
1. Press
Menu
â
Phonebook
â
Add new contact
â
select
T
or
T
.
2. Enter
Name
and
Number
for the con
3. Enter w
4. When done, press
Opons
â
Save
.
T
Opons
for the a
Memory ke
Add numbers to Memory k
1. Press
Menu
â
Phonebook
â
Opons
â
Phonebook
sengs
â
ABC-ke
.
2. Select
Key A
and enter the phone number including the
area code. Delet
Clear
.
3. Repeat t B and C .
4. Press
OK
to sav
Use A – C to speed dial an entry from s
• Press the corr
Speeddial2 - 9
Enable/disablespeeddial
1. Press
Menu
â
Phonebook
â
Opons
â
Phonebook
sengs
â
Speeddial
.
2. Select
Status
â
On/O
Addspeeddialnumbers
1. Press
Menu
â
Phonebook
â
Opons
â
Phonebook
sengs
â
Speeddial
â
Set numbers
.
2. Select the wanted posion (2-9) â
Edit
âand select an
entry from the phonebook.
3. Press
OK
to conrm.
4. Repeat t
T
Opons
â
Edit/Remo
Use 2 – 9 to speed dial an entry from s
• Press the corr
V
If your subscripon includes an answering service, caller
can leav
answer a call. V
need to subscribe to it r
the voice mail number
Callvoicemail
• Press and hold shortcut bu1 .
8. MUL
Press
Menu
â
Mulmedia
to reach the f
Camera
Y
and videos.
1. Press
Menu
â
Mulmedia
â
Camera.
2. Press middle navig
3. Press
UP
to switch betw
videocamera.
4. Press
Opons
or press
Back
to tak
(if you do not mak
Camerasengs
Press and scroll through the di
Press to go back.
Image view
Here you c
Opons
to
view the av
Videogallery
Here you c
Sound recor
Here you c
Recor
1. Press
Menu
â
Mulmedia
â
Sound recorder
2. Press
Opons
â
New recor
to st
3. Press
Pause/Connue
or
Stop
to contr
.
4. Press
Opons
for the a
FM radio
The FM radio has a fr
MHz. T
compable headset which acts as an ant
• Press LEFT to change frequency
• Press UP to c
• Press
Opons
for the a
•
Channellist
to sav
•
Manualinput
to enter the fr
•
Auto search
to search and sa
in your curren
Pleasenote! Pre
replaced by
Auto search
.
•
Sengs
for mor
9. SETTINGS
Phonesengs
•
Time and date
T
Y
update the me when y
•
Language
Set the language of the phone.
•
W
Set background w
•
LCDbacklight
Set brightness and meout f
Callsengs
•
Callwaing
: Y
put the current call on hold and answ
call. When acvat
incoming call while talking.
•
Calldivert
Y
or to another phone number
be diverted. Select a condion and pr
OK
, then select
Acvat
,
Deacvat
or
Query status
for each.
•
Callbarring
Y
certain types of calls.
Note! A passwor
your service provider t
Network setup
Selectnetwork
•
New search
to perform ne
•
Selectnetwork
to view av
av
delay). Select desired oper
•
Network mode
to select another network. Select
Automac
to select network aut
Manual
to
select network manually
Pref
T
Serviceselecon
•
GSM
service only
•
WCDMA
3G service only
•
Automac
switch between GSM and 3G f
Networkinf
View your curren
GPRSconnecon
Set when GPRS dat
When needed
or
Alway
.
GPRStrans
Set if data or v
GPRS pre
HSP
Set if HSP
Userproles
The phone has 4 available user pr
can hav
vibraon, messag
also be customiz
1. Select the wanted user pr
2. Press
Opons
to:
•
Acvat
to acva
•
Customiz
to set it as you wish
•
Reset
to return the pr
Flightmode
T
Bluetooth
Y
devices such as headsets or other phones.
Important!
When you are not using Bluet
Powe
or
Visibility
. Do not pair with an unknown device.
English
Note!
All illustra
and may not accur
items supplied with your phone might v
the soware and accessories a
oer
accessories from your loc
accessories provide the bes
2
3
4
6
14
12
16
13
11
7
10
9
1
8
17
5
15