
-
Kan je nummers blokkeren, zodat ze je niet meer kunnen bellen.
Reageer op deze vraag Misbruik melden
Wordt gebeld , neem niet op en moet betalen. Gesteld op 4-3-2024 om 20:01 -
Ik kan niet gebeld worden schakelt gelijk op voicemail daarna krijg ik een bericht dat ik gebeld ben hoe los ik dit op? Gesteld op 12-10-2023 om 18:59
Reageer op deze vraag Misbruik melden -
nergens in de handleiding gevonden om de speaker te activeren om handvrij te bellen Gesteld op 28-9-2023 om 01:38
Reageer op deze vraag Misbruik melden -
Weet iemand hoe ik op mijn Primo 406 het luide muziek bij het openen en sluiten kan stop zetten ? Gesteld op 14-9-2023 om 18:00
Reageer op deze vraag Misbruik melden -
mijn telefoon werkt, alleen hoor ik het telefoon gesprek niet, ik kan wel spreken en blijkbaar horen ze mij aan de andere kant van de lijn Gesteld op 14-8-2023 om 09:14
Reageer op deze vraag Misbruik melden -
Ik kan de melodie tijdens het openen en het sluiten niet verwijderen
Reageer op deze vraag Misbruik melden
Gesteld op 28-7-2023 om 21:03 -
Ben handleiding verloren Hoe stel ik de tijdnotatie in voor mij te wekken met de wekker ? Gesteld op 26-2-2023 om 13:33
Reageer op deze vraag Misbruik melden -
kan geen berichten ontvangen op gsm doro 406.
Reageer op deze vraag Misbruik melden
Hoe los je dit op? Gesteld op 17-1-2023 om 18:00 -
Kan geen berichten ontvangen op mijn gsm doro 406.
Reageer op deze vraag Misbruik melden
Hoe los je dat op? Gesteld op 17-1-2023 om 17:56 -
hoe kan ik aan de achterzijde het blauwe flikkerlicht doen stoppen Gesteld op 4-11-2022 om 18:27
Reageer op deze vraag Misbruik melden -
Hoe schakel ik het geluid uit bij openen en sluiten van de gsm
Reageer op deze vraag Misbruik melden
Gesteld op 3-11-2022 om 12:02 -
Het led-lampje aan de achterzijde blijft flikkeren bij het niet opladen van de batterij. Hoe uitschakelen? Gesteld op 21-10-2022 om 10:32
Reageer op deze vraag Misbruik melden-
led-lampje blijft flikkeren als er een bericht niet gelezen is Geantwoord op 27-10-2022 om 11:17
Waardeer dit antwoord (2) Misbruik melden
-
-
hoe kan ik de invoerwijze bij het aanmaken van berichten opslaan? Schakelt altijd over naar numeriek na het aanmaken en verzende van een bericht. Wil dit vastzetten op Nl, maar hoe? Door bij invoerwijze dit aan te klikken helpt niet gaat altijd automatisch terug naar numeriek??? Gesteld op 8-9-2022 om 11:31
Reageer op deze vraag Misbruik melden -
heb mijn pinnummer vergeten , kan dit opgelast worden ? Gesteld op 1-9-2022 om 17:53
Reageer op deze vraag Misbruik melden -
kan geen verbindingbmaken wegens ongeldige sim. hoe los ik dit op? Gesteld op 21-7-2022 om 21:43
Reageer op deze vraag Misbruik melden -
Hallo, in doro model 406 kan je de antwoordmodus instellen op automatisch opnemen. Dit lijkt niet te werken. Zijn er extra instellingen nodig om dit te verkrijgen? Mvg Dirk Gesteld op 28-3-2022 om 23:57
Reageer op deze vraag Misbruik melden -
Hoe kan ik het blauwe flikkerlicht aan de achterkant uitschakelen? Gesteld op 11-3-2022 om 20:45
Reageer op deze vraag Misbruik melden -
Ik kan geen gesprekken meer ontvangen, wat kan ik doen? Gesteld op 3-3-2022 om 20:22
Reageer op deze vraag Misbruik melden -
de telefoonnummers van de gsm op de simkaart zetten
Reageer op deze vraag Misbruik melden
Gesteld op 26-2-2022 om 13:23 -
ik heb vandaag een nieuwe gsm gekocht primo 406 en wil de beltonen wijzigien
Reageer op deze vraag Misbruik melden
maar ik vind het antwoord niiet in de handleiding Gesteld op 14-1-2022 om 15:34 -
Op mijn nieuwe gsm blijft aan de buitenkant het blauwe led lichtje flikkeren. Kan dit uitgeschakeld worden? Gesteld op 12-1-2022 om 11:57
Reageer op deze vraag Misbruik melden -
Als de batterij is opgeladen dan ziet men een blauw lichtje. Blijft dat lichtje altijd knipperen of kan men dat uitzetten? Gesteld op 18-9-2021 om 20:14
Reageer op deze vraag Misbruik melden -
Hoelang moet de batterij opladen bij eerste gebruik Gesteld op 30-8-2021 om 19:05
Reageer op deze vraag Misbruik melden -
hoe gebruik je luidspreker primo doro 406 bij handenvrij gebruik Gesteld op 21-6-2021 om 15:05
Reageer op deze vraag Misbruik melden -
Waar kan ik nadere uitleg vinden over de verbinding van mijn telefoon met Bluetooth ?
Reageer op deze vraag Misbruik melden
Dit teneinde een verbinding te maken met mijn hoorapparaat ! Gesteld op 8-6-2021 om 21:53 -
Ik zoek de 5 verschillende beltonen maar vind ze niet. Ik toets op belinstellingen maar kom niet verder. Hoe doe ik dit? Gesteld op 28-4-2021 om 11:06
Reageer op deze vraag Misbruik melden-
Gebruiksprofielen > algemeen > opties > aanpassen > binnenkomende oproepen ... Geantwoord op 11-11-2021 om 12:03
Waardeer dit antwoord (1) Misbruik melden
-
-
hoe moet ik alarm instellen dat die smorgens afloopt Gesteld op 19-4-2021 om 08:50
Reageer op deze vraag Misbruik melden-
Zoek organisator wekker, ok bewerken, status staat uit, druk op hekje status gaat aan.met pijltje gewenste alarmtooninstellen Geantwoord op 29-5-2021 om 13:26
Waardeer dit antwoord (1) Misbruik melden
-
-
Waarom blijft mijn telefoon rinkelen als ik hem open doe of toeleg.Waarom is mijn batterij zo rap leeg. Gesteld op 29-1-2021 om 16:33
Reageer op deze vraag Misbruik melden-
ik heb exact hetzelfde probleem, heeft u al een oplossing? Geantwoord op 29-5-2021 om 15:04
Waardeer dit antwoord (9) Misbruik melden
-
-
heb gsm doro primo 406 gekocht maar als er iemand belt is het gehoor slecht.grt
Reageer op deze vraag Misbruik melden
Gesteld op 21-1-2021 om 19:13 -
Wij krijgen de wekker niet ingesteld. Kaniemand helpen Gesteld op 29-11-2020 om 18:22
Reageer op deze vraag Misbruik melden -
Hoe zet ik geluid telefoon harder,iwaar zie ik hoe luidijn telefoon staat? Gesteld op 3-10-2020 om 09:18
Reageer op deze vraag Misbruik melden-
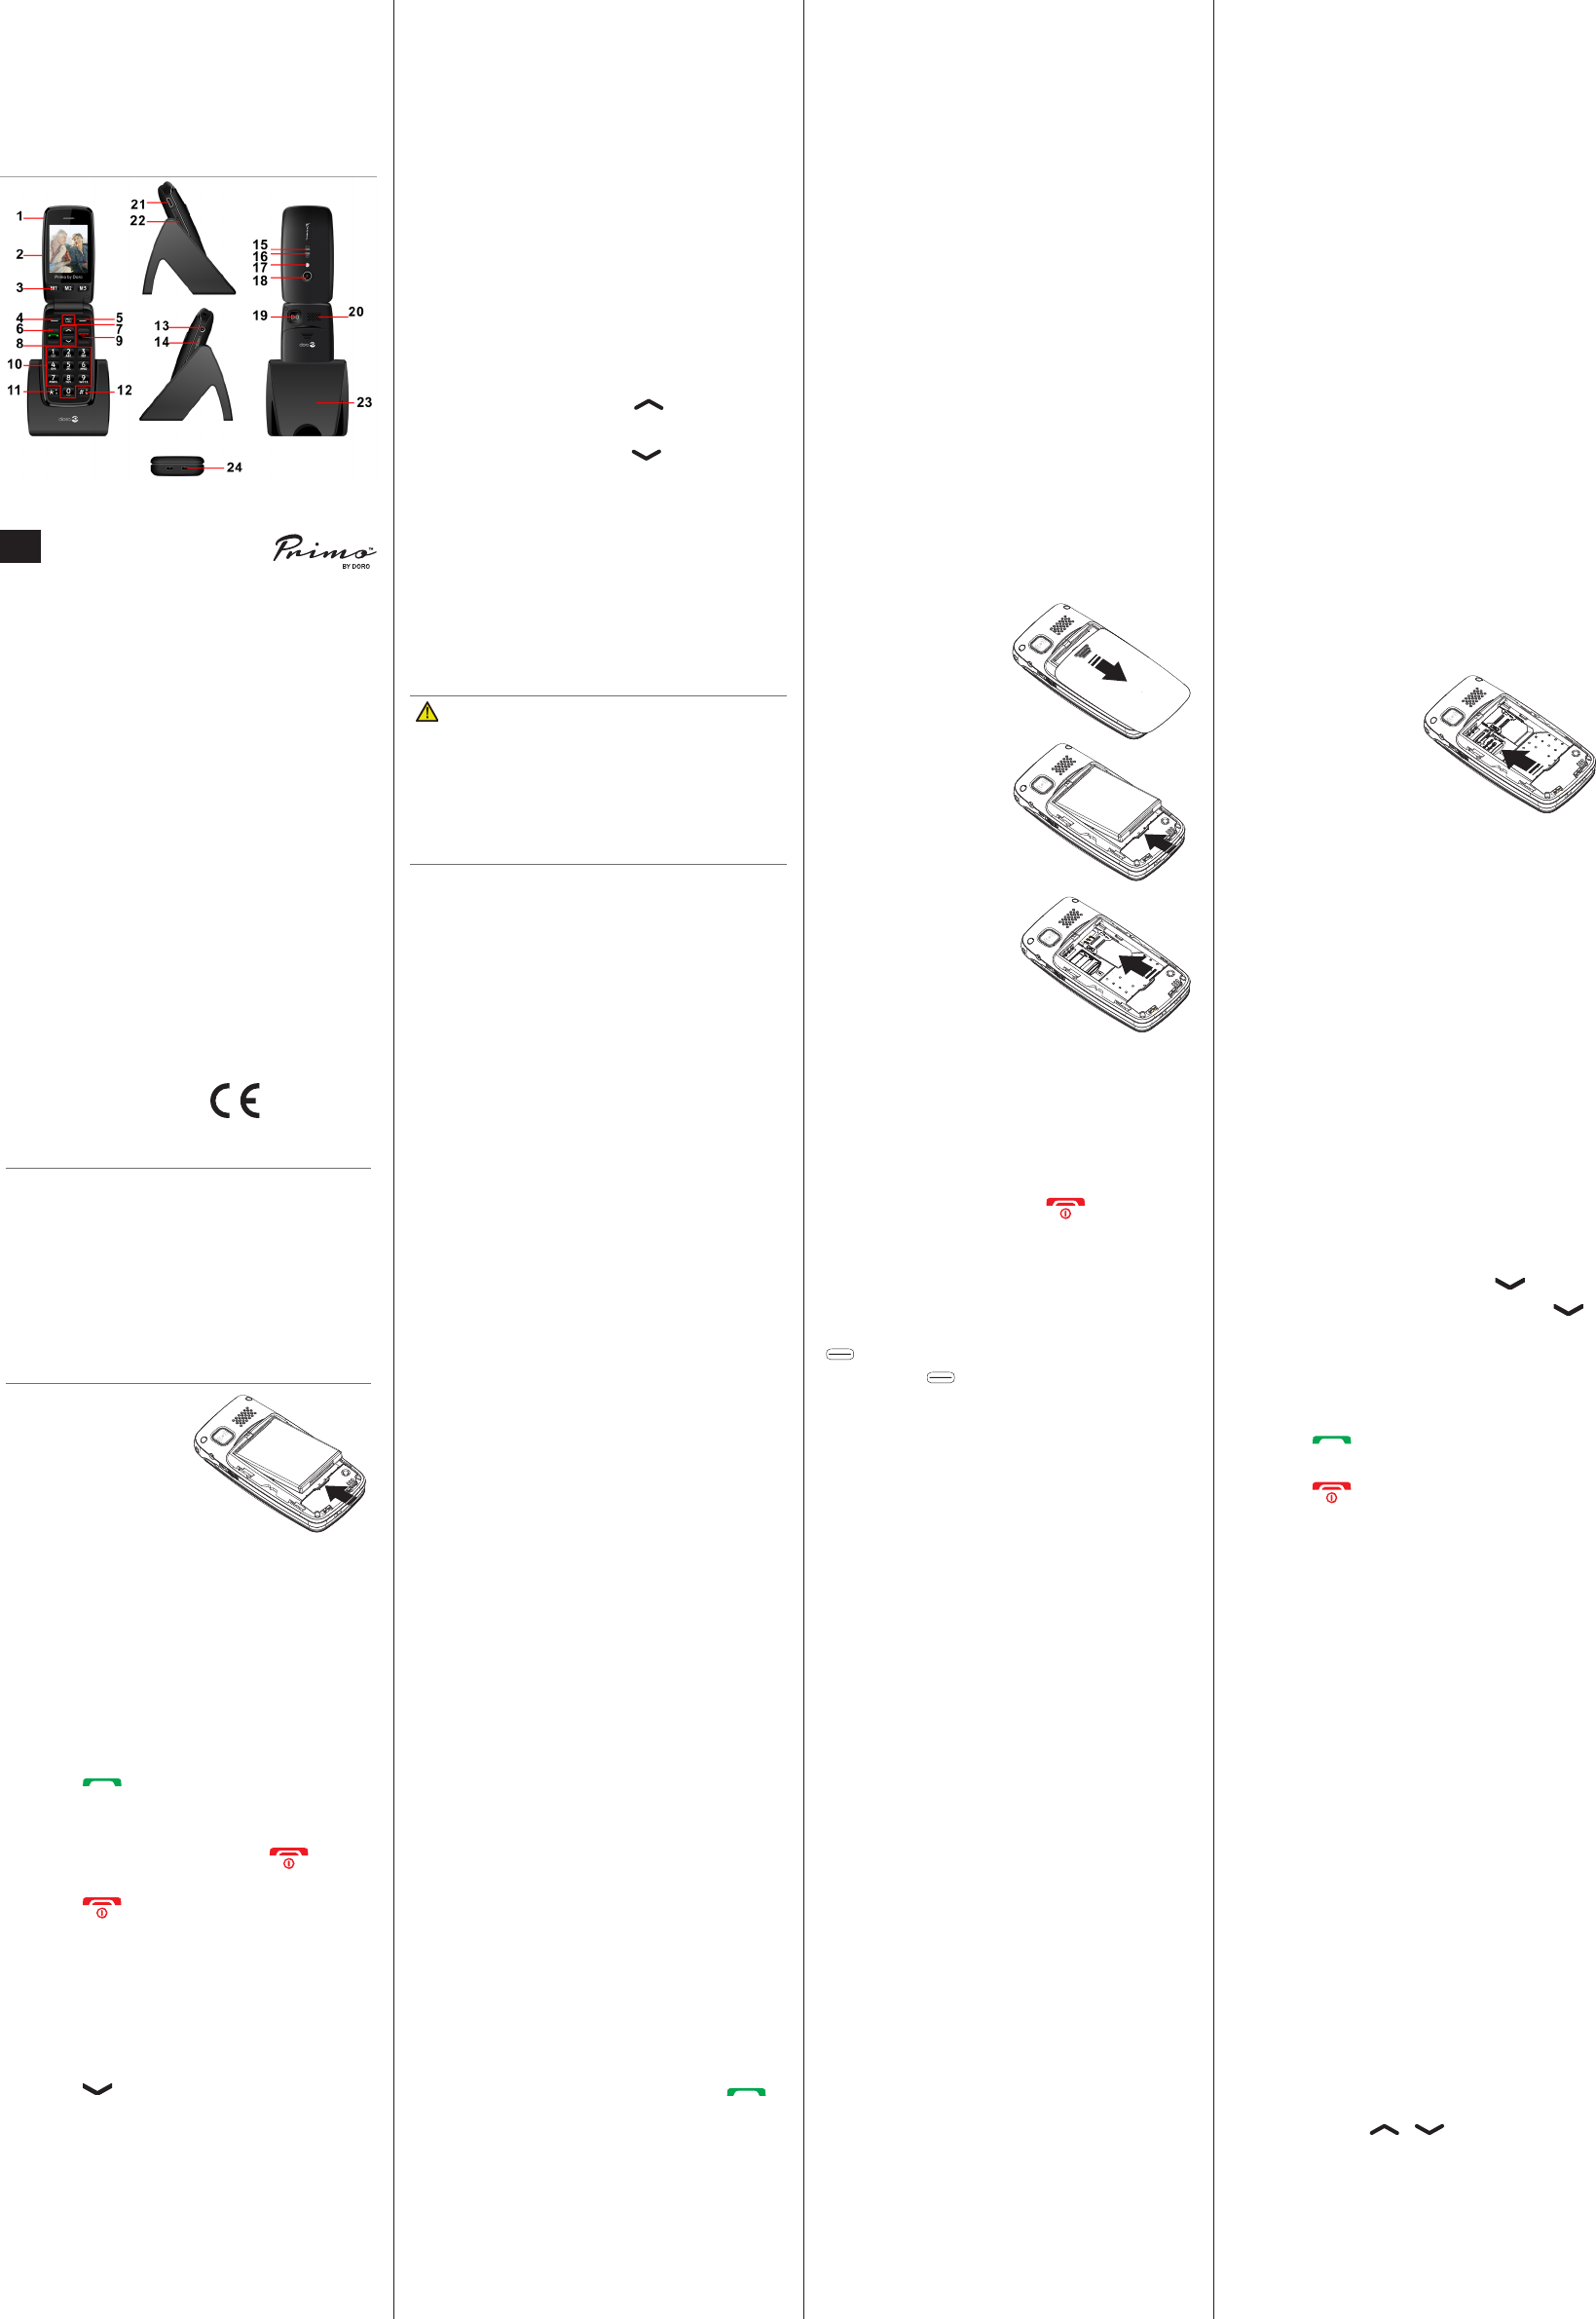
Net onder de usb opening om de telefoon op te laden staat een schakelaar +/- .
Waardeer dit antwoord Misbruik melden
Met deze knop nr22 kan je het belgeluid luider of zachter zetten.
Succes Geantwoord op 21-12-2020 om 18:27
-
-
Werkt een klasieke grote simkaart in de doro primo 406? Gesteld op 17-8-2020 om 04:02
Reageer op deze vraag Misbruik melden -
Kan nergens vinden hoe ik het geluid van open en dicht doen van de gsm uit te schakelen word er gek van ??wie weet hoe ?
Reageer op deze vraag Misbruik melden
En ook andere beltonen vind ik niet ?? Gesteld op 3-7-2020 om 21:54-
je moet hem bij gebruikers profielen op algemeen zetten. Bij u zal hij buitenshuis staa en dan heb je dat Geantwoord op 12-7-2020 om 12:06
Waardeer dit antwoord Misbruik melden
-
-
Beste , we hebben deze week een Doro primo 406 gekocht voor mijn moeder en deze vandaag ingesteld, maar als ze ons belt of wij haar verstaan we niet eens wat ze zegt het kraakt langs alle kanten , zij verstaat ons wel, kunnen jullie hiermee even helpen aub?
Reageer op deze vraag Misbruik melden
grtjs KArine Gesteld op 20-6-2020 om 20:03 -
ik zoek een primo doro met WhatsApp erop, heeft deze dat ook, met vriendelijke groet Tonneke Gesteld op 3-6-2020 om 14:43
Reageer op deze vraag Misbruik melden -
doro primo 406 hoe kan foto's doorsturen naar iemand of hoe kan ik ze op fb zetten? geen uitleg over wekker zetten? Spijtig geen uitleg over die zaken in handleiding. kan de beltoon veranderd worden of geluid als er bericht binnen komt? grtn Gesteld op 16-5-2020 om 16:46
Reageer op deze vraag Misbruik melden -
Gsm primo 406 gekocht bij vandenborre komt steeds op storing bij het opladen wat kan ik doen? Gesteld op 16-4-2020 om 15:44
Reageer op deze vraag Misbruik melden -
HOE KAN IK BIJ GSM HEB JE KNOPJE TOT 3 NRS ,1 en 2 en 3 resetten om 2oude nrs te vervangen en 2andere nrs in steken Gesteld op 2-4-2020 om 14:09
Reageer op deze vraag Misbruik melden -
het blauw lichtje van doro Primo 406 blijft pinken wat doen? Gesteld op 26-3-2020 om 11:36
Reageer op deze vraag Misbruik melden-
in de handleiding staat dat het knippert als hij volledig is opgeladen Geantwoord op 9-11-2020 om 09:27
Waardeer dit antwoord (21) Misbruik melden
-
-
Kan niet bellen of sms'en met nummers uit telefoonlijst. Gesteld op 25-3-2020 om 10:17
Reageer op deze vraag Misbruik melden -
Het postvak is vol. Ik probeer in Oproepgeschiedenis; via Gesprekdlog wissen Alle gesprekken te wissen door op enter te drukken. Geen reactie Gesteld op 6-3-2020 om 11:09
Reageer op deze vraag Misbruik melden -
Ik hoor de persoon aan de andere kant van de lijn niet. Welke instelling moet ik gebruiken ? Gesteld op 28-2-2020 om 18:51
Reageer op deze vraag Misbruik melden -
Ben mijn pincode vergeten van gsm primo by doro,kan ik de gsm resetten?
Reageer op deze vraag Misbruik melden
Gesteld op 21-2-2020 om 13:37 -
Het lukt niet om de simkaart in gsm primo by doro in te brengen,wat doe ik verkeerd? Gesteld op 5-2-2020 om 19:23
Reageer op deze vraag Misbruik melden -
Het lukt niet om de simkaart in te brengen in gsm primo by doro,wat doe ik verkeerd? Gesteld op 5-2-2020 om 19:21
Reageer op deze vraag Misbruik melden -
hoe kan ik nummers van mailbox op simkaart zetten ??? GRTN Gesteld op 23-1-2020 om 11:40
Reageer op deze vraag Misbruik melden -
Mijn primo 406 geeft geen geluid weer als ik opgebeld word. alle andere functies werken normaal. Het toestel staat aan op maximum geluid, maar rinkelt niet. Als er iemand raad weet, dan hoor ik het graag van u. . Gesteld op 17-1-2020 om 08:38
Reageer op deze vraag Misbruik melden -
mijn toestel gaat niet over wanner ik gebeld word
Reageer op deze vraag Misbruik melden
Gesteld op 17-1-2020 om 08:26 -
Ik word gebeld, ik neem op, mijn oproeper hoort mij, ik hem niet.
Reageer op deze vraag Misbruik melden
ik druk op handfree en krijg hem verterkt.
Wat doe ik om hem norm Gesteld op 15-1-2020 om 16:10-
Mag ik vragen waar handgreep op primo 406 zit dan? Geantwoord op 13-9-2020 om 14:14
Waardeer dit antwoord Misbruik melden
-
-
Blauw lampje blijft oplichten zelfs na gemiste oproepen gewist te hebben Gesteld op 9-12-2019 om 14:27
Reageer op deze vraag Misbruik melden-
Wij hebben hetzelfde probleem . Blauw lichtje blijft altijd knipperen ook al is hij volledig opgeladen Geantwoord op 2-1-2020 om 14:43
Waardeer dit antwoord (33) Misbruik melden
-
-
Bij het openen en sluiten van m'n toestel, gaat er telkens een deuntje af, hoe kan ik dat uitschakelen. Gesteld op 22-8-2019 om 13:07
Reageer op deze vraag Misbruik melden-
Ben ook op zoek naar die oplossing nog niet gevonden ,jij wel ? Geantwoord op 3-7-2020 om 22:07
Waardeer dit antwoord (5) Misbruik melden
-
-
Kan je in dit model de beltonen (ringtoon) veranderen? (primo 406).
Reageer op deze vraag Misbruik melden
Kunnen foto's enkel via bluetooth overgezet worden naar de computer of bestaat er ook een kabeltje voor. Gesteld op 2-1-2019 om 16:54-
Ja U kan de beltonen verzetten in het Menu! Overzetten naar de P.C. Is met een kabeltje. Geantwoord op 2-1-2019 om 19:58
Waardeer dit antwoord (8) Misbruik melden
-
-
Hallo kan je met dit toestel een beantwoorden door gewoon de klep open te klappen?
Reageer op deze vraag Misbruik melden
m.a.w zonder op de groene toets te drukken Gesteld op 8-10-2018 om 11:16-
ga naar menu instellingen, belinstellingen, onderaan: geavanceerde instellingen, antwoordmodus: keuze bovenaan: 'antwoord dekken' aanvinken (slechte vertaling) Geantwoord op 24-10-2018 om 19:57
Waardeer dit antwoord (1) Misbruik melden
-
-
KAN JE HET BLAUWE LICHTJE VOORAAN GSM OOK UITZETTEN,
Reageer op deze vraag Misbruik melden
Gesteld op 1-9-2017 om 22:56-
Reden dat het blauwe lampje brandt, is dat er een oproep is geweest. Als je de gemiste oproep wist, dan gaat het blauwe lampje uit.
Waardeer dit antwoord (40) Misbruik melden
Hopelijk werkt het.
Rosane Geantwoord op 5-9-2017 om 15:56
-
-
Ik heb alle oproepen gewist en het lampje brandt nog Geantwoord op 25-10-2022 om 10:51
Waardeer dit antwoord (12) Misbruik melden -
Je moet jouw berichten ook verwijderen. Geantwoord op 10-9-2023 om 09:47
Waardeer dit antwoord (2) Misbruik melden -
Om dat blauwe lampje te doven, hoef je niet uw ontvangen bericht te wissen.
Waardeer dit antwoord (2) Misbruik melden
Als je het gelezen hebt, kan je het gewoon bewaren, en terugkeren naar het oorspronkelijke display..Het blauwe lampje is dan uit.
Geantwoord op 10-9-2023 om 10:51 -
Reden dat het blauwe lampje brandt, is dat er een oproep is geweest. Als je de gemiste oproep wist, dan gaat het blauwe lampje uit.
Waardeer dit antwoord (3) Misbruik melden
Hopelijk werkt het.
Rosane
Geantwoord op 5-9-2017 om 15:56
Als het een gemiste oproep betreft, is het natuurlijk zoals Rosane schrijft. Geantwoord op 10-9-2023 om 11:29 -
Hoe kan ik mijn GMS toestel verbinden met de autotelefoon geplaatst in een Quashquai Acenta? Gesteld op 12-5-2017 om 16:52
Reageer op deze vraag Misbruik melden-
beste, ik zou ook een doro willen kopen ,weet je al een antwoord op je vraag, ik rijd ook qachqai Geantwoord op 8-8-2017 om 21:35
Waardeer dit antwoord (3) Misbruik melden
-