Low power is indicated when the lights of all the touch
buttons, except for the 3FUNCTION, start to flash. When
this happens, try lowering the volume level. If this does not
stop the flashing, replace the batteries with new ones.
IMPORTANT!
•Continued use with low batteries will cause Digital
Piano power to turn off automatically. This can cause
data stored in Digital Piano memory to be corrupted
or lost.
1.
Before turning on power, rotate the 2 volume
knob as far as it will go in the direction shown in the
illustration below.
2.
Press the 1P (Power) button to turn on power.
Turning on power will cause the lights of the front panel
touch button to light in sequence from left to right
(3FUNCTION to 9ELEC. PIANO). The Digital
Piano is ready to play when all touch button lights are
lit.
3.
Use the 2 volume knob to adjust volume.
4.
To turn off power, hold down the 1P (Power)
button until all lit touch button lights turn off.
NOTE
•Power may not turn on if you press the 1P (Power)
button too lightly. This does not indicate malfunction. If
this happens, apply more pressure when you press the
1P (Power) button.
•Pressing the 1P (Power) button to turn off power
actually puts the Digital Piano into a standby state.
Minute amounts of current continue to flow within the
Digital Piano in the standby state. If you do not plan to
use the Digital Piano for a long time or if there is a
lightning storm in your area, be sure to unplug the AC
adaptor from the power outlet.
■DAMPER PEDAL Jack
Connect the supplied pedal (SP-3) to the bmDAMPER
PEDAL jack. This pedal functions as a damper pedal under
initial Digital Piano default settings.
For details about how to assign functions to this pedal, refer
to the User’s Guide that is available on the CASIO website.
■PEDAL UNIT Jack
You can connect the optionally available 3-Pedal Unit (SP-
34) to the bnPEDAL UNIT jack on the back of the Digital
Piano. You can then use the pedals for expression that is
similar to that available on an acoustic piano.
☞CASIO WEBSITE: User’s Guide
Using headphones cuts off output from the built-in speakers,
which means you can practice playing even late at night
without disturbing others.
•Be sure to turn down the volume level before connecting
headphones.
NOTE
•Headphones do not come with the Digital Piano.
•Use commercially available headphones. See
“Separately Available Accessories” for information about
options.
IMPORTANT!
•Do not listen to very high volume output over
headphones for long period. Doing so creates the
risk of hearing damage.
•If you are using headphones that require an adaptor
plug, make sure you do not leave the adaptor
plugged in when you unplug the headphones. If you
do, nothing will sound from the speakers when you
play.
IMPORTANT!
•When operating a touch button, touch it firmly with a
bare finger. Touch buttons will not respond if you
touch them while wearing gloves.
■Touch Button Only Operations
Touching a touch button firmly and immediately releasing it
will perform the operation assigned to the button. For
example, touching 9ELEC. PIANO selects the
ELEC.PIANO tone, while touching 5METRONOME
starts (or stops) the metronome.
■Touch Button + Keyboard Key Combinations
A number of different Digital Piano settings can be
configured by using a touch button (except for the 70
(REC) button) in combination with a keyboard key.
As an example, the procedure below shows how to select
the JAZZ ORGAN tone.
1.
Hold down 8GRAND PIANO.
•Until you release 8GRAND PIANO in step 3
below, you can use keyboard keys to select tones
and to configure other settings. For information
about what operations you can perform while
8GRAND PIANO is depressed, see the
“Keyboard Function List”.
Turning Power On or Off
Using a Pedal
Using Headphones
Touch Button Operations
2.
Press the B1 keyboard key.
This selects the JAZZ ORGAN tone and causes the
confirmation tone to sound using the JAZZ ORGAN
tone.
3.
Release 8GRAND PIANO.
•Now you can play on the keyboard with the JAZZ
ORGAN tone.
■Touch Button Light Auto Off (Panel Light
Setting)
To save power, you can configure a setting that will turn off
all button lights, except for 3FUNCTION, after a certain
period of non-operation.
☞CASIO WEBSITE: User’s Guide
Your Digital Piano comes with 17 tones that are assigned to
the entire keyboard range, plus one bass tone that can be
assigned to lower range only.
■To select a tone using keyboard keys
1.
While holding down 8GRAND PIANO, press a
keyboard key from A0 through C{2.
•For example, pressing the F{1 keyboard key will
select the HARPSICHORD tone and will sound the
confirmation tone using the HARPSICHORD tone.
•For information about the tone assigned to each
keyboard key, see the “GRAND PIANO Button +
Keyboard Key” entry in the “Keyboard Function List”.
2.
Release 8GRAND PIANO.
■To select a tone with the touch buttons
You can configure the keyboard to play two different tones
at the same time across its entire range (Layer), or to play
different tones in the left and right ranges (Split).
■To layer two tones
1.
Use the procedure under “Selecting a Single Tone”
to select the Upper1 tone.
2.
Keep 9ELEC. PIANO depressed until step 5,
below.
3.
Press the C7 keyboard key to enable layering.
•Each press of C7 toggles layering between enabled
and disabled.
4.
Press a keyboard key within the range of A0
through C{2 to sound both tones at the same time.
•For information about the tone assigned to each
keyboard key, see the “GRAND PIANO Button +
Keyboard Key” entry in the “Keyboard Function List”.
5.
Release 9ELEC. PIANO.
•Now when you press a keyboard key to play, the two
tones you selected will sound at the same time.
■To use split to play bass notes in the lower
range
1.
Use the procedure under “Selecting a Single Tone”
to select the upper range tone.
2.
While holding down 9ELEC. PIANO, press the D2
keyboard key.
This assigns the bass tone to the lower range.
3.
Release 9ELEC. PIANO.
NOTE
•Touching 8GRAND PIANO or 9ELEC. PIANO
selects the tone assigned to the touch button, and
unlayers and unsplits the keyboard.
1.
Hold down 3FUNCTION.
This causes the 3FUNCTION and DEMO lights to
flash, and the 4SOUND MODE light to turn light.
2.
Touch 4SOUND MODE.
This will cause the 6a and DEMO lights to light,
and starts playback of the one demo song (and the
lights of touch buttons except for 6a to turn off).
After demo song playback is complete, it will continue
with playback of Music Library songs.
•The operations below are supported during demo
play.
*For details about built-in songs, see the “Music
Library List”.
Selecting a Tone
Selecting a Single Tone
To select this tone:Touch:
GRAND PIANO CONCERT8GRAND PIANO
ELEC.PIANO9ELEC. PIANO
Layer and Split
Listening to Demo Play
To do this:Perform this operation:
Skip forward to the
next song
While holding down 6a, press
the B0 keyboard key.
Skip back to the
previous song
While holding down 6a, press
the B}0 keyboard key.
Jump to a specific
song
While holding down 6a, press a
keyboard key from C1 through B5.*
Stop demo song
playback
Touch 6a.
Touch Response alters tone volume in accordance with
keyboard pressure (speed). This provides you some of the
same expressivity you get on an acoustic piano.
■To change touch response sensitivity
1.
While holding down 8GRAND PIANO, press a
keyboard key from F{7 through B7.
2.
Release 8GRAND PIANO.
The metronome sounds a regular tone to mark time. Use the
metronome when you want to practice playing at a regular
tempo.
■To start or stop the metronome
1.
Touch 5METRONOME.
This starts the metronome.
•LEDs above 6a button flash yellow (first beat)
and red (remaining beats) in time with the
metronome beats.
2.
To turn off the metronome, touch the
5METRONOME again.
■To change the metronome beat
1.
While holding down 5METRONOME, press a
keyboard key from C2 through A2.
•For the location of each metronome setting
keyboard key, see the “METRONOME Button +
Keyboard Key” entry of the “Keyboard Function
List”.
2.
Release 5METRONOME.
When using the metronome or when playing back a Music
Library song, you can specify a tempo setting within the
range of 20 to 255 beats per minute.
For the location of each tempo setting keyboard key, see the
“METRONOME Button + Keyboard Key” entry of the
“Keyboard Function List”.
■To input a tempo setting value
1.
While holding down 5METRONOME, use
keyboard keys B0 to A}1 to input a tempo value.
•Input three digits for the tempo value. To specify a
value that has fewer than three digits, input zero (0)
for the unused leading digit. For example, to specify
a tempo of 80 bpm, press keyboard keys in the
following sequence: B0 (0) 3 G1 (8) 3 B0 (0).
The end tone will sound when you input the third
digit.
•Here, you could use the A0 (–) or B}0 (+) keyboard
key to raise or lower the tempo by 1 with each press.
2.
After the setting is the way you want, release
5METRONOME.
Changing Keyboard Response to
Touch Pressure (Touch Response)
Pressing
this key:
Selects this
setting:
Which does this:
F{7OffDisables Touch Response.
Sound volume is fixed,
regardless of key press speed.
G71: LightMakes production of a louder
sound easier, so touch feels
lighter than “Normal”.
A}72: Medium
Light
A73: NormalSpecifies normal sensitivity.
B}74: Medium
Heavy
Makes production of a louder
sound more difficult, so touch
feels heavier than “Normal”.
B75: Heavy
Using the Metronome
Pressing
this key:
Selects this
setting:
Which does this:
C2OffSounds a click for all beats.
C{21Sounds a bell for all beats.
D22
These keys specify a beat
setting of 2 to 9.
The first beat of each measure
is a bell sound, while the
remaining beats are clicks.
E}23
E24
F25
F{26
G27
A}28
A29
Specifying the Tempo
Continued on the back
Function settings can be configured by holding down a touch button as you press a keyboard key. For more information refer to the Keyboard Function List available from the CASIO website.
Keyboard Function List
A0
B
}0
B0
C1
C
{1
D1
E
}1
E1
F1
F
{1
G1
A
}1
A1
B
}1
B1
C2
C
{2
D2
E
}2
E2
F2
F
{2
G2
A
}2
A2
B
}2
B2
C3
C
{3
D3
E
}3
E3
F3
F
{3
G3
A
}3
A3
B
}3
B3
C4
C
{
4
D4
E
}4
E4
F4
F
{
4
G4
A
}4
A4
B
}4
B4
C5
C
{5
D5
E
}5
E5
F5
F
{5
G5
A
}5
A5
B
}5
B5
C6
C
{6
D6
E
}6
E6
F6
F
{
6
G6
A
}6
A6
B
}6
B6
C7
C8
C
{7
D7
E
}7
E7
F7
F
{7
G7
A
}7
A7
B
}7
B7
245791012
1368111315C{E}F{A}B}
1416CDEFGAB
Scale Tuning selection
Duet Mode (off/on/pan)
Equal Temperament
Clear Bluetooth connection logs
Bluetooth Pairing
Execution
Factory Reset
Left-side Keyboard Octave Shift (–)
Auto Power Off enable/disable
Keyboard Channel (–)
Right-side Keyboard Octave Shift (–)
Keyboard Volume (
+
)
Bluetooth on/off
Hi-Reso V
elocity MIDI OUT enable/
disable
Touch Button Sensitivity (–)
Audio Volume (–)
Power On Alert enable/disable
Auto Resume enable/disable
Tuning (442.0Hz)
Notification Tone Volume (
+
)
Left-side Keyboard Octave Shift (
+
)
Right-side Keyboard Octave Shift (
+
)
Tuning (440.0Hz)
Tuning (–0.1Hz)
Tuning (+0.1Hz)
Keyboard V
olume (–)
Song Volume (–)
Song Volume (
+
)
Audio Volume (
+
)
Local Control on/off
Keyboard Channel (
+
)
Pedal Function
Touch Button Luminosity
Touch Button Sensitivity (
+
)
Speaker Out enable/disable
Panel Light setting
Notification Tone Volume (–)
Notification Tone Set selection
Panel Lock enable/disable
Scale Tuning base noteDuetTuningVolume
settings
MIDI
settings
Audio-In Center Cancel enable/
disable
ROCK PIANO
ELEC.PIANO
DIGITA L E.PIANO 2
60’S E.PIANO
VIBRAPHONE
STRINGS 2
ELEC.ORGAN 1
GRAND PIANO CONCERT
GRAND PIANO MELLOW
JAZZ ORGAN
A0
B}0
B0
C1
C
{1
D1
E}1
E1
F1
F{1
G1
A}1
A1
B}1
B1
C2
C
{2
D2
E}2
E2
F2
F{2
G2
A}2
A2
B}2
B2
JAZZ PIANO
DIGITAL E.PIANO 1
HARPSICHORD
STRINGS 1
PIPE ORGAN
ELEC.ORGAN 2
GRAND PIANO BRIGHT
Tone Selection
C6
C
{6
D6
E}6
E6
F6
F{6
G6
A}6
A6
B}6
B6
C7
C8
C
{7
D7
E}7
E7
F7
F{7
G7
A}7
A7
B}7
B7
Upper1 Volume (
+
)
Upper1 Octave Shift (
+
)
Touch Response (off)
Touch Response (2)
Touch Response (4)
Upper1 Volume (–)
Upper1 Octave Shift (–)
Transpose (–)
Transpose (
+
)
Touch Response (1)
T
ouch Response (3)
Touch Response (5)
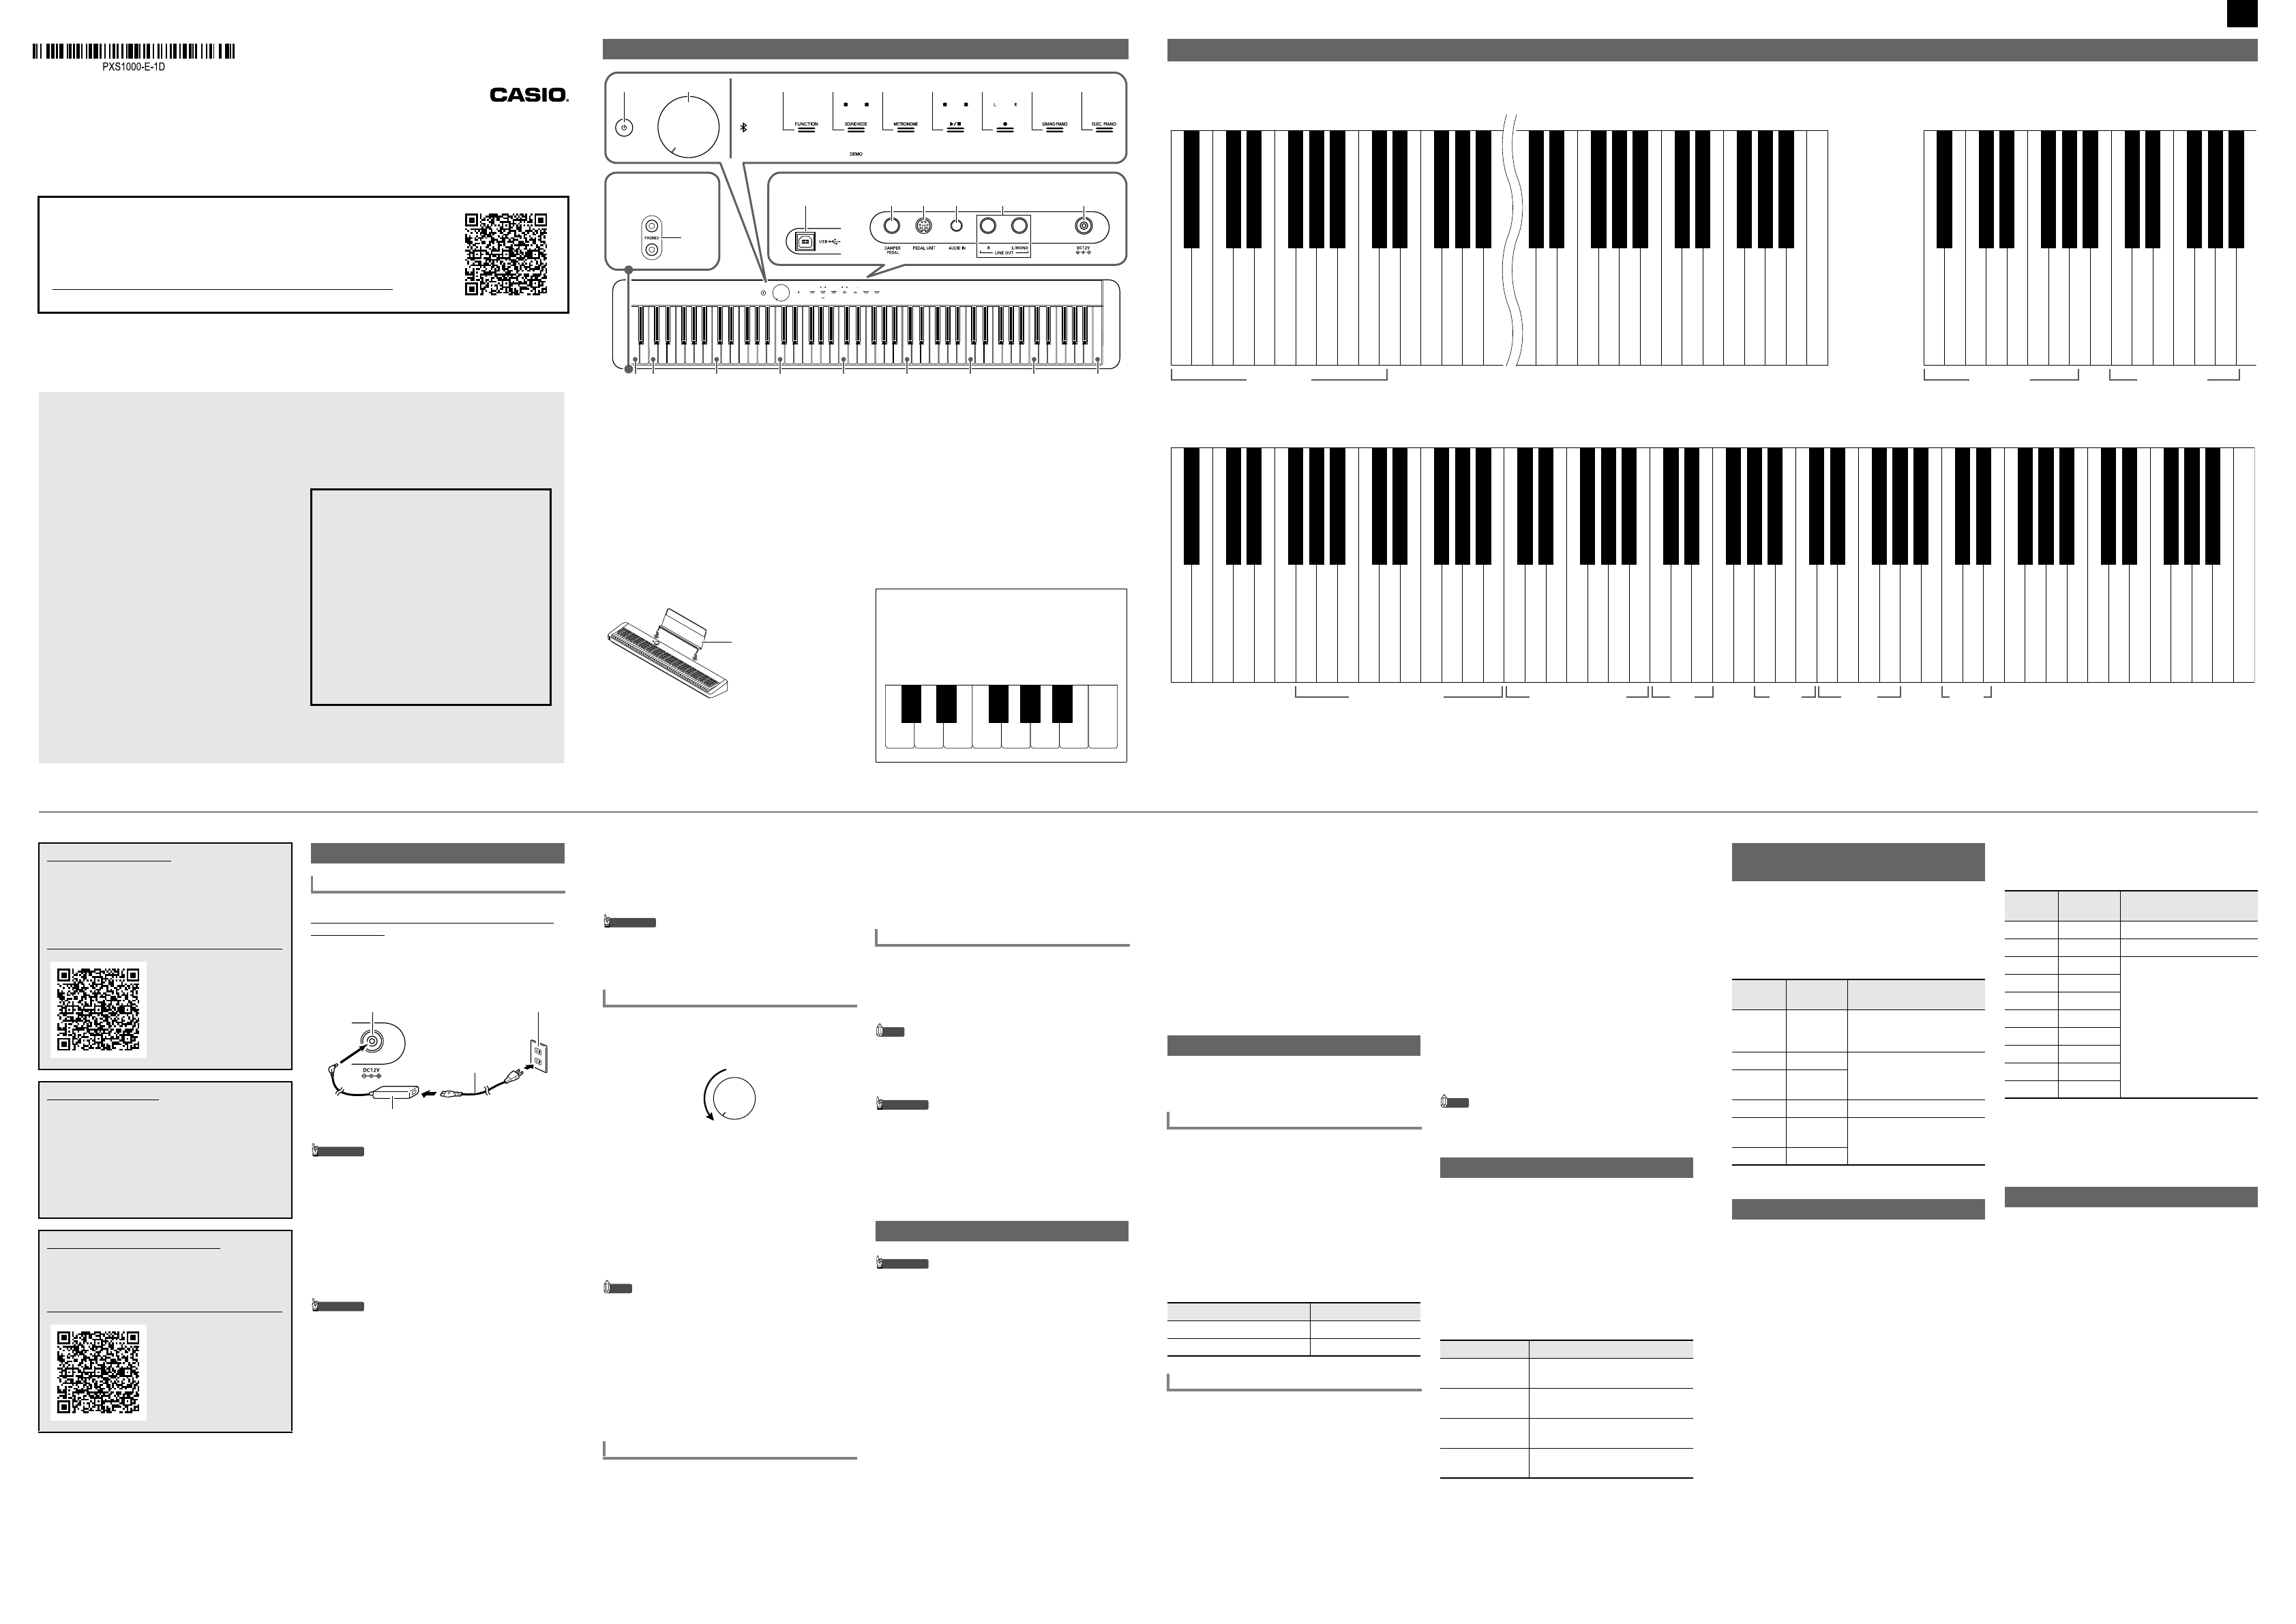
■GRAND PIANO Button + Keyboard Key
*
■FUNCTION Button + Keyboard Key
■METRONOME Button + Keyboard Key
A0
B}0
B0
C1
C
{1
D1
E}1
E1
F1
F{1
G1
A}1
A1
B}1
B1
C2
C
{2
D2
E}2
E2
F2
F{2
G2
A}2
A2
B}2
B2
10(−)
356824579
24791368
(+)
Tempo setting
Off
Metronome Volume (
+
)
Metronome Volume (–)
Metronome Beat
*The tones assigned to keyboard keys A0 to C{2 are the same as those when the ELEC. PIANO
Gebruikershandleiding.com neemt misbruik van zijn services uitermate serieus. U kunt hieronder aangeven waarom deze vraag ongepast is. Wij controleren de vraag en zonodig wordt deze verwijderd.
Product:
Spelregels forum
Om tot zinvolle vragen te komen hanteren wij de volgende spelregels:
lees eerst de handleiding door;
controleer of uw vraag al eerder door iemand anders is gesteld;
probeer uw vraag zo duidelijk mogelijk te stellen;
heeft u een probleem en al geprobeerd om dit op te lossen, vermeld dit erbij aub;
heeft u een oplossing gekregen van een bezoeker dan horen wij dat graag in dit forum;
wilt u een reactie geven op een vraag of antwoord, gebruik dan niet dit formulier maar klik op de knop 'reageer op deze vraag';
uw vraag wordt direct op de website gezet; vermijd daarom persoonlijke gegevens in te vullen;
Belangrijk! Als er een antwoord wordt gegeven op uw vraag, dan is het voor de gever van het antwoord nuttig om te weten als u er wel (of niet) mee geholpen bent! Wij vragen u dus ook te reageren op een antwoord.
Belangrijk! Antwoorden worden ook per e-mail naar abonnees gestuurd. Laat uw emailadres achter op deze site, zodat u op de hoogte blijft. U krijgt dan ook andere vragen en antwoorden te zien.
Abonneren
Abonneer u voor het ontvangen van emails voor uw Casio PX-S1000 Privia bij:
nieuwe vragen en antwoorden
nieuwe handleidingen
U ontvangt een email met instructies om u voor één of beide opties in te schrijven.
Ontvang uw handleiding per email
Vul uw emailadres in en ontvang de handleiding van Casio PX-S1000 Privia in de taal/talen: Engels als bijlage per email.
De handleiding is 2,13 mb groot.
U ontvangt de handleiding per email binnen enkele minuten. Als u geen email heeft ontvangen, dan heeft u waarschijnlijk een verkeerd emailadres ingevuld of is uw mailbox te vol. Daarnaast kan het zijn dat uw internetprovider een maximum heeft aan de grootte per email. Omdat hier een handleiding wordt meegestuurd, kan het voorkomen dat de email groter is dan toegestaan bij uw provider.
Uw handleiding is per email verstuurd. Controleer uw email
Als u niet binnen een kwartier uw email met handleiding ontvangen heeft, kan het zijn dat u een verkeerd emailadres heeft ingevuld of dat uw emailprovider een maximum grootte per email heeft ingesteld die kleiner is dan de grootte van de handleiding.
Er is een email naar u verstuurd om uw inschrijving definitief te maken.
Controleer uw email en volg de aanwijzingen op om uw inschrijving definitief te maken
U heeft geen emailadres opgegeven
Als u de handleiding per email wilt ontvangen, vul dan een geldig emailadres in.
Uw vraag is op deze pagina toegevoegd
Wilt u een email ontvangen bij een antwoord en/of nieuwe vragen? Vul dan hier uw emailadres in.