-Gate
Das LAN-Gatew
Heimnetzwerk eine k
Steck
iPhone, iP
DE
Bedienungsanleitung
Home Aut
GW
V
Zum Betrieb des Gate
oder iOS-Gerät und einen WLAN-R
mit einem freien R
Erst
Nach dem Auspacken sind w
um das Syst
Schritten gehen wir dav
Heimnetz einen WLAN-Rout
verwenden (
Sollte das nicht der F
WLAN-Rout
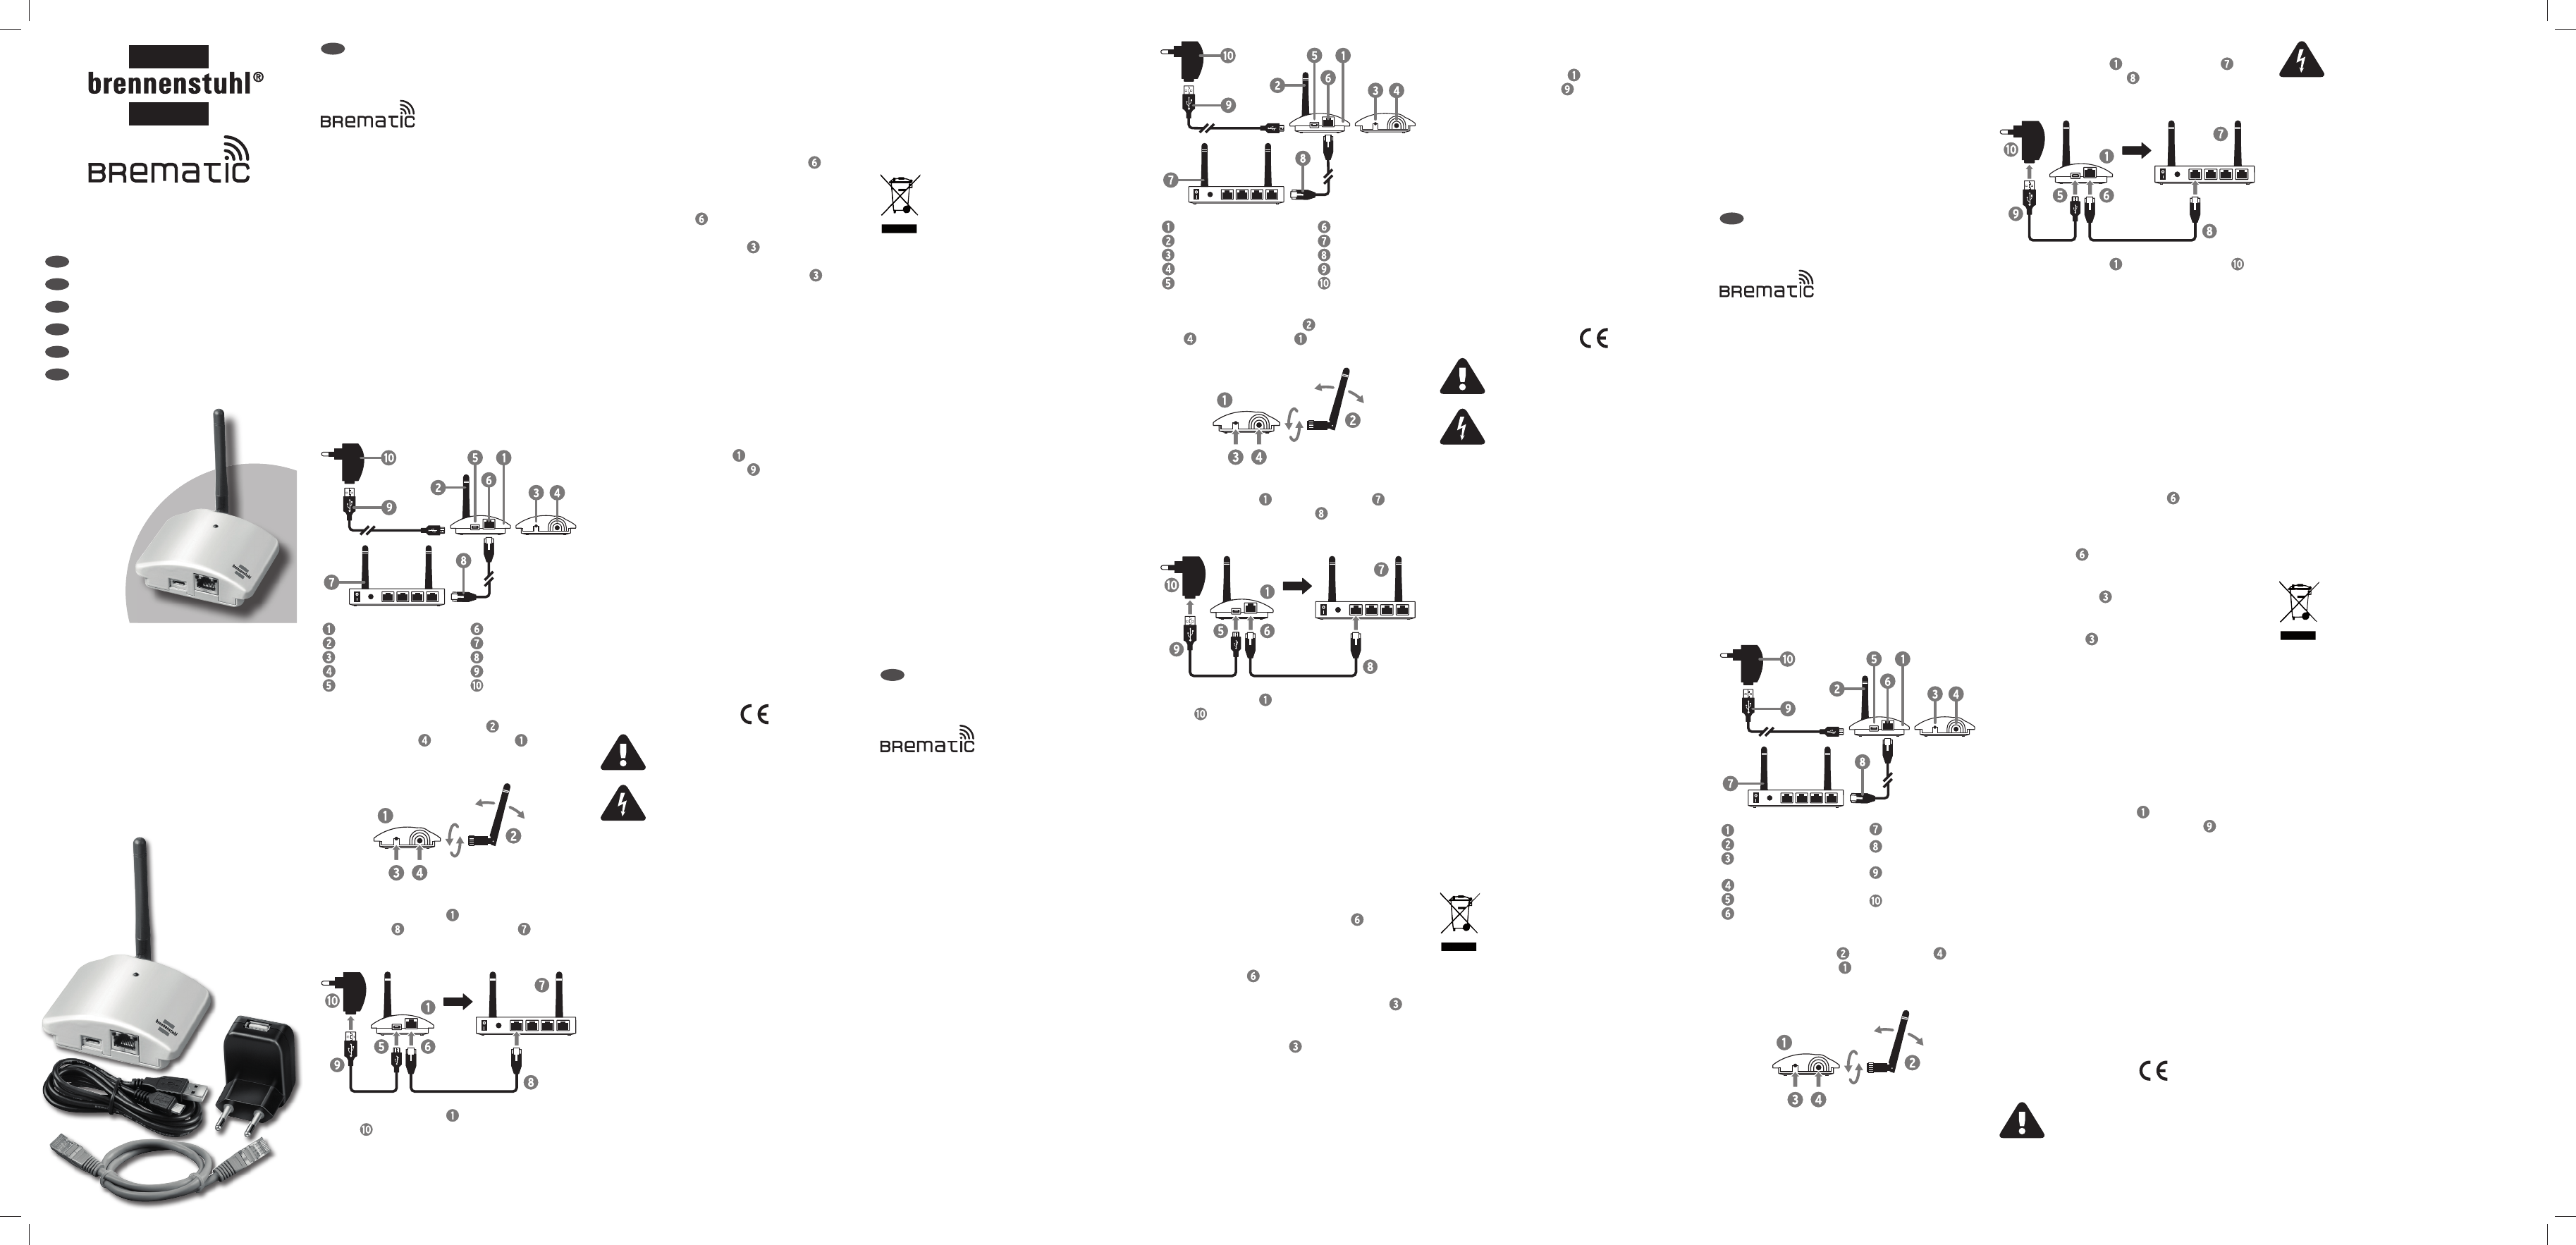
Antenne anschr
Schrauben Sie die 433 MHz-
an die dafür
vorgesehene Buchse
am LAN-Gatew
.
Sie ist dreh- und abwink
Montagelage gut ausrichten zu können.
Anschluss des Gat
V über das beiliegende
Netzwerkk
mit Ihrem WLAN-R
.
F
Sie ihn jetzt ein und wart
LAN
V mit dem beiliegenden
Netzteil , danach sucht das LAN-Gate
Sekunden nach einer fr
Alternativ kann das LAN-Gat
USB Anschluss (500 mA) gespeist w
z.B durch ein USB-Char
des WLAN Router
Betriebsber
• Blaue LED blinkt beim Einsteck
vom DHCP-Rout
V
LAN-Gatew
in kurz Abständen dauerhaft.
• Beim Senden eines Befehls zum Ein- oder Aus
schalten eines F
• Die orangene LED an der Netzw
leuchtet dauerhaft und zeigt damit an, dass der
WLAN-Rout
• Bei Datenv
Netzwerkbuchse
kurz auf
• Blaue LED leuchtet dauerhaft ¬ Zur erneuten
Synchr
6 Sekunden
während dem Betrieb drück
• Neustart/R
6 sekunden drück
Download der S
Damit die F
gesteuert wer
App auf dem iPhone, iP
Android-
Informationen zu St
App fi
T
Übertragungsfr
Reichw max. 25 m
Umgebungstemper 0 ° bis 35 °C
Lagertemper - 40 ° bis 7
Betriebsspannung Netzteil:
Eingang: 230 V~, 50 Hz
Ausgang: 5 V
EG-k
Sicherheitshinw
Lesen Sie diese Bedienungsanleitung und
Sicherheitshinweise aufmerksam dur
V
dur
• Öffnen Sie das Gerät, insbesondere das Net
keinen F
Repar
oder einer Elektro- F
• V
geschlossenen Räumen. Sie sind nicht für den
Außenbereich
• Diese Anleitung ist ein Bestandteil des Gerät
Geben Sie diese deshalb bei Weit
an Dritte unbedingt auch w
• V
F
St
Aus dem unbeaufsichtigt
und V
Sie daher die Schaltfunktion ausschließlich für solche
Steck
hierfür durch ihr
wurden und aus der
entsteht. F
jeweiligen Her
Beachten Sie ferner
eingesetzte T
ein angefordert
ausgeführt wird.
Entsor
Elektr
werf
Gemäß Europäischer Richtlinie 2
über Elektro- und Elek
müssen verbr
und Batterien getr
umwelt
Möglichkeit
erfahr
Kon
In Übereinstimmung mit f
Richtlinienwurde das CE
• 1999
• 2006/
• 2004/108
• 2011/
Die Kon
hinterlegt:
www
ke_129
Herst
Hugo Brennenstuhl GmbH & Co
Seestr
www
Urheberr
iOS, iPhone
eingetragene Mark
ihrer je
gekennzeichnet.
Firmw
(Die Firmwar
Stand sein!)
1. T vom Netz und
schließen Sie das USB-Kabel
an einen freien
USB-Port Ihres PC
2. Laden Sie die aktuelle Firmw
Websit
3. Start
und folgen den Anw
4. Start
Home Aut
Gat
DE
Bedienungsanleitung
GB
User
FR
Notice
IT
Istruzioni per l‘uso
NL
Handleiding
ES
Manual de instrucciones
Lieferum
1 x 1 x USB-Netzteil (500 mA)
1 x 1 x
1 x
Gatew
Antenne (433 MHz
Progr
Antennen-Buchse
Mini-USB Anschluss
Netzwerk Anschluss
Rout
Netzwerkk
USB-Kabel
Netzteil
GB
User
Home Aut
GW
-Gate
The LAN gate
Steck
via an iPhone, iP
integr
Requir
T
device and a WLAN r
RJ45 ethernet net
First s
After r
needed to start using the s
assume that you use a WLAN r
in your home netw
If that isn‘t the case, you hav
WLAN rout
Scope o
1 x 1 x USB power supply
1 x (500 mA)
1 x 1 x USB cabel (1.8 m)
Gatew
Antenna (433 MHz
Progr
Antenna sock
Mini-USB socket
Network sock
Rout
Network cable
USB cabel
Pow
Scr
Screw on the 43
to the pr
cket
on the LAN gatew . It can be rotat
angled so it can be aligned in any installation position.
Connecting the LAN gat
Connect the gate to y
using the provided net . If the rout
not swit
operationally r
Connect the gate
with the provided po
supply
; then the LAN gatew
seconds for a fr
Alternatively
power via a 5 V USB c
This can be done e.
USB outlet on the WLAN rout
LAN
Oper
• The blue LED will blink from the time it is plugged in
until it is assigned an IP address fr
rout
If the LAN gatew
blue LED will continuously blink in short intervals.
• When sending the command to s
wireless actuator the blue LED will light up once.
• The orange LED on the net
will
remain lit and indicat
been recognised as the r
• During a data transf
network
will light up briefl
• The blue LED is lit permanently
¬ T
6 seconds during operation.
• Restart
¬ Press the r
6 seconds.
Download the S
F
the gatew
on the iPhone, iP
tablet. F
download of the app go online t
T
T 433,
Radio signal r max. 25 m
Ambient temper 0°C t
Stor -40°C t
Supply voltage pow
Input: 230 V~, 50 Hz
Output: 5 V
CE
Firmw
(The fi
1. Disconnect the gate from the netw
connect the USB cable
to a fr
your comput
2. Download the latest fi
www
3. Run the fi
installation
4. Start the updat
St
Hazardous situations can arise when s
devices and c
Use the switching function only f
connected de
purpose by the manufactur
a danger when switched on. If in doubt, please ask the
respectiv
In addition, also be awar
guarant
be carried out because of the technologies used.
Steck
connected de
devices and c
develop int
unless you hav
Y
the swit
Disposal
Do not thro
with the house rubbish!
In ac
2
electronic de
and batteries must be c
of in an envir
Y
used devices at y
Con
The CE marking was at
the following E
• 1999
• 2006/
• 2004/108
• 2011/
The conf
wing link:
www
ke_129
Manufactur
Hugo Brennenstuhl GmbH & Co
Seestr
www
Cop
iOS, iPhone
brands or r
owners and may not be e
Safe
Read the oper
instructions
A
due to electric shock!
• Never open the device
supply yourself
performed by the servic
electrician.
• Only use the power supply in closed rooms. The
not suitable for out
• These instructions are a component of the devic
They must be included when passing on the de
to a thir
• Avoid moistur
-Gate
Grâce à son intégr
passerelle G
les modules télécommandés 433 MHz compatibles a
Steck
lette Andr
FR
Notice
Home Aut
GW
S
Afi
disposer d’un appareil Andr
d’une box Int
ment réseau Ethernet RJ4
Pr
Une fois que vous a
rout
vous utilisez dans vo
sans fi
malement le cas). Sinon, il v
votre bo
Cont
1 x 1 x
1 x USB (500 mA)
1 x 1 x
RJ4 USB (1,8 m)
P
Ant
T
de
Prise d’antenne
Port mini-USB
Raccor
Box Internet
Câble réseau
Ethernet
Câble de rac
ment
Bloc d’
Installation de l’
Vissez l’
à la prise prévue
sur la passerelle G
. L
et pliable et permet donc une bonne orientation, quelle
que soit la position de montage.
Racc
Raccor à votre box Int à
l’
. Si la box Internet n
pas encore activée
jusqu’à ce qu’
LAN
Raccor au bloc d’alimentation
fourni ; la passer
quelques secondes une adresse IP libr
local. La passerelle G
via un port USB 5 V (500 mA). Cela peut se f
d’un chargeur USB
de la prise USB de la box Int
Etat de f
• Lors du r
ce que la box Int
échéant, elle s’éteint. Si la passer
trouve aucune adr
permanence à courts int
• Lors de l’
désactivation d’un module téléc
bleue s’
• La LED orange de la prise réseau
est allumée en
permanence et indique ainsi que la box Int
été
• Lors de la cir
prise
s’
• La LED bleue est allumée en permanence : pour
renouveler la s
de pendant 6 secondes.
• Redémarr
appuyez pendant 6 sec
réinitialisation
.
Téléchargement de l’
St
Afi
mandés avec la passer
être inst
smartphone ou une tablette Andr
relatives à S
cation sont disponibles sur le site www
Car
F 433,
Portée du signal r 25 m max.
T de 0° à 35
T de - 40° à 7
T
Entrée : 230 V~, 50 Hz
Sortie : 5 V
Conf
Consignes de sécurité
Lisez att
ces consignes de sécurité.
E
par électr
• N’
notamment le bloc d’
tout
après-vent
• N’utilisez le bloc d’
dans des locaux fermés. Ils ne sont pas appr
l’usage
• Ce mode d’
Il est donc impératif de le r
concernées en cas de cession à un tier
• Évitez impér
tempér
F
La mise en rout
n’
commande à distance e
interrupteur
autorisés par leur fabricant et n
par leur mise en service
renseigner auprès du f
V
mise en place, S
procédur
exécutée
Steck
appareils connectés
dispositif électrique présentant ou pouvant entr
quelconque risque sans avoir un aperçu.
Les risques liés à une utilisation non con
commande à distance v
Mise au r
Ne jetez pas le
les ordure
Selon la directive eur
relative aux appar
niques usagés, les appar
doivent être c
nière rvironnement. Des renseigne-
ments sur les possibilités de mise au rebut de l’
usagé sont disponibles auprès de votr
municipalité.
Mise à jour du fi rmw
(Le fi
1. Déconnecte du réseau et
connecte
à un
port USB libre de vo
2. Téléchargez le fi
site W
3. Ouvrez le fi
les instructions d’installation.
4. Démarrer la mise à jour
Déclar
La plaque CE a été apposée conf
directives eur
• 1999
• 2006/
• 2004/108
• 2011/
Cliquez sur le lien suivant pour c
de conf
www
rung/ke_129
F
H. Brennenstuhl S.A.S
Z.A. 5 rue de l‘
6
www
Inf
iOS, iPhone
ques déposées par leurs pr
sont pas marqués spécifi
T
Auch kann St
angeschlossener Geräte nicht bestimmen. Schalt
Sie daher ohne Sichtkontak
und V
entwickeln können oder auf der
Schaltung es ankommt.
Die aus dem unsachgemäßen Einsatz der Schaltfunk
resultier