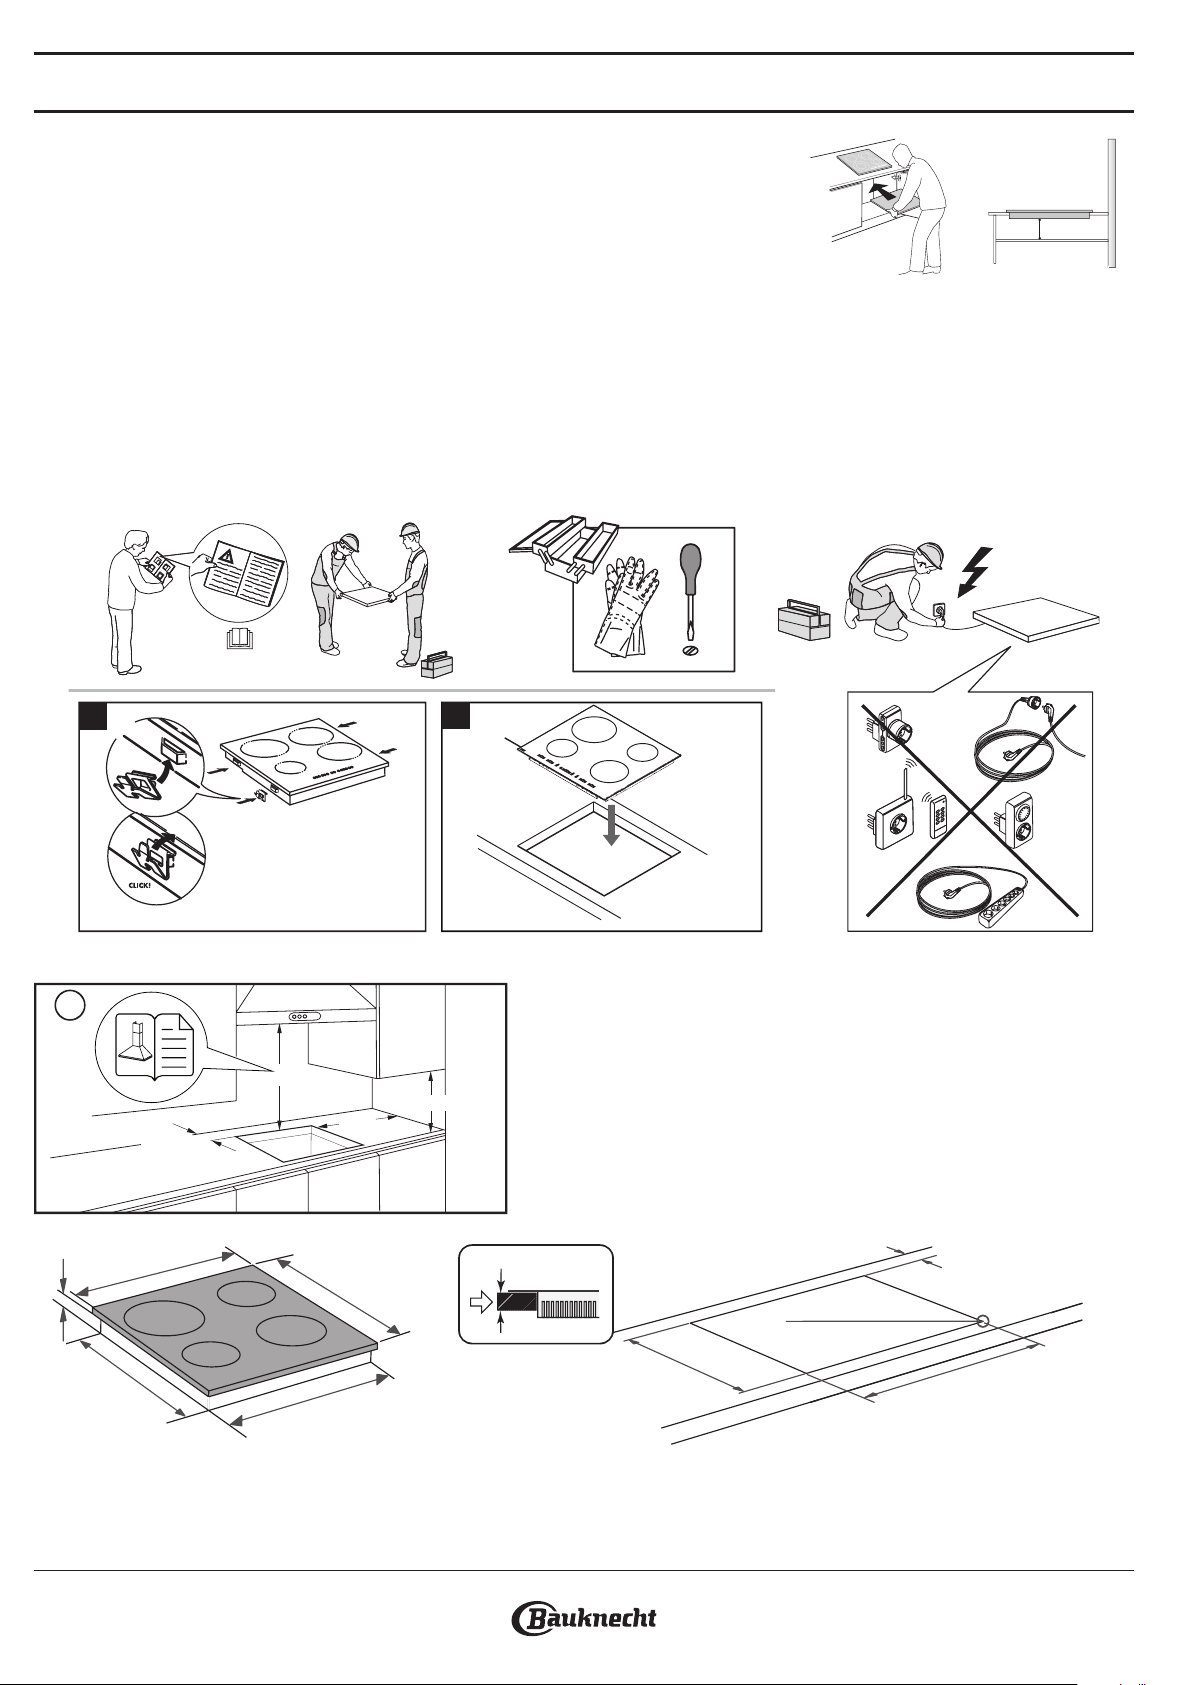
•The cooktop must be set into a worktop at least 20 mm deep.
•There must be nothing between the cooktop and the oven (cross rails, brackets, etc.).
•Make sure the power cord is long enough to allow convenient installation.
•The distance between the lower face of the glass ceramic hob and the cupboard or separating
panel must be at least 20 mm.
•For built-in dimensions and installation see the picture in this paragraph.
•A minimum distance must be maintained between the hob and the hood above it. Please refer to
the user manual of the hood for more informations.
•Apply the supplied gasket to the cooktop (unless it has already been tted), after having cleaned its surface.
•Do not install the cooktop near a dishwasher or washing machine, so that the electronic circuits do not come into contact with steam or
moisture, which could damage them.
•If an oven (from our range of ovens) is installed beneath the cooktop, make sure that it is equipped with a cooling system. If the temperature of the
electronic circuits exceeds the maximum permitted temperature, the cooktop will switch o automatically; in this case, wait for a few minutes until the
internal temperature of the electronic circuits reaches a tolerable level, at which point it will be possible to switch the hob on again.
PLACING THE HOB
After the electrical connection (see the chapter “Electrical connection“).Position each xing clips on the dedicated slots on the lateral sides of the hob as
shown in the picture. Then push the hob inside the cut out and check that the glass is at and parallel to the worktop. The xing clips are designed for
every type of worktop material (wood, marble, etc).
4x
12
DIMENSIONS AND DISTANCES TO BE MAINTAINED
Min. 40 cm
L
Min. 5 cm
Min.10 cm
i
552 mm
47 mm
507 mm
577 mm
Min. 6,5 mm
Max. 8 mm
490 - 492 mm
560 - 562 mm
Min. 50 mm
Min.
20 mm
482 mm
REMOVING THE HOB:
To remove the hob, rst, disconnect it from the electric supply. It is strongly recommended to free the underneath part from the oven, drawer,
separator, or other. It allows the technician to access the lower part of the hob to unfasten the four clips with a screwdriver, lift the hob and remove
Gebruikershandleiding.com neemt misbruik van zijn services uitermate serieus. U kunt hieronder aangeven waarom deze vraag ongepast is. Wij controleren de vraag en zonodig wordt deze verwijderd.
Product:
Spelregels forum
Om tot zinvolle vragen te komen hanteren wij de volgende spelregels:
lees eerst de handleiding door;
controleer of uw vraag al eerder door iemand anders is gesteld;
probeer uw vraag zo duidelijk mogelijk te stellen;
heeft u een probleem en al geprobeerd om dit op te lossen, vermeld dit erbij aub;
heeft u een oplossing gekregen van een bezoeker dan horen wij dat graag in dit forum;
wilt u een reactie geven op een vraag of antwoord, gebruik dan niet dit formulier maar klik op de knop 'reageer op deze vraag';
uw vraag wordt direct op de website gezet; vermijd daarom persoonlijke gegevens in te vullen;
Belangrijk! Als er een antwoord wordt gegeven op uw vraag, dan is het voor de gever van het antwoord nuttig om te weten als u er wel (of niet) mee geholpen bent! Wij vragen u dus ook te reageren op een antwoord.
Belangrijk! Antwoorden worden ook per e-mail naar abonnees gestuurd. Laat uw emailadres achter op deze site, zodat u op de hoogte blijft. U krijgt dan ook andere vragen en antwoorden te zien.
Abonneren
Abonneer u voor het ontvangen van emails voor uw Bauknecht CTAR 7642 IN bij:
nieuwe vragen en antwoorden
nieuwe handleidingen
U ontvangt een email met instructies om u voor één of beide opties in te schrijven.
Ontvang uw handleiding per email
Vul uw emailadres in en ontvang de handleiding van Bauknecht CTAR 7642 IN in de taal/talen: Engels als bijlage per email.
De handleiding is 0.63 mb groot.
U ontvangt de handleiding per email binnen enkele minuten. Als u geen email heeft ontvangen, dan heeft u waarschijnlijk een verkeerd emailadres ingevuld of is uw mailbox te vol. Daarnaast kan het zijn dat uw internetprovider een maximum heeft aan de grootte per email. Omdat hier een handleiding wordt meegestuurd, kan het voorkomen dat de email groter is dan toegestaan bij uw provider.
Uw handleiding is per email verstuurd. Controleer uw email
Als u niet binnen een kwartier uw email met handleiding ontvangen heeft, kan het zijn dat u een verkeerd emailadres heeft ingevuld of dat uw emailprovider een maximum grootte per email heeft ingesteld die kleiner is dan de grootte van de handleiding.
Er is een email naar u verstuurd om uw inschrijving definitief te maken.
Controleer uw email en volg de aanwijzingen op om uw inschrijving definitief te maken
U heeft geen emailadres opgegeven
Als u de handleiding per email wilt ontvangen, vul dan een geldig emailadres in.
Uw vraag is op deze pagina toegevoegd
Wilt u een email ontvangen bij een antwoord en/of nieuwe vragen? Vul dan hier uw emailadres in.