DE/A DE/A DE/A DE/A DE/A DE/A DE/A DE/A
DE/A DE/A
DE/A DE/A DE/A DE/A DE/A DE/A DE/A DE/A
GB/IE GB/IE
GB/IE
product pr
useful life and not in the household waste. Information
on collection points and their opening hours can be
obtained from y
Faulty or used batteries
in accordance with Directiv
Please return the batteries
product to the av
Environment
di
bat
Batteries
usual domestic waste. The
are subject to hazardous w
The chemical symbols for heavy metals are as follo
mium, Hg = mercury
of used batteries
point.
j
The outside sensor is only protected against r
and splashes of water
Disposal
which you may dispose of at local r
The Green Dot is not v
b
a
waste separ
tions (a) and numbers (b) with following meaning:
1–7: plastics
80–98: composite materials.
dispose of it separately for better w
T
details of how to dispose of y
Q
T
Error Cause / Remedy
Incorrect temperatur Measurement is impaired, e.g. b
light, air-conditioning or a fan heater – remo
the digital thermometer and the outside sensor
from the area of interference.
Display diminishes /
incorrect temperatur
displayed
Spent battery or dir
clean the contacts and insert batter
replace the battery if necessar
Display is black T
or the product has been exposed to dir
light for a long time.
Irregular display of figures Remov
battery compar
9
.
Normal functioning of the
pr
electromagnetic inter ference
If so, simply reset the product to r
operation as described in chapter ‘’Settings’’
Q
Cleaning and Care
j
dr
j
j
agents, as they will damage the instrument.
Note: As soon as the outside temperature reaches the signal
range, a 16-second warning signal is emitted at 5-minute
inter
surfaces becoming slipper
Pay particular attention and drive according t
Press an
Q
Call up the tem
j
2
to call
up the stored maximum temper
j
2
again to call up the stored
minimum temperature (MIN).
j
2
again or wait appr
to return the normal display mode.
Q
Delete t
j
2
to call
up the stored maximum temper
button
3
to delete the stored temper
j
2
again to call up the stored mini-
mum temperature (MIN). Pr
3
to delete
the stored temper
Da
When this setting is made, the minimum and maximum tempera-
tures of the past 24 hours ar
midnight.
Manual reset:
This setting enables you to manually delete the temper
stored so far
4. Activate / deactiv
The
5
an
6
flash. They indicate the sig-
na+ to –1
j
2
to activate the ice w “
appears in the ice warning display
7
.
j
2
again to deactivate the ice w
The ice warning display
7
disappears.
j
3
.
Y
warning in
j
1
. The ice
warning is activated when the “
“ symbol appears in the
ice warning display
7
.
I
0
“ wi
time di
4
. I
1
“,
“C
4
.
j
2
and / or holding
the button down to mo
j Confirm your setting b
3
.
2. Select Celsius / Fahrenheit
The outside
5
an
temperature display
6
flash.
j
2
to select Celsius (°C) or
Fahrenheit (°F).
j Confirm your setting b
3
.
3. Set memor
“
--
” fl
6
.
j
2
to switch between daily “
iD
“ or
manual reset “
--
“.
j
3
.
j
11
to the window frame or behind
the front bumper of y
Q
Operation
Note: Af
temperature memory), the product automatically switches back
into normal display mode. The inside and outside temperature
and the time are displayed.
Q
Settings
Note: Whenever y
the MODE
2
and RESET
3
buttons for 2 seconds, all the displays
appear briefly and the product then switches into the “Settings”
mode. All settings can be made in the order indicated below
1. Set t
“
1 2 h®
” fl
4
.
j
2
to switch between 12 and 24
hour mode.
j
3
.
Q
Getting star
NoRemo
Q
Inserting / c
j
9
on the back of the digital ther-
mometer
8
by pushing the battery compar
10
in the
direction indicated b
j
a spent batter
j
9
again.
Q
Mounting
W
cluded in the delivery) to mount the digi
8
. This
ad
8
to
almost-
tions for the adhesive tape.
j
mometer
8
with a degreasing and non-abrasiv
cleaning agent before mounting it.
the event of contact with battery acid, thoroughly flush the
affected area with plenty of clean water and seek immediate
medical attention.
WEAR PRO Leak
aged batteries
burns on contact with the skin. W
tective glo
immediately remov
not be used for a longer period.
Ri
marks (+) and (-) on the batter
the product.
in the batter
product immediately
away fr
failing. In cases of the product failing to w
button
3
and MODE button
2
together to reset the produ
or remov
rechar
Keep batteries / r
out of reach of children. If accidentally sw
diate medical attention.
D Nev
non-rechargeable batteries. Do not short-circuit
batteries / rechargeable batteries and / or open
them. Overheating, fire or burs
batteries.
Ri
which could affect batteries
radiators / dir
the product in a safe way and under
volv
and user maintenance shall not be made by childr
super
Do not place the product anywher
J
area. This can restrict visibility and distract the driver
J
ing on the traffic by the display
J -
ag
J
assembly can result in injury
J
- strong vibr
- high mechanical loads,
- moisture.
J
that if it is placed near an object that transmits radio signals, it
could cause interference. This could be, for ex
telephones, walkie talkies, CB r-
cro
Q
T
Operating volt 1.5 V (direct current)
T 1.5
(direct current), AA
Inside temperature
measuring range: –10
Outside temperature
measuring range: –50
T ± 2 °C
(0 °C to +30 °C) ± 1 °C
(+30 °C to +70 °C) ± 2 °C
Ice warning signal range: –1
Outside sensor cable length: approx. 3
Outside sensor: IP44 (splash pr
Q
Safet
Safet
J
abov
capabilities or lack of experience and knowledge if the
have been giv
Q
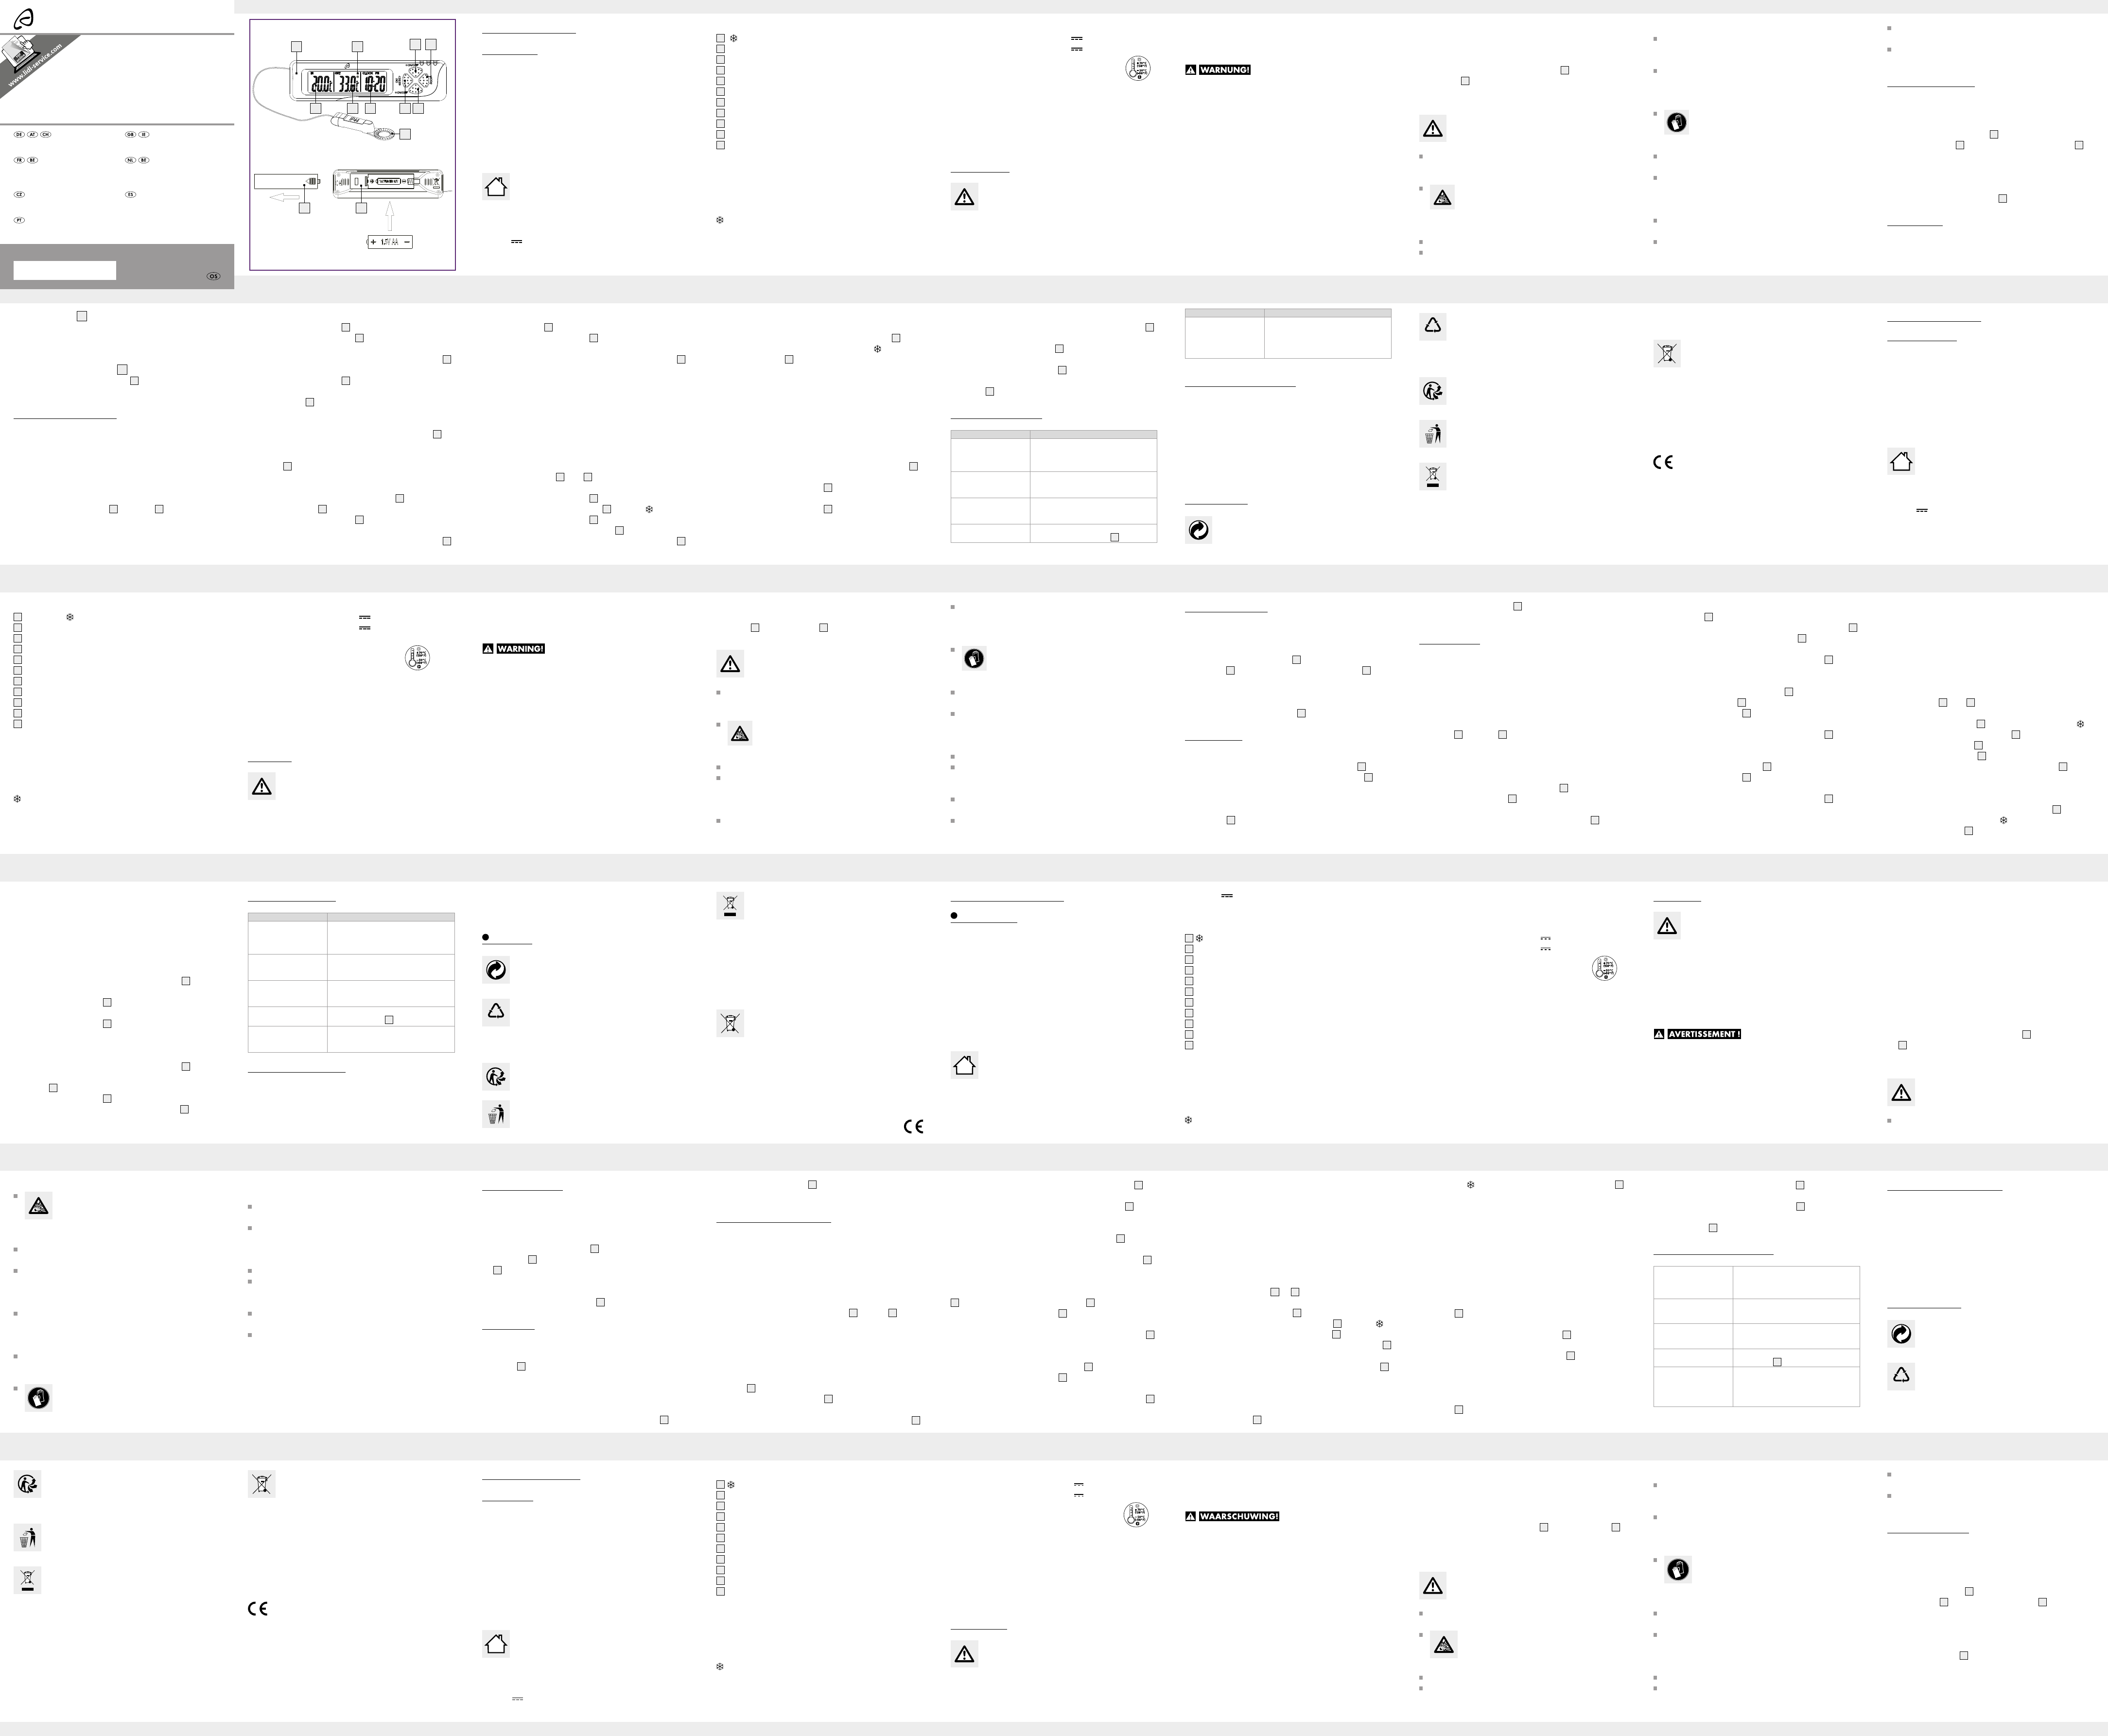
Description of parts
1
Ice warning ON / OFF button
2
MODE (function) button
3
RESET button
4
Time display
5
Outside temperature dis
6
Inside temperature dis
7
Ice warning display
8
Digital thermometer
9
Batter
10
Batter
11
Outside sensor
Display
IN = Inside temperature
OUT = Outside temperature
MAX = Stored maximum temperatur
MIN = Stored minimum temper
= Ice warning
CL Time
AM = Morning (time in 12-hour mode)
PM = Af
Digital Thermometer
Q
Introduction
W
have chosen a high quality product. The instructions for use are
part of the product. They contain important information concern-
ing safety, use and disposal. Bef
miliarise yourself with all of the safety information and instructions
for use. Only use the product as described and for the specified
applications. If you pass the pr
ensure that you also pass on all the documentation with it.
Q
Proper Use
The product is only suitable for use in priv
holds and is not intended for commercial use.
Q
Supply scope
1
1 x 1.5 V
(direct current) AA battery
1
IAN 291520
1
2
1 4
7
11
10
9
8
Sie Batterien
Sammeleinrichtungen zurück.
Umw
der Batterien /
Batterien
Sie können giftige Schwermetalle enthalten und unterliegen der
Sondermüllbehandlung. Die chemischen Symbole der Schwerme-
talle sind wie folgt: Cd = Cadmium, Hg = Quec
Geben Sie deshalb verbrauchte Batterien
munalen Sammelstelle ab.
b
a
-
rialien bei der Abfalltrennung, diese sind gekennz
mit Abkürzungen (a) und Nummern (b) mit folgender
Bedeutung: 1–7: K
80–98: V
-
celbar
Abfallbehandlung. Das T
Produkts erfahren Sie bei Ihrer Gemeinde- oder
Stadtverwaltung.
Interesse des Um
sondern führen Sie es einer fachgerechten Entsorgung
zu. Über Sammelstellen und deren Öffnungszeiten
können Sie sich bei Ihr
informieren.
Defekte oder verbrauchte Batterien
2006/66/EG und deren Änderungen recy
Fehler Ursache / Beseitigung
Es ist möglich, dass die
normalen Funktionen des
Produkts durch elektr
netische Störungen beein-
trächtigt wer
In diesem Fall, setzen Sie das Pr
zurück, um den normalen Betrieb wieder
aufzunehmen wie in Kapitel “Einstellungen
vornehmen” beschrieben wird.
Q
j
trock
j
j
gungsmittel, da diese das Produkt beschädigen.
j
feuchteten T
oben und Spritzwasser geschützt.
Q
Entsorgung
rialien, die Sie über die örtlic
sorgen k
Q
T löschen
j Drücken Sie im normalen Anzeigemodus die T
2
,
um die gespeicherte Maximaltemperatur (MAX) abzurufen.
Drücken Sie die T
3
, um die gespeicherten Werte
zu löschen.
j
2
erneut, um die gespeicherte
Minimaltemperatur (MIN) abzurufen. Drück
RESET
3
, um die gespeicherten Werte zu löschen.
Q
Fehler beseitigen
Fehler Ursache / Beseitigung
Falsche
T
Messung ist beeinträchtigt, z.B. durch dir
Sonneneinstrahlung, Klimaanlage oder Heiz-
lüfter – bringen Sie Digital-Thermometer und
Außensensor aus dem Störbereich.
Displayanzeige wir
schwächer / falsche T-
raturangabe
V
riekontakte – K
ggf. neue Batterie, einlegen.
Anzeige schwarz T
oder Produkt zu lange direkter Sonneneinstr
lung ausgesetzt.
Unregelmäßige
Ziffernanzeige
Entnehmen Sie die Batterie und setzen
Sie sie erneut ins Batteriefach
9
ein.
3. Speic
Im A
6
blinkt „
--
“.
j
2
, um zwischen täglichem
„
iD
“ oder manuellem Reset „
--
“ auszuwählen.
j
3
.
Täglicher R
In dieser Einstellung wer
turen der ver
Mitternacht gelöscht.
Manueller Reset:
Diese Einstellung ermöglicht jederzeit das manuelle Löschen der
bis dahin gespeicherten Temper
4. Eiswarner aktivieren / deaktivieren
Di
5
un
6
blinken.
Signalbereic+ bis –
j
2
, um den Eiswarner zu
aktivieren. Im Eiswarnung-Display
7
erscheint „ “.
j
2
erneut, um den Eiswarner zu
deaktivieren. Das Eiswarnung-Display
7
erlischt.
j
3
.
GB/IE
GB/IE
GB/IE
GB/IE
GB/IE
GB/IE
GB/IE
GB/IE
GB/IE
Digital-Thermometer
8
auf fast allen glatten Oberflächen befestigt
werden. Beachten Sie die Hin
j
nicht scheuernden bzw
Sie das Digital-Thermometer
8
montieren.
j
11
am Fensterrahmen oder
hinter der Fr
Q
HiNach ca. 1 Minute in jedem beliebigen Modus (auße
Sie rufen den T
automatisch in den normalen Anzeigemodus zurück. Innen- und
Außentemperatur und die Uhrzeit w
Q
Einstellung v
Hi Nach jedem Einlegen der Batterie bzw
und Halten der T
2
und RESET
3
für 2 Sekunden
erscheinen alle Anzeigen kurz im Display und das Produkt w
anschließend in den Modus „Einstellungen“. In hier genannter
Reihenfolge k
vor dem Einlegen!
Produkt.
Q
Inbetriebnahme
Hi Entfernen Sie sämtliches V
Q
j
9
auf der Rückseite des Digi-
tal-Thermometers
8
, indem Sie den Batteriefachdeckel
10
gemäß gekennz
j
Polungsangaben ein bzw
Batterie entsprechend gegen eine neue aus.
j
9
wieder
Q
Montage
Zur Montage empfehlen wir einen doppelseitigen Klebestreifen
(nicht im Lieferumfang enthalten). Mit diesem kann das
Ri
auf Batterien
direkte Sonneneinstrahlung.
Spü
sofort mit klarem W
Arzt auf!
SCHUTZ Ausgelau-
fene oder beschädigte Batterien
Berührung mit der Haut V
T
diese sofort aus dem Produkt, um Beschädigungen zu vermeiden.
Zeit nicht verwendet wird.
Risik
Akkutyp!
nung (+) und (-) an Batterie
etc. auf. Der Funk
Entfernen Sie solche Geräte aus der Reichw
meters. Elektrostatische Ladung k
her
3
und die MO-
DE-T
2
, um die Einstellungen des Produkts zurückzuset-
zen, oder entnehmen Sie kurzzeitig die Batterie, w
Produkt F
Sicherheitshinweise für
Batterien / Akkus
LEBEN Halten Sie Batterien
weite v
sofort einen Arzt auf!
EXPLOSIONSGEFLaden Sie nicht auflad-
bare Batterien niemals wieder auf. Schließen Sie
Batterien
diese nicht. Überhitzung, Brandgefahr oder Platzen k
die Folge sein.
Werfen Sie Batterien
Setzen Sie Batterien
und die daraus resultier
dürfen nicht mit dem Produkt spielen. Reinigung und Benut-
zerwartung dür
durchgeführt werden.
Platzieren Sie das Produkt nicht im Ber
kommen k
J Bringen Sie das Produkt möglichst nicht im unmittelbaren
Fr
Sichtbehinderungen und Ablenkung die Folge sein.
J Lassen Sie sich nicht durch die Anzeigen v
auf den Straßenv
J K
Montage beschädigter T
J K
Bei unsachgemäßer Montage besteht V
J Setzen Sie das Produkt
- keinen stark
- keinen stark
- keiner F
J Das Produkt enthält elektr
Produkt nicht in der Nähe von Störquellen wie Mobiltelef
Funk
Q
T
Betriebsspannung: 1,5 V (Gleichstrom)
Batteriet 1,5 V
(Gleichstrom), AA
T –10
T –50
T ± 2
(0 ± 1
(+30
Signalbereich Eiswarner: –1
K ca. 3
Außenfühler: IP44 (spritzwassergeschützt)
Q
Sicherheit
Sicherheitshinweise
J
sowie v
oder mentalen Fähigk
Wissen benutzt wer
des sicheren Gebrauchs des Pr
Auch im normalen
Eiswarner
j
1
.
Der Eiswarner ist aktiviert, wenn das Symbol „
“ im Eis-
warnung-Display
7
erscheint.
HiSobald die Außentemperatur den Signalber
erreicht, ertönt ein W
jew
Gefahr entstehen, dass sich Straßenglätte bildet oder bereits
gebildet hat. Seien Sie besonders aufmerksam und passen
Sie Ihre Fahrweise entsprechend an. Drück
bige T
Q
T abruf
j
2
,
um die gespeicherte Maximaltemperatur (MAX) abzurufen.
j
2
erneut, um die gespeicherte
Minimaltemperatur (MIN) abzurufen.
j
2
erneut oder warten Sie ca.
5 Sekunden, um zum normalen Display-Modus zu-
rückzukehr
Q
T
1
ON
2
MODE- (Funktions-) T
3
RESET-T
4
Anzeigefeld Uhrzeit
5
Anzeigefeld Außentemperatur
6
Anzeigefeld Innentemperatur
7
Eiswarnung-Display
8
Digital-Thermometer
9
Batteriefach
10
Batteriefachdeckel
11
Außensensor
Display
IN = Innentemperatur
OUT = A
MAX = gespeicherte Maximaltemperatur
MIN = gespeicherte Minimaltemperatur
= Eiswarner
CL Uhrzeit
AM = Morgen (Uhrzeit im 12-Stunden-Modus)
PM = Nachmittag (Uhr
Digital-Thermomet
Q
Einleitung
Wir beglückwünschen Sie zum Kauf Ihr
n
sich damit für ein hochwertiges Produkt entschieden. Die Bedie-
nungsanleitung ist Teil dieses Pr-
se für
der Benutzung des Produkts mit allen Bedien- und Sicherheitshin-
weisen ver
und fü
terlagen bei W
Q
Bestimmungsgemäßer Gebrauc
geeignet. Das Produkt ist nur für priv
nicht für den gewerblichen Einsatz bestimmt.
Q
Lieferumfang
1
1 x 1,5 V
(Gleichstrom), AA Batterie
1 x Bedienungsanleitung
1. Uhrzeit einst
Im A
4
blinkt „
1 2 ®
“.
j
2
,um zwischen 12 und
24 Stunden-Modus auszuwählen.
j
3
.
Im A
4
wi
0
“ an
wen24 a-
gefeld Uhr
4
werden„
1
“
„a
haben.
j
2
drücken bzw
j
RESET
3
.
2. Celsius / Fahrenheit auswählen
Die Anz
5
un
Innentemperatur
6
blinken.
j
2
, um zwischen Celsius (°C)
oder Fahrenheit (°F) auszuw
j
3
.
FR/BE
FR/BE
FR/BE
FR/BE
FR/BE
FR/BE
FR/BE FR/BE
FR/BE
FR/BE
FR/BE
FR/BE
1 pile 1,5V (courant continu), AA
1 mode d‘emploi
Q
Description des pièces et éléments
1
Touche ON
2
3
4
5
6
7
8
9
10
11
Affichage à l’
IN = température intérieure
OUT = température e
MAX = température maximale mémorisée
MIN = températur
= avertissement gel
CL heure
Rem
Dans ce paramétrage, les tempér
des dernières 24 heures sont mémorisées, et effacées tous les
jours à minuit.
Rem
Ce paramétrage permet d’effacer manuellement à tout moment
les températures mémorisées jusque-là.
4.
l’avertissement gel
Les c
5
et
6
cl
af+3 °
j
2
pour activer l‘av
glace. Sur l‘écran d‘av
7
apparaît „ “.
j
2
pour désactiver
l‘avertisseur de glace. L’affichage d’av
7
disparaît.
j Confirmez votre sélection par pr
3
.
V
tissement gel en
j
MARCHE/ARRÊT
1
. L‘avertisseur de glace est activé lorsque
Es
4
,
si vo0 ». So
a
4
, si
vous a1 2:0», « C
et «A
j Réglez l’heure en appuy
2
ou en la
maintenant appuyée pour faire av
j Confirmez votre r
3
.
2. Sélection Celsius / Fahrenheit
Les
5
et de
6
clignot
j Appuyez sur la touche MODE
2
pour sélectionner Celsius
(°C) ou Fahrenheit (°F).
j Confirmez votre sélection par pr
3
.
3.
C
6
«
--
».
j Appuyez sur la touche MODE
2
pour choisir la remise à
zéro quotidienne «iD » ou manuelle «
--
».
j Confirmez votre sélection par pr
3
.
j
11
sur l‘encadrement de vitre ou
derrière le pare-choc avant de v
Q
Utilisation
Remarque : Apr
(à moins que vous n‘activiez la mémoir
duit revient aut
températures intérieur
Q
Remarque : Après chaque mise en place de la pile voir
pressant et maintenant les touches MODE
2
et RESET
3
pen-
dant 2 secondes, tous les affichages apparaissent brièvement sur
l‘écran et le pr
réglages peuv
1. R
C
l’heure
4
«1 2 ® ».
j Appuyez sur la touche MODE
2
pour sélectionner le mode
12 heures ou le mode 24 heures.
j Confirmez votre sélection par pr
3
.
Q
Mise en ser
Remarque : V
l‘emballage du produit.
Q
j
9
à l‘arrière du thermomètre
numérique
8
en faisant glisser le couver
10
dans le sens de la flèche.
j
cez la pile usagée par une neuve.
j
9
.
Q
Montage
Pour le mont
double face (non fournie). Celle-ci permet de fixer le thermomètre
numérique
8
sur presque toutes les surfaces lisses.
Respectez les instructions du fabricant de la bande adhésive.
j
toy
chimique avant de monter le thermomètre numérique
8
.
au contact de la peau. V
adéquats pour les manipuler
aussitôt du produit pour é
Retir
utiliser le produit pendant une période prolongée.
Risque d‘endommagement du produit
Exclusiv
l‘indication de polarité (+) et (-) indiquée sur la pile
rechargeable et sur le pr
compartiment à pile avant d‘insérer la pile !
produit.
consultez immédiatement un médecin !
RISQUE D‘EXPLOSION ! Ne rechar
jamais des piles non rechargeables. Ne court-cir-
cuitez pas les piles
les ouvrez pas ! Autrement, v
surchauffe, un incendie ou une e
l’eau.
N
charge mécanique.
Risque de fuite des piles
Évitez d’exposer les piles
tions et températures e
ger
du soleil.
Évitez tout contact avec la peau, les y
En cas de contact avec l’acide d’une pile, rincez la zone t
à l’eau claire et consultez immédiatement un médecin !
PORTER DES GANTS DE PR Les
piles
jettes à des fuites peuvent pr
J
Il existe un risque de blessur
J N‘exposez pas le pr
- à de fortes vibrations,
- à des sollicitations mécaniques importantes,
- à l‘humidité.
J Le produit contient des composants électr
pas le produit à pr
des téléphones mobiles, appareils radio, postes CB, télécom-
mandes ou fours à micro-ondes, etc. Ceci peut altér
réception du signal radio. Éloignez ces appar
nement du thermomètre. Une charge électr
causer des défaillances.
3
et la touche MODE
2
afin de réinitialiser les réglages du pr
brièvement la pile si le produit pr
fonctionnement.
Consignes de sécurit
piles / aux piles rechar
Rangez les piles
geables hors de la portée des enfants. En cas d’ingestion,
Q
Nettoy
j
fon doux et sec.
j
j
toy
j Nettoyez le capteur e
légèrement humidifié. Le capteur e
que contre la pluie du haut et les éclaboussures.
Q
vant être mises au r
Le «point vert» n‘est pas valable en Allemagne.
b
a
ballage pour le tri sélectif, ils sont identifiés avec des
abbréviations (a) e
tion suivante : 1–7 : plastiques
cartons
clables, mettez-les au rebut séparément pour un meil-
leur traitement des déchets. Le logo T
valable qu’en Fr
sur les possibilités de mise au rebut des produits
usagés.
veuillez ne pas jeter v
dures ménagères, mais éliminez-le de manièr
priée. Pour obtenir des r
points de collecte et leurs horair
pouvez contacter v
Les piles
être recy
modifications. Les piles et
duit doivent être r
Pollution de l’environnement par la mise
au rebut incorrecte des piles
recharg
Les piles
avec les ordur
lourds to
spéciaux. Les symboles chimiques des métaux lourds sont les sui-
vants : Cd = cadmium, Hg = mer
son, veuillez toujours déposer les piles
usagées dans les conteneurs de recy
Q
Sécurité
Consignes de sécurité
J
plus ainsi que par des personnes ayant des capacités ph
siques, sensorielles ou mentales réduites ou manquant d‘e
rience ou de connaissances, s‘ils sont sur
informés de l‘utilisation sûre du produit et com
risques liés à son utilisation. Les enfants ne doivent pas jouer
avec le pr
pas être effectués par des enfants laissés sans surveillance.
Ne placez pas le produit à pro
de celui-ci.
J Si possible, ne placez pas le produit à pr
pare-brise côté conducteur
gêne de la vision et une distraction.
J Ne laissez pas les affichages vous déconcentrer et v
détourner de la circulation r
J V
blessures en cas de pièces endommagées lors du montage.
mémorisée. Appuyez sur la touche RESET
3
pour effacer les
valeurs mémorisées.
j Appuyez à nouveau sur la touche MODE
2
pour consulter la
température minimale (MIN) mémorisée. Appuy
touche RESET
3
pour effacer les valeurs mémorisées.
Q
Solution aux problèmes
Indication de températures
erronées
La mesure est influencée, p. ex. pour cause
d'ensoleillement direct, de climatiseur ou de
chauffage – éloignez le thermomètre numé-
rique de la zone perturbée.
L’affichage à l’écr
blit / indication de tempéra-
tures erronées
Pile usagée ou contacts de pile sales –
nettoy
échéant une pile neuve.
Affichage noir T
produit expos
ment direct.
Affichage irrégulier des
chiffres
Retirez la pile et r
compartiment
9
.
Il est possible que les fonc-
tions normales du produit
soient influencées par des
perturbations électromagné-
tiques
Dans ce cas, réinitialisez simplement le produit
pour rev
comme décrit au chapitre "Effectuer les
réglages".
AM = matin (heure en mode 12 heures)
PM = après-midi (heure en mode 12 heures)
Q
Données techniq
T (courant continu)
T
(courant continu), AA
Plage de température intérieur:
Plage de température e
T (-50 °C à 0 °C) ± 2 °C
(0 °C à +30 °C) ± 1 °C
(+30 °C à +70 °C) ± 2 °C
Plage de déclenchement
avertissement gel:
Longueur du cordon du
capteur extérieur:
Capteur extérieur :
projections d‘eau)
le symbole „
“ apparaît sur l‘écran d‘av
7
.
Avis: Dès que la température extérieur
d’avertissement, un signal sonore d’avertissement retentit
toutes les 5 minutes pendant respectiv
Dans cette plage de température, il y a risque de formation ou
de présence de ver
adaptez votr
touche quelconque pour couper le signal sonore.
Q
Consultation de la mémoire
des températur
j Dans le mode d’affichage normal, appuyez sur la touche
MODE
2
, pour consulter la température maximale (MAX)
mémorisée.
j Appuyez à nouveau sur la touche MODE
2
, pour consulter
la température minimale (MIN) mémorisée.
j
2
et attendez
env
Q
Effacement de la mémoire des tempér
j Dans le mode d’affichage normal, appuyez sur la touche
MODE
2
, pour consulter la température maximale (MAX)
Thermomètre numérique
Introduction
Nous vous félicitons pour l‘achat de vo
avez opté pour un pr
fait partie intégrante de ce produit. Il contient des indications im-
portantes pour la sécurité, l’utilisation et la mise au rebut. V
lire consciencieusement toutes les indications d‘utilisation et de
sécurité du produit. Ce produit doit uniq
mément aux instructions et dans les domaines d‘application spéci-
fiés. Lors d‘une cession à tiers, veuillez également r
les documents.
Q
Utilisation conforme
térieur
dans des foy
commercial.
Q
Contenu de la livraison
1
env
NL/BE NL/BE NL/BE NL/BE
batterijvak, voor
V
Q
Ingebruikname
Opmerking: verwijder al het verpakkingsmateriaal van het
product.
Q
j
9
aan de achterkant v
thermometer
8
door het deksel van het v
10
in de richting
van de pijl te schuiven.
j
eenkoms
vang een lege batterij op dezelfde manier door een nieuw
j Sluit het batterijvak
9
weer
Risico dat de batterijen
op de batterijen
ren / direct z
V
van contact met batterijzuur de desbetreffende plekk
af met voldoende schoon w
een arts!
DRAAG VEILIGHEIDSHANDSCHOENEN!
Lekkende of beschadigde batterijen
nen in gev
wond
veiligheidshandschoenen.
product te halen om beschadigingen te vermijden.
V
een langere periode niet gebruikt.
Risico op beschadiging van het product
polariteit (+) en (-) op batterij
telefoons, radioapparatuur
dieningen of magnetrons etc. De ontv
kan hier
ratuur uit de reikwijdte v
ontlading kan leiden tot functionele s
3
en de MODE-knop
2
om de instellingen van het pr
kort de batterij als het product door storingen niet goed functi-
oneert.
V voor
batterijen / accu‘s
LEVENSGEVAAR! Houd batterijen
van kinderen. R
EXPLOSIEGEVLaad niet oplaadbare bat-
terijen nooit op. Sluit de batterijen
en
ov
werden me
en zij de hieruit voortvloeiende gevar
mogen niet met het product spelen. R
mogen niet door kinderen z
Plaats het product niet in de buurt
dingen.
J Plaats het product indien mogelijk niet in het dir
veld v
bestuurder afleiden.
J Laat u niet afleiden door de displays en blijf geconcentreer
het verk
J
vinden. Bij de montage van beschadigde onderdelen bes
gev
J
Bij ondeskundige montage bestaat k
J Stel het product niet bloot aan:
- sterke trillingen,
- sterke mechanische belastingen,
- vochtigheid.
J
product niet in de buurt van storingsbronnen z
Q
T
V 1,5 V (gelijkstroom)
Batterijt 1,5 V
(gelijkstroom), AA
Meetbereik temperatuur binnen: –10
Meetbereik temperatuur buiten: –50
T ± 2 °C
(0 °C tot +30 °C) ± 1 °C
(+30
Signaalbereik ijswaar –1
K
buitensensor: ong. 3 m
Buitensensor: IP44 (spatwater
Q
V
V
J
door personen met verminder
le vaardigheden of een gebr
den gebruikt, als zij onder toezicht staan of geïnstrueerd
Q
Besc
1
ON
2
3
RESET-toets
4
5
6
7
V
8
9
Batterijvak
10
11
Buitensensor
Displayweer
IN = binnentemperatuur
OUT = buitentem
MAX = opgeslagen maximale temperatuur
MIN = opgeslagen minimale temper
= ijswaarschuw
CL tijd
AM = ‚s morgens (tijd in 12-uurs modus)
PM = ‚s middags (tijd in 12-uurs modus)
Digitale t
Q
Inleiding
Hartelijk gefeliciteerd met de aankoop v
heeft voor een hoogwaardig pr
wijzing is een deel van het pr
wijzingen voor v
voor de ingebruikname van het pr
veiligheidsv
zoals beschre
Overhandig alle documenten bij doorgifte van het pr
derden.
Q
Doelmatig gebruik
is. Het product is alleen bestemd v
ens en niet voor commer
Q
Lev
1
1 x 1,5
(gelijkstroom) / AA batterij
1 x gebruiksaanwijzing
DIGIT
THERMOMETER / THERMOMÈTRE NUMÉRIQUE
DIGIT
DIGIT THERMOMETER
THERMOMÈTRE
DIGITALE THERMOMETER
TERMÓMETRO DIGIT
TERMÓMETRO DIGITAL
DIGIT TEPLOMĚR
Pokyn