1 2 3 4 5 6 7 8
DE PROCEDER AU NETTOYAGE.
11 Ne pas utiliser le thermostat avec d’autres appareils.
12 Le produit ne doit pas être alimenté à travers des
minuteries externes ou avec des installations séparés
et commandées à distance.
13 Il est conseillé d’utiliser un ventilateur d’aspiration ou
une aération efficace et suffisante de l’ambiance en cas
d’utilisation dans des lieux fermés.
14 Ne pas utiliser l’appareil près des murs ou des rideaux.
15 ATTENTION: Cet appareil ne doit pas être utilisé
avec du charbon ou autre combustible similaire.
16
Vérifier d’avoir toujours les mains sèches avant d’utiliser
ou de régler les interrupteurs placés sur l’appareil ou avant
de manipuler la fiche et les connexions électriques.
17 Pour débrancher l’appareil, saisir directement la fiche
en la débranchant de la prise murale. Ne tirez jamais
sur le câble d’alimentation.
18 N’utilisez pas l’appareil si le câble électrique ou la fiche
sont endommagés, ou si l’appareil résulte défectueux;
dans ce cas, contactez le Centre d’Assistance Après-
vente Autorisé le plus proche.
19 Si le câble d’alimentation est endommagé, il doit être
remplacé par le Constructeur ou par son service après-
vente ou, dans tous les cas, par un technicien qualifié,
de façon à éviter tout risque de danger.
20 L’appareil a été conçu EXCLUSIVEMENT pour un
USAGE DOMESTIQUE et il ne peut en aucun cas être
destiné à un usage commercial ou industriel.
21 Cet appareil est conforme à la directive 2006/95/EC et
EMC 2004/108/EC.
22 Toute modification du produit, non autorisé expressé-
ment par le producteur, peut comporter la réduction de
la sécurité et la déchéance de la garantie.
23 Si vous décidez de vous défaire de cet appareil, il
est fortement recommandé de le rendre inutilisable
en éliminant le câble d’alimentation électrique. Nous
conseillons en outre d’exclure toute partie de l’appareil
pouvant constituer une source de danger, en particulier
pour les enfants qui peuvent se servir de l’appareil pour
jouer.
24 Ne laissez pas les parties de l’emballage à la portée des
enfants car elles constituent une source potentielle de
danger.
CONSERVEZ
SOIGNEUSEMENT CES
INSTRUCTIONS
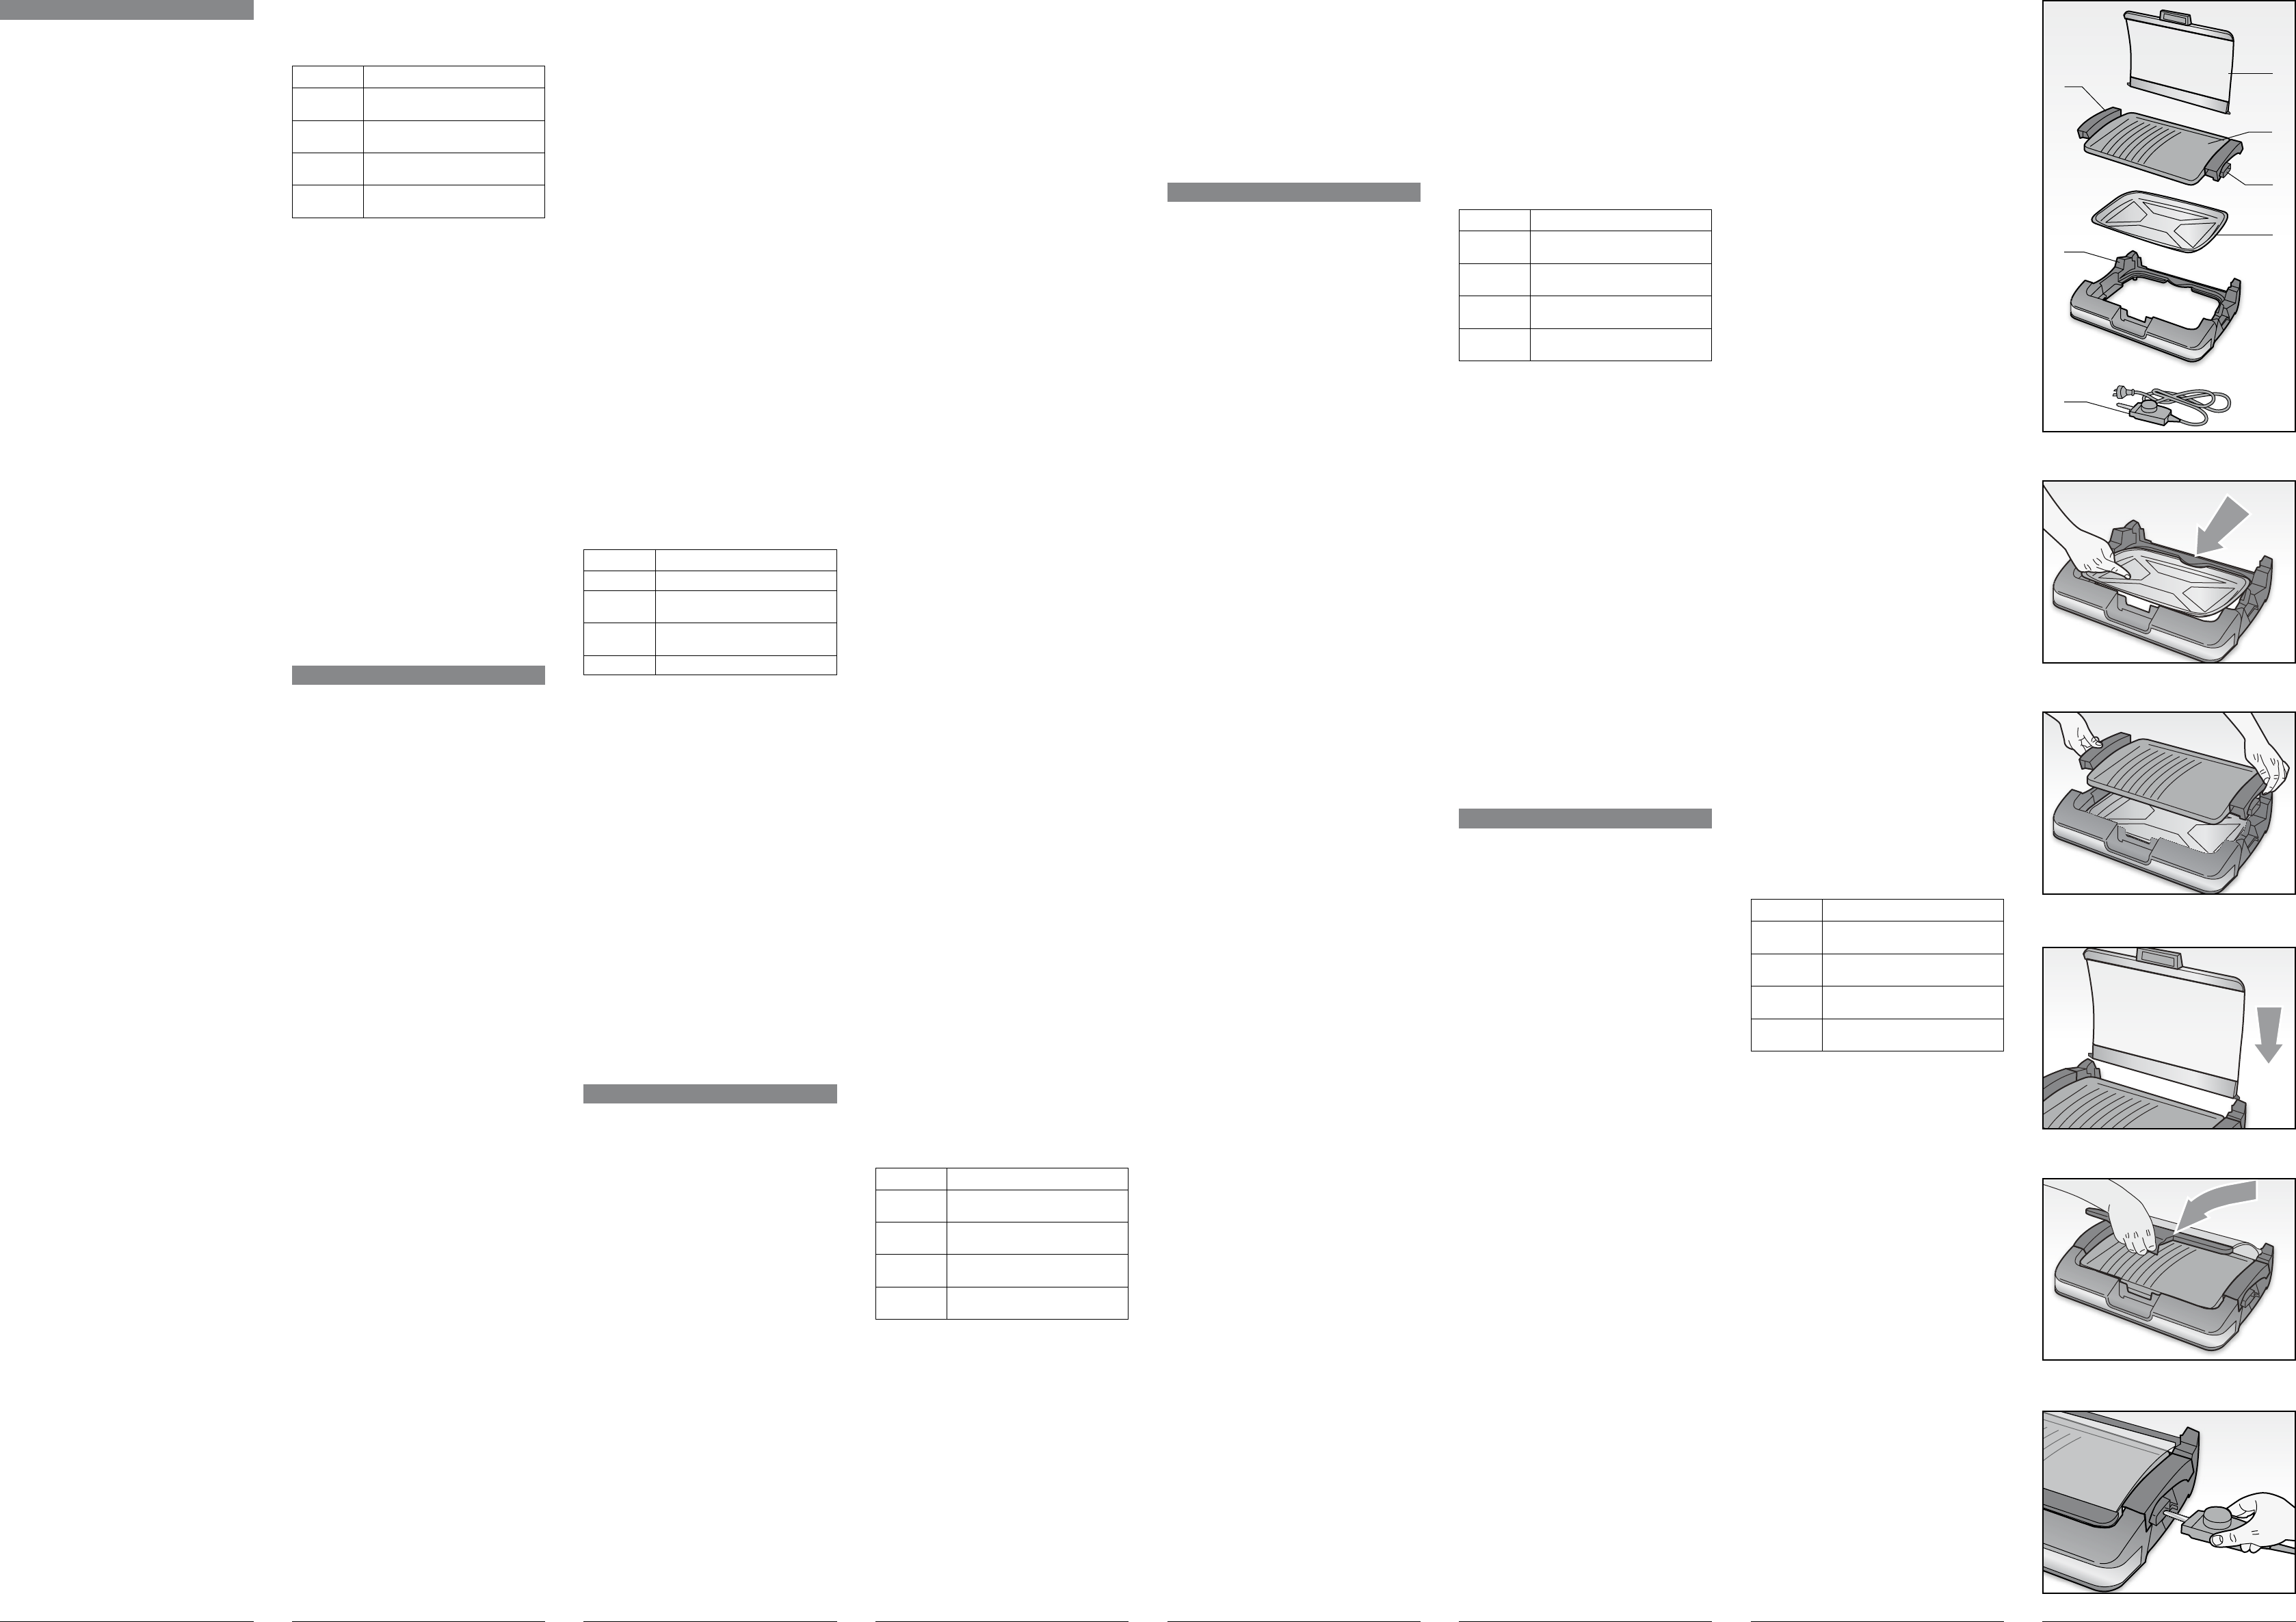
DESCRIPTION DE L’APPAREIL (Fig. 1)
A Couvercle
B Plaque anti-adhérente
C Prise thermostat
D Plateau de récupération du gras
E Thermostat
F Base
G Poignées anti-chaleur
MODE D’EMPLOI
ATTENTION: MEME LORSQUE L’APPAREIL N’EST PAS
EN MARCHE, DEBRANCHER LA FICHE DE LA PRISE
DE COURANT ELECTRIQUE AVANT D’INSTALLER OU
DE DEFAIRE LES SIMPLES PARTIES OU AVANT DE
PROCEDER AU NETTOYAGE.
- Avant de l’utiliser, laver la plaque (B) et le plateau de récu-
pération du gras (D) avec de l’eau chaude et un produit de
nettoyage délicat. Bien essuyer.
- Positionner le plateau de récupération du gras (D) à l’inté-
rieur de la base (F), en l’introduisant d’abord sous l’ailette
de blocage située sur la partie arrière de la base (Fig. 2)
puis en l’abaissant.
Pour faciliter le nettoyage, recouvrir le plateau avec du
papier d’aluminium pour récupérer les gras et les sauces.
- Positionner la plaque anti-adhérente (B) sur le plateau de
récupération du gras (D) (Fig. 3), en vérifiant que les man-
ches (G) s’enclenchent parfaitement dans les logements
situés sur la base (F).
- Mettre les aliments à cuire sur la plaque (B) et introduire
verticalement le couvercle (A) en introduisant les tourillons
latéraux dans les fissures arrière de la base (F) (Fig. 4).
Baisser le couvercle (A), en le saisissant par sa poignée et
en le tirant délicatement en avant (Fig. 5).
- Brancher le thermostat (E) dans la prise (C) de la plaque
(B) (Fig. 6) puis brancher la fiche du câble d’alimentation
dans une prise de courant.
- Positionner le cadran du thermostat de contrôle (E) sur le
réglage de la chaleur désirée. Nous reportons ci-dessous
le tableau des différents réglages.
REGLAGES FONCTIONS
- Quand le voyant lumineux du thermostat (E) s’éteint,
cela signifie que la température de cuisson désirée a été
atteinte et que le gril est prêt pour l’emploi.
- Le voyant lumineux du thermostat (E) indique que le gril
est en phase de réchauffement. Le voyant lumineux reste
allumé tant que la température programmée n’est pas
atteinte, après quoi il s’allume et s’éteint de façon alternée
pendant toute la cuisson afin de garantir le maintien de la
température sélectionnée.
- Le temps de réchauffement dépend du réglage de la cha-
leur sélectionnée. Plus la chaleur sélectionnée est élevée,
plus le temps de réchauffement sera long.
- A la fin de la cuisson, retirer le thermostat (E) et soulever le
couvercle (A) en le saisissant par sa poignée.
NETTOYAGE ET ENTRETIEN
ATTENTION: NE JAMAIS PLONGER LE THERMOSTAT,
LA FICHE OU LE CABLE ELECTRIQUE DANS L’EAU OU
AUTRES LIQUIDES, UTILISER UN CHIFFON HUMIDE
POUR LES NETTOYER.
ATTENTION: MEME LORSQUE L’APPAREIL N’EST PAS
24 Packaging must never be left within the reach of chil-
dren since it is potentially dangerous.
DO NOT THROW AWAY
THESE INSTRUCTIONS
DESCRIPTION OF THE APPLIANCE (Fig. 1)
A Lid
B Non-stick plate
C Thermostat inlet
D Drip tray
E Thermostat
F Base
G Heat-proof handles
INSTRUCTIONS FOR USE
IMPORTANT: ALWAYS UNPLUG THE POWER CORD
FROM THE ELECTRICITY MAINS BEFORE FITTING
OR REMOVING SINGLE ATTACHMENTS OR BEFORE
CLEANING THE APPLIANCE.
- Before use, wash the plate (B) and the drip tray (D) in hot
water and a mild detergent. Dry them thoroughly.
- Fit the drip tray (D) inside the base (F), inserting it first
under the lock tab in the back of the base (Fig. 2) before
lowering it into place.
To make clearing easier, cover the tray with foil to collect
any fats and juices.
- Place the non-stick plate (B) over the drip tray (D) (Fig.
3), making sure that the handles (G) slot perfectly into the
special openings in the base (F).
- Place the food for cooking on the plate (B) and insert the
lid (A) vertically so that the side pins slot into the special
openings at the back of the base (F) (Fig. 4).
Lower the lid (A), gripping the handle and turning it gently
forwards (Fig. 5).
- Insert the thermostat (E) into the inlet (C) on the plate (B)
(Fig. 6) and plug the power cord into a mains socket.
- Set the dial on the control thermostat (E) to the required
heat setting. To help you, we have included a table with
the different settings.
FUNCTION SETTINGS
- When the indicator light on the thermostat (E) switches off,
this means that the required cooking temperature has been
reached and that the grill is ready to use.
- The indicator light on the thermostat (E) shows that the grill
is heating up and it will stay lit until the grill reaches the set
temperature; after this, it will switch on and off in cycles
during the cooking process to guarantee that the selected
temperature is maintained.
- The pre-heating time depends on the chosen heat setting.
The higher the selected temperature, the longer the pre-
heating time will be.
- When cooking is complete, remove the thermostat (E) and
lift the lid (A) using the relevant handle.
CLEANING AND MAINTENANCE
IMPORTANT: NEVER PLACE THE THERMOSTAT, PLUG
OR POWER CORD IN WATER OR OTHER LIQUIDS; ONLY
WIPE THESE PARTS CLEAN WITH A DAMP CLOTH.
IMPORTANT: ALWAYS UNPLUG THE POWER CORD
FROM THE ELECTRICITY MAINS BEFORE FITTING
OR REMOVING SINGLE ATTACHMENTS OR BEFORE
CLEANING THE APPLIANCE.
The lid, the non-stick plate and the drip tray can be washed
in warm soapy water or in the top rack of the dishwasher.
The shaped base can be wiped clean with a damp cloth
or washed using lukewarm water, a mild detergent and a
soft cloth.
IT
EN
FR
DE
ES
Fig. 1
A
Fig. 2
Fig. 3
Fig. 4
Fig. 5
AVVERTENZE
IMPORTANTI
LEGGERE QUESTE ISTRUZIONI PRIMA DELL’USO.
Usando apparecchi elettrici è necessario prendere le oppor-
tune precauzioni, tra le quali:
1 Assicurarsi che il voltaggio elettrico dell’apparecchio
corrisponda a quello della vostra rete elettrica.
2 Non lasciare l’apparecchio incustodito quando collegato
alla rete elettrica; disinserirlo dopo ogni uso.
3 Non mettere l’apparecchio sopra o vicino a fonti di
calore.
4 Durante l’utilizzo posizionare l’apparecchio su di un
piano orizzontale, stabile e ben illuminato.
5 Non lasciare l’apparecchio esposto ad agenti atmosferi-
ci (pioggia, sole, ecc...).
6 Fare attenzione che il cavo elettrico non venga a contat-
to con superfici calde.
7 Questo apparecchio non è adatto all’utilizzo da parte
di persone (compresi i bambini) con capacita fisiche,
sensoriali o mentali ridotte. Gli utenti che manchino di
esperienza e conoscenza dell’apparecchio oppure ai
quali non siano state date istruzioni relative all’utilizzo
dell’apparecchio dovranno essere soggette alla super-
visione da parte di una persona responsabile della loro
sicurezza.
8 E’ necessario vigilare sui bambini per assicurare che
non giochino con l’apparecchio.
9 NON IMMERGERE MAI IL TERMOSTATO, LA SPINA
ED IL CAVO ELETTRICO IN ACQUA O ALTRI LIQUIDI,
USARE UN PANNO UMIDO PER LA LORO PULIZIA.
10 ANCHE QUANDO L’APPARECCHIO NON E’ IN
FUNZIONE, STACCARE LA SPINA DALLA PRESA
DI CORRENTE ELETTRICA PRIMA DI INSERIRE
O TOGLIERE LE SINGOLE PARTI O PRIMA DI
ESEGUIRE LA PULIZIA.
11 Non usare il termostato con altri apparecchi.
12 Il prodotto non va alimentato attraverso timer esterni o
con impianti separati comandati a distanza.
13 Si consiglia l’uso di una ventola di aspirazione o un’ade-
guata aerazione del locale in caso di utilizzo in ambienti
chiusi.
14 Non utilizzare l’apparecchio in prossimità di pareti o
tende.
15 ATTENZIONE: Questo apparecchio non deve essere
utilizzato con carbone o combustibile similare.
16 Assicurarsi di avere sempre le mani ben asciutte prima
di utilizzare o di regolare gli interruttori posti sull’appa-
recchio o prima di toccare la spina e i collegamenti di
alimentazione.
17 Per staccare la spina, afferrarla direttamente e staccarla
dalla presa a parete. Non staccarla mai tirandola per il
cavo.
18 Non usare l’apparecchio se il cavo elettrico o la spina
risultano danneggiati, o se l’apparecchio stesso risulta
difettoso; in questo caso portatelo al più vicino Centro
di Assistenza Autorizzato.
19 Se il cavo di alimentazione è danneggiato, esso deve
essere sostituito dal Costruttore o dal suo servizio
assistenza tecnica o comunque da una persona con
qualifica similare, in modo da prevenire ogni rischio.
20 L’apparecchio è concepito per il SOLO USO
DOMESTICO e non deve essere adibito ad uso com-
merciale o industriale.
21 Questo apparecchio è conforme alla direttiva 2006/95/
EC e EMC 2004/108/EC.
22 Eventuali modifiche a questo prodotto, non espressa-
mente autorizzate dal produttore, possono comportare
il decadimento della sicurezza e della garanzia del suo
utilizzo da parte dell’utente.
23 Allorchè si decida di smaltire come rifiuto questo
apparecchio, si raccomanda di renderlo inoperante
tagliandone il cavo di alimentazione. Si raccomanda
inoltre di rendere innocue quelle parti dell’apparecchio
suscettibili di costituire un pericolo, specialmente per i
bambini che potrebbero servirsi dell’apparecchio per i
propri giochi.
24 Gli elementi dell’imballaggio non devono essere lasciati
alla portata dei bambini in quanto potenziali fonti di
pericolo.
CONSERVARE QUESTE
ISTRUZIONI
DESCRIZIONE DELL’APPARECCHIO (Fig. 1)
A Coperchio
B Piastra antiaderente
C Presa termostato
D Vassoio raccogli grasso
E Termostato
F Base
G Manici antiriscaldamento
ISTRUZIONI PER L’USO
ATTENZIONE: ANCHE QUANDO L’APPARECCHIO NON
E’ IN FUNZIONE, STACCARE LA SPINA DALLA PRESA
DI CORRENTE ELETTRICA PRIMA DI INSERIRE O
TOGLIERE LE SINGOLE PARTI O PRIMA DI ESEGUIRE
LA PULIZIA.
- Prima dell’uso lavare la piastra (B) e il vassoio raccogli
grasso (D) con acqua calda usando un detersivo delicato.
Asciugare bene.
- Collocare il vassoio raccogli grasso (D) all’interno della
base (F), inserendolo prima sotto l’aletta di bloccaggio
posta nella parte posteriore della base (Fig. 2) quindi
abbassandolo.
Per facilitare la pulizia, ricoprire il vassoio con della carta
d’alluminio per la raccolta dei grassi e dei sughi.
- Posizionare la piastra antiaderente (B) sopra il vassoio rac-
cogli grasso (D) (Fig. 3), assicurandosi che i manici (G) si
innestino perfettamente negli appositi alloggiamenti ricavati
sulla base (F).
- Porre il cibo da cuocere sulla piastra (B) ed inserire vertical-
mente il coperchio (A) inserendo i propri perni laterali nella
apposite fessure posteriori della base (F) (Fig. 4).
Abbassare il coperchio (A), afferrando la relativa maniglia,
ruotandolo delicatamente in avanti (Fig. 5).
- Inserire il termostato (E) nella presa (C) della piastra (B)
(Fig. 6) ed inserire la spina del cavo di alimentazione in una
presa di corrente.
Fig. 6
- Posizionare il quadrante del termostato di controllo (E)
sulla regolazione del calore desiderata. Per comodità ripor-
tiamo di seguito una tabella con le varie regolazioni.
REGOLAZIONI FUNZIONI
- Quando la spia del termostato (E) si spegne, significa che
la temperatura di cottura desiderata è stata raggiunta e che
la griglia è pronta per l’uso.
- La spia del termostato (E) indica che la griglia si sta riscal-
dando. La spia resterà accesa fino a che la temperatura
impostata non sarà stata raggiunta, dopodichè si accen-
derà e si spegnerà ciclicamente durante la cottura per
garantire il mantenimento della temperatura selezionata.
- Il tempo di preriscaldamento dipende dalla regolazione del
calore selezionata. Maggiore è il calore selezionato, più
lungo sarà il tempo di preriscaldamento.
- A fine cottura, rimuovere il termostato (E) ed alzare il coper-
chio (A) afferrandolo per l’apposita maniglia.
PULIZIA E MANUTENZIONE
ATTENZIONE: NON IMMERGERE MAI IL TERMOSTATO,
LA SPINA ED IL CAVO ELETTRICO IN ACQUA O ALTRI
LIQUIDI, USARE UN PANNO UMIDO PER LA LORO
PULIZIA.
ATTENZIONE: ANCHE QUANDO L’APPARECCHIO NON
E’ IN FUNZIONE, STACCARE LA SPINA DALLA PRESA
DI CORRENTE ELETTRICA PRIMA DI INSERIRE O
TOGLIERE LE SINGOLE PARTI O PRIMA DI ESEGUIRE
LA PULIZIA.
Il coperchio, la piastra antiaderente, il vassoio raccogli gras-
so, possono essere lavati in acqua tiepida e sapone, oppure
in lavastoviglie, nel ripiano superiore.
La base sagomata può essere pulita con un panno umido o
lavata in acqua tiepida usando un detersivo delicato e una
spugna morbida.
Regolazioni Funzioni
1 - 2 Calore basso - per mantenere gli ali-
menti caldi.
2 - 3 Calore medio - per cuocere completa-
mente gli alimenti.
3 - 4 Calore alto - per cottura veloce e tratte-
nimento sugo.
5 Calore super - per rosolare gli alimenti
in breve tempo.
B
C
D
E
F
G
IMPORTANT
SAFEGUARDS
READ THESE INSTRUCTIONS BEFORE USE.
The necessary precautions must be taken when using elec-
trical appliances, and these include the following:
1 Make sure that the voltage on the appliance rating plate
corresponds to that of the mains electricity.
2 Never leave the appliance unattended when connected
to the power supply; unplug it after every use.
3 Never place the appliance on or close to sources of
heat.
4 Always place the appliance on a flat, level surface dur-
ing use.
5 Never leave the appliance exposed to the elements
(rain, sun, etc....).
6 Make sure that the power cord does not come into
contact with hot surfaces.
7 This appliance is not intended for use by persons
(including children) with reduced physical, sensory or
mental capabilities, or lack of experience and knowl-
edge, unless they have been given supervision or
instruction concerning use of the appliance by a person
responsible for their safety.
8 Children should be supervised to ensure that they do
not play with the appliance.
9 NEVER PLACE THE THERMOSTAT, PLUG OR
POWER CORD IN WATER OR OTHER LIQUIDS;
ONLY WIPE THESE PARTS CLEAN WITH A DAMP
CLOTH.
10 ALWAYS UNPLUG THE POWER CORD FROM
THE ELECTRICITY MAINS BEFORE FITTING OR
REMOVING SINGLE ATTACHMENTS OR BEFORE
CLEANING THE APPLIANCE.
11 Never use the thermostat with other appliances.
12 The appliance must not be powered through external
timers or using separate, remote-controlled systems.
13 We recommend using an extractor fan or that you
ventilate the area thoroughly when using the appliance
indoors.
14 Never use the appliance in the vicinity of walls or cur-
tains.
15 IMPORTANT: This appliance must never be used
with coal or similar solid fuel.
16 Always make sure that your hands are thoroughly dry
before using or adjusting the switches on the appliance,
or before touching the power plug or power connections.
17 To unplug the appliance, grip the plug and remove it
directly from the power socket. Never pull the power
cord to unplug the appliance.
18 Never use the appliance if the power cord or plug are
damaged or if the appliance itself is faulty; in this case,
take it to your nearest Authorised Assistance Centre.
19 To prevent any risks, if the power cord is damaged, it
must be replaced by the manufacturer, its Technical
Assistance Service or a similarly qualified person.
20 This appliance is designed for HOME USE ONLY and
may not be used for commercial or industrial purposes.
21 This appliance conforms to the 2006/95/EC and EMC
2004/108/EC directives.
22 Any changes to this product that have not been
expressly authorised by the manufacturer may lead to
the user’s guarantee being rendered null and void.
23 In the event that you decide to dispose of the appli-
ance, we advise you to make it inoperative by cutting
off the power cord. We also recommend that any parts
that could be dangerous be rendered harmless, espe-
cially for children, who may play with the appliance or
its parts.
Settings Function
1 - 2 Low heat - for keeping food warm.
2 - 3 Medium heat - for cooking foods tho-
roughly.
3 - 4 High heat - for quick cooking and sealing
in the juices.
5 Super heat - for browning foods quickly.
INSTRUCTIONS
IMPORTANTES
LIRE CES INSTRUCTIONS AVANT L’EMPLOI.
Lors de l’utilisation d’appareils électriques, il est nécessaire
de prendre les précautions suivantes:
1 Vérifiez que le voltage électrique de l’appareil corres-
ponde à celui de votre réseau électrique.
2 Ne laissez jamais l’appareil sans surveillance lorsqu’il
est branché au réseau électrique; débranchez-le après
chaque utilisation.
3 Ne placez pas l’appareil au dessus ou près de sources
de chaleur.
4 Lors de son utilisation, placez l’appareil sur une surface
horizontale et stable.
5 N’exposez jamais l’appareil aux agents atmosphériques
externes (pluie, soleil, etc.).
6 Veillez à ce que le câble électrique n’entre jamais en
contact avec des surfaces chaudes.
7 Cet appareil n’est pas indiqué pour l’utilisation de la
part de personnes (y compris les enfants) ayant des
capacités physiques, sensorielles ou mentales réduites.
Les utilisateurs n’ayant pas l’expérience, une connais-
sance suffisante de l’appareil ou n’ayant pas reçu les
instructions relatives à l’appareil, devront faire l’objet
d’un contrôle de supervision de la part d’une personne
responsable de leur sécurité.
8 Il est nécessaire de surveiller les enfants pour empê-
cher qu’ils ne jouent avec l’appareil.
9 NE JAMAIS PLONGER LE THERMOSTAT, LA FICHE
OU LE CABLE ELECTRIQUE DANS L’EAU OU
AUTRES LIQUIDES, UTILISER UN CHIFFON HUMIDE
POUR LES NETTOYER.
10 MEME LORSQUE L’APPAREIL N’EST PAS EN
MARCHE, DEBRANCHER LA FICHE DE LA PRISE
DE COURANT ELECTRIQUE AVANT D’INSTALLER
OU DE DEFAIRE LES SIMPLES PARTIES OU AVANT
Réglages Fonctions
1 - 2 Chaleur basse – pour maintenir les
aliments au chaud.
2 - 3 Chaleur moyenne – pour cuire entière-
ment les aliments.
3 - 4 Chaleur élevée – pour cuisson rapide et
maintient sauce.
5 Chaleur super – pour rôtir les aliments
en peu de temps.
EN MARCHE, DEBRANCHER LA FICHE DE LA PRISE
DE COURANT ELECTRIQUE AVANT D’INSTALLER OU
DE DEFAIRE LES SIMPLES PARTIES OU AVANT DE
PROCEDER AU NETTOYAGE.
Le couvercle, la plaque anti-adhérente et le plateau de
récupération du gras peuvent être lavés avec de l’eau tiède
et du produit vaisselle, ou au lave-vaisselle sur la clayette
supérieure.
La base profilée peut être lavée à l’aide d’un chiffon humide
ou avec de l’eau tiède en utilisant un produit de nettoyage
délicat et une éponge souple.
WICHTIGE
HINWEISE
VOR GEBRAUCH BITTE DIESE ANLEITUNG LESEN.
Beim Gebrauch von Elektrogeräten sind einige
Vorsichtsmaßnahmen zu treffen:
1 Vergewissern Sie sich, dass die Netzspannung mit der
Gerätespannung übereinstimmt.
2 Das am Stromnetz angeschlossene Gerät niemals
unbeaufsichtigt lassen; die Stromzuführung des Geräts
nach jedem Gebrauch unterbrechen.
3 Gerät nicht auf oder an Wärmequellen abstellen.
4 Gerät beim Gebrauch auf eine waagerechte und solide
Fläche stellen.
5 Gerät keinen Witterungseinflüssen (Regen, Sonne,
usw.) aussetzen.
6 Das Stromkabel darf nicht mit heißen Flächen in
Berührung kommen.
7 Dieses Gerät ist nicht für den Gebrauch durch Personen
(einschließlich Kindern) geeignet, die nicht im vollen
Besitz ihrer körperlichen, sensoriellen und geistigen
Fähigkeiten sind. Benutzer, denen es an Erfahrung
und Kenntnis des Geräts mangelt oder die nicht in die
Verwendung des Geräts eingewiesen wurden, müssen
durch eine Person überwacht werden, die für ihre
Sicherheit verantwortlich ist.
8 Kinder müssen überwacht werden, um sicher zu stellen,
dass sie nicht mit dem Gerät spielen.
9 TAUCHEN SIE DEN THERMOSTATEN, DEN STECKER
UND DAS STROMKABEL KEINESFALLS IN WASSER
ODER SONSTIGE FLÜSSIGKEITEN. VERWENDEN
SIE ZUR REINIGUNG EIN FEUCHTES TUCH.
10 AUCH WENN DAS GERÄT NICHT IN BETRIEB IST,
ZIEHEN SIE DEN NETZSTECKER AUS DER DOSE,
BEVOR SIE DIE EINZELNEN TEILE EINSETZEN
ODER DIE REINIGUNG VORNEHMEN.
11 Verwenden Sie den Thermostat nicht für andere
Geräte.
12 Das Produkt darf nicht über externe Timer oder separa-
te, ferngesteuerte Anlagen mit Strom versorgt werden.
13 Bei Verwendung in geschlossenen Räumen empfiehlt
sich eine Abzugshaube oder ausreichende Lüftung des
Raums.
14 Verwenden Sie das Gerät nicht in der Nähe von
Wänden oder Gardinen.
15 ACHTUNG: Dieses Gerät darf nicht mit Kohle oder
ähnlichen Brennstoffen verwendet werden.
16 Vergewissern Sie sich immer, dass Ihre Hände tro-
cken sind, bevor Sie die Schalter am Gerät benutzen
oder einstellen, oder bevor Sie den Stecker und die
Versorgungsanschlüsse berühren.
17 Direkt am Stecker ziehen, um diesen aus der
Wandsteckdose zu führen. Niemals am Kabel ziehen.
18 Das Gerät nicht benutzen, falls das Stromkabel oder der
Stecker beschädigt sein sollten oder das Gerät selbst
defekt ist. Es zur nächsten Vertrags-Kundendienststelle
bringen.
19 Zur Gefahrenvorbeugung darf das eventuell beschä-
digte Stromkabel nur vom Hersteller oder seiner
Kundendienststelle, d.h. nur von einer ähnlich qualifi-
zierten Person ausgewechselt werden.
20 Das Gerät ist AUSSCHLIEßLICH FÜR DEN
HAUSGEBRAUCH und nicht für Handels- oder
Industriezwecke bestimmt.
21 Dieses Gerät ist konform mit den Richtlinien 2006/95/
EC und EMC 2004/108/EC.
22 Eventuelle Abänderungen an diesem Produkt, die nicht
ausdrücklich vom Hersteller genehmigt wurden, können
die Sicherheit und Garantie seines Einsatzes durch den
Bediener aufheben.
23 Falls dieses Gerät entsorgt werden soll, ist sein
Stromkabel abzuschneiden, so dass es nicht mehr funk-
tionstüchtig ist. Darüber hinaus sind all die Geräteteile
unschädlich zu machen, die vor allem für Kinder, die
das Gerät als Spielzeug verwenden könnten, eine
Gefahr darstellen.
24 Die Verpackungsteile nicht in Reichweite von Kindern
lassen. Sie stellen eine potentielle Gefahr dar.
ANLEITUNG
AUFBEWAHREN
BESCHREIBUNG DES GERÄTS (Abb. 1)
A Deckel
B Antihaft- Grillplatte
C Thermostat-Steckdose
D Fettschale
E Thermostat
F Gehäuse
G Wärmeisolierte Griffe
BETRIEBSANLEITUNG
ACHTUNG: AUCH WENN DAS GERÄT NICHT IN BETRIEB
IST, ZIEHEN SIE DEN NETZSTECKER AUS DER DOSE,
BEVOR SIE DIE EINZELNEN TEILE EINSETZEN ODER
DIE REINIGUNG VORNEHMEN.
- Spülen Sie vor dem Gebrauch die Grillplatte (B) und die
Fettschale (D) mit warmem Wasser und einem milden
Reinigungsmittel. Trocknen Sie sie gründlich ab.
- Setzen Sie die Fettschale (D) in das Gehäuse (F) ein,
indem Sie sie zunächst unter den Befestigungsflügel an der
Rückseite des Gehäuses (Abb. 2) einführen und sie dann
nach unten drücken.
Kleiden Sie die Fettschale mit Alu- Folie aus, um Fett und
Saft aufzufangen und die Reinigung zu erleichtern.
- Setzen Sie die Antihaft- Grillplatte (B) über der Fettschale
(D) (Abb. 3) ein und vergewissern Sie sich, dass die Griffe
(G) richtig in die Aufnahmen am Gehäuse (F) einrasten.
- Legen Sie das Grillgut auf die Platte (B) und setzen Sie ver-
tikal den Deckel (A) ein, indem Sie die seitlichen Stifte in die
rückseitigen Schlitz am Gehäuse (F) einführen (Abb. 4).
Kippen Sie den Deckel (A) mithilfe des zugehörigen Griffs
leicht nach vorn und drücken Sie ihn dann nach unten
(Abb. 5).
- Den Thermostat (E) in die zugehörige Steckdose (C) der
Platte (B) einstecken (Abb. 6) und die Steckdose des
Versorgungskabels in eine Stromsteckdose stecken.
- Den Thermostat (E) auf die gewünschte Hitzestufe ein-
stellen. Der Bequemlichkeit halber ist nachstehend eine
Tabelle mit den verschiedenen Einstellungen abgedruckt.
EINSTELLUNG DER FUNKTIONEN
- Wenn die Kontrolllampe des Thermostats (E) erlischt,
bedeutet dies, dass die eingestellte Temperatur erreicht
wurde und der Grill betriebsbereit ist.
- Die Kontrolllampe des Thermostats (E) zeigt an, dass der
Grill aufgeheizt wird. Die Lampe bleibt eingeschaltet, bis
die eingestellte Temperatur erreicht ist. Danach wird sie
während des Garvorgangs zyklisch ein- und ausgeschaltet,
um die Temperatur auf dem eingestellten Wert zu halten.
- Die Vorheiz- Zeit ist von der eingestellten Heizstufe abhän-
gig. Je höher die eingestellte Hitze ist, desto länger dauert
das Vorheizen.
- Entfernen Sie nach dem Gebrauch den Thermostaten (E)
und heben Sie den Deckel (A) an dessen Griff hoch.
REINIGUNG UND INSTANDHALTUNG
ACHTUNG: TAUCHEN SIE DEN THERMOSTATEN, DEN
STECKER UND DAS STROMKABEL KEINESFALLS
IN WASSER ODER SONSTIGE FLÜSSIGKEITEN.
VERWENDEN SIE ZUR REINIGUNG EIN FEUCHTES
TUCH.
ACHTUNG: AUCH WENN DAS GERÄT NICHT IN BETRIEB
IST, ZIEHEN SIE DEN NETZSTECKER AUS DER DOSE,
BEVOR SIE DIE EINZELNEN TEILE EINSETZEN ODER
DIE REINIGUNG VORNEHMEN.
Der Deckel, die Antihaft- Grillplatte und die Fettschale kön-
nen mit warmem Wasser und Spülmittel gereinigt oder im
oberen Fach der Spülmaschine gewaschen werden.
Das Gehäuse kann mit einem feuchten Tuch gesäubert oder
mit warmem Wasser, mildem Reinigungsmittel und einem
weichen Schwamm gereinigt werden.
Einstellungen
Funktionen
1 - 2 Geringe Hitze – zum Warmhalten der
Speisen.
2 - 3 Mittlere Hitze – zum Durchgaren der
Speisen.
3 - 4 Starke Hitze – zum raschen Garen ohne
Verlust des Safts.
5 Super- Hitze – zum kurzen Anbraten
von Speisen.
ADVERTENCIAS
IMPORTANTES
LEER ESTAS INSTRUCCIONES ANTES DEL EMPLEO.
Cuando se usan aparatos eléctricos es necesario tomar
algunas precauciones, entre las cuales:
1 Cerciorarse que el voltaje eléctrico del aparato corres-
ponda al de vuestra red eléctrica.
2 No dejar el aparato sin vigilar cuando esté conectado
a la red eléctrica; desconectarlo después de cada
empleo.
3 No colocar el aparato sobre o en proximidad de fuentes
de calor.
4 Durante el uso situar el aparato sobre una superficie
horizontal estable.
5 No dejar el aparato expuesto a agentes atmosféricos
(lluvia, sol, etc.).
6 Controlar que el cable eléctrico no toque superficies
calientes.
7 Este aparato no es adecuado para ser empleado por
personas (includos los niños) con capacidades físicas,
sensoriales o mentales reducidas. Los usuarios que
no tengan la experiencia y conocimiento del aparato
o bien a aquellos a los que no se les haya dado las
instrucciones referentes al empleo del aparato tendrán
que estar sometidos a la supervisión por parte de una
persona responsable de su seguridad.
8 Es necesario vigilar a los niños para asegurarse de que
no jueguen con el aparato.
9 NO SUMERGIR NUNCA EL TERMOSTATO, EL
ENCHUFE Y EL CABLE ELÉCTRICO EN EL AGUA
O EN OTROS LÍQUIDOS, USAR UN PAÑO HÚMEDO
PARA LIMPIARLOS.
10 INCLUSO CUANDO EL APARATO NO ESTÉ EN
MARCHA, HAY QUE DESCONECTAR EL ENCHUFE
DE LA TOMA DE CORRIENTE ELÉCTRICA ANTES DE
ACOPLAR O QUITAR LAS PARTES INDIVIDUALES O
ANTES DE EFECTUAR LA LIMPIEZA.
11 No usar el termostato con otros aparatos.
12 El producto no se alimenta a través de temporizadores
externos o con instalaciones separadas controladas a
distancia.
13 Se aconseja el uso de un ventilador de aspiración o una
adecuada ventilación del local en caso de empleo en
ambientes cerrados.
14 No utilizar el aparato cerca de paredes o cortinas.
15 ATENCIÓN: Este aparato no se tiene que utilizar con
carbón o combustible parecido.
16 Asegurarse de tener siempre las manos bien secas
antes de utilizar o de regular los interruptores situados
en el aparato o antes de tocar el enchufe y las conexio-
nes de alimentación.
17 Para desenchufar, coger directamente el enchufe y
desconectarlo de la toma de la pared. No desenchufar
estirando del cable.
18 No usar el aparato si el cable eléctrico o el enchufe
estuvieran dañados, o si el mismo aparato fuera defec-
tuoso; en este caso llevarlo al Centro de Asistencia
Autorizado más cercano.
19 Si el cable de alimentación está dañado tiene que ser
sustituido por el Fabricante o por su servicio asistencia
técnica o en todo caso por una persona con calificación
similar, para prevenir cualquier riesgo.
20 El aparato ha sido proyectado SÓLO PARA EMPLEO
DOMÉSTICO y no tiene que ser destinado a uso
comercial o industrial.
21 Este aparato cumple la directiva 2006/95/EC y EMC
2004/108/EC.
22 Eventuales modificaciones a este producto, no autori-
zadas expresamente por el fabricante pueden compor-
tar el vencimiento de la seguridad y de la garantía de
su empleo por parte del usuario.
23 Cuando decida deshacerse de este aparato, aconse-
jamos inhabilitarlo cortando el cable de alimentación.
Se recomienda además hacer inocuas aquellas partes
del aparato que pudieran constituir un peligro, espe-
cialmente para los niños que podrían utilizar el aparato
para sus juegos.
24 Los elementos del embalaje no se tienen que dejar al
alcance de los niños ya que constituyen fuentes poten-
ciales de peligro.
GUARDAR ESTAS
INSTRUCCIONES
DESCRIPCIÓND EL APARATO (Fig. 1)
A Tapadera
B Plancha antiadherente
C Toma termostato
D Bandeja recogedora de la grasa
E Termostato
F Base
G Mangos anti-calentamiento
INSTRUCCIONES DE EMPLEO
ATENCIÓN: INCLUSO CUANDO EL APARATO NO ESTÉ
EN MARCHA, HAY QUE DESCONECTAR EL ENCHUFE
DE LA TOMA DE CORRIENTE ELÉCTRICA ANTES DE
ACOPLAR O QUITAR LAS PARTES INDIVIDUALES O
ANTES DE EFECTUAR LA LIMPIEZA.
- Antes del uso lavar la plancha (B) y la bandeja recogedora
de grasa (D) con agua caliente usando un detergente
delicado. Secar bien.
- Colocar la bandeja recogedora de grasa (D) dentro de la
base (F), introduciéndola primero debajo de la aleta de
bloqueo situada en la parte trasera de la base (Fig. 2),
bajándola.
Para facilitar la limpieza, recubrir la bandeja con papel de
aluminio para recoger grasas y salsas.
- Colocar la plancha antiadherente (B) encima de la bandeja
recogedora de grasa (D) (Fig. 3), asegurándose de que los
mangos (G) se introduzcan perfectamente en los corres-
pondientes espacios en la base (F).
- Colocar el alimento que hay que cocinar sobre la plancha
(B) y colocar verticalmente la tapa (A) introduciendo los
propios pernos laterales en las correspondientes hendidu-
ras traseras de la base (F) (Fig. 4).
Bajar la tapa (A), agarrando el correspondiente mango,
girándolo delicadamente hacia delante (Fig. 5).
- Introducir el termostato (E) en la toma (C) de la plancha (B)
(Fig. 6) y enchufar el cable de alimentación en una toma de
corriente.
- Colocar el cuadrante del termostato de control (E) en la
regulación del calor deseado. Para mayor comodidad
indicamos a continuación una tabla con las diferentes
regulaciones.
REGULACIONES FUNCIONES
- Cuando la luz indicadora del termostato (E) se apaga,
significa que la temperatura de cocción deseada se ha
alcanzado y que la parrilla está lista para el uso.
- La luz indicadora del termostato (E) indica que la parrilla
se está calentando. La luz indicadora permanecerá encen-
dida hasta que la temperatura ajustada no se alcance,
a continuación se encenderá y se apagará cíclicamente
durante la cocción para garantizar el mantenimiento de la
temperatura seleccionada.
- El tiempo de precalentamiento depende de la regulación
del calor seleccionada. Mayor es el calor seleccionado y
más largo será el tiempo de precalentamiento.
- Al final de la cocción, quitar el termostato (E) y levantar la
tapa (A) agarrando por el mango.
LIMPIEZA Y MANTENIMIENTO
ATENCIÓN: NO SUMERGIR NUNCA EL TERMOSTATO,
EL ENCHUFE Y EL CABLE ELÉCTRICO EN EL AGUA O
EN OTROS LÍQUIDOS, USAR UN PAÑO HÚMEDO PARA
LIMPIARLOS.
ATENCIÓN: INCLUSO CUANDO EL APARATO NO ESTÉ
EN MARCHA, HAY QUE DESCONECTAR EL ENCHUFE
DE LA TOMA DE CORRIENTE ELÉCTRICA ANTES DE
ACOPLAR O QUITAR LAS PARTES INDIVIDUALES O
ANTES DE EFECTUAR LA LIMPIEZA.
La tapa, la plancha antiadherente, la bandeja recogedora de
grasa, se pueden lavar con agua templada y jabón, o bien
en el lavavajillas, en la parte superior.
La base perfilada se puede limpiar con un paño húmedo o
lavar con agua templada usando un detergente delicado y
una esponja blanda.
Regulaciones
Funciones
1 - 2 Calor bajo – para mantener los alimen-
tos calientes.
2 - 3 Calor medio – para cocinar completa-
mente los alimentos.
3 - 4 Calor alto – para cocción rápida y reten-
ción salsa.
5 Calor super – para sofreír los alimentos
en breve tiempo.