1
2 3 4 5 6 7 8
IT
A
LEGGERE A
• L
un uso industriale o professionale.
• Non si assumono responsabilità per uso errato o per impieghi diversi da quelli
previsti dal presente libretto.
• Si consiglia di conservare gli imballi originali, poiché l’assistenza gratuita non è
prevista per i guasti causati da imballo non adeguato del prodotto al momento
della spedizione ad un Centro di
• Questo apparecchio è conforme alla Direttiva 2006/95/CE e alla Direttiva EMC
2004/108/CE.
Pericolo per i bambini
•
da bambini con un età superiore
a 8 anni e da persone che hanno
capacità fi
tali ridotte, oppure con mancanza
di esperienza o di conoscenza,
solo se sono seguiti da una per-
sona responsabile o se hanno
ricevuto e compreso le istruzioni
e i pericoli presenti durante l’uso
dell’apparecchio.
•
l’apparecchio.
•
portate in questo libretto non de-
vono essere eseguite dai bambini
senza la supervisione di una per-
sona adulta.
• Gli elementi dell’imballaggio non devono essere lasciati alla portata dei bambini in
quanto potenziali fonti di pericolo.
• Allorché si decida di smaltire come rifi
renderlo inoperante tagliandone il cavo di alimentazione. Si raccomanda inoltre di
rendere innocue quelle parti dell’apparecchio suscettibili di costituire un pericolo,
specialmente per i bambini che potrebbero servirsi dell’apparecchio per i propri
giochi.
Pericolo do
•
mentazione alla portata di bambi-
ni con età inferiore a 8 anni se è
collegato alla presa di corrente o
mentre si sta raffreddando.
• Prima di collegare l’apparecchio alla rete di alimentazione controllare che la ten-
sione indicata sulla targhetta corrisponda a quella della rete locale.
• Collegare sempre l’apparecchio ad una presa con messa a terra.
• NON IMMERGERE L’APP
• Non iniziate a stirare se avete la mani bagnate o se avete i piedi nudi.
•
e staccare la spina del cavo di
alimentazione dalla presa di cor-
rente elettrica prima di riempire il
serbatoio con acqua.
Pericolo di danni derivanti da altre cause
• Riempire la caldaia con acqua prima di mettere in funzione l’apparecchio. Le ope-
razioni di riempimento di acqua devono essere effettuate con la spina del cavo di
alimentazione elettrica staccata dalla presa.
• Per rifornire la caldaia usare sempre l’imbuto (J) in dotazione.
• Accendere l’apparecchio solo quando è in posizione di lavoro.
• Quando usate l’apparecchio per la prima volta può accadere che emani un po’ di
fumo; non preoccupatevi, è perfettamente normale perché alcune parti sono state
leggermente lubrifi cate, quindi dopo poco tempo il fenomeno scomparirà.
• Durante l’utilizzo posizionare l’apparecchio su di un piano orizzontale stabile e ben
illuminato.
• Non lasciare incustodito l’apparecchio mentre è collegato alla rete elettrica.
• L’apparecchio deve essere utilizzato e lasciato a riposo su una superfi cie
• Quando si ripone il ferro sul suo appoggia ferro, assicurarsi che la superfi
è collocato l’appoggia ferro sia stabile.
• Quando vi dovete assentare anche per poco tempo, posizionare sempre il ferro da
stiro sull’apposita griglia appoggia ferro (I), spegnere l’apparecchio e scollegare
sempre il cavo di alimentazione elettrica dalla presa di corrente.
• Premendo il pulsante vapore prima che la caldaia abbia raggiunto la temperatura
ottimale o che il ferro sia caldo, potrebbe uscire acqua dai fori per il vapore.
•
utilizzato se è stato fatto cadere,
se vi sono segni di danni visibili o
se ha perdite di acqua. Non usare
l’apparecchio se il cavo elettrico
o la spina risultano danneggiati, o
se l’apparecchio stesso risulta di-
fettoso. T
presa la sostituzione del cavo di
alimentazione, devono essere
eseguite solamente dal Centro
Assistenza
torizzati
nire ogni rischio.
• Non lasciare l’apparecchio esposto ad agenti atmosferici (pioggia, sole, ecc...).
Avv
• Mai tentare di stirare indumenti indosso.
• Per rifornire la caldaia durante l’uso utilizzare acqua di rubinetto. Inserire molto
lentamente acqua in caldaia. In tal modo eviterete l’improvvisa fuoriuscita di schiz-
zi di acqua calda o vapore dalla caldaia. T
• Non toccare le parti metalliche del ferro quando è in funzione e nei minuti seguenti
al suo spegnimento poiché potrebbero causare scottature.
• Non dirigere il getto vapore verso parti del corpo o verso animali domestici.
•
il tappo della caldaia (B) durante
l’uso.
•
il tappo (B) procedere sempre
come segue:
(A) premendo il pulsante (L);
e lasciare uscire tutto il vapore re-
siduo;
te il pulsante (M) e scollegare il
cavo di alimentazione dalla presa
di corrente;
(B) ed attendere, prima di averlo
completamente svitato, che cessi
un eventuale sibilo di vapore.
Attenzione - danni materiali
• Si consiglia di conservare gli imballi originali, poiché l’assistenza gratuita non è
prevista per i guasti causati da imballo non adeguato del prodotto al momento
della spedizione ad un Centro di
• Prima di utilizzare l’apparecchio per la prima volta togliere eventuali etichette o
protezioni dalla piastra del ferro da stiro.
• Svolgere sempre il cavo prima dell’utilizzo.
• L
provocare danni ed incidenti.
• Non utilizzare acqua gassata (addizionata di anidride carbonica).
• Non appoggiare il ferro da stiro caldo sul cavo di collegamento o sul cavo di ali-
mentazione e fare molta attenzione a che essi non vengano in contatto con la
piastra calda del ferro.
• Non scollegare la spina dalla presa di corrente tirandola per il cavo.
• Dopo aver staccato la spina del cavo di alimentazione elettrica dalla presa e dopo
che tutte le parti si saranno raffreddate, l’apparecchio potrà essere pulito esclu-
sivamente con un panno non abrasivo e appena umido di acqua. Non usare mai
solventi che danneggiano le parti in plastica.
• Eseguire il ciclo di pulizia della caldaia almeno ogni due mesi in modo da eli-
minare eventuali residui di calcare che possono compromettere il regolare
funzionamento dell’apparecchio.
• Non versare nella caldaia aceto, decalcifi canti o altre sostanze profumanti; pena
la decadenza della garanzia.
•
Non avvolgere il cavo di alimentazione attorno alla piastra quando il ferro è caldo.
• Non mettere la piastra a contatto con superfi ci
• Prima di riporre l’apparecchio spengerlo premendo gli interruttori (L) e (M), scol-
legare sempre la spina del cavo di alimentazione dalla presa, attendere che si sia
raffreddato e svuotare completamente la caldaia.
• Non si assumono responsabilità per uso errato o per impieghi diversi da quelli
previsti dal presente libretto.
• Per il corretto smaltimento del prodotto ai sensi della Direttiva Euro-
pea 2009/96/CE si prega leggere l’apposito foglietto allegato al prodotto.
CONSERV
Nota: al primo utilizzo del ferro, provatelo su un vecchio pezzo di stoffa per veri fi care
che la piastra ed il serbatoio dell’acqua siano perfettamente puliti.
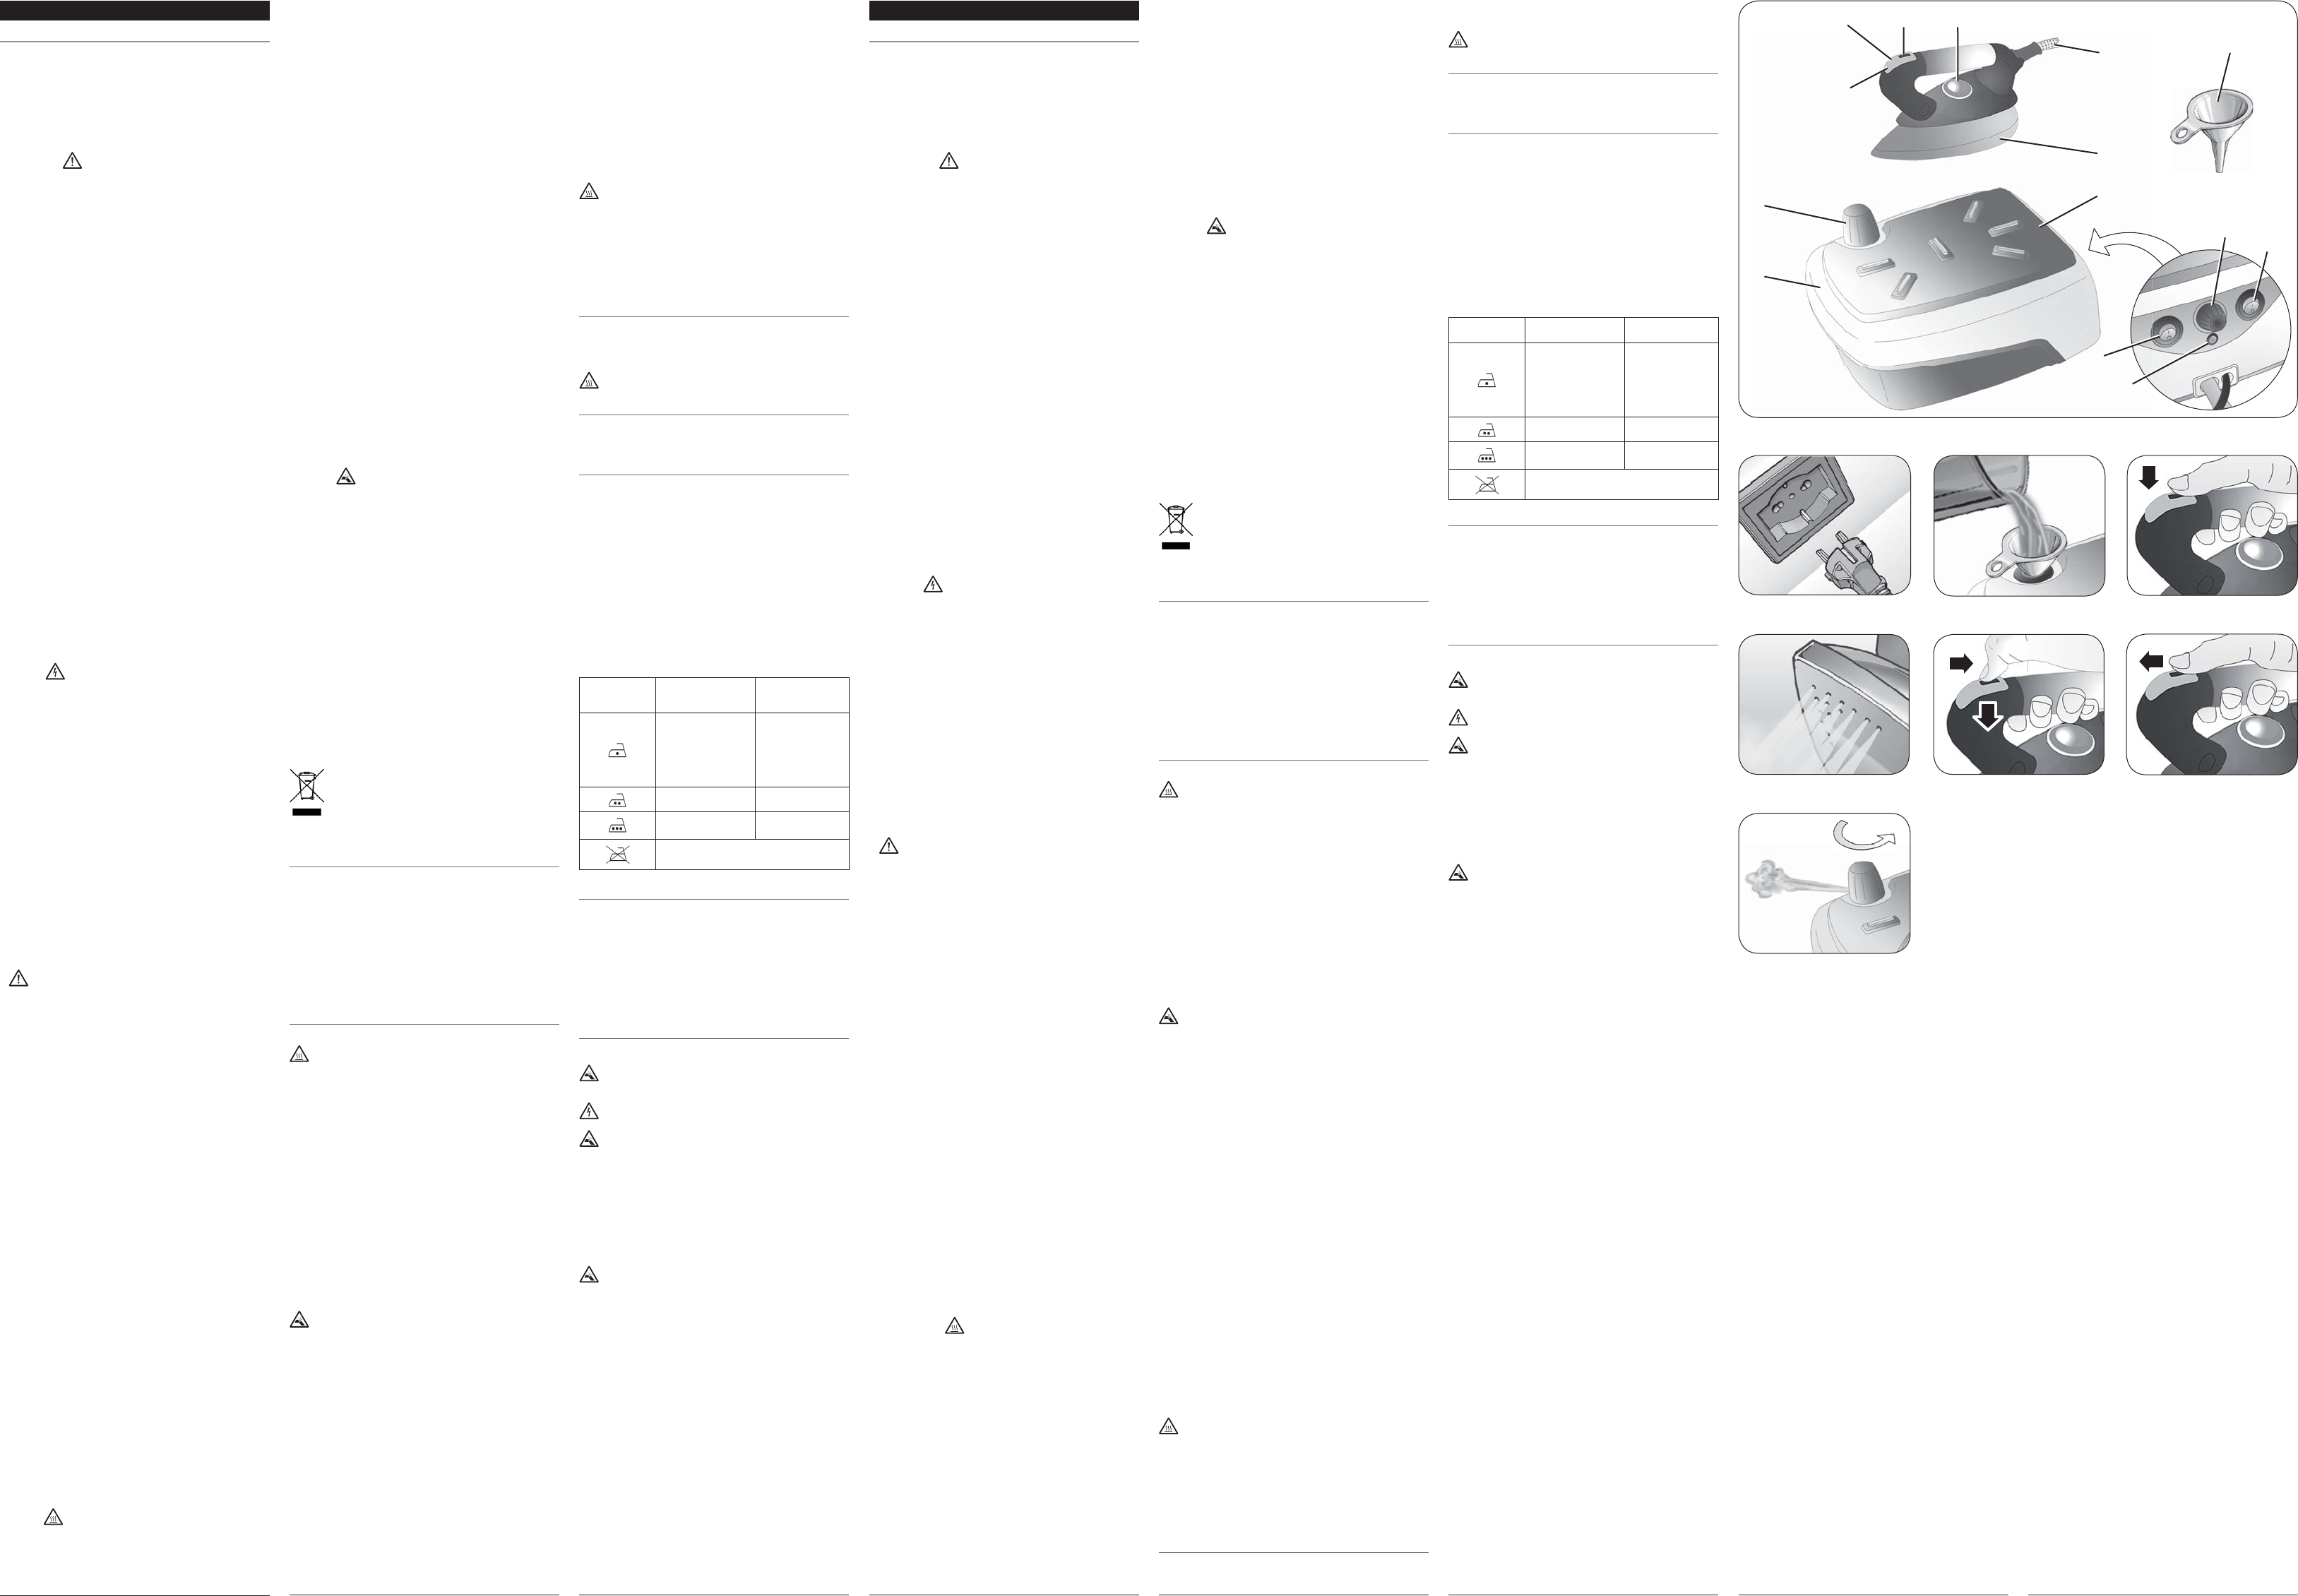
DESCRIZIONE DELL
A
B -
C - Spia luminosa controllo temperatura ferro
D -
E -
F -
G - Cavo di collegamento ferro-caldaia
H -
I -
J -
K -
L - Interruttore di accensione caldaia
M -
N - Spia pronto vapore
ISTRUZIONI PER L
Riempimento della caldaia prima dell’uso
Attenzione!
Non svitare mai il tappo della caldaia prima di essersi assicurati che l’ap-
parecchio sia scollegato dalla presa di corrente (Fig. 2) e che non ci sia
pressione all’interno.
Ruotare in senso antiorario il tappo della caldaia (B). V
caldaia fi
Riavvitare il tappo (B).
Il prodotto funziona con normale acqua di rubinetto.
In caso di acque particolarmente calcaree (con durezza superiore a 20°F) utilizzare
una miscela composta al 50% di acqua del rubinetto e al 50% di acqua demine-
ralizzata.
Mai utilizzare acqua demineralizzata pura.
Accensione dell’apparecchio
Collegare l’apparecchio alla rete di alimentazione controllando che la tensione indi-
cata sulla targhetta corrisponda a quella della rete locale.
Alla prima messa in funzione del ferro è possibile una leggera esalazione di fumo,
si tratta di un fenomeno perfettamente normale che scomparirà dopo brevissimo
tempo.
T
ne caldaia (L) e impostare la manopola regolazione vapore (K) sul valore desiderato.
Attendere l’accensione della spia (N) per utilizzare il vapore. Dopodiché premere
l’interruttore (M) per l’accensione del ferro da stiro.
temperatura desiderata tramite la manopola termostato (F).
Prima di dirigere il getto di vapore sul capo da stirare, erogare due o tre colpi di
vapore prolungati verso terra per far stabilizzare il getto (Fig. 5).
Attenzione!
Non erogare mai vapore quando il ferro è appoggiato sopra l’apposita
griglia (I).
Regolazione vapore
Questo apparecchio è dotato di un regolatore (K) che permette la regolazione della
quantità di vapore, dal minimo al massimo a seconda delle esigenze della stiratura.
Colpo vapore
Posizionare la manopola di regolazione vapore (K) sul valore MAX. Impostare la
temperatura di stiratura tramite la manopola di regolazione (F) oltre il simbolo (
•••
).
Attendere che la spia (C) del ferro sia spenta.
to vapore (N). Quando premete il pulsante vapore (D) dai 3 ai 5 secondi, un intenso
getto di vapore sarà erogato al rilascio del pulsante. Se il pulsante di erogazione
vapore (D) viene azionato ininterrottamente per più di 30 secondi, possono uscire
delle gocce d’acqua dai fori di vapore della piastra del ferro da stiro, pertanto non
insistere eccessivamente sul pulsante (D).
V
Posizionare la manopola di regolazione vapore (K) sul valore MAX. Impostare la
temperatura di stiratura tramite la manopola di regolazione (F) oltre il simbolo (
•••
).
Attendere che la spia (C) del ferro sia spenta.
pronto vapore (N). Premere il pulsante vapore (D) e spostare il cursore (E) verso il
manico (Fig. 6). Il cursore (E) bloccherà il pulsante provocando l’uscita di un getto
di vapore continuo e costante. Per sbloccare il pulsante (D) e interrompere il getto
continuo spingere in avanti il cursore (E) Fig. 7.
Selezione della temperatura
Controllare prima di tutto che sul tessuto vi sia un’etichetta con le indicazioni per
la stiratura e confrontare il simbolo riportato sull’etichetta con la tabella riportata di
seguito. Se manca l’etichetta con le istruzioni di stiro del tessuto, ma conoscete il tipo
di tessuto, seguire le indicazioni riportate sulla tabella.
Si noti che la tabella fa riferimento ai tessuti non trattati con appretti o similari, se lo
fossero si può stirare anche ad una temperatura più bassa.
Riempimento della caldaia durante l’uso
Prima di svitare il tappo (B) spegnere la caldaia premendo l’interruttore (L).
Premere il pulsante vapore (D) sul ferro e lasciare uscire il vapore fi
esaurimento. Facendo ciò non tenere il ferro sopra l’apposita griglia appoggia ferro.
Spegnere ora il ferro, premendo il pulsante (M).
Scollegare il cavo di alimentazione dalla presa elettrica (Fig. 2). Lasciare raffreddare
l’apparecchio per qualche minuto. Con molta attenzione, ruotare in senso antiorario
il tappo della caldaia (B) ed attendere, prima di svitarlo completamente, che cessi il
sibilo del vapore residuo (Fig. 8).
Rifornire la caldaia per mezzo dell’imbuto (J) in dotazione (Fig. 3).
Riavvitare in senso orario e a fondo il tappo (B), accertandosi che abbia esaurito
completamente la sua corsa.
Attenzione!
Non svitare mai il tappo della caldaia mentre l’apparecchio è collegato alla
presa di corrente e quando vi è ancora pressione all’interno.
Non svitare mai il tappo della caldaia mentre state stirando.
Se il ferro rimane inattivo per lungo tempo (più settimane) prima di stirare si consiglia
di tenerlo in posizione orizzontale ed azionare per circa 30 secondi il pulsante di
erogazione vapore (D) allo scopo di pulire i condotti interni del vapore.
Non eseguire l’operazione sopra la griglia appoggia ferro (I).
Per stirature di breve durata non è necessario che la caldaia venga riempita comple-
tamente. Una minor quantità di acqua in caldaia ridurrà infatti i tempi di attesa e, di
conseguenza, il consumo di energia elettrica.
STIRARE IN VERTICALE
Potete usare il getto di vapore continuo per stirare i tessuti in verticale. Questa specia-
le procedura di stiratura serve per rimuovere le pieghe dalle tende, dai tessuti ecc…
Impostare la temperatura di stiratura tramite la manopola di regolazione (F) oltre
il simbolo (
•••
). Posizionare la tenda o il tessuto nel modo in cui volete stirarlo in
verticale e premere il pulsante vapore.
Attenzione!
Non stirate tessuti che vengono sorretti da altre persone.
STIRA
Per poter stirare a secco, ovvero senza vapore, dopo aver collegato l’apparecchio
alla rete di alimentazione, è suffi ciente accendere il ferro premendo l’interruttore (M).
Posizionare la manopola di regolazione vapore al minimo e regolare la manopola
termostato (F) alla temperatura desiderata. Non premere il pulsante vapore.
SUGGERIMENTI
Suddividere i capi da stirare in base al tipo di tessuto: lana con lana, cotone con
cotone, ecc...
Poiché il riscaldamento della piastra del ferro avviene molto più rapidamente del suo
raffreddamento è consigliabile iniziare a stirare tutti i tessuti che richiedono tempe-
rature più basse per poi passare a stirare quei tessuti che richiedono progressiva-
mente temperature più elevate.
Se il tessuto è composto da più tipi di fi
fi bra che richiede il minor calore.
fi bre sintetiche ed un 30% di cotone, bisognerà regolare la temperatura sulla posizio-
ne (
•
) (vedi tabella) senza vapore, cioè quella per i tessuti sintetici.
Se non siete a conoscenza della composizione del tessuto del capo da stirare,
cercare un punto del tessuto che non sia visibile. Fare una prova stirando questo
punto e stabilire la temperatura più adatta (iniziare sempre da una temperatura re-
lativamente bassa ed aumentarla gradatamente fi no a raggiungere quella idonea).
I tessuti di pura lana (100%) si possono stirare anche con il ferro regolato su una
delle posizioni vapore. Per i tessuti di pura lana, seta e sintetici, abbiate l’accortezza,
per evitare che il tessuto stirato prenda il lucido, di stirarli a rovescio. Per gli altri tipi di
tessuto ed in special modo per il velluto, onde evitare che diventino facilmente lucidi,
stirarli in una sola direzione (con un telo), facendo una pressione molto leggera. Il
ferro da stiro deve essere mantenuto in costante movimento sul tessuto da stirare.
Etichetta istruzioni di
stiratura riportata sui
tessuti
Tipo di tessuto T
Tessuti sintetici:
Acetati
Acrilici
Viscosa
Poliammide (Nylon)
Viscosa (Rayon)
Seta
•
Lana
••
Cotone
Lino
•••
Il marchio sull'etichetta signifi ca non stirare
DOPO A
Spegnere la caldaia premendo l’interruttore (L). Con la spina inserita nella presa
l’apparecchio rimane in tensione ed è possibile, premendo il pulsante vapore (D),
eliminare la pressione residua nella caldaia. Spegnere il ferro premendo l’interruttore
(M). Scollegare la spina dalla prese di corrente.
raffreddare l’apparecchio. Con molta attenzione, svitare il tappo della caldaia (B)
ed attendere, prima di svitarlo completamente, che cessi il sibilo del vapore resi-
duo (Fig. 8). Lasciare raffreddare il ferro da stiro sull’apposita griglia appoggia ferro
avendo l’accortezza di non far toccare i cavi di alimentazione e di collegamento con
le parti calde dell’apparecchio. Successivamente svuotare completamente la caldaia
in modo da evitare che il ristagno dell’acqua in caldaia favorisca la formazione del
calcare.
Riporre l’apparecchio su una superfi cie stabile e lontano dalla portata dei bambini.
PULIZIA DELL
Prima di procedere alla pulizia dell’apparecchio scollegare sempre la spina dalla presa
di corrente (Fig. 2) e lasciare raffreddare il ferro sull’apposita griglia appoggia ferro (I).
Attenzione!
Non fare uso di abrasivi per pulire la piastra. Fare in modo che la piastra
rimanga liscia: evitare il contatto con oggetti metallici.
Attenzione!
Non immergere mai l’apparecchio in acqua o altri liquidi.
Attenzione!
Controllare le condizioni del cavo di alimentazione del vostro ferro regolar-
mente prima di utilizzarlo e nel caso di danneggiamento portarlo al più vicino
centro di assistenza per farlo sostituire solo dal personale specializzato.
Per la pulizia interna della caldaia procedere nella seguente maniera:
- staccare la spina dalla presa di corrente;
- riempire la caldaia con acqua del rubinetto e avvitare il tappo (B);
- agitare la caldaia in modo da rimuovere eventuali residui di calcare formatosi al
suo interno;
- svitare il tappo e svuotare la caldaia;
- ripetere nuovamente l’operazione fi nché l’acqua non esce limpida e pulita, dopo-
diché riporre il prodotto con la caldaia completamente vuota.
Per la pulizia dell’apparecchio servirsi solo di un panno umido.
Attenzione!
Eseguire la pulizia della caldaia almeno ogni due mesi in modo da eliminare
eventuali residui di calcare che possono compromettere il regolare funziona-
mento dell’apparecchio.
LA GARANZIA
CALCARE.
Fig. 1
B
I
H
EF
G
A
D
M
K
L
N
J
C
Fig. 2 Fig. 3 Fig. 4
Fig. 6 Fig. 7
Fig. 5
Fig. 8
IMPORT
READ THESE INSTRUCTIONS CAREFULL
• The appliance has been designed for home use only and must not be used for
commercial or industrial purposes.
• W
covered in this booklet.
• We suggest you keep the original box and packaging, as our free-of-charge
service does not cover any damage resulting from inadequate packaging of the
product when this is sent back to an
•
2004/108/EC.
Danger for c
•
children aged from 8 years and
above and persons with reduced
physical, sensory or mental ca-
pabilities or lack of experience
and knowledge if they have been
given supervision or instruction
concerning use of the appliance
in a safe way and understand the
hazards involved.
•
appliance.
•
shall not be made by children
without supervision.
• Do not leave the packaging near children because it is potentially dangerous.
• In the event that this appliance is to be disposed of, it is suggested that the power
chord is cut off. It is also recommended that all potentially dangerous components
are rendered harmless to prevent children hurting themselves when playing with
the apparatus.
Danger due to electricity
•
power cord within the reach of
children under the age of 8 years
if the iron is connected to the out-
let or while it is cooling.
• Before plugging the appliance into the mains socket, ensure that the voltage
shown on the rating plate matches the local voltage supply
• Always connect the iron to an earthed socket.
• Do not immerse the appliance in water or other liquids.
• Do not start ironing if your hands are wet or if you are barefoot.
•
the socket-outlet before the boiler
is fi
Danger of
causes
• Fill up the boiler with water before starting up the appliance. Be sure to unplug the
appliance before pouring water into the tank.
• When fi lling the boiler, always use the funnell (J) provided.
• Turn on the appliance only when it is in working position.
• The appliance may give out a little smoke when used for the fi rst time; this transi-
tory effect is perfectly normal and is due to the fact that some of components have
been slightly lubricated.
• During use, rest the appliance onto a horizontal and lit up surface.
• Never leave the appliance unattended when it is connected to the power supply.
• The appliance must be used and rested on a stable surface.
• When placing the iron on its stand, ensure that the surface on which the stand is
placed is stable.
• Before leaving the iron unattended, even for a short time, turn off the appliance,
always unplug it and place it on support base (I).
• Pressing the steam button before the boiler has reached the optimum temperature
or the iron has heated up may cause water to leak from the steam holes.
•
it has been dropped, if there are
visible sign of damage or if it is
leaking. Do not use the appliance
if the power cord or the plug are
damaged, or if the appliance is
faulty
all repairs, including the replace-
ment of the power cord, must
be carried out by an
Service Centre or
qualifi ed
• Do not expose the appliance to atmospheric agents (rain, sun…).
War
• Never try to iron garments being worn.
• Use tap water to refi ll the boiler during use. Add the water to the boiler very slowly
In this way you will avoid splatters of hot water or steam from the boiler
face away from the hole.
• Do not touch the metal parts of the iron when in operation and for several minutes
after it is turned off since it could cause burns.
• Do not aim the jet of steam towards parts of the body or pets.
•
during use.
•
the cap (B) proceed as follows:
pressing button (L);
allow any remaining steam to es-
cape;
button (M) and remove the plug
from the wall socket;
4) slowly unscrew the cap (B) and
before completely unscrewing it,
wait until the sound of escaping
steam has stopped.
War
• We suggest you keep the original box and packaging, as our free-of-charge
service does not cover any damage resulting from inadequate packaging of the
product when this is sent back to an
• Remove any labels and protections from the soleplate before using the appliance
for the fi rst time.
• Always unwind the power cord before use.
• The use of extensions not approved by the manufacturer can result in damage to
property and personal injury
• Do not use sparkling (carbonated) water.
• When the iron is hot, do not rest it onto the connecting cable or the power cord.
T
with the soleplate when it is hot.
• Do not pull the power cord to unplug the appliance.
• The appliance must only be cleaned with a soft, slightly damped, cloth after un-
plugging the iron and allowing all its parts to cool down. Never use solvents which
may damage the plastic parts.
• Clean the boiler at least every two months so as to eliminate any residue of lime
that could jeopardize proper operation of the appliance.
• Do not pour vinegar, descalers or other scented substances into the boiler; other-
wise, the warranty may be revoked.
• Do not wrap the power cord around the soleplate when the iron is hot.
• Do not put the soleplate in contact with metal surfaces.
• Before storing the appliance, turn it off by pressing (L) and (M) buttons, always
unplug it from the mains, and allow it to cool down before emptying the boiler
completely
• W
covered in this booklet.
• For proper disposal of the product pursuant to the European Directive
2009/96/EC please read the relevant leafl et enclosed with the product
SA
Note: when using the iron for the fi rst time, test it on an old piece of fabric to ensure
that the sole plate and water tank are completely clean.
DESCRIPTION OF THE APPLIANCE
A
B -
C - Iron temperature control indicator light
D -
E -
F -
G - Iron/boiler connection cable
H -
I -
J -
K -
L - Boiler on-off switch
M -
N - Steam ready light
INSTRUCTIONS FOR USE
Filling the boiler before use
Warning!
Do not unscrew the cap of the boiler without ensuring that the appliance is
disconnected from the power supply (Fig. 2) and that there is no pressure
inside.
Rotate the boiler cap (B) anti-clockwise. Pour natural mineral water into the boiler
until completely fi lled (Fig. 3). Use the funnell (J). Screw the cap again (B).
The product functions with normal tap water
If the tap water is particularly hard (higher than 20°F), use a mixture of 50% tap water
and 50% demineralized water
Never use pure demineralized water
Switching on the appliance
Connect the appliance to the power supply
identifi cation plate corresponds to your local power supply
When fi rst used, the iron may give out a little smoke. This transitory effect is perfectly
normal and will disappear very soon.
Keep the iron on its grille rest. Press the boiler starting switch (L) and turn the steam
adjustment knob (K) to the value you want. Wait the light (N) is on before using the
steam. Then press the switch (M) to switch on the iron. Now select the required
temperature using the thermostat knob (F).
Before applying a jet of steam to the article to be ironed, release two or three good
jets of steam towards the fl oor to stabilise the steam fl ow (Fig. 5).
Warning!
Do not release steam when the iron is standing on its grille rest (I).
Steam adjustment
The appliance is equipped with a regulator (K) which allows the steam output to be
adjusted from a minimum to a maximum according to ironing requirements.
Shot of
Turn the steam adjustment knob (K) to MAX. Set the ironing temperature by turning
the adjustment knob (F) past the symbol (
•••
). Wait for the indicator lamp (C) of
the iron to turn off. W
the steam button (D) 3 to 5 seconds, a concentrated jet of steam will be delivered
when the button is released. If the steam supply button (D) is operated continuously
for more than 30 seconds, drops of water may come from the steam holes in the
plate of the iron. It is recommended that the button (D) is used for shorter periods.
Continuous steam
Turn the steam adjustment knob (K) to MAX. Set the ironing temperature by turning
the adjustment knob (F) past the symbol (
•••
). Wait for the indicator lamp (C) of the
iron to turn off. W
(D) and move the cursor (E) toward the handle (Fig. 6). The cursor (E) will lock the
button, making the jet of steam exit continuously and steadily
(D) and stop the continuous jet, press the cursor (E) forward (Fig. 7).
T
First check whether the fabric has a label containing ironing instructions and com-
pare the symbol with the instructions which follow
tions, but you know the type of material, follow the instructions below
Note that the table refers to fabrics not treated with sizing agents or similar products;
if they have been, you can also iron at a lower temperature.
Filling the boiler during use
T
Press the steam button (D) on the iron and allow all the steam to escape. The iron
must not be on its stand during this operation.
Switch off the iron by pressing the button (M).
Disconnect the power supply cable from the power point (Fig. 2). Let the appliance
to cool down for a few minutes. Rotate the boiler cap (B) anti-clockwise very carefully
and wait for the residual steam to stop hissing before emptying it completely (Fig. 8).
T
Replace the cap (B) and screw it right down in a clockwise direction, ensuring that
it is completely tight.
Warning!
Never unscrew the cap of the boiler while the appliance is connected to the
mains or when there is still pressure inside.
Never unscrew the cap of the boiler while you are ironing.
If the iron has not been used for a long time (many weeks), it is advisable to keep it
in a horizontal position and press the steam button (D) about for 30 seconds in order
to clean the inner dispensing lines of the iron.
Do not carry out this operation when the iron is on its stand (I).
For a short ironing session, it is not necessary to fi
less water in the boiler will reduce the waiting time, and consequently electric energy
consumption.
VERTICAL IRONING
Y
ironing procedure serves to remove creases from curtains, fabrics, etc.
Set the ironing temperature by turning the adjustment knob (F) past the symbol
(
•••
). Put the curtain or fabric in the position you want to iron it vertically and press
the steam button.
Warning!
Do not iron fabrics held by other people.
DR
Then, to iron dry - i.e. without steam - all you have to do is turn the iron on by press-
ing the switch (M) after connecting it to the supply mains. Put the steam adjustment
knob on minimum and turn the thermostat knob (F) to the desired temperature. Do
not press the steam button.
SUGGESTIONS
Divide the articles to be ironed according to the types of material: wool with wool,
cotton with cotton, etc.
Because the iron heats up much more quickly than it cools down, it is advisable
to start with those fabrics which require lower temperatures and move on to those
which require progressively higher temperatures.
If the material is made up of more than one type of fi bre, always set the temperature
to the fi bre which requires less heat. For example, if the material is made up of 70%
synthetics and 30% cotton, set the temperature control to position (
•
) (see table)
without steam, that is, the temperature for synthetic fabrics.
If you do not know the composition of the article to be ironed, choose a part of the
article which will not be seen. Do a test ironing on this part to establish the appropri-
ate temperature (always start with a relatively low temperature and work up until the
ideal temperature is reached).
Pure (100%) wool articles can be ironed with the iron set to one of the steam posi-
tions. T
sense to iron them on the reverse side. For other materials, especially velvet, which
can become shiny very easily
using light pressure. The iron must be kept constantly moving over the fabric.
Label Ironing
instructions
Kind of fabric Thermostat
Synthetic fabrics:
Acetate
Acrylic
Viscose
Poliammide (Nylon)
Viscose (Rayon)
Silk
•
Wool
••
Cotton
Linen
•••
The mark on the label means do not iron
AFTER IRONING
Turn of
plugged in and it is possible to eliminate the pressure remaining in the boiler by
pressing the steam button (D). T
Remove the power cable from the socket-outlet. Wait few minutes to make the appli-
ance cool down. V
ing it completely wait until any sound of escaping steam has stopped (Fig. 8). Let the
iron cool down on its stand, taking care not to touch the power cables and connection
with the hot parts of the appliance.
prevent water from stagnating in the boiler
Put the appliance back on top of a stable surface and out of the reach of children.
CLEANING THE APPLIANCE
Before cleaning, always disconnect the plug from the power point (Fig. 2) and allow
the iron to cool down on its stand grille (I).
Warning!
Do not use abrasives for cleaning the soleplate. T
smooth: avoid contact with metal objects.
Warning!
Never immerse the appliance in water or other liquids.
Warning!
Check the state of the power cable of your iron on a regular basis before us-
ing it, and if it is damaged, take it to the service centre closest to you to have
it replaced only by specialised personnel.
T
- disconnect the plug from the socket-outlet;
- fi ll the boiler with normal tap water and screw the cap (B) back on;
- shake the boiler so as to remove any lime residue that may have formed inside;
- unscrew the cap and empty the boiler;
- repeat the operation again until the water comes out clear and clean, then store
the appliance with the boiler completely empty
Clean plastic parts with a damp, non-abrasive cloth and dry them with a dry cloth.
Warning!
Clean the boiler at least every two months so as to eliminate any residue of
lime that could jeopardize proper operation of the appliance.
THE WARRANTY
TO LIME.
EN