1 INTRODUCTION
1
The
monitor that allows you to remotely
listen to sounds from the baby room.
Attention:
• Only use the baby monitor as an
aid and never as a replacement
for an adult and human (baby)
sitter
• The baby monitor has a range of
up to 300 meters in an open field
and up to 50 meters indoors; this
range depends on local condi-
tions (concrete walls, other baby
monitors or wireless phones,
etc.).
• Before each use, check whether
the baby monitor is working prop-
erly
and connection check, during
ease use it’s recommended to
regularly listen and check wheth-
er the connection with the baby
monitor is still in order
• The DBX-84 may not be used
for anything else other than for
detecting sounds within your own
private environment; any persons
present or that could be present
in the space you’re listening to
must be informed of the installed
baby monitor
• When the DBX-84 is not in use,
always switch it off by pressing
the power push-button.
USER’S MANUAL
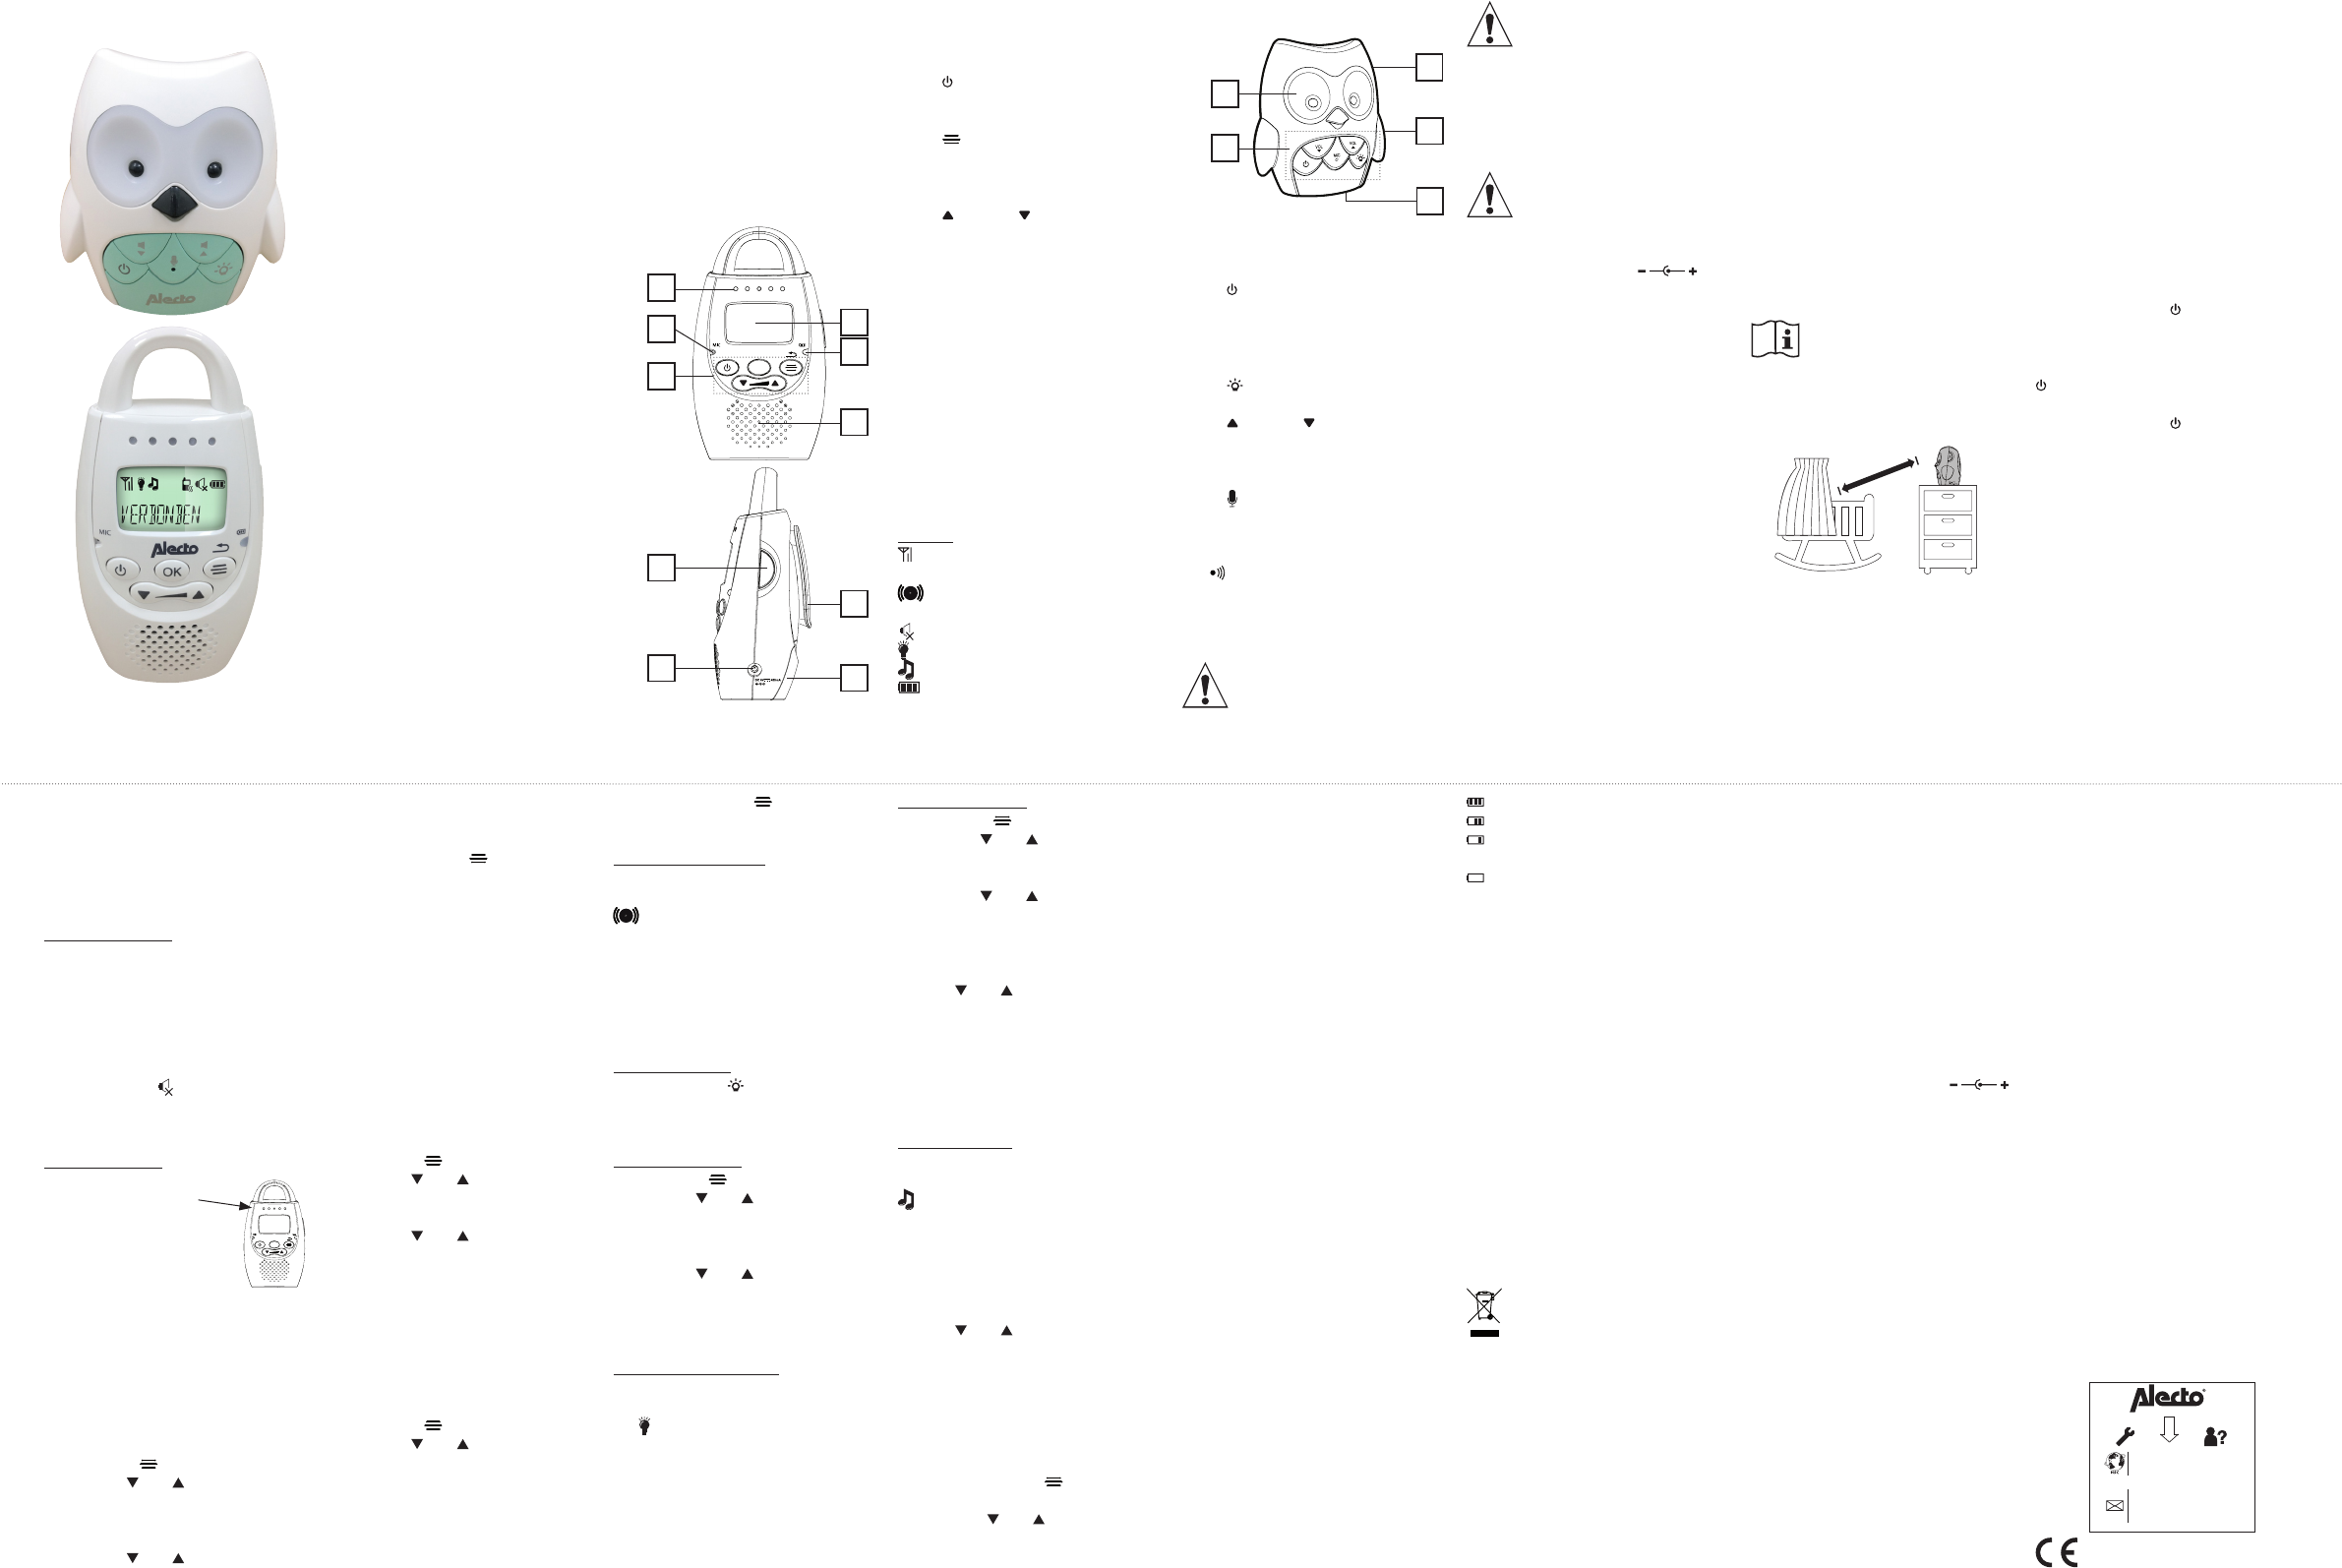
2.2 BABY UNIT OVER
1. Built-in night light. Attention: the
2 black eyes are no lights and
therefore provide no light!
2. - button: press and hold for
5 seconds to switch the bay
unit on or o,
indicator is located behind this
button
- button: to switch the night
light on or o
- button & button: to
increase/decrease the volume
of the lullabies and talk-back
function
- : not a button, but the loca-
tion of the built-in microphone
3. power adaptor input
4. temperature sensor (rear)
5. button: to send an alert tone to
the parent unit
3 INST
A
THE SUPPLIED BA
P
DIFFERENT MODELS CAN CAUSE
DAMAGE OR EVEN EXPLOSION.
• Do not expose the baby-unit or
parent-unit to direct sunlight or
humid areas. This baby intercom
is not water-proof, penetrating
moisture can cause damage to
the electronics.
4 USE
Don’t forget that this baby intercom
is merely an extra piece of mind. The
device can never replace the physical
and monitoring presence of a parent
or babysitter
4.1
Press and hold the button for at
least 5 seconds to switch on the unit
concerned.
On the baby unit the light behind the
button illuminates and on the par -
ent unit the display switches on.
Press and hold the button for
5 seconds again to switch the unit off.
4.2
As soon as you switch on the par-
ent-unit, it will start searching for the
baby-unit.
1. while searching for the baby unit,
the antenna icon flashes in the
display of the baby unit.
2. as soon as the parent unit has
located the baby unit, the anten-
na icon in the display remains lit
and the temperature measured
by the baby unit appears in the
display of the parent unit.
3. If the parent-unit still hasn’t locat-
ed the baby-unit after 10 seconds
this indicator stays lit as long as
the adapter is connected; this
indicator does not turn off when
the batteries are full).
The display shows the charging prog-
ress of the batteries.
3.2 BABY
The baby-unit is powered by the sup-
plied power adaptor
1. Connect the power adaptor with
the 6 VDC connection of the par-
ent unit and plug the power adap-
tor in a 230 V
as soon as the adaptor is
connected to the baby unit
and plugged into a wall socket, the
baby unit switches on automatically
3.3 PLACEMENT TIPS:
>
1,5 / 2m
• Do NOT place the baby unit in
the bed with the baby-
tain a minimal distance of 1.5 to
2 meter between the baby and
the baby unit.
• MAKE SURE THE BABY
CANNOT T
ADAPTOR CABLE.
ONL
BA
FOLLOWING
SPECIFICA
TYPE: NIMH
SP
CAP
SIZE:
ONL
SUPPLIED ADAPTORS
WITH THE FOLLOWING
SPECIFICA
INPUT
OUTPUT
3.1 P
The parent unit is powered by the
included rechargeable batteries.
These batteries are charged through
the included power adaptor
1. slide down the battery cover at
the rear of the parent unit and
remove it from the parent unit
2. install the supplied battery pack
in the parent unit and connect the
small plug with the parent unit.
Attention: the plug fits in one way
only
3. Slide the battery cover back onto
the parent unit.
4. Connect the power adaptor with
the 6 VDC connection of the
parent unit and plug in the power
adaptor in a 230 V-
et.
5. The battery indicator on the
parent unit illuminates, and the
batteries are charged (attention,
1. sound indicators, ashing when
the baby unit is picking up sound
2. built-in microphone (for the talk-
back function)
3. - button: press and hold for
5 seconds to switch the parent
unit on or o
- button: to open the menu
-
button: to open the selected
option or to switch functions on
or o
- button & button: to in-
crease/decrease the volume +
buttons for scrolling the menu
options
4. built-in speaker
5. battery indicator:
- remains lit when the battery is
being charged
- starts ashing when the battery
is nearly exhausted
6. display
7. T
towards the baby unit
8. power adaptor input
9. battery compartment
10. belt clip, to carry the unit with you
Display:
connection indicator (ashes
when there’s no connection)
illuminates when the sound alert
is set; ashes upon
speaker volume set to 0
night light enabled
lullabies enabled
battery indicator
• Y
license for using this wireless
baby monitor
freely used in domestic situations.
However
interference-free signal transmis-
sion cannot be guaranteed.
2 OVERVIEWS
2.1 P
(because it’s still turned of
of range), a short warning tone
will be emitted every 10 seconds
while the text [ NOT LINKED ]
appears in the display
4
Reception volume:
The set level is indicated by illuminat-
ing indicator lights, as well as on the
display (5 levels + sound off).
• Upon reaching the maximum or
minimum volume, an extra beep
tone will sound when you press
the + or - button.
• The symbol appears on the
display when the volume is set to
0 (no sound)
Sound indicators:
The lights on the parent unit
illuminate when the
baby unit is transmitting
sounds. The louder the
sound picked up by the baby
unit, the more lights illumi-
nate on the parent unit.
4
The various notications on
display can be displayed in various
languages. Upon leaving the factory
the default language is set to Dutch.
Y
follows:
1. press the button
2. use the and buttons to
search for the option [ LAN-
GUAGE ]
3. press the OK button
4. use the and button to select
the desired language
5. press the OK button to save your
selection
6. briey press the button to
leave the settings
4.5 SOUND-CONTROLLED-
TION:
Y
the baby unit must start transmitting.
- level 1: the baby must cry loudly be-
fore the baby unit starts transmitting
...
- level 4: the baby unit already starts
transmitting when soft sounds are
detected
- level 5: the baby unit is switched
on continuously (all sounds are
transmitted)
1. press the button
2. use the and button to search
for the option [ SENSITIVITY ]
3. press the OK button
4. use the and buttons to select
the desired activation level
5. press the OK button to save your
selection
4
If you’ve switched off the sound on
the parent unit, you may have it emit
an alert tone when the baby unit is
picking up loud sounds.
1. press the button
2. use the and buttons to
search for the option [ SOUND
ALERT
3. press 2x the OK button to enable
this function if it
or to disable the function if it was
switched on
4. briey press the button to
leave the settings
Sound alert indication:
The display indicates that the sound
alert is enabled by illuminating the
symbol.
4
The night light on the baby unit may
be switched on and off both via the
baby unit itself and remotely via the
parent unit.
On the baby unit:
Briefly press the button on the
baby unit to switch the night lighting
on or off.
Via the parent unit:
1. press the button
2. use the and buttons to
search for the option [ NIGHT-
LIGHT ]
3. press the OK button
4. use the and buttons to select
ON? or OFF?
5. press the OK button to save your
selection
Light enabled indication:
The display indicates that the night
light alert is enabled by illuminating
the symbol.
4
There are 5 lullabies programmed in
the baby unit. Y
follows:
Via the parent unit:
1. press the button
2. use the and buttons to
search for the option [ LULLABY ]
3. press the OK button
4. use the and buttons to select
the desired lullaby
5. press 2x the OK button to start
playback
Use the and buttons on the baby
unit to adjust the playback volume of
the lullabies
Playback is ended after 15 minutes of
you may repeat the instructions 1-5 to
stop playback before that.
Music indication:
The display indicates that the lullabies
are being played by illuminating the
symbol.
4.9 T
Press the T button on the parent
unit to talk back to the baby unit and
release this button to listen again.
Use the and buttons on the baby
unit to adjust the volume of the talk-
back function.
4.10 RESET SETTINGS:
If you have lost the overview concern-
ing the settings, then you can restore
the factory settings in a simple way
1. Press on the key .
2. Search the option [RESET] with
the keys and .
3. Press twice on the key OK
Factory settings:
V level 3
Sound-operated
activation: level 5
Display language: Dutch.
Sound alert: o
Sound alarm: o.
5 GENERAL (SAFETY)
INSTRUCTIONS AND
5.1
INTERCOMS:
The technology of the DBX-84 allows
for the simultaneous and strings-free
use of multiple complete baby inter-
com sets (baby-unit and parent-unit)
next to each other-
tiple baby rooms at the same time;
each parent/baby-unit combination is
provided with its own unique code,
making it impossible to receive DBX-
84 signals from other baby intercoms
or for other baby intercoms to receive
the sound from your baby
It is not possible to expand your
DBX-84 with individual baby-units or
parent-units.
5
With fully charged NiMH batteries
with a capacity of 750mAh, you can
use the parent unit more than 24
hours without the power adaptor
time depends on the use (the setting
of the volume level, the condition of
the rechargeable batteries, etc.).
Y
the display of the parent unit:
: The battery is full.
: The battery is still full for 2/3.
: The battery is full for 1/3,
charging is advised.
: The battery is low; the parent
unit will switch of soon; connect the
adapter immediately to charge the
batteries.
As soon as the battery low indicator
illuminates, also a alert beep sounds
every 60 seconds, and [LOW BA
will flash on the display
Connect the power adaptor to
recharge the battery-
imately 24 hours to fully recharge an
exhausted battery
5.3 MAINTENANCE:
Only clean the baby monitor with a
moist cloth; never use chemical clean-
ers. Before any cleaning, you must
disconnect the adapters.
Before cleaning, any connected power
adaptors must be disconnected.
5.4 ENVIRONMENT
The packaging of this baby
video monitor can be discarded
as waste paper
the product’s life span, it must not be
disposed of as normal domestic
waste. Y-
tion point for the recycling of electric
and electronic equipment.
Y-
tive batteries to your local depot for
small chemical waste or to dedicated
battery collection points. Never dis-
card batteries as normal domestic
waste.
6 DECLARA
CONFORMITY
Hereby
equipment type
compliance with directive 2014/53/
EU. The full text of the EU declaration
of conformity is available at the fol-
lowing internet address: http://DOC.
hesdo.com/DBX-84-DOC.pdf
7 TECHNICAL SPECIFICA
Frequency: 1880-1900 MHz.
Parent unit & baby unit power supply:
power adaptor 6V / 450mA
(incl.), model: T
S004L
Parent unit battery pack: NiMH, 2.4V
750mAh, rechargeable, size 2x
(incl.).
T
Recommended ambient temperature:
10°C to 40°C
Storage temperature: 0°C to 60°C
8 W
For the
warranty of 24 months from the date
of purchase. During this period, we
guarantee the free repair of defects
caused by material and workmanship
errors.
assessment of the importer
If you notice any defect, first refer
to the user
provides no definite answer
contact the supplier of this baby video
monitor or contact customer service
of Alecto.
THE W
AND VOID:
In case of improper use, incorrect
connections, leaking and/or incorrect-
ly installed batteries, use of unoriginal
parts or accessories, negligence
and in case of defects caused by
moisture, fire, flooding, lightning and
natural disasters. In case of unau-
thorised modifications and/or repairs
performed by third parties. In case of
incorrect transportation of the device
without adequate packaging and
when the device is not accompanied
by this warranty card and proof of
purchase. The warranty does not
cover connecting cables, plugs and
batteries.
All further liability-
ing any consequential damages, is
excluded.
DBX-84
OK
450
7
1
4
2
3
6
5
10
9
8
T
1
2
5
4
3
OK
v1.1
Service Help
WWW.ALECT
SERVICE@ALECTO.NL
Hesdo, Australiëlaan 1
5232 BB, ‘s-Hertogenbosch
The Netherlands
WWW.ALECT
SERVICE@ALECTO.NL
Hesdo, Australiëlaan 1, 5232 BB,
‘s-Hertogenbosch,
The Netherlands