A
B
C
D
E
F
G
H
I
J
K
L
M
N
O
Cordless DECT/GAP telephone
DE190x
Operating Instructions
Unpacking your phone
In the box you wil fi
- the cordl handset (two handset with a T system, three wit a
T system and four with a Quad system
- the base unit
- two rechargeabl batt cells for each handset.
- a batter compar cover for each handset.
- a telephone line cable for the base unit
- a mains power lead and adapter for the base unit
- charger pods, each with an att mains power lead and adapter
for mult system.
** Keep your sales receipt as it is your guarant
Chargi batter for the fi tim
Befor you st to use your telephone make sure that all batter are
ful charged for 16 hours.
Impor note:
This tel is not designed for Emergency c alls when the mains
power fails.
For Emergency calls you should have a basic phone that operates
wit mains power connected to your line so that you can make calls
duri a power fai
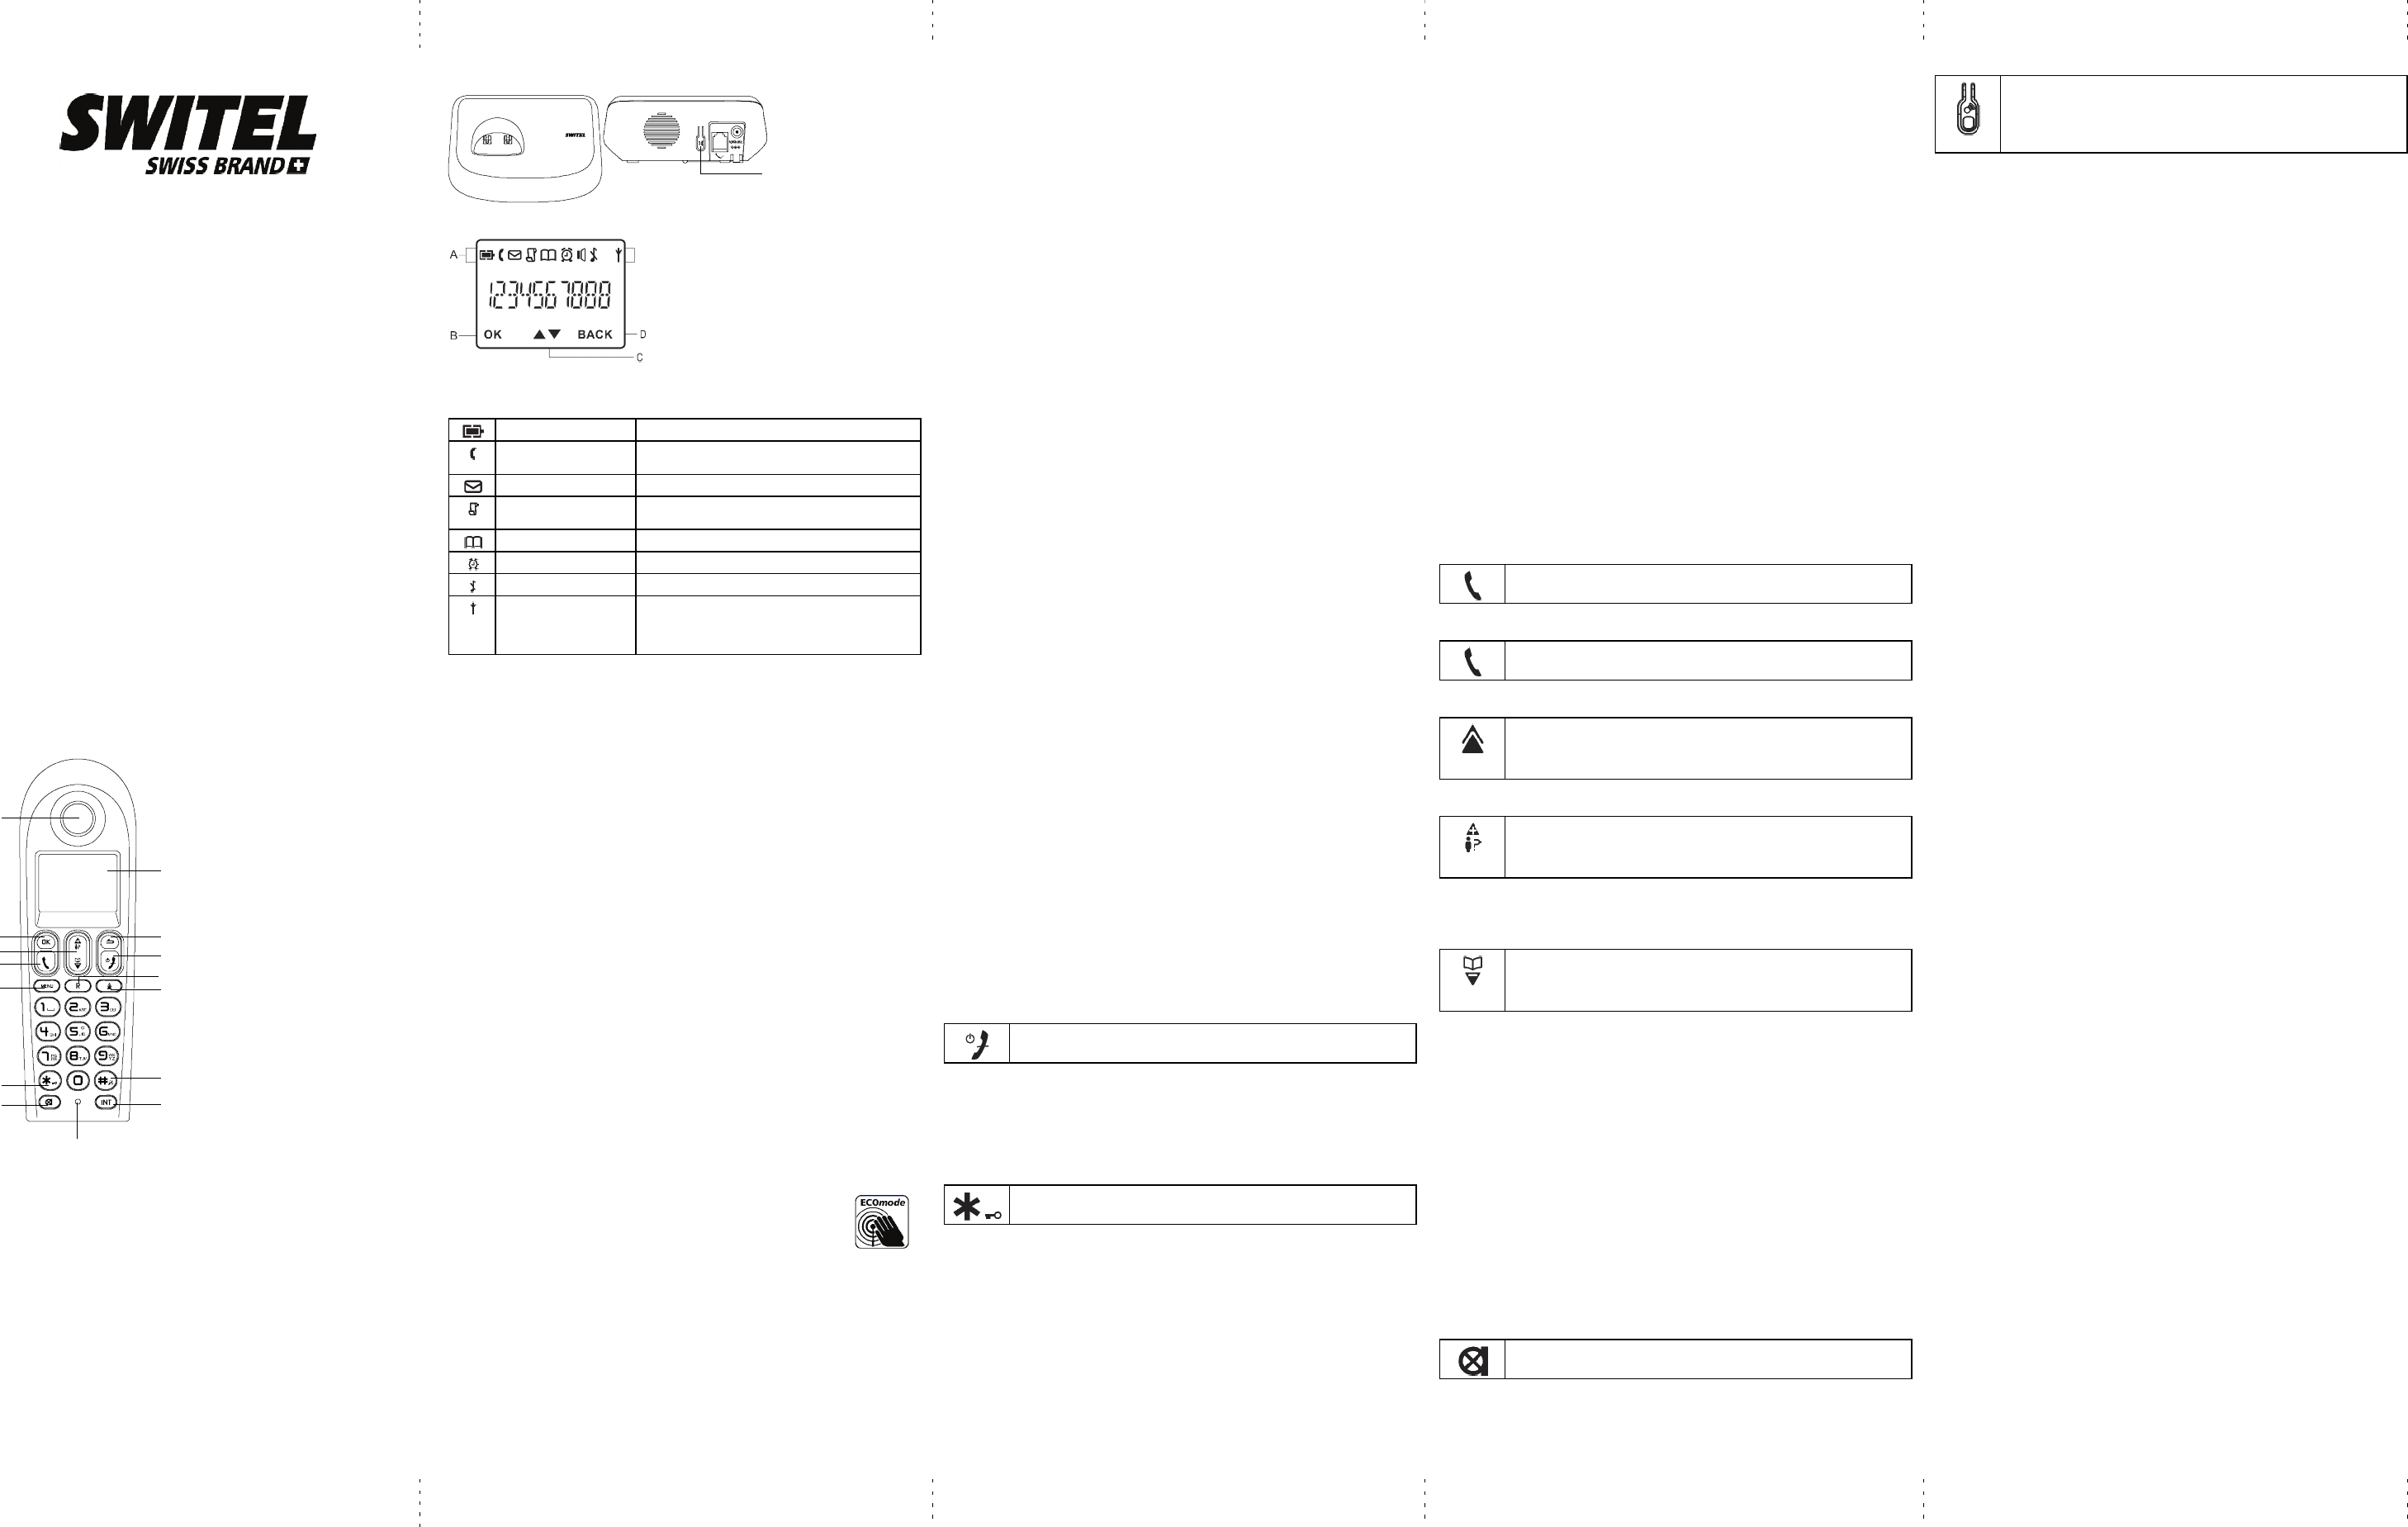
Phone Function Key
E Menu Butto n
- Access to ma men
F [*] Button
- Long press to act or deactiv the k lock
G Mute Butt
- Mut the mic
HD
I Back Bu
- Cancel a menu ent
- Back t digit or charact
- Pres and hold to t between handset name
and date / in idle mode
J End Button
-E
- Pres and hold to t the handset on/of
- Exit the m
KRB
- Flas the phone line
L Redial Button
- Ent redial list and dial the recent number
A Earpeace M [#] Bu
- Ins a pause
- Long press to t the ringer on /
BO
- Select a menus ent
N INT Butto
- Mak t inter call
- Make t confer call
C Nav Button
- Up to inc volume and v CI
- Down to dec volume and ac phonebook
O Micr
D Talk Button
- Mak a c
- Acc a call
Base statio
HANDSE LOCA Button
Press to page hands
Press and hold to star
registr proc
What on the display?
A Display Icons
B Display when in menu mode t confir your selec
tion.
C Indicat t more opt are available.
Use the UP / DO k to s up/down.
D Displays when in menu mode.
Sel BACK to re to the pr men leve
Select BACK to delet t last digit char
entered.
What the icons mean?
Battery Char Lev Indicates batter is fully c
Call Indicates that an exter c is connec or held.
Ic blink w r a inc c
Mess Indicates y hav a new V Mail mess
Calle dis Indicates y hav new miss calls, or the call log
is being v
Phonebook Displays when the phonebook is acc
Alarm Displays when the alarm c is act
Ringer Off Displays when ringer volume is turned off.
Signal Level Indicates that the handset is r and within
range of the bas s
Icon blinks when the handset is out of range or is
sear for a bas
Read F Bef Use
The base unit and charger pod(s) should be placed on a level surf
in a positi where:
- the mains adapter plug wil reach an easily accessible 100 V
AC
swit mains supply socket - never try to lengthen the mains power
cable.
- the base unit’ telephone line cable wil reach your tel li
socket or extension socket (t charger pod does not have a tel
li connection)
- it is not close to another telephone - this can cause radio inter
- it is not close to a sink, bath or shower or anywhere else where it
might get wet.
- it is not close to other electr equipment - fri washing
machines, micr ovens, fl light televi etc.
- it is away fr hot, humid condit and str sunli
Radio signal between handset and base unit
T use your handset and base unit toget y ou must be able to
maint a radio li between them. Be aware that any lar met
ob lik a refrig a mirro filin ca etc b th
handset and the base unit may block the radio signal Other solid
str like wall may reduce the signal strengt
Int
If the sound quality gets worse as you move around while on a call, thi
is probabl caused by int between the handset and the base
unit perhap because y ou are too near to another phone or other
elect equipment Move to a dif position to clear the
int If you do not move, it might cause a short break or your
call may be cut of
ECO Mode
Both in Call mode as well as in S mode, the radiat
is reduced consider as compar to standar cordless
DECT telephones.
Mains power connection
IMPO - The base unit and charger pod must be used wit the
mains adapters supplied with the unit Using any other adapter will
resul in non - with EN60950, and will invali any approval
given to this appar
Y phone’s base st is suppli wit an energy- switchi
power supply IA5060G or S003IV0600050 (Input 100~240 V
AC
, Output
6V
DC
, 500 mA). The adaptor input power without load is approx. 0.3 W
The average ef is approx. 69.12 %.
The electr consumpti of the base is:
- in operat mode (idl approx. 0.8 W / 1.1 W
- duri charging of the handset: approx. 1.4 W
The charger( deli wit a telephone set is/ar supplied wit an
energy- swit power supply (I 100~240 V
AC
, Output
6V
DC
, 150 mA). The adaptor input power without load is approx. 0.3 W
The average ef is approx. 69.12 %.
The electr consumpti of the charger is:
- wit handset charging: approx. 0.3 W
- duri charging of the handset: approx. 0.9 W
Batt safet - CAUTION
ONL use the rechargeabl batt suppli with the handset. DO
NOT use non-r batt - they may explode and cause
damage to your telephone.
Inst and Set-
Fit the rechar batt in each handset
1) Inst the AAA batt (Brand name: HFR, Capacit Ni-
1.2V/ or Brand name: SANIK, Capacit Ni -MH 1.2V/400mAh)
int handset in accordance with the polari marked in the batter
comp
2) Close the batter compar cover sli it into place and
pressi fir to make sure it is secure.
Connecti AC (el power
1. Plug the base power adaptor (T IA5060G or S003IV0600050,
100-240 V
AC
/6V
DC
/ 500 mA) cord int the power jack on rear panel of
the base and the other end into a 100 V
AC
50-60 Hz elect
outl
2. Connect telephone line cord into the phone jack on rear panel of the
base and the other end into a mai s ocket, Plug the c harger power
adaptor int a 100 -240 V
AC
50-60 Hz elect outl
Befor you use the cordless handset for the fi time, it impor to
charge the batter ful
Leave the handset on the charging cradl for 16 hours.
The batter charge symbol will bli when you’re charging an empty
ba
If you think that the symbol isn’t showing the corr batt charge
level fi check that the handset is corr positioned in the charging
cradl
If you’r sure that it is, remove and ref the batt Please note that
it normal for the mains adapter to become warm this doesn’t indicat a
faul
CAUTION:
Use only the power supply that came with thi unit. Using other power
suppli may damage the unit.
Base adaptor type is IA5060G or S003IV0600050, 100 V
AC
/
6V
DC
/ 500 mA.
Y T Oper
Swit on/of
Press and hold the HANG button for more than 2
seconds to switch on/of the handset in idl mode.
** Y can swit the handset of and save batter charge.
Notes: When the handset is OFF it cannot be used for making calls
incl emergency c alls. There wil be no ri during an incomi
call T answer a call you will need to switch it back on. It may t
some tim for the handset to re -est a radi link wit the base unit
T lock/unl the keypad
Press and hold the ST key for 1 second to lock/unl
the k eypad in idl mode.
Note: Incomi calls can sti be answered even if the keypad was
locked.
Set time and date
Note: If you subscri to the Caller Display servi the ti and date
wil be set automati when you receive a c all, but you may sti need
to set the correct year
1. Press MENU key to enter menu selecti
2. Press the Navigat key to select CLOCK&ALARM and then press
OK key to select.
3. Press OK key to select DA The last stored date is
displ Enter the current date (YY- press OK, then enter the
time (HH-MM)
4. Press the Navigat key to select AM or PM (if the time is in 12
HOURS form and then press OK key to confi A confir beep
is played.
Change your handset’s name
1. Press MENU key to enter menu selecti
2. Press the Navigat key to select PERSONAL SET and then press
OK key to select.
3. Press the Navigat key to select HANDSET NAME and then press
OK key to select. The curr handset name is displ
4. Press BACK key to delet the character one by one.
Enter the new name (m 10 charact and press OK key to
confi A confir beep is played.
Change the display language
1. Press MENU key to enter menu selecti
2. Press the Navigat key to select PERSONAL SET and then press
OK key to select.
3. Press the Navigat key to select LANGUAGE and then press OK
key to select.
4. Press the Navigation key to your desir language and press OK key
to confir A confir beep is played.
** Once the display language is set, the opti menus on the handset
wil swit to display in the selected language immedi
Make and answer calls
Make a call
Pre
Dial the number (maxi 24 digit and then press T
key
Dire dia
Press T key to take the line and then dial the number
(maxi 24 digit
Ca fro re lis
Press Redial key in idle mode.
Press the Navigat key to an entr in the redial list and
then press T key
Ca fro th ca lo
Press CALL LOG (UP) key in idle mode.
Press the Navigat key to an entr in the call list and then
press T key
Note: Y need to subscribe to Caller Line Identi service to be
able to see the caller number or name in the call log.
Call fr the phonebook
Press PHONEBOOK (DOWN) key in idle mode.
Press the Navigat key to an entr in the phonebook and
then press T key
Answer and end a call
1. When the phone ri press T key
2. T end a conversati press HANG - key
W When the handset rings during an incoming call, please do not
hold the handset too close to your ear as the volume of the ringi tone
may damage your hearing.
Impor note:
Y can simply place the handset back on it base st or charger
pod to end the call
Make sure that you have not deactivat the auto hang -up featur
Adjust the earpi volume
Duri a call press the Navigati key to select fr VOLUME 1 to
VOLUME 3.
Mute/ micr
When the micr is muted, the handset displays MUTE ON, and
your caller cannot hear you.
Duri a call press the MUTE key to turn on/of the micr
phone.
Paging
The paging featur enables you to locat a missi handset if the
handset is in range and cont charged batter
Press HANDSET LOCA key located at the back of the
base stat All the regist handsets st to ri
Once retr press any key on the handset or the HAND -
SET LOCA key again to end the pagi
Ca wa
If you have subscri to Call W servi the earpi will emit a
beep tone to infor you that ther is a second incoming call. The
number or name of the second call wil also be displayed on your
phone if you have subscri to Call Line Ident service (CLI)
Please cont y our network provider for more infor on this
servi
Using your phonebook
Y phone can store up to 50 phonebook memories. Each phonebook
entr can have a maximum of 24 digi for the phone number and 12
charact for name.
How to enter character
When you select a fiel in which you can enter text, you can enter the
let that are print on the keys by pressi the relevant key once or
several ti
For example, press 2 once to insert the let A, press 2 twi to insert
the lett B, and so on.. S and other symbols can be enter
u
S a cont in the phonebook
1. Press MENU key to enter menu selecti
2. Press the Navigat key to select PHONEBOOK and then press OK
key to select.
3. Press OK key again to enter NEW ENTRY
4. Enter the name of the cont (maxi 12 character T edit
press BACK key to delet the last charact enter Press OK key to
confi the name entr
5. Enter the number of the contact (maxi 24 digit and then press
OK key to confir A confir beep is played.
** Y cannot store a new phonebook entr when the memory is full In
thi case, you have to delete existi entri to make space for new
entr
** When stor the number enter the ful number including the STD
(ar code if you subscri to caller display other it will not display
the name when there is an incomi call.
Access phonebook
1. Press PHONEBOOK (DOW key in idle mode to browse the
phonebook entri Alt you can press the MENU key to
displ PHONEBOOK and then press OK key to select
2. Press the Navigati key to select LIST and then press OK key to
confi The phonebook entr will be listed in alphabetical order and
you can press Navigat k ey to scroll through the stored entr
3. Press OK key to view the detai of the selected entr
** Inst of pressing the Navigati key to browse the phonebook
entr you can press the numeri key corr to the fir let
of the entry you wish to locate. For example, pressi 2 wil show the
entr st wit A. Pressing 2 again wil show the entri star
wit B, and so on...
Modif a phonebook entr
1. Press MENU key to enter menu selecti
2. Press the Navigat key to select PHONEBOOK and then press OK
key to select.
3. Press the Navigat key to select EDIT ENTRY and then press OK
key to select.
4. Press the Navigation key to select an entr to edit and then press OK
key The curr name is displayed. Edit the name and then press OK
key to confir
5. Edit the number and then press OK key to confir A confi
beep is played.
Delet a phonebook entry
1. Press MENU key to enter menu selecti
2. Press the Navigat key to select PHONEBOOK and then press OK
key to select.
3. Press the Navigati key to select DELETE and then press OK key
to select.
4. Press the Navigation key to select an entr to delete and then press
OK k ey
5. Press OK key again to c onfir A confi beep is played.
Delet all entr fr the phonebook li
1. Press MENU key to enter menu selecti
2. Press the Navigat key to select PHONEBOOK and then press OK
key to select.
3. Press the Navigat key to select DELETE ALL and then press OK
key to select.
4. Press OK key again to c onfir A confi beep is played.
Dir access memory
There are 2 dir access memori (Keys 1 & 2) in additi to the
phonebook memory A long press on the keys in idle mode will
automat dial the stor phone number
Add/edi dir access memory
1. Press MENU key to enter menu selecti
2. Press the Navigat key to select PHONEBOOK and then press OK
key to select.
3. Press the Navigat key to select DIRECT MEM. and then press OK
key to select.
4. Press the Navigat key to select KEY 1 or KEY 2 and then press
OK key The stored name is displayed, or NO NUMBER if it is empty If
ther is no number stored for the select key or if you want to change
the name or number current stor press MENU key to enter dir
memor menu to add/edi the name or number
5. Press the Navigat key to select EDIT NUMBER and then press
OK key to select. The displ shows the curr stor name, or
ENTER NAME if ther is n o number stored. Edit or enter the name you
want and then press OK key The displ shows the curr stored
number or ENTER NUMBER if there is no number stor Edit or enter
the number you want and then press OK key to confi A confir
beep is played.
Delet direct access memory
1. Press MENU key to enter menu selecti
2. Press the Navigat key to select PHONEBOOK and then press OK
key to select.
3. Press the Navigat key to select DIRECT MEM. and then press OK
key to select.
4. Press the Navigat key to select KEY 1 or KEY 2 and then press
OK key The stored name is displayed (or NO NUMBER if it is alr
empty)
5. Press MENU key to enter dir memory menu.
6. Press the Navigati key to select DELETE and then press OK key
to select. Press OK key again to confi A confir beep is played.
Us th red list
The redial list stor the last 5 numbers dialed. A maximum of 24 digit
can be displ for each entry
Access redial li
1. Press Redi button in idle mode and press Navigat key to browse
the redial list The last number dialed will appear fi in the redial list
2. Press OK key to view the detai of the selected entr
Save a redi number into the phonebook
1. Press Redial key in idl mode to go to the redi li
2. Press the Navigation key to select an entr
3. Press MENU key to displ SA NUMBER, then press OK key to
displ ENTER NAME. Enter the name of the cont (maximum 12
charact and then press OK key to save the entry and ret the
displ to the redial list
Delet a redi number
1. Press Redial key in idl mode to go to the redi li
2. Press the Navigati key to select an entr and then press MENU
key
3. Press the Navigati key to select DELETE and then press OK key
to select.
4. Press OK key again to c onfir A confi beep is played.
De th red list
1. Press Redial key in idl mode to go to the redi li
2. Press the MENU key
3. Press the Navigat key to select DELETE ALL and then press OK
key to select.
4. Press OK key again to c onfir A confi beep is played.
Using the call log
T receive Call ID you may need to contact your telephone service
provi and they will inf you also of any charges for it ID let
you see the phone numbers of your caller on the handset display
befor you answer and in your Call Log aft Call Log stores
the last 10 external calls, whether or not you answered the call, so you
can call them back lat
Only the most recent call is saved if ther are repeat calls fr the
same number When the Call Log is ful the next new call will repl
the oldest entr If you’ve got a new call in the Call Log, the Caller
Displ icon will appear on the handset display
If the recei number is the same as one in your phonebook, the name
fr the phonebook wil displ as well as the number