Copyright Communications Corporation
Box Contents
Overview
The PoE12-HP is a one-port power injector
100/1000 BaseT Ethernet networks. The PoE12-HP in
through the unused twisted-wires
This increases flexibility in the positioning of
(PoE) enabled device by eliminating the need for a nea
source.
Key Features
• Complies IEEE802.3at and IEEE 802.3af.
• One RJ-45, 10/100/1000 Mbps PoE-enabled port.
• Ensures a constant power supply to a PoE-enabled device.
• Automatically detects if the connected device is PoE-enabled to
avoid sending power to a non-PoE device.
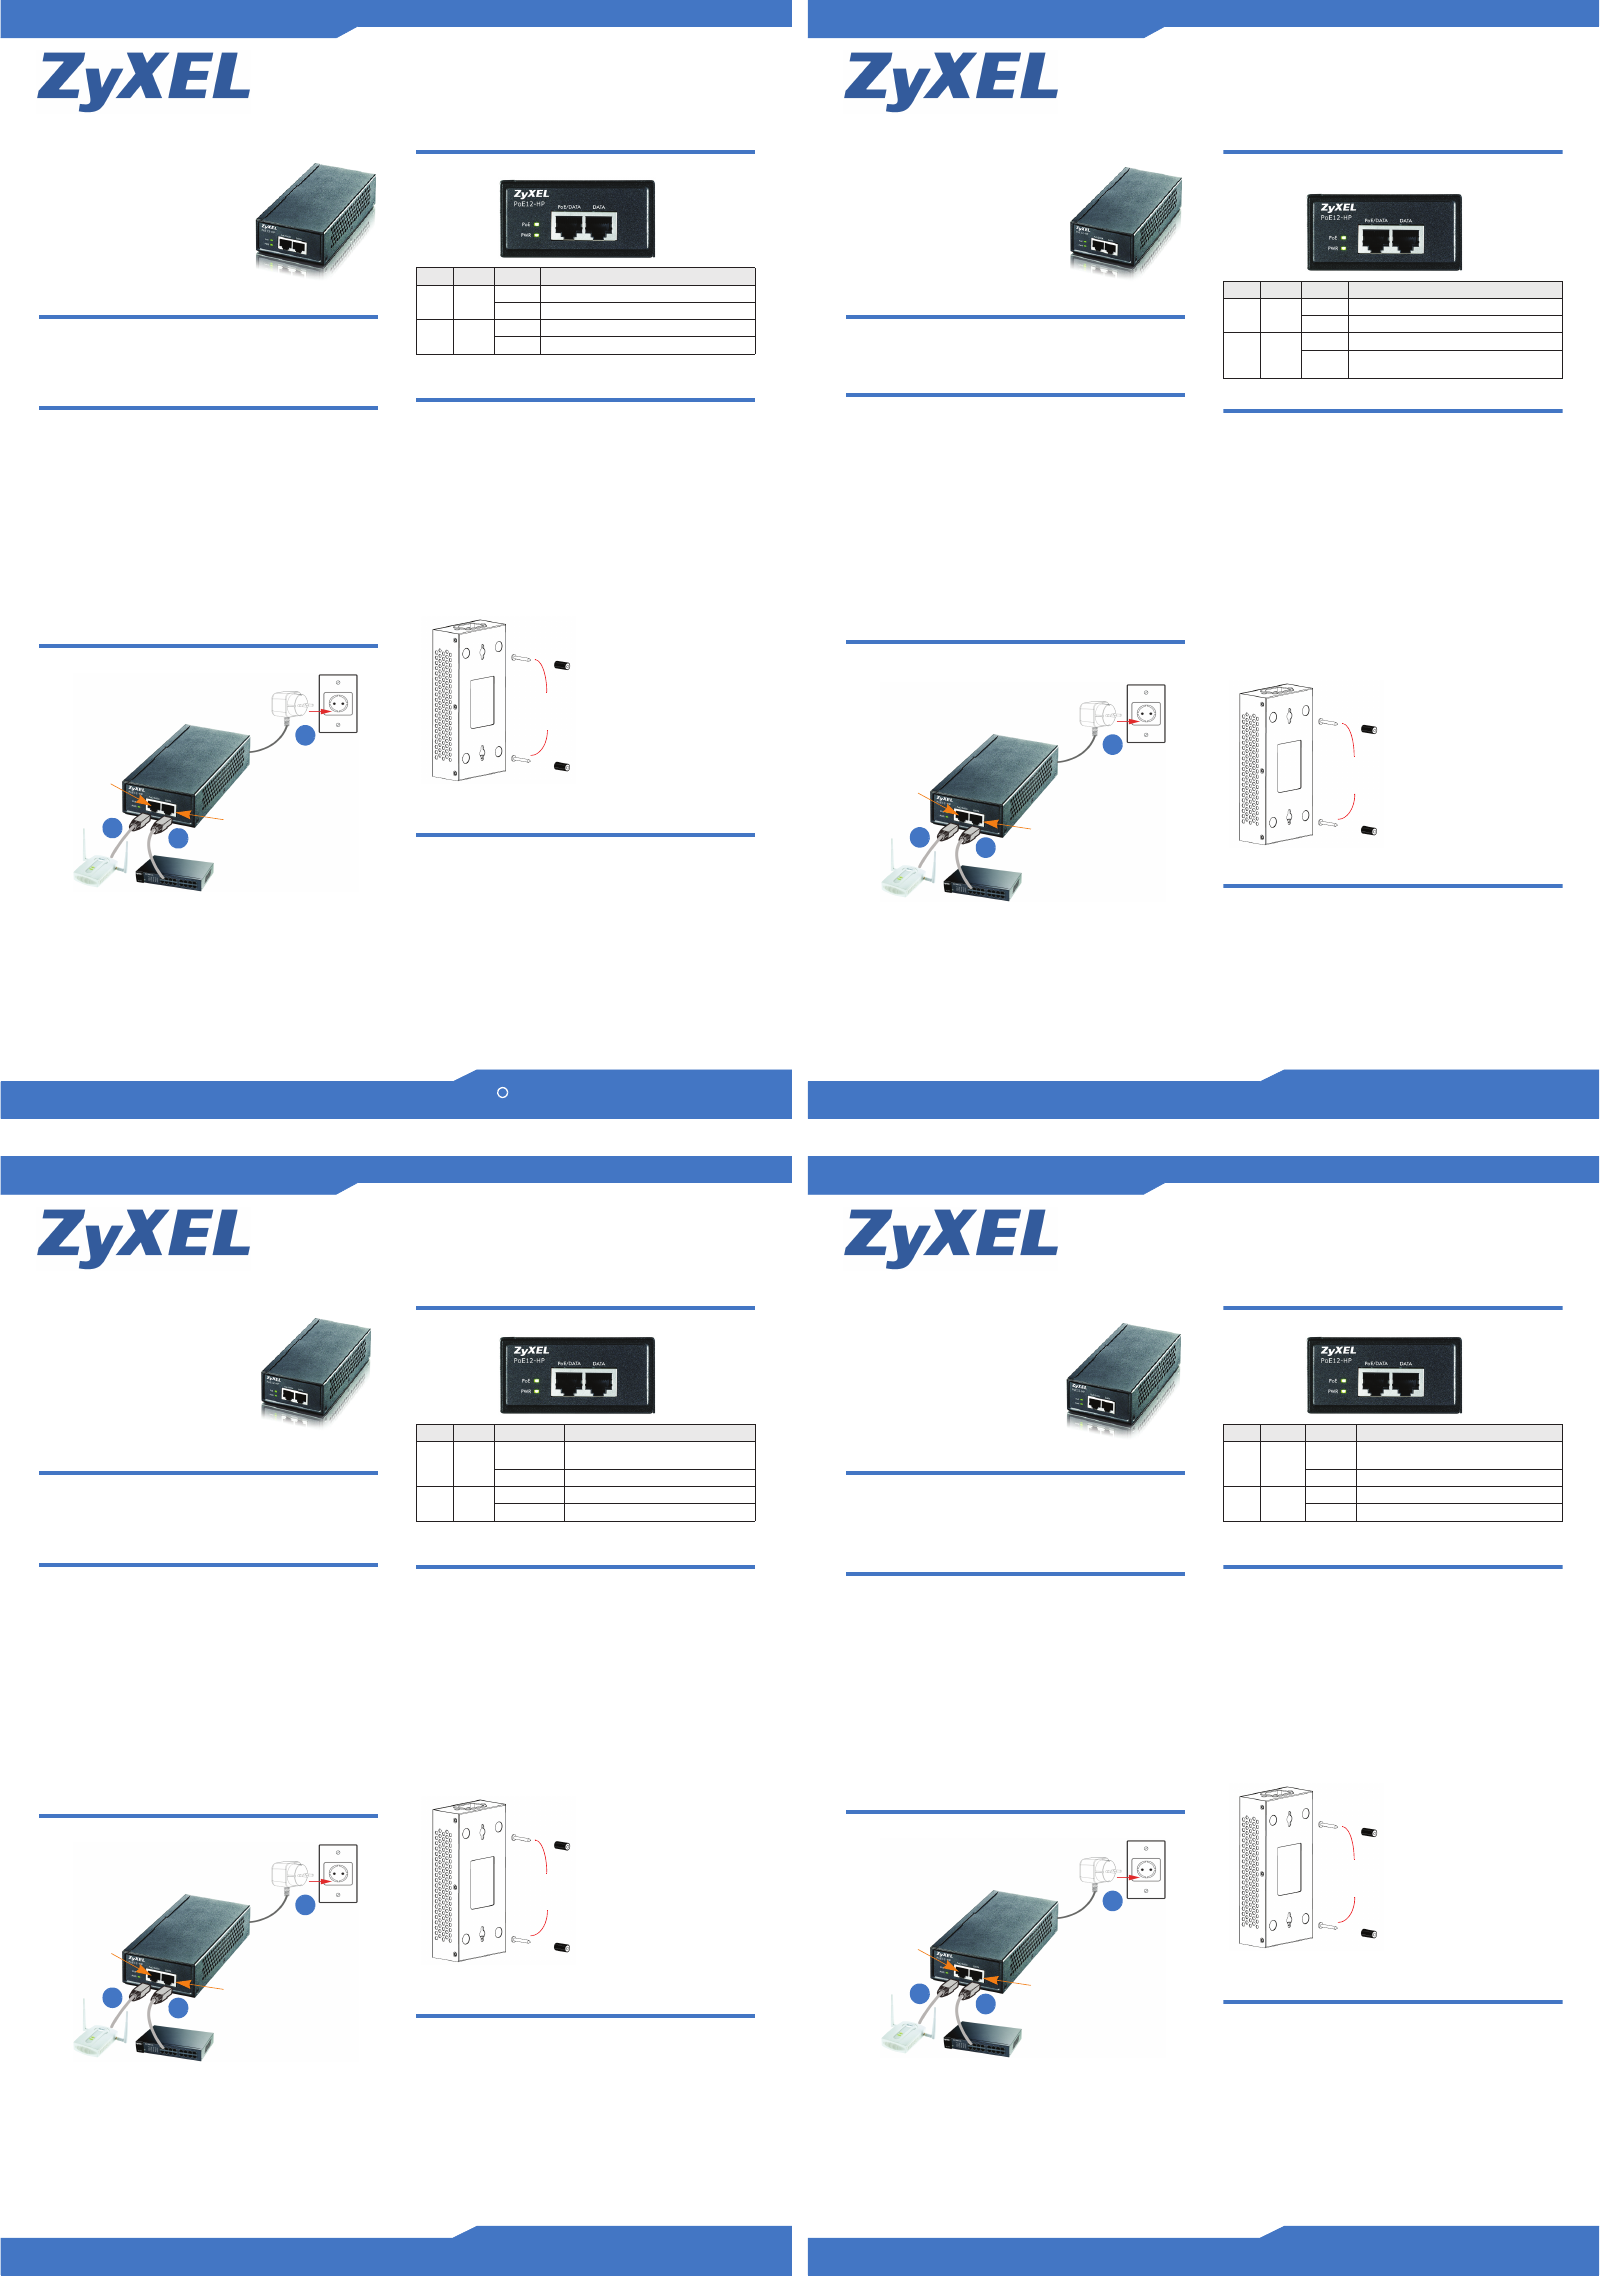
Connecting the PoE12-HP
Connect the PoE12-HP as follows.
1. The DA port does not deliver power
connect the PoE12-HP’DA port to the LAN of an Ethernet
device (such as an Ethernet switch).
2. The PoE/DA port sends power and Ethernet
enabled device. Use a straight-through E
the PoE/DA port to your PoE-enabled device.
The maximum Ethernet cable length is 1
• One PoE12-HP • One User’s Guide • Wall-mounting
Accessory
• One Power Cord • One Warrenty Card
1
3
DA
PoE
PoE
device
Ethernet device
1
2
3. Use the included power cord to connect the PoE1
socket to a power source (wall outlet or power strip).
•TPWR LED turns on green when the PoE12-HP is receiving
power.
LEDs
The following table describes
Wall Mounting
Do the following to atta
1. Screw the two screws provided with
106 mm apart. Use screws with
heads. Do not screw the screws all the way in to the w
small gap between the head o
2. The gap must be big enough
screw slots and the connection cables t
PoE12-HP.
Make sure the screws are securely fixed to the wall an
enough to hold the weight
cables.
3. Align the holes on the back of the PoE12
the wall. Hang the PoE12
Troubleshooting
The PWR LED is off
enabled device.
• Check to see that the power cord is securely connected to the
PoE12-HP and an appropriate power source. Make sure the power
source is on and functioning properly
• Refer to the Connecting the PoE12-HP section. Check that the
Ethernet cables are connected properly and tha
correct type of Ethernet cable. Contact your local distributor if the
problem
LED Color Status Description
PoE Green Blinking The PoE12-HP is detecting PoE-enabled device.
On PoE power is supplied.
PWR Gre On The system is turned on.
Of The system is off or has failed.
The PoE12-HP should be wall-mounted
vertically with the power socket facing
upwards.
106mm
User
PoE12-HP
802.3at PoE Injector
V
Edition 1, 4/201
ENGLISH
Packungsinhalt
Übersicht
Der PoE12-HP ist ein Power Injector mit einem Anschluss für die
V
PoE12-HP-Anschluss leitet DC-S
gedrehten Leitungen eines 8-poligen
bietet mehr Flexibilität beim Aufstellen eines PoE-fähigen
dafür nun keine zusätzliche S
Die wichtigsten Leistungsmerkmale
• Entspricht IEEE802.3at und IEEE 802.3af.
• Ein PoE-fähiger RJ-45-Anschluss, 10/100/1000 Mbps.
• Stellt eine gleichmäßige S
sicher
• Erkennt automatisch, ob das angeschlossene Gerät PoE-fähig ist,
um die Stromversorgung eines nicht PoE-fähigen Geräts zu
vermeiden.
Anschließen des PoE12-HP
Schließen Sie den PoE12-HP entsprechend der folgenden
Beschreibung an.
1. Der DAAnschluss liefert keinen S
Ethernet-Kabel an den DAAnschluss des PoE12-HP und an
den LAN-Anschluss eines Ethernet-Geräts (z. B.
Switches) an.
2. Der Anschluss PoE/DA leitet den S
zum PoE-fähigen Gerät. V
einem direkten Ethernetkabel an den AnschluPoE/DAT an.
Die maximale Lange des Ethernetkabels betrag
• Ein PoE12-HP • Ein Benutzerhandbuch • Wandmont
Zubehör
• Ein Netzkabel • Eine Garantiekarte
1
3
DA
PoE
PoE
Gerät
Ethernet-ät
1
2
3. Schließen Sie das mitgelieferte S
und an das S
S
•DPWR-LED wird grun, sobald der Anschluss P
S
LED-Anzeigen
In der folgenden T
LED-Anzeigen des PoE12-H
Wandmontage
Führen Sie die nachfolgenden Schritt
einer Wa
1. Schrauben Sie die zwei mit dem PoE12-H
Schrauben in einem Abstand von 1
V
0,31"). Drehen Sie die Schrauben nicht vo
Zwischen dem Kopf der
kleiner Abstand bleiben.
2. Der Abstand muss so groß sein,
dessen Schraublöcher sich an der Rückseite bef
Schraubköpfen einhäng
Stellen Sie sicher
angebracht und stark genug sind, u
HP und der Anschlusskabel zu tragen.
3. Richten Sie die Löcher an der Rückseite
Schrauben in der W
Schrauben.
Problembeseitigung
Die PWR -LED leuchtet nicht und/oder das Po
nicht mit S
• Make sure the power source is on and functioning properly
Sie, ob das Netzkabel fest am PoE12-HP-Anschluss und an einer
geeigneten Stromquelle angeschlossen ist. S
die S
• Lesen Sie nach im Anschließen des PoE12-HP.
Prüfen Sie, ob der richtige Ethernet
und ob sie richtig angesch
weiterhin bestehen bleibt, wenden Si
V
LED Farbe Status Beschreibung
PoE Grün Blinkt Der PoE12-HP ermittelt ein PoE-fähig
Ein PoE-S
PWR Grü Ein Das System ist eingeschaltet.
Aus Das System ist ausgeschaltet oder ein Fehler ist
aufgetreten.
Der PoE12-HP sollte vertikal an einer
Wand montiert werden, und der
gerichtet sein.
106 mm
Stromanschluss sollte nach oben
Benutzerhandbuch
PoE12-HP
802.3at PoE Injector
V
Ausgabe 1. 4/201
DEUTSCH
Contenido de la caja
V
El PoE12-HP es un inyector de potencia de un puerto
usarlo en redes Ethernet 10/100/1000 BaseT
corriente DC a través de los cables trenzados no usados de un cable
estándar CA
posicionamiento de un dispositivo con corriente sobre Ethernet
eliminando la necesidad de una fuente de
Características principales
• Cumple con IEEE802.3at y IEEE 802.3af.
• Un puerto RJ-45, 10/100/1000 Mbps con PoE activado.
• Asegura una fuente de corriente constante para dispositivos con
PoE.
• Detecta automáticamente si el dispositivo conectado tiene PoE para
evitar enviar corriente a dispositivos sin PoE.
Conectar el PoE12-HP
Conecte el PoE12-HP como sigue.
1. El puerto DA no envía corriente. Utilice un cable Ethernet para
conectar el puerto DA del PoE12-HP a la LAN de un dispositivo
Ethernet (como un switch Et
2. El puerto PoE/DA envía corriente y Ethernet a su dispositivo
con PoE. Utilice un cable directo Ethernet para conectar el puerto
PoE/DA a su dispositivo con PoE.
La longitud máxima del cable Ethernet e
• Un PoE12-HP • Una Guía del usuario •
en la pared
• Un cable de corriente • Una T
1
3
DA
PoE
PoE a
dispositivo
Dispositivo Ethernet
1
2
3. Utilice el cable de corriente incluido para conectar el zócalo de
corriente a la fuente de alimentació
•EPWR se enciende en verde cuando el PoE12-HP está
recibiendo energía.
LEDs
La tabla siguiente describe los LEDs del
Montaje en pared
Siga estos pasos para
1. Atornille los dos tornillos incluidos con
con 106mm de separación. Use los t
a 8mm (0,24" a 0,31") de ancho.
fondo en la pared; deje un pequeño hueco entre la cabeza del
tornillo y la pared.
2. El hueco debe ser lo suficientemente grande p
de los tornillos puedan entrar en las ranu
conexión quepan a través d
Compruebe que los tornillos estén bien
lo suficientemente fuertes como para
PoE12-HP con los cables de conexión.
3. Alinee los agujeros en la p
tornillos en la pared. Cuelgue el PoE12-HP en los tornillos.
Solución de problemas
El LED PWR está apagado y/o la corriente no llega a mi
con PoE.
• Compruebe si el cable de alimentación está bien conectado al
PoE
la fuente de alimentación está encendida y si funciona
correctamente.
• Consulte la sección Conectar el PoE12-HP. Compruebe si los
cables Ethernet están bien conectados y si está utilizando el tipo
correcto de cable Ethernet. Contacte con su distribuidor local si el
problema persiste.
LED Color Estado Descripción
PoE V Parpadeando El PoE12-HP
con PoE activado.
Encendido Hay suministro de energía PoE.
PWR V E El sistema está encendido.
Apagado El si
El PoE12-HP debe montarse en la pared
verticalmente con el enchufe mirando
hacia arriba.
106mm
Guía del usuario
PoE12-HP
Inyector 802.3at PoE
V
Edición 1, 4/201
ESP
Contenu de l'emballage
Présentation
Le PoE12-HP est un in
une utilisation avec les réseaux Ethernet 10/100/1000 BaseT
injecte le courant CC à travers les fils torsadés non utilisés d'un câble
CA
positionnement d'un périphérique adapté Power over Ethernet (PoE)
en éliminant le besoin d'une
Caractéristiques principales
• Compatible IEEE802.3at et IEEE 802.3af.
• Un port RJ45, 10/100/1000 Mbps PoE.
• Assure une alimentation continue du périphérique PoE.
• Détecte automatiquement si le périphérique co
éviter d'alimenter un périphérique non-PoE.
Connexion du PoE12-HP
Connectez le PoE12-HP comme suit.
1. Le port DA ne dé
Ethernet pour connecter le port DA du PoE12-HP au LAN d'un
périphériqu
2. Le port PoE/DA fournit l'alimentation et Ethernet
périphérique adapté PoE. Ut
connecter le port PoE/DA à votre périphérique adapté PoE.
La longueur maximum du cable Ethern
• Un PoE12-HP • Un guide de l'utilisateur • Un support de fixation
murale
• Un cordon
d'alimentation
• Une carte de garantie
1
3
DA
PoE
Pé riph é rique PoE
Pé riph é rique Etherne
1
2
3. Utilisez le cordon d'alimentation fourni pour connecter la prise
d'alimentation à
prise multiple).
• La LED PWR devient verte quand le PoE12-HP est alimenté.
V
Le tableau suivant dé crit les voyant
Fixation murale
Suivez les étapes pour fixe
1. Vissez les deux vis fournies avec votre PoE1
106 mm l'une de l'autre. Utilisez des vis de
0,31") à tête large. Ne vissez pas complètement les vis dans le
mur; laissez un petit esp
2. L
s'insérer dans les logements prévus et pour faire descen
câbles de connexion derrière le PoE12-HP.
Vérifiez que les vis sont correctement fixées au mur et assez
solides pour supporter le poids du PoE12-HP avec les câbles de
connexion.
3. Alignez les trous à l'arriè
Accrochez le PoE12-HP sur les vis.
Dépannage
La LED PWR est éteinte et/ou l'aliment
périphérique adapté PoE.
• Vérifiez si le cordon d'alimentation est correctement connecté au
PoE
source d'alimentation est allumée et fonctionne correctement.
• Reportez-vous à la section Connexion du PoE12 . Vérifiez que
les câbles Ethernet sont connectés correctement et que vous
utilisez le type de câble Ethernet correct. Contactez votre
distributeur local si le problème persiste.
DEL Couleur Éta Description
PoE V Clignotant Le PoE12-HP est en train de détecter le
périphérique PoE.
Activé L'alimentation d
PWR V Act Le système est allumé.
Dés Le système est éteint ou défaillant.
Le PoE12-HP doit être fix é au mur
verticalement avec la prise de courant
106mm
orientée vers le haut.
Manuel de l'utilisateur
PoE12-HP
802.3at PoE Injector
V
Édition 1, 4/201
FRANÇAIS