25
4
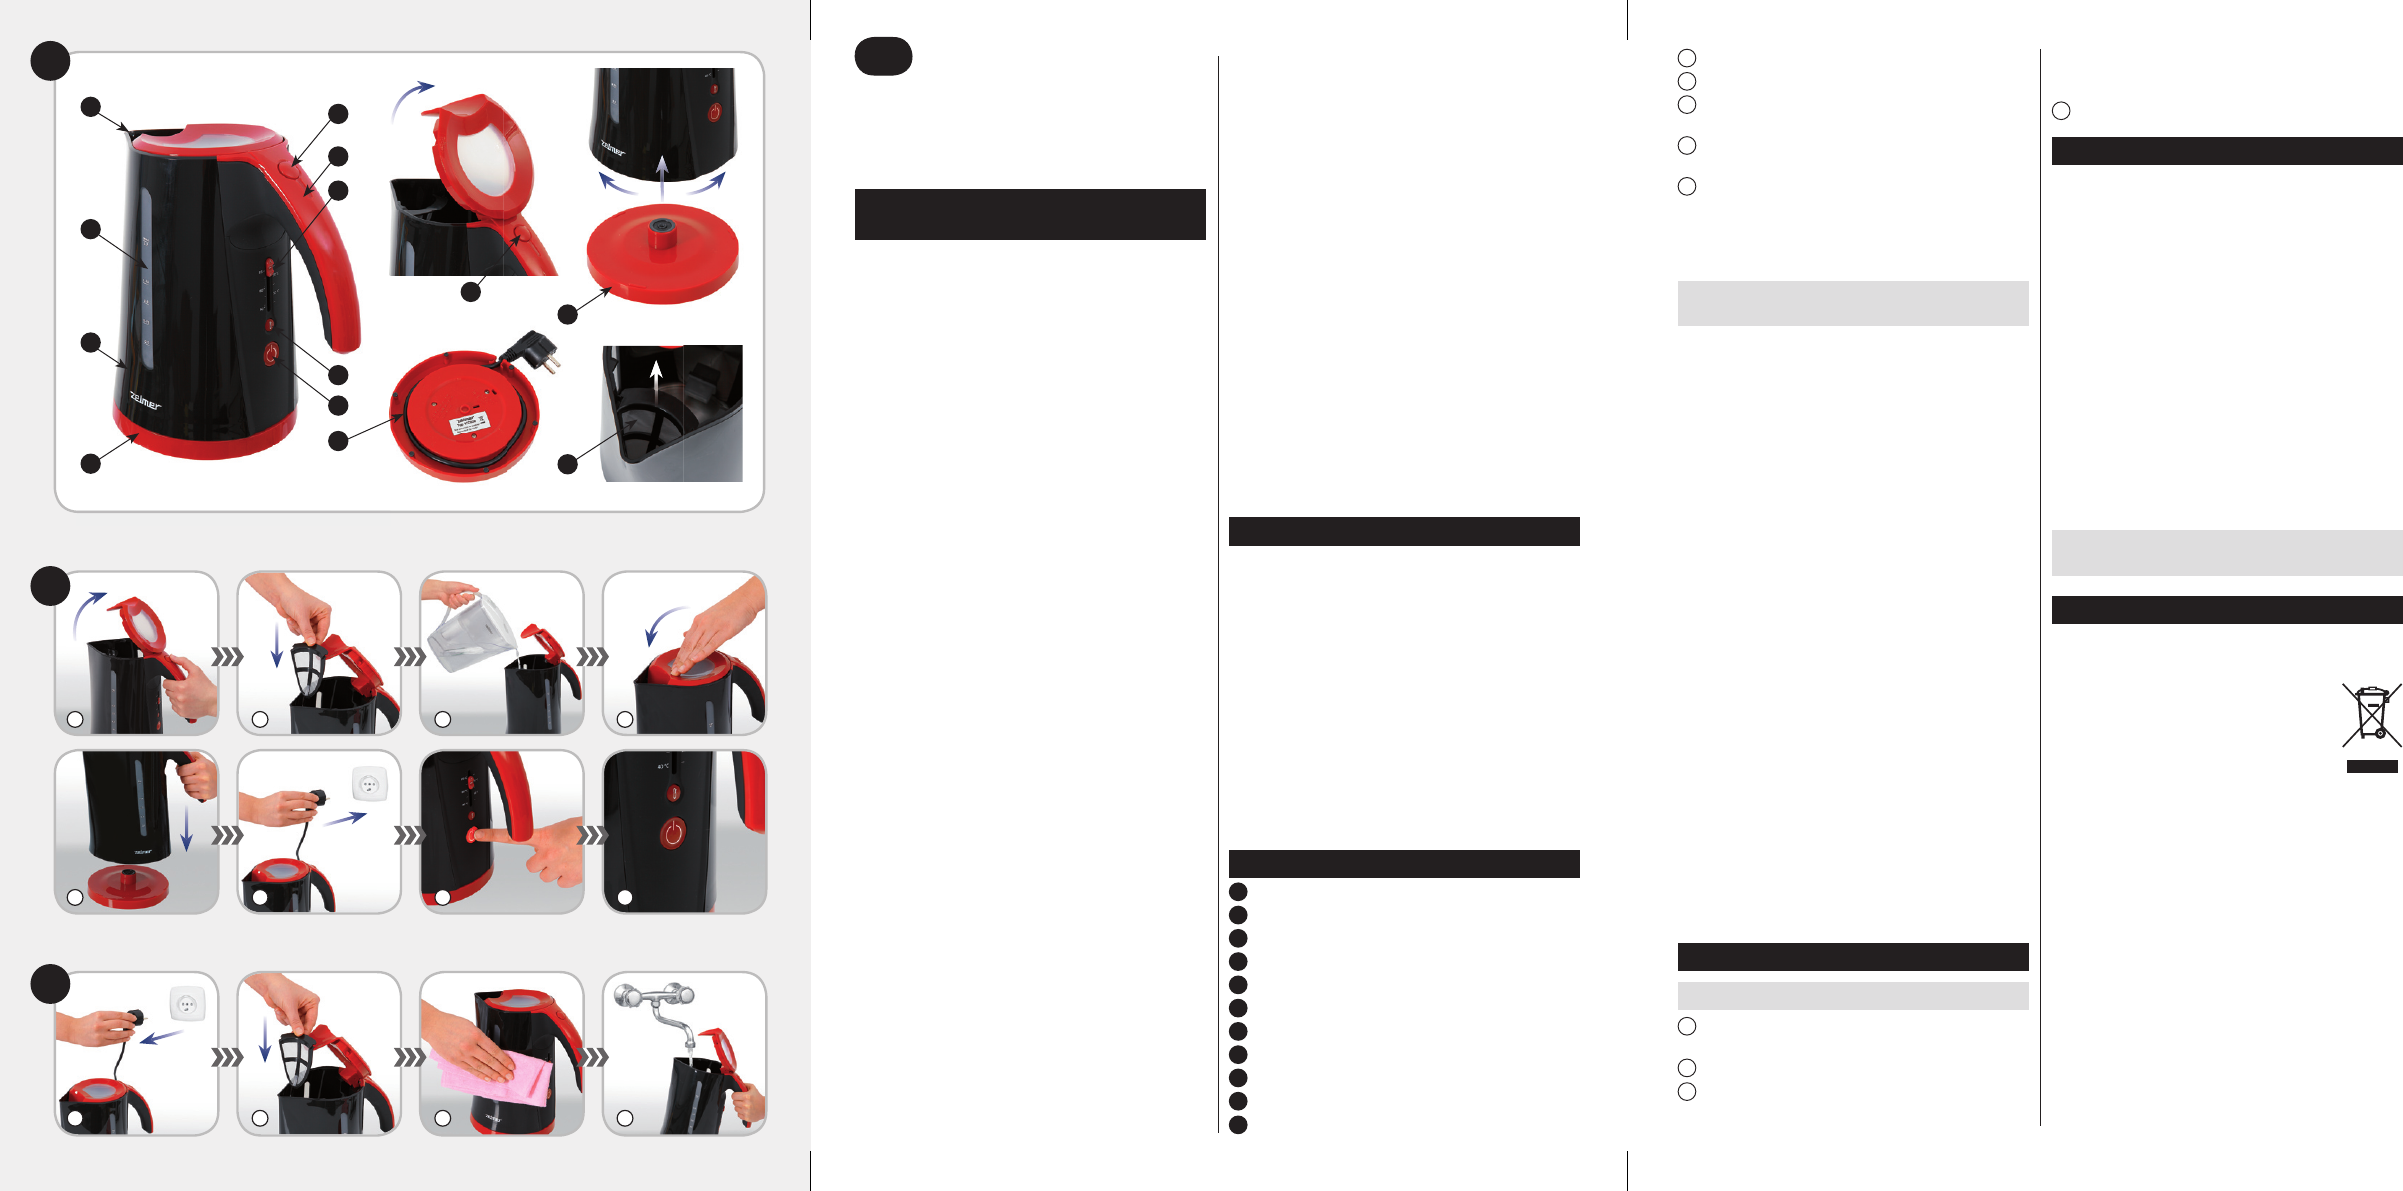
Close the lid.
5
Place the kettle on the power base (4).
6
Put the plug of the connecting cord into a mains socket
with an earth pin.
7
Switch the kettle on by pressing button (6) – the light will
come on.
8
The kettle switches off automatically when the water has
reached the boiling point, the switch returns to its starting
position – the light comes off.
If further use of the kettle is anticipated, it is not necessary to
remove the plug of the connecting cord from the power socket.
WARNING: Be careful not to ll up with water beyond the
nominal capacity when pouring water into the kettle.
The rising of the water level in the kettle is delayed in relation
to the speed of pouring the water. It is caused by the lter
slowing down the speed of the ow. This can be prevented
by pouring the last portions of water extremely carefully
before it reaches the maximum level on the indicator.
In the event that an empty kettle is switched on, it will be
switched off by a thermal device automatically.
In order to switch the kettle on again after it has cooled
down (approx. 15 minutes), take it off the base, replace it
and switch the kettle on by pressing switch (6). The cooling
down of the kettle can be accelerated by puring cold water
into the kettle.
Description of the function selection buttons:
keep warm/boiling
Both switches (boiling and keeping warm) may be used
together or separately to allow activation of different functions.
Set the temperature with the regulator.
●
Press the „keep warm” button
●
(7) – the kettle will quickly
warm up water to the pre-set temperature and will keep it
warm at this temperature.
Press both buttons together – rst the kettle will boil the
●
water and then, after reaching the pre-set temperature,
it will keep the temperature.
Press the boiling button
●
(6) or „keep warm” button (7)
again to cancel the settings.
Each activity, pressing a button or another action,
●
is accompanied by a signal sound.
„Keep warm”
The number of settings and the temperature of different
settings is changeable (40°C, 50°C, 60°C, 70°C, 85°C);
it may be adjusted to an individual customer’s needs.
Cleaning and maintenance
Always clean a cold kettle!
1
Remove the plug of the connecting cord from the power
socket.
2
Take out the lter (11).
3
Clean the outside surfaces with a soft cloth moistened
with washing-up liquid.
In order to remove the build-up of hard water lm from the
outside and inside walls of the kettle, wipe them with a cloth
moistened with vineger.
4
Rinse the kettle with fresh water.
Filter replacement – descaling
In the event that scale builds up on the bottom of the kettle,
it needs to be removed. 6% or 10% vinegar is used for this
purpose.
Open the lid
●
(10).
Take out the lter
●
(11).
Wash the lter under running water.
●
Pour 0.5 l of vinegar and switch on the kettle.
●
Boil the vinegar and leave in the kettle for about 30
●
minutes.
Pour the vinegar out and rinse the kettle with fresh
●
water.
Fill the kettle up with fresh water, boil the water and pour
●
it out after is has boiled.
Repeat the above procedure if there still is scale on the
●
bottom.
When the procedure is nished, replace the ter
●
(11) in
the kettle, following the procedure of taking the lter out
in reverse order.
Negligence in descaling the kettle may results in its
damage.
Ecology – environment protection
Each user can protect the natural environment. It is neither
difcult nor expensive.
In order to do it: put the cardboard packing into
recycling paper container; put the polyethylene
(PE) bags into container for plastic.
When worn out, dispose the appliance to
particular disposal centre, because of the
dangerous elements of this appliance, which
can be hazardous for natural environment.
Do not dispose into the domestic waste disposal!!!
The manufacturer/importer does not accept any liability for any
damages resulting from unintended use or improper handling.
The manufacturer/importer reserves his rights to modify the product
any time in order to adjust it to law regulations, norms, directives,
or due to construction, trade, aesthetic or other reasons, without
notifying in advance.
4
Szanowni Klienci!
Prosimy o uważne przeczytanie niniejszej instrukcji użytko-
wania. Szczególną uwagę należy poświęcić wskazówkom
bezpieczeństwa. Instrukcję użytkowania prosimy zachować,
aby mogli Państwo z niej korzystać również w trakcie póź-
niejszej eksploatacji urządzenia.
Wskazówki dotyczące bezpieczeństwa i właści-
wego użytkowania czajnika elektrycznego
Podczas używania urządzenia elektrycznego, zawsze prze-
strzegaj poniższych podstawowych wymogów bezpieczeń-
stwa:
Czajnik przeznaczony jest tylko do użytku domowego.
●
Czajnik podłączaj jedynie do gniazdka sieci prądu prze-
●
miennego wyposażonego w kołek ochronny.
Stawiaj czajnik zawsze na stabilnej, równej i płaskiej
●
powierzchni; przewód przyłączeniowy nie może zwisać
poza krawędź powierzchni, na której stoi czajnik.
Jeżeli przewód zasilający nieodłączalny ulegnie uszko-
dzeniu, to powinien on być wymieniony u wytwórcy lub
w specjalistycznym zakładzie naprawczym albo przez
wykwalikowaną osobę w celu uniknięcia zagrożenia.
Napraw urządzenia może dokonywać jedynie przeszko-
lony personel. Nieprawidłowo wykonana naprawa może
spowodować poważne zagrożenia dla użytkownika.
W razie wystąpienia usterek zwróć się do specjalistycz-
nego punktu serwisowego ZELMER.
Czajnik może być eksploatowany tylko z załączoną pod-
●
stawką zasilającą, przeznaczoną dla danego typu.
Nie przepełniaj czajnika poza maksymalną oznaczoną
●
pojemność – w czasie gotowania wrząca woda może
z niego wypryskiwać.
Używaj czajnika tylko do gotowania i podgrzewania wody.
●
Nie otwieraj pokrywki bezpośrednio po zagotowaniu się
●
wody – może nastąpić spływanie skroplonej pary wodnej
na zewnątrz czajnika.
Zachowaj szczególną ostrożność podczas pracy z czaj-
●
nikiem w obecności dzieci.
Niniejszy sprzęt nie jest przeznaczony do użytkowania
●
przez osoby (w tym dzieci) o ograniczonej zdolności
zycznej, czuciowej lub psychicznej, lub osoby niema-
jące doświadczenia, lub znajomości sprzętu, chyba że
odbywa się to pod nadzorem lub zgodnie z instrukcją
użytkowania sprzętu, przekazanej przez osoby odpowia-
dające za ich bezpieczeństwo.
Należy zwracać uwagę na dzieci, aby nie bawiły się
●
sprzętem.
Sprzęt nie jest przeznaczony do pracy z użyciem
●
zewnętrznych wyłączników czasowych lub oddzielnego
układu zdalnej regulacji.
Nie uruchamiaj czajnika, jeśli przewód zasilający jest
●
uszkodzony lub obudowa jest w sposób widoczny uszko-
dzona.
Nie wyciągaj wtyczki z gniazdka sieci pociągając za
●
przewód.
Nie otwieraj pokrywki bezpośrednio po zagotowaniu się
●
wody – może nastąpić spływanie skroplonej pary wodnej
na zewnątrz czajnika.
Nie stawiaj czajnika na gorących przedmiotach i w ich
●
pobliżu.
Nie zanurzaj czajnika ani podstawki zasilającej w wodzie
●
podczas napełniania lub mycia.
Uważaj, aby nie zamoczyć wtyczki przewodu przyłącze-
●
niowego.
W przypadku zalania wodą wewnętrznych elementów
●
elektrycznych, jak również podstawki zasilającej, przed
ponownym włączeniem czajnika do sieci dokładnie je
wysusz.
Uważaj na wydobywającą się w czasie gotowania parę.
●
Nie uruchamiaj czajnika bez wody.
●
Nie używaj czajnika bez ltra.
●
Nie używaj czajnika z otwartą pokrywką – nie zadziała
●
wówczas automatyczny wyłącznik.
Przed czyszczeniem, czajnik powinien całkowicie osty-
●
gnąć.
Do mycia obudowy nie używaj agresywnych detergen-
●
tów w postaci emulsji, mleczka, past itp. Mogą one mię-
dzy innymi usunąć naniesione informacyjne symbole
graczne, takie jak: podziałki, oznaczenia, znaki ostrze-
gawcze, itp.
Dane techniczne
Parametry techniczne podane są na tabliczce znamionowej
wyrobu.
Pojemność: 1,7 litra.
Czajnik jest urządzeniem klasy I, wyposażonym w prze-
wód przyłączeniowy z żyłą ochronną i wtyczkę ze stykiem
ochronnym.
Czajnik ZELMER spełnia wymagania obowiązujących norm.
Urządzenie jest zgodne z wymaganiami dyrektyw:
Urządzenie elektryczne niskonapięciowe (LVD) –
– 2006/95/EC.
Kompatybilność elektromagnetyczna (EMC) –
– 2004/108/EC.
Wyrób oznaczono znakiem CE na tabliczce znamionowej.
Deklaracja zgodności CE znajduje się na stronach
www.zelmer.pl.
Budowa czajnika (Rys. A)
1
Dzióbek
2
Wskaźnik poziomu wody
3
Obudowa
4
Obrotowa podstawka zasilająca
5
Schowek na przewód przyłączeniowy
6
Przycisk WŁĄCZENIA/WYŁĄCZENIA (ON/OFF)
7
Przycisk podtrzymywania ciepła
8
Suwak regulacji temperatury
9
Rączka
10
Przycisk otwierania pokrywy
11
Filtr antyosadowy
PL