We recommend playing back multichannel audio (5.1-channel or more) to feel surround sound produced by the unit.
Playing back a BD/DVD
1
Turn on the BD/DVD player.
2
Press HDMI 1 to select “HDMI 1” as the
input source.
3
Start playback on the BD/DVD player.
4
Press STRAIGHT repeatedly to select
“STRAIGHT”.
When “STRAIGHT” (straight decode) is enabled, each
speaker produces each channel audio signal directly
(without sound field processing).
5
Press VOLUME to adjust the volume.
This completes the basic setup procedure.
When surround sound is not heard, or no sound is output from a
specific speaker, see “Troubleshooting” in the Owner’s Manual.
Français
7
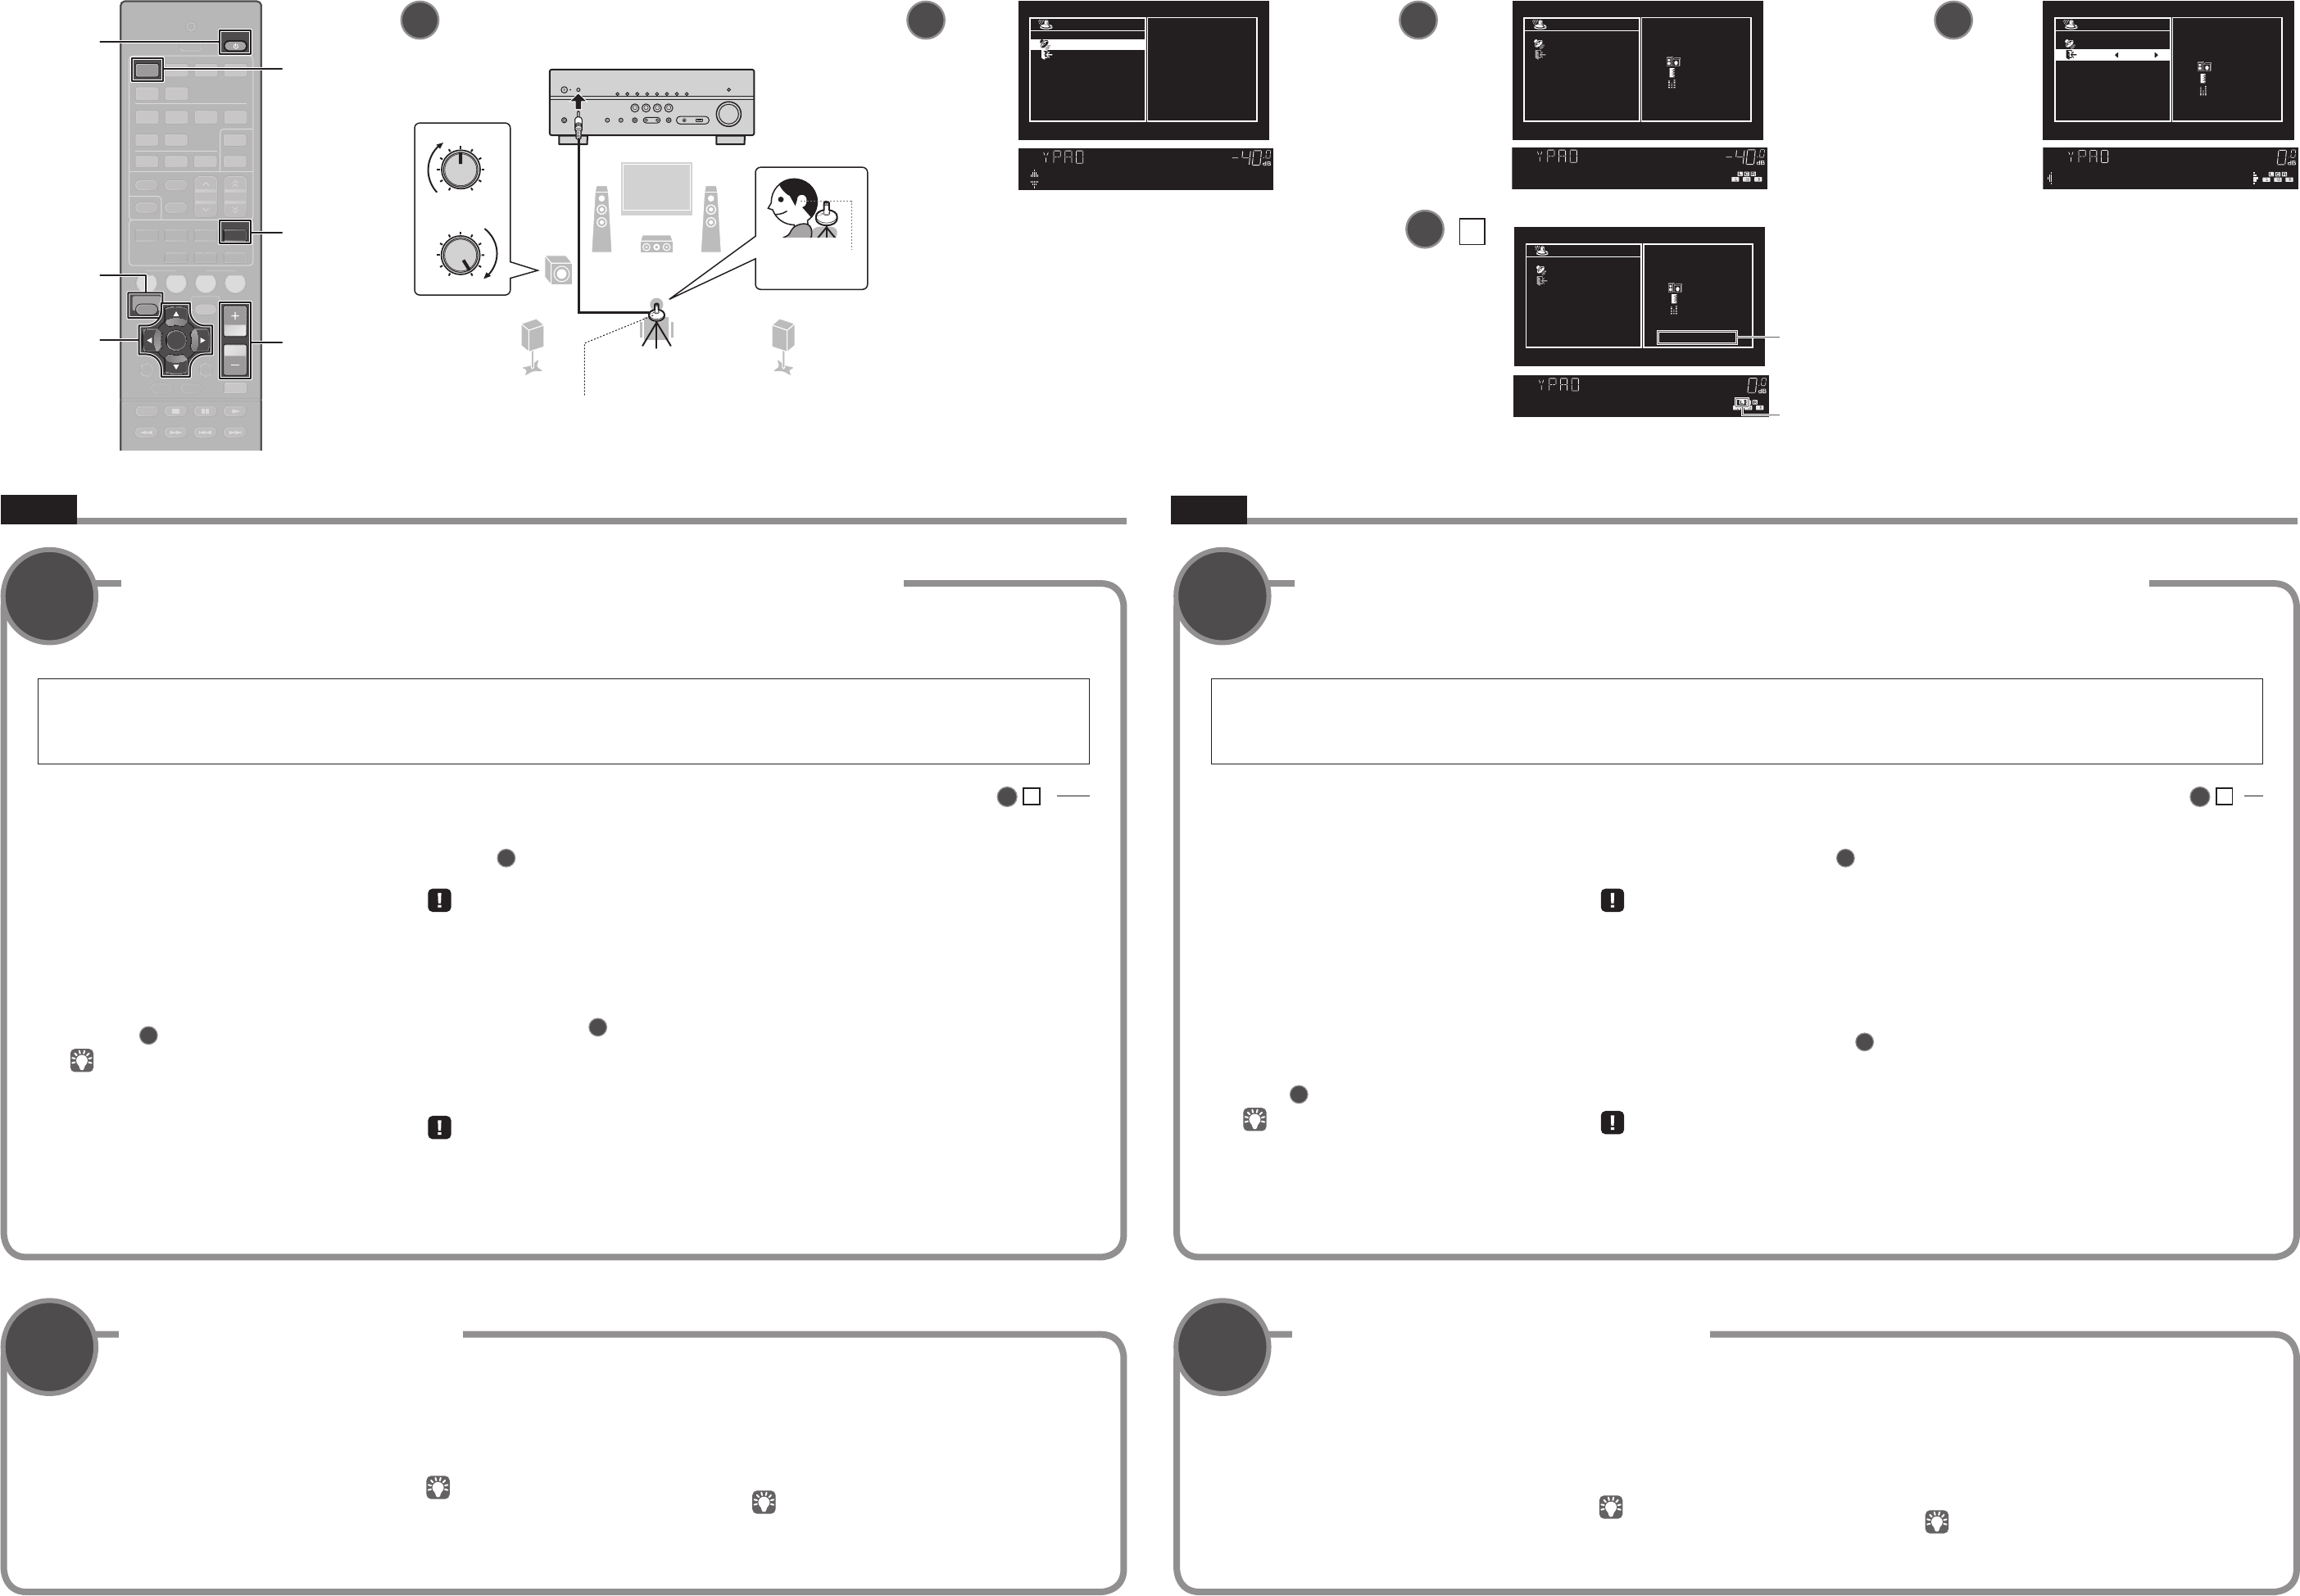
The Yamaha Parametric room Acoustic Optimizer (YPAO) function detects speaker connections, measures the distances from them to your listening position(s), and
then automatically optimizes the speaker settings, such as volume balance and acoustic parameters, to suit your room.
Note the following regarding YPAO measurement
• Test tones are output at high volume and may surprise or frighten small children.
• Test tone volume cannot be adjusted.
• Keep the room as quiet as possible.
• Stay in a corner of the room behind the listening position so that you do not become
an obstacle between speakers and the YPAO microphone.
• Do not connect headphones.
Optimizing the speaker settings automatically (YPAO)
1
Press RECEIVER (z) to turn on the unit.
2
Turn on the TV and switch the TV input to
display video from the unit (HDMI OUT
jack).
3
Turn on the subwoofer and set the volume
to half. If the crossover frequency is
adjustable, set it to maximum.
4
Place the YPAO microphone at your
listening position and connect it to the
YPAO MIC jack on the front panel.
The screen
7
-4 appears.
Place the YPAO microphone at your listening position
(same height as your ears). We recommend the use of
a tripod as a microphone stand. You can use the tripod
screws to stabilize the microphone.
5
To start the measurement, press SETUP.
The measurement will start in 10 seconds.
It takes about 3 minutes to measure.
The screen
7
-5 appears on the TV when the
measurement finishes.
• If any error message (such as E-1) or warning message
(such as W-2) appears, see “Error messages” or
“Warning messages” in the Owner’s Manual.
• If the warning message “W-1:Out of Phase” appears,
see “If “W-1:Out of Phase” appears”.
6
Use the cursor keys (e/r) to select
“SAVE” (Save) (screen
7
-6) and press
ENTER.
7
Disconnect the YPAO microphone from the
unit.
Do not leave the YPAO microphone in a place where it will
be exposed to direct sunlight or high temperature for an
extended period of time.
This completes optimization of the speaker settings.
Follow the procedure below to check the speaker
connections.
1
The speaker indicator in the front display will blink for
a problem speaker.
2
Check cable connections (+/-) for the problem
speaker.
If the speaker is connected incorrectly:
Turn off the unit, reconnect the speaker cable, and then
try YPAO measurement again.
If the speaker is connected correctly:
Depending on the type of speakers or room environment,
this message may appear even if the speakers are
connected correctly.
In this case, ignore the message and proceed to step 6.
If “W-1:Out of Phase” appears (
7
-
A
)
7
-
A
1234
56
FM
INFO
MEMORY
AM
PRESET
TUNING
SCENE
RETURN
TOP
MENU
POP-UP
MENU
VOLUME
BD
DVD
TV
NET
RADIO
MUTE
DISPLAY
ENTER
TRANSMIT
RECEIVER
HDMI
AV
SLEEP
AUXUSB
56
NET
ZONE B
ZONE A
MOVIEMUSIC
SUR. DECODESTRAIGHT
ENHANCER
BASS
DIRECT
MODE
SETUP
OPTION
2341
HDMI 1
RECEIVER z
SETUP
ENTER
Cursor keys
Touches de
curseur
STRAIGHT
VOLUME
12
3
9
54
VOLUME
CROSSOVER/
HIGH CUT
MINMAX
MINMAX
Ear height
Hauteur d’oreille
YPAO microphone
Microphone YPAO
Listening position
Position d’écoute
The unit
L’unité
Warning message
Message d’avertissement
Problem speaker (blinks)
Enceinte défectueuse (clignote)
8
À présent, lisons un disque BD/DVD.
Nous vous recommandons de lire le son multivoie (5.1 voies ou plus) pour sentir le son d’ambiance émis par l’unité.
Lecture d’un disque BD/DVD
1
Allumez le lecteur de disques BD/DVD.
2
Appuyez sur HDMI 1 pour sélectionner
«HDMI 1» comme source d’entrée.
3
Lancez la lecture sur le lecteur de disques
BD/DVD.
4
Appuyez à plusieurs reprises
sur STRAIGHT pour sélectionner
«STRAIGHT».
Lorsque «STRAIGHT» (décodage direct) est activé,
chaque enceinte produit directement le signal audio de sa
propre voie (sans traitement du champ sonore).
5
Appuyez sur VOLUME pour régler le
volume.
Ceci termine la procédure de configuration de base.
Si vous n’entendez pas le son d’ambiance ou si aucun son n’est
émis d’une enceinte spécifique, voir «Guide de dépannage»
dans le Mode d’emploi.
7
La fonction Yamaha Parametric room Acoustic Optimizer (YPAO) permet de détecter les raccordements des enceintes et de mesurer la distance entre ces
dernières et la position d’écoute. Elle optimise ensuite automatiquement les réglages des enceintes tels que les paramètres d’équilibre du volume et les paramètres
acoustiques qui conviennent à la pièce.
Veuillez noter les points suivants concernant la mesure YPAO
• Les signaux tests étant émis à un volume élevé, ils peuvent surprendre ou effrayer
les jeunes enfants.
• Le volume du signal test ne peut pas être réglé.
• Faites en sorte que la pièce soit le plus calme possible.
• Restez dans un coin de la pièce derrière la position d’écoute afin de ne pas faire
obstacle entre les enceintes et le microphone YPAO.
• Ne raccordez pas d’écouteurs.
Optimisation automatique des réglages d’enceintes (YPAO)
1
Appuyez sur RECEIVER (z) pour mettre
l’unité sous tension.
2
Mettez le téléviseur sous tension et
changez la source d’entrée an d’afficher
l’image à partir de l’unité (prise HDMI
OUT).
3
Allumez le caisson de graves et réglez
le volume à moitié. Si la fréquence de
coupure est réglable, réglez-la sur la valeur
maximale.
4
Placez le microphone YPAO sur la position
d’écoute et branchez-le sur la prise YPAO
MIC sur le panneau avant.
L’écran
7
-4 apparaît.
Placez le microphone YPAO à votre position d’écoute
(à hauteur d’oreilles). Nous conseillons l’utilisation d’un
trépied comme support de microphone. Lorsque vous
utilisez un trépied, utilisez les vis de ce dernier pour
stabiliser le microphone.
5
Pour lancer la mesure, appuyez sur SETUP.
La mesure commence dans les 10secondes.
La mesure dure environ 3minutes.
Lorsque la mesure est terminée, l’écran
7
-5
apparaît sur le moniteur TV.
• Si un message d’erreur (comme E-1) ou un
message d’avertissement (comme W-2) apparaît,
voir «Messages d’erreur» ou «Messages
d’avertissement» dans le Mode d’emploi.
• Si le message d’avertissement «W-1:Out of Phase»
apparaît, voir «Si «W-1:Out of Phase» apparaît».
6
Utilisez les touches du curseur (e/r) pour
sélectionner «SAVE» (Save) (écran
7
-6)
et appuyez sur ENTER.
7
Débranchez le microphone YPAO de l’unité.
Ne laissez pas le microphone YPAO dans un endroit
où il sera exposé aux rayons directs du soleil ou à une
température élevée pendant une période prolongée.
L’optimisation des réglages d’enceintes est maintenant
terminée.
Procédez comme indiqué ci-dessous pour vérifier les
raccordements des enceintes.
1
Le témoin d’enceinte sur l’afficheur de la face avant
clignote en cas d’enceinte défectueuse.
2
Contrôlez les raccordements des câbles (+ et -) de
l’enceinte défectueuse.
Si l’enceinte est mal raccordée:
Éteignez l’unité, rebranchez le câble d’enceinte, puis
réessayez la mesure YPAO.
Si l’enceinte est bien raccordée:
Selon le type d’enceintes ou l’environnement, ce
message peut apparaître, même si les enceintes sont
correctement raccordées.
Dans ce cas, ignorez le message et passez à l’étape 6.
Gebruikershandleiding.com neemt misbruik van zijn services uitermate serieus. U kunt hieronder aangeven waarom deze vraag ongepast is. Wij controleren de vraag en zonodig wordt deze verwijderd.
Product:
Spelregels forum
Om tot zinvolle vragen te komen hanteren wij de volgende spelregels:
lees eerst de handleiding door;
controleer of uw vraag al eerder door iemand anders is gesteld;
probeer uw vraag zo duidelijk mogelijk te stellen;
heeft u een probleem en al geprobeerd om dit op te lossen, vermeld dit erbij aub;
heeft u een oplossing gekregen van een bezoeker dan horen wij dat graag in dit forum;
wilt u een reactie geven op een vraag of antwoord, gebruik dan niet dit formulier maar klik op de knop 'reageer op deze vraag';
uw vraag wordt direct op de website gezet; vermijd daarom persoonlijke gegevens in te vullen;
Belangrijk! Als er een antwoord wordt gegeven op uw vraag, dan is het voor de gever van het antwoord nuttig om te weten als u er wel (of niet) mee geholpen bent! Wij vragen u dus ook te reageren op een antwoord.
Belangrijk! Antwoorden worden ook per e-mail naar abonnees gestuurd. Laat uw emailadres achter op deze site, zodat u op de hoogte blijft. U krijgt dan ook andere vragen en antwoorden te zien.
Abonneren
Abonneer u voor het ontvangen van emails voor uw Yamaha RX-V477 bij:
nieuwe vragen en antwoorden
nieuwe handleidingen
U ontvangt een email met instructies om u voor één of beide opties in te schrijven.
Ontvang uw handleiding per email
Vul uw emailadres in en ontvang de handleiding van Yamaha RX-V477 in de taal/talen: Engels, Frans als bijlage per email.
De handleiding is 0,86 mb groot.
U ontvangt de handleiding per email binnen enkele minuten. Als u geen email heeft ontvangen, dan heeft u waarschijnlijk een verkeerd emailadres ingevuld of is uw mailbox te vol. Daarnaast kan het zijn dat uw internetprovider een maximum heeft aan de grootte per email. Omdat hier een handleiding wordt meegestuurd, kan het voorkomen dat de email groter is dan toegestaan bij uw provider.
Uw handleiding is per email verstuurd. Controleer uw email
Als u niet binnen een kwartier uw email met handleiding ontvangen heeft, kan het zijn dat u een verkeerd emailadres heeft ingevuld of dat uw emailprovider een maximum grootte per email heeft ingesteld die kleiner is dan de grootte van de handleiding.
Er is een email naar u verstuurd om uw inschrijving definitief te maken.
Controleer uw email en volg de aanwijzingen op om uw inschrijving definitief te maken
U heeft geen emailadres opgegeven
Als u de handleiding per email wilt ontvangen, vul dan een geldig emailadres in.
Uw vraag is op deze pagina toegevoegd
Wilt u een email ontvangen bij een antwoord en/of nieuwe vragen? Vul dan hier uw emailadres in.