1. The battery compartment is accessed from the rear
of the alarm unit by removing the screw from the
base of the unit and lifting the rear cover-fixing
bracket B.
2. Insert four (4) ‘AAA’ size batteries (not included)
following the polarity as shown C. When the last
battery is inserted the alarm will beep very loudly
to indicate that the batteries are installed properly
(see programming the alarm).
3. Replace the back cover and fix with screw.
The Low battery warning indicator light will illuminate
when the batteries need replacing.
Installation
1. Place the alarm in the desired location.
2. Remove the rear cover and fix it to the wall using the
screws supplied.
3. The alarm body can then be snapped into place onto
the rear cover and secured using the screw at the base
of the unit.
Please note: This alarm can also be used in a free
standing position.
Programming the alarm
Immediately after inserting the batteries, the 4-digit
security code must be set, simply press the desired 4 digits
code onto the keypad. Do not press ”0”as the first digit of
your personal code as “0” is the digit to arm the alarm.
Note: The alarm unit must be re-programmed with your
security code each time the batteries are removed or
replaced.
If you are required to change the personal code for any
reason you must remove the batteries. Insert the batteries
following section C, when the last battery is inserted you
will hear a loud beep, now enter your new four digit
security code. You do not need to remove the batteries to
store any new telephone numbers or record a new voice
message.
Storing telephone Number
Press
*
1 and store 1st group of telephone No. and
press
*
to confirm storing. Press
*
2 for 2nd group of
telephone No. and so on. Maximum 3 sets of telephone
number with max 16 digits can be stored.
Note: Only use friends and families telephone numbers.
Do not use emergency service numbers.
Can be used with a PABX phone system.
Recording a message
Press #
1 # the low battery indicator light will
illuminate, you now have 6 seconds to record your
personal message. Once the light goes off your recording
time is over.
Suggested message: This is an alarm call from?
The alarm unit has a permanent memory for stored
telephone Numbers and the recorded voice message.
To change the telephone number or recorded message,
repeat above.
Using the MA80 as a silent alarm.
You have the option to disable the siren by pressing
*
9
*
.To retrieve the siren press #
9 #
Connection to the telephone unit
1. Remove the screw at the base of the alarm unit.
2. Remove the back plate and connect the telephone
socket into the alarm unit 6. The other end of the cable
is connected into the telecom wall socket.
Operation
Leaving the protected area
Press keypad number 0 you will hear a confirmation tone
this will indicate that the alarm is armed. You now have 30
seconds to vacate the area. After this time, if motion is
detected the alarm will start to dial the stored telephone
numbers and the alarm siren will sound 20 seconds after
the first telephone number is dialled.
Entering the protected area
Type in your 4-digit security code within 10 seconds and
this will disarm the alarm.
When the unit is activated, it will dial the first telephone
number stored. If the first telephone number is not
answered within 45 seconds the second stored number
will be dialled and so on. All three stored telephone
numbers will be dialled if the unit is activated
unless the security code is entered to disarm the
alarm.
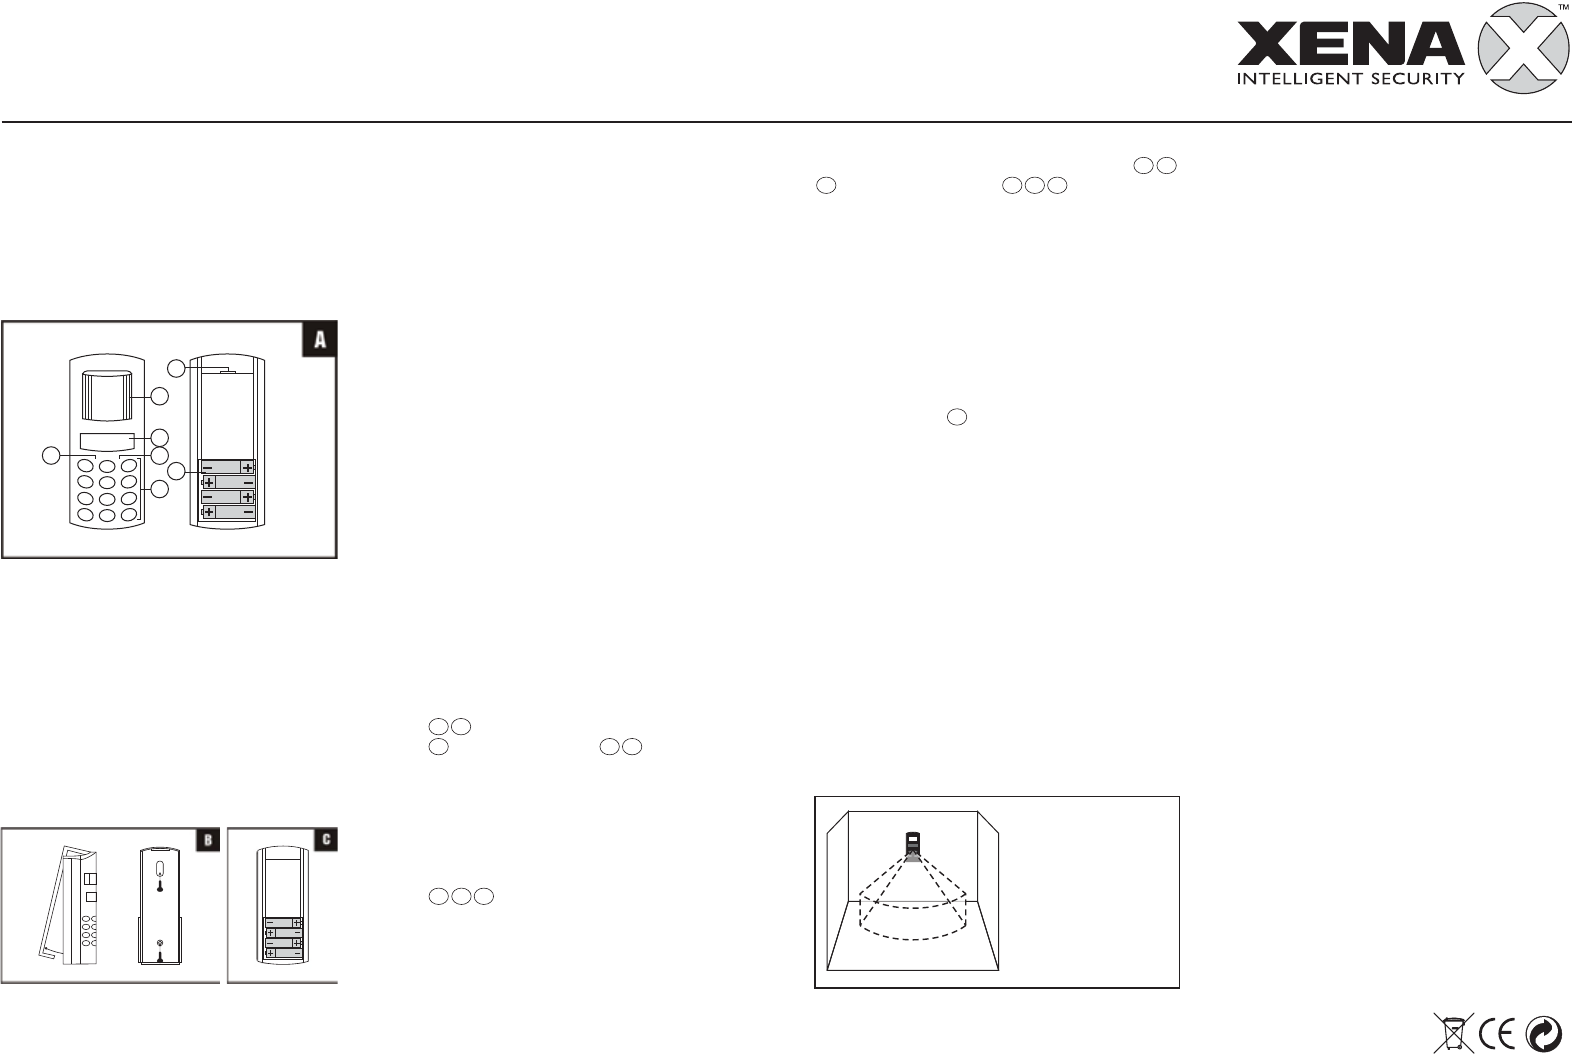
Detection Area
Care and maintenance
To clean the case, simply use a soft slightly damp
cloth with water and wipe dry immediately.
Caution: Never use chemicals to clean the case, as
they may cause damage to the plastic and cause the
alarm not to function.
Troubleshooting
The unit does not sound when the batteries are
installed
Ensure that the batteries are connected correctly
according to the diagram in the battery compartment
The alarm does not arm
Ensure that the back plate of the alarm unit is secure
to hold the batteries in place and that the red light
comes on when the keypad buttons are pressed
The red light located in the middle of the alarm 4
is on
This is the low battery warning indicator light. The
batteries need replacing
Battery precautions
When using this product follow these precautions at all times.
• Use only the appropriate size batteries
• Be sure to follow the correct polarity when
installing the batteries as indicated in the battery
compartment. Incorrect polarity may cause damage
to the alarm.
• Do not mix different types of battery such as
Alkaline and Carbon-zinc or old batteries with new.
• If the alarm is not used for long periods of time,
remove the batteries to prevent damage or injury
from possible battery leakage.
• Do not recharge batteries not intended to be
recharged as they can overheat and rupture.
(Always follow the manufacturer's directions.)
1
2
3
4
5
6
7
8
9
*
0
#
1
2
3
5
7
6
4
*Tested at 25˚C (range may vary
at higher temperature).
120º
061107
Hulp nodig? Stel uw vraag in het forum
Misbruik melden
Gebruikershandleiding.com neemt misbruik van zijn services uitermate serieus. U kunt hieronder aangeven waarom deze vraag ongepast is. Wij controleren de vraag en zonodig wordt deze verwijderd.
Product:
Spelregels forum
Om tot zinvolle vragen te komen hanteren wij de volgende spelregels:
lees eerst de handleiding door;
controleer of uw vraag al eerder door iemand anders is gesteld;
probeer uw vraag zo duidelijk mogelijk te stellen;
heeft u een probleem en al geprobeerd om dit op te lossen, vermeld dit erbij aub;
heeft u een oplossing gekregen van een bezoeker dan horen wij dat graag in dit forum;
wilt u een reactie geven op een vraag of antwoord, gebruik dan niet dit formulier maar klik op de knop 'reageer op deze vraag';
uw vraag wordt direct op de website gezet; vermijd daarom persoonlijke gegevens in te vullen;
Belangrijk! Als er een antwoord wordt gegeven op uw vraag, dan is het voor de gever van het antwoord nuttig om te weten als u er wel (of niet) mee geholpen bent! Wij vragen u dus ook te reageren op een antwoord.
Belangrijk! Antwoorden worden ook per e-mail naar abonnees gestuurd. Laat uw emailadres achter op deze site, zodat u op de hoogte blijft. U krijgt dan ook andere vragen en antwoorden te zien.
Abonneren
Abonneer u voor het ontvangen van emails voor uw Xena XA801 bij:
nieuwe vragen en antwoorden
nieuwe handleidingen
U ontvangt een email met instructies om u voor één of beide opties in te schrijven.
Ontvang uw handleiding per email
Vul uw emailadres in en ontvang de handleiding van Xena XA801 in de taal/talen: Engels als bijlage per email.
De handleiding is 0,17 mb groot.
U ontvangt de handleiding per email binnen enkele minuten. Als u geen email heeft ontvangen, dan heeft u waarschijnlijk een verkeerd emailadres ingevuld of is uw mailbox te vol. Daarnaast kan het zijn dat uw internetprovider een maximum heeft aan de grootte per email. Omdat hier een handleiding wordt meegestuurd, kan het voorkomen dat de email groter is dan toegestaan bij uw provider.
Uw handleiding is per email verstuurd. Controleer uw email
Als u niet binnen een kwartier uw email met handleiding ontvangen heeft, kan het zijn dat u een verkeerd emailadres heeft ingevuld of dat uw emailprovider een maximum grootte per email heeft ingesteld die kleiner is dan de grootte van de handleiding.
Er is een email naar u verstuurd om uw inschrijving definitief te maken.
Controleer uw email en volg de aanwijzingen op om uw inschrijving definitief te maken
U heeft geen emailadres opgegeven
Als u de handleiding per email wilt ontvangen, vul dan een geldig emailadres in.
Uw vraag is op deze pagina toegevoegd
Wilt u een email ontvangen bij een antwoord en/of nieuwe vragen? Vul dan hier uw emailadres in.