Connect the yellow/green earth wire to the terminal with the symbol .
This wire must be longer than the other wires.
1.Remove the terminal block cover (A), undoing the screw and inserting the cover in the terminal block hinge (B).
2.Insert the power cable in the cable clamp and connect the wires to the terminal block as indicated in the connection diagram located near it.
3.Secure the power cable with the cable clamp.
4.Close the cover (C) and screw it on the terminal block with the previously removed screw.
Each time the power is connected, the hob performs an automatic check for a few seconds.
If the hob already has a power cable, follow the instructions attached to the cable. Connect the appliance to the power supply by means of a multipole switch with
minimum contact gap of 3mm.
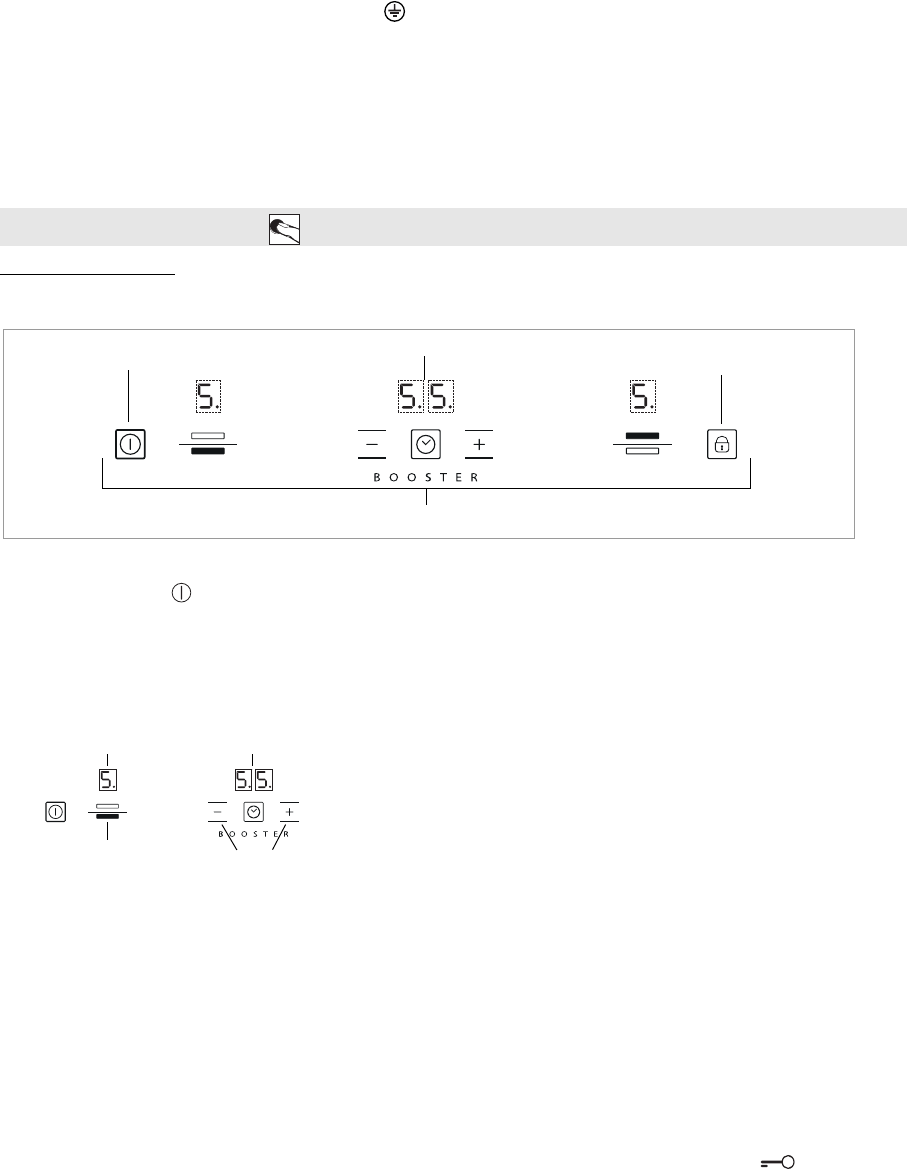
Control Panel Description
Control panel
Switching the hob ON/OFF
To switch the hob on, press the button for approx. 2 seconds until the cooking zone displays light up. To switch off, press the same button until the displays switch
off. All the cooking zones are deactivated
If the hob has been in use, the residual heat indicator “H” remains lit until the cooking zones have cooled down.
If within 10 seconds of switching on, no function is selected, the hob switches off automatically.
Switching on and adjusting cooking zones
After switching the hob on and placing the pot on the chosen cooking zone, adjust the power level using the + button. Upon activation, the display shows level 5.
Each cooking zone has various power levels, adjustable with the +/- buttons, going from “1”: min. power, to “9”: max. power. Some cooking zones have a fast boil
function (Booster), shown on the display with the letter “P”.
Fast boil function (Booster)
This function, only present on some cooking zones, makes it possible to exploit the hob’s maximum power (for example to bring water to the boil very quickly). To select this
function, press the button “+” until “P” appears on the display or, after switching the hob on, press the “-” button for the selected cooking zone. In this case too, “P” appears
on the display. After 10 minutes’ use of the booster function, the appliance automatically sets the zone to level 9.
Deactivation of cooking zones
Select the cooking zone to be switched off by pressing the “+” or “-” key (a dot lights up at the bottom right hand side of the heat setting indicator).
Press the key “-” to set the level to “0”.
The cooking zone can also be switched off by pressing the “+” and “-” buttons at the same time. The cooking zone switches off and the residual heat indicator “H” lights
up.
Control panel lock
This function locks the hob controls to prevent accidental switching on. To activate the control panel lock function, switch on the hob and hold button for three seconds; an
acoustic signal and a luminous indicator above the key signal activation. The control panel is locked except for the deactivation function. To deactivate the control panel lock, repeat
the activation procedure. The luminous dot goes off and the hob is active again.
The presence of cleaning water, liquid spilled from pots or any objects resting on the button below the symbol can accidentally activate or deactivate the control panel
lock function.
INSTRUCTIONS FOR USE
Key lock
Cooking zone controls and corresponding display
On/Off
Timer
Button
Cooking zone position
Heat setting indicator
Timer display
400010780191.book Page 4 Thursday, March 12, 2015 11:39 AM
Gebruikershandleiding.com neemt misbruik van zijn services uitermate serieus. U kunt hieronder aangeven waarom deze vraag ongepast is. Wij controleren de vraag en zonodig wordt deze verwijderd.
Product:
Spelregels forum
Om tot zinvolle vragen te komen hanteren wij de volgende spelregels:
lees eerst de handleiding door;
controleer of uw vraag al eerder door iemand anders is gesteld;
probeer uw vraag zo duidelijk mogelijk te stellen;
heeft u een probleem en al geprobeerd om dit op te lossen, vermeld dit erbij aub;
heeft u een oplossing gekregen van een bezoeker dan horen wij dat graag in dit forum;
wilt u een reactie geven op een vraag of antwoord, gebruik dan niet dit formulier maar klik op de knop 'reageer op deze vraag';
uw vraag wordt direct op de website gezet; vermijd daarom persoonlijke gegevens in te vullen;
Belangrijk! Als er een antwoord wordt gegeven op uw vraag, dan is het voor de gever van het antwoord nuttig om te weten als u er wel (of niet) mee geholpen bent! Wij vragen u dus ook te reageren op een antwoord.
Belangrijk! Antwoorden worden ook per e-mail naar abonnees gestuurd. Laat uw emailadres achter op deze site, zodat u op de hoogte blijft. U krijgt dan ook andere vragen en antwoorden te zien.
Abonneren
Abonneer u voor het ontvangen van emails voor uw Whirlpool acm 712 ix bij:
nieuwe vragen en antwoorden
nieuwe handleidingen
U ontvangt een email met instructies om u voor één of beide opties in te schrijven.
Ontvang uw handleiding per email
Vul uw emailadres in en ontvang de handleiding van Whirlpool acm 712 ix in de taal/talen: Engels als bijlage per email.
De handleiding is 1,27 mb groot.
U ontvangt de handleiding per email binnen enkele minuten. Als u geen email heeft ontvangen, dan heeft u waarschijnlijk een verkeerd emailadres ingevuld of is uw mailbox te vol. Daarnaast kan het zijn dat uw internetprovider een maximum heeft aan de grootte per email. Omdat hier een handleiding wordt meegestuurd, kan het voorkomen dat de email groter is dan toegestaan bij uw provider.
Uw handleiding is per email verstuurd. Controleer uw email
Als u niet binnen een kwartier uw email met handleiding ontvangen heeft, kan het zijn dat u een verkeerd emailadres heeft ingevuld of dat uw emailprovider een maximum grootte per email heeft ingesteld die kleiner is dan de grootte van de handleiding.
Er is een email naar u verstuurd om uw inschrijving definitief te maken.
Controleer uw email en volg de aanwijzingen op om uw inschrijving definitief te maken
U heeft geen emailadres opgegeven
Als u de handleiding per email wilt ontvangen, vul dan een geldig emailadres in.
Uw vraag is op deze pagina toegevoegd
Wilt u een email ontvangen bij een antwoord en/of nieuwe vragen? Vul dan hier uw emailadres in.