539921
1
Verklein
Vergroot
Pagina terug
1/2
Pagina verder
GB
THIS FUNCTION IS USED for quick reheating of food with a
high water content such as clear soups, co ee or tea.
q
PRESS THE JET START BUTTON.
THIS FUNCTION AUTOMATICAL-
LY STARTS with maximum mi-
crowave power level and the cooking time set to 30
seconds. Each additional press increases the time with
30 seconds. You may also alter the time by turning the
adjust knob to increase or decrease the time after the
function has started.
GT 285
THE CLOCK IS SET and in operation.
DURING YOUR SETTING, if you press the Stop button it will
exit the setting and enter standby mode with only colon
shown.
NOTE: If current clock setting is not completed till clock
set mode time out (1 minute), it will enter Standby mode
with only colon shown.
q
TURN THE ADJUST KNOB to set the hour when the left-
hand digit (hours) blinking.
w
PRESS START BUTTON to set the hours.
e
TURN THE ADJUST KNOB to set the minute when the
two right hand digit (minutes) blinking.
r
PRESS START BUTTON to set the minutes.
USE THIS FUNCTION TO cook lasagne,  sh gratins and veg-
etable gratins.
D
O NOT USE PLASTIC utensils when grilling. They will
melt. Items of wood or paper are not suitable either.
ENSURE THAT THE UTENSILS used are microwave safe and
heat resistant when you use this function. Place the
utensil on the glass turntable.
DURING COOKING TIME, It is possible to adjust the cook time
by turning the adjust knob.
q
PRESS THE GRATIN BUTTON.
w
TURN THE ADJUST KNOB to set the cooking time.
e
PRESS THE START BUTTON.
I
T IS NOT POSSIBLE TO CHANGE OR SWITCH the Power level or
Grill on/o , when using the Gratin function.
USE
TH
IS
FUN
CTI
ON
TO
co
co
k
ok
ok
l
las
las
agn
agn
e
e,
s
s
h
hg
hg
t
rat
i
ins
an
d
d v
-
GRATIN
SUPPLY VOLTAGE 230 V/50 HZ
RATED POWER INPUT 1900 W
FUSE 10 A (UK 13 A)
MW OUTPUT POWER 700 W
GRILL 900 W
OUTER DIMENSIONS (HXWXD) 299 X 521 X 391
INNER DIMENSIONS (HXWXD) 200 X 326 X 320
H
IS F
U
N
C
TI
O
N I
S U
S U
SED
SED
f
fo
fo
rq
r q
i
uic
uic
k
k
kr
k
r
h
h
ehe
ehe
ti
ati
ati
ng
ng
f
of
of
f
foo
foo
d
dw
d w
ith
ith
a
JET START
CLOCK
MICROWAVES ONLY
P
OWER SUGGESTED USE:
JET
(700 W)
REHEATING OF BEVERAGES, water, clear soups,
co ee, tea or other food with a high water
content. If the food contains egg or cream
choose a lower power.
500 W
MORE CAREFUL COOKING e.g. high protein
sauces, cheese and egg dishes and to  nish
cooking casseroles.
350 W S
IMMERING STEWS, melting butter.
160 W D
EFROSTING. Softening butter, cheeses.
90 W SOFTENING Ice cream.
QUICK REFERENCE GUIDE
CONTROL PANEL
PAUSE OR STOP COOKING
TO PAUSE COOKING:
THE COOKING CAN BE PAUSED to check, turn or stir the
food by opening the door. The setting will be main-
tained for 10 minutes.
T
O CONTINUE COOKING:
CLOSE THE DOOR and press the Jet Start button
ONCE. The cooking is resumed from where it
was paused.
PRESSING THE STAR T BUTTON TWICE will increase the
time by 30 seconds.
I
F YOU DONT WANT TO CONTINUE COOKING:
REMOVE THE FOOD, close the door and press the
STOP button.
NOTE: After cooking ends, the fan, turntable and
cavity lamp is on before pressing STOP button, it’s
normal.
A
BEEP WILL SIGNAL once a minute for 10 minutes when
the cooking is  nished. Press the STOP
button or open the door to cancel the
signal.
NOTE: The oven will only hold the settings for 60
seconds if the door is opened and then closed after
the cooking is  nished.
COOK & REHEAT WITH MICROWAVES
USE THIS FUNCTION for normal cooking and reheating,
such as vegetables,  sh, potatoes and meat.
O
NCE THE COOKING PROCESS HAS BEEN STARTED:
The time can easily be increased in 30-second steps by
pressing the Start button. Each press increases the time
with 30 seconds. You may also alter the time by turning
the adjust knob to increase or decrease the time.
q
PRESS THE POWER BUTTON repeatedly to set the power.
w
TURN THE ADJUST KNOB to set
the cooking time.
e
PRESS THE JET START BUTTON.
CHILD LOCK
THIS AUTOMATIC SAFETY FUNCTION IS ACTIVATED 1
MINUTES AFTER the oven has returned to “stand
bymode“. In this mode the door will be
locked.
T
HE DOOR MUST BE OPENED AND CLOSED e.g. putting food into
it, before the safety lock is released. Else the display will
show DOOR.
WHEN THE APPLIANCE IS FIRST PLUGGED IN or after a power
failure, it will enter clock setting mode automatically.
POWER BUTTON
Use to set the desired
microwave power level.
S
TOP BUTTON
Press to stop or reset any of
the oven functions.
J
ET DEFROST BUTTON
Use to select Jet Defrost func-
tion and select type of food to
be defrosted.
ADJUST KNOB
Use to set the cooking time or
weight.
G
RATIN BUTTON
Use to select Gratin function.
G
RILL BUTTON
Use to select Grill function.
JET START BUTTON
Use to start the cooking
process or invoke the Jet
Start function.
DIGITAL DISPLAY
The display includes a 24-hour
clock and indicator symbols.
C
RISP BUTTON
Use to select Crisp function.
J
ET MENU CRISP BUTTON
Use to select Jet Menu Crisp
function and select food
class.
S
UPPLY
VO
LTAGE
230
230
230
V/
V/
V/
50
50
H
HZ
TECHNICAL SPECIFICATION
1

Hulp nodig? Stel uw vraag in het forum

Spelregels
1

Forum

Whirlpool-GT-285

Zoeken resetten

  • Waar kan ik een crispplaat kopen voor whirlpool gt 285 Gesteld op 16-1-2023 om 14:12

    Reageer op deze vraag Misbruik melden
  • Waar kan ik een crispplaat kopen voor whirhlpool gt285 Gesteld op 16-1-2023 om 14:07

    Reageer op deze vraag Misbruik melden
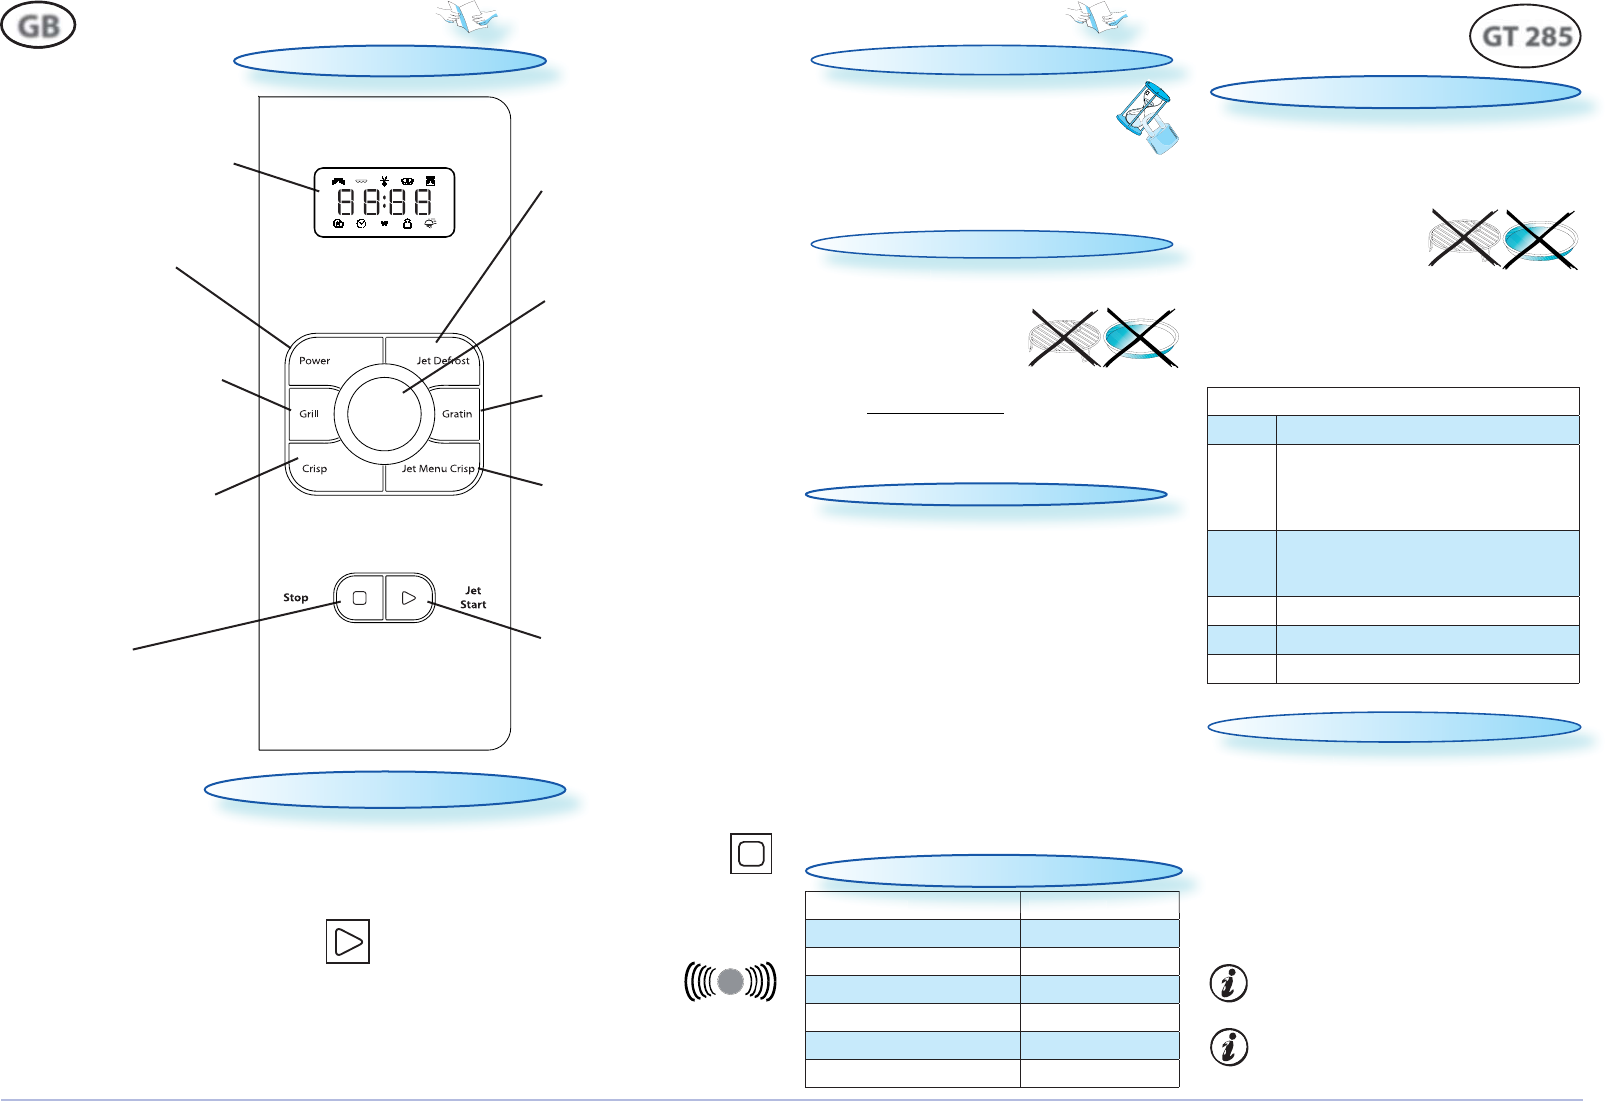
  • Wat is de betekenis van de indicatiesymbolen?
    Die bevinden zich boven en onder de digitale weergave van klok Gesteld op 17-10-2022 om 13:47

    Reageer op deze vraag Misbruik melden
  • Ik heb een whirlpool gt 385 kan daar ook de klok voor in te stellen staat ook niks van bij in de handleiding .ben het al gaan vragen in de winkel waar ik hem gekocht heb maar die weten het ook niet .kan zelfs geen handleiding vinden op internet want hij komt niet in het lijstje voor daar deze toch nog verkocht word wil ik wel contact opnemen met de leveransier maar waar moet ik die zoeken of weet iemand hoe ik de tijd kan instellen bvb dank Gesteld op 8-8-2015 om 23:09

    Reageer op deze vraag Misbruik melden
    • Trek de stekker uit het stopcontact en wacht een 20 seconden, dan terug in het stopcontact,dan zal het linkse puntje van de 2 stippen pinken en dat is de uur instelling , draai aan de afstelknop tot u het gewenste uur hebt bereikt en leg dit uur vast door op de onderste knop rechts te drukken ,het uur is nu vastgelegd.Het rechtse puntje van de minuten zal nu beginnen pinken, herhaal dit zoals bij de uur en leg tenslotte vast door op de onderste knop rechts te drukken. Voila de uur en minuten staan op magnetron
      ' Geantwoord op 29-11-2015 om 20:26

      Waardeer dit antwoord (3) Misbruik melden
  • Juist magnetron gekocht, kan klok niet instellen volgens handleiding. Zelfs van de gesproken puntjes die moeten verschijnen links en rechts is geen teken.?
    Gesteld op 11-12-2014 om 19:37

    Reageer op deze vraag Misbruik melden
  • Heb de handleiding helemaal grondig gelezen, maar de klok kan ik niet instellen.
    Er pinkt zelfs links of rechts geen lampje. Enkel de twee puntjes boven elkaar lichten op.
    Voor de rest doet hij niets als ik zoals vermeld in het boekje naar links of rechts draai met de afstelknop.? Gesteld op 11-12-2014 om 19:09

    Reageer op deze vraag Misbruik melden
  • 6
  • hoe kan ik de klok van een Whirlpool magnetron GT 285 terugdraaien? Dank voor uw antwoord. Gesteld op 26-10-2014 om 10:24

    Reageer op deze vraag Misbruik melden

Misbruik melden

Gebruikershandleiding.com neemt misbruik van zijn services uitermate serieus. U kunt hieronder aangeven waarom deze vraag ongepast is. Wij controleren de vraag en zonodig wordt deze verwijderd.

Product:

Bijvoorbeeld antisemitische inhoud, racistische inhoud, of materiaal dat gewelddadige fysieke handelingen tot gevolg kan hebben.

Bijvoorbeeld een creditcardnummer, een persoonlijk identificatienummer, of een geheim adres. E-mailadressen en volledige namen worden niet als privégegevens beschouwd.

Spelregels forum

Om tot zinvolle vragen te komen hanteren wij de volgende spelregels:

Belangrijk! Als er een antwoord wordt gegeven op uw vraag, dan is het voor de gever van het antwoord nuttig om te weten als u er wel (of niet) mee geholpen bent! Wij vragen u dus ook te reageren op een antwoord.

Belangrijk! Antwoorden worden ook per e-mail naar abonnees gestuurd. Laat uw emailadres achter op deze site, zodat u op de hoogte blijft. U krijgt dan ook andere vragen en antwoorden te zien.

Abonneren

Abonneer u voor het ontvangen van emails voor uw Whirlpool GT 285 bij:


U ontvangt een email met instructies om u voor één of beide opties in te schrijven.


Ontvang uw handleiding per email

Vul uw emailadres in en ontvang de handleiding van Whirlpool GT 285 in de taal/talen: Engels als bijlage per email.

De handleiding is 0,32 mb groot.


U ontvangt de handleiding per email binnen enkele minuten. Als u geen email heeft ontvangen, dan heeft u waarschijnlijk een verkeerd emailadres ingevuld of is uw mailbox te vol. Daarnaast kan het zijn dat uw internetprovider een maximum heeft aan de grootte per email. Omdat hier een handleiding wordt meegestuurd, kan het voorkomen dat de email groter is dan toegestaan bij uw provider.

Andere handleiding(en) van Whirlpool GT 285

Whirlpool GT 285 Snelstart handleiding - Nederlands - 2 pagina's

Whirlpool GT 285 Gebruiksaanwijzing - Nederlands - 8 pagina's

Whirlpool GT 285 Snelstart handleiding - Deutsch - 2 pagina's

Whirlpool GT 285 Gebruiksaanwijzing - Deutsch - 8 pagina's

Whirlpool GT 285 Gebruiksaanwijzing - English - 8 pagina's

Whirlpool GT 285 Snelstart handleiding - Français - 2 pagina's

Whirlpool GT 285 Gebruiksaanwijzing - Français - 8 pagina's


Uw handleiding is per email verstuurd. Controleer uw email

Als u niet binnen een kwartier uw email met handleiding ontvangen heeft, kan het zijn dat u een verkeerd emailadres heeft ingevuld of dat uw emailprovider een maximum grootte per email heeft ingesteld die kleiner is dan de grootte van de handleiding.

Er is een email naar u verstuurd om uw inschrijving definitief te maken.

Controleer uw email en volg de aanwijzingen op om uw inschrijving definitief te maken

U heeft geen emailadres opgegeven

Als u de handleiding per email wilt ontvangen, vul dan een geldig emailadres in.

Uw vraag is op deze pagina toegevoegd

Wilt u een email ontvangen bij een antwoord en/of nieuwe vragen? Vul dan hier uw emailadres in.


Info