Specifications, technical data and images may vary
from model to model.
Connect the appliance to the water supply and power
supply (see Installation manual).
Read the user handbook carefully before using the
appliance.
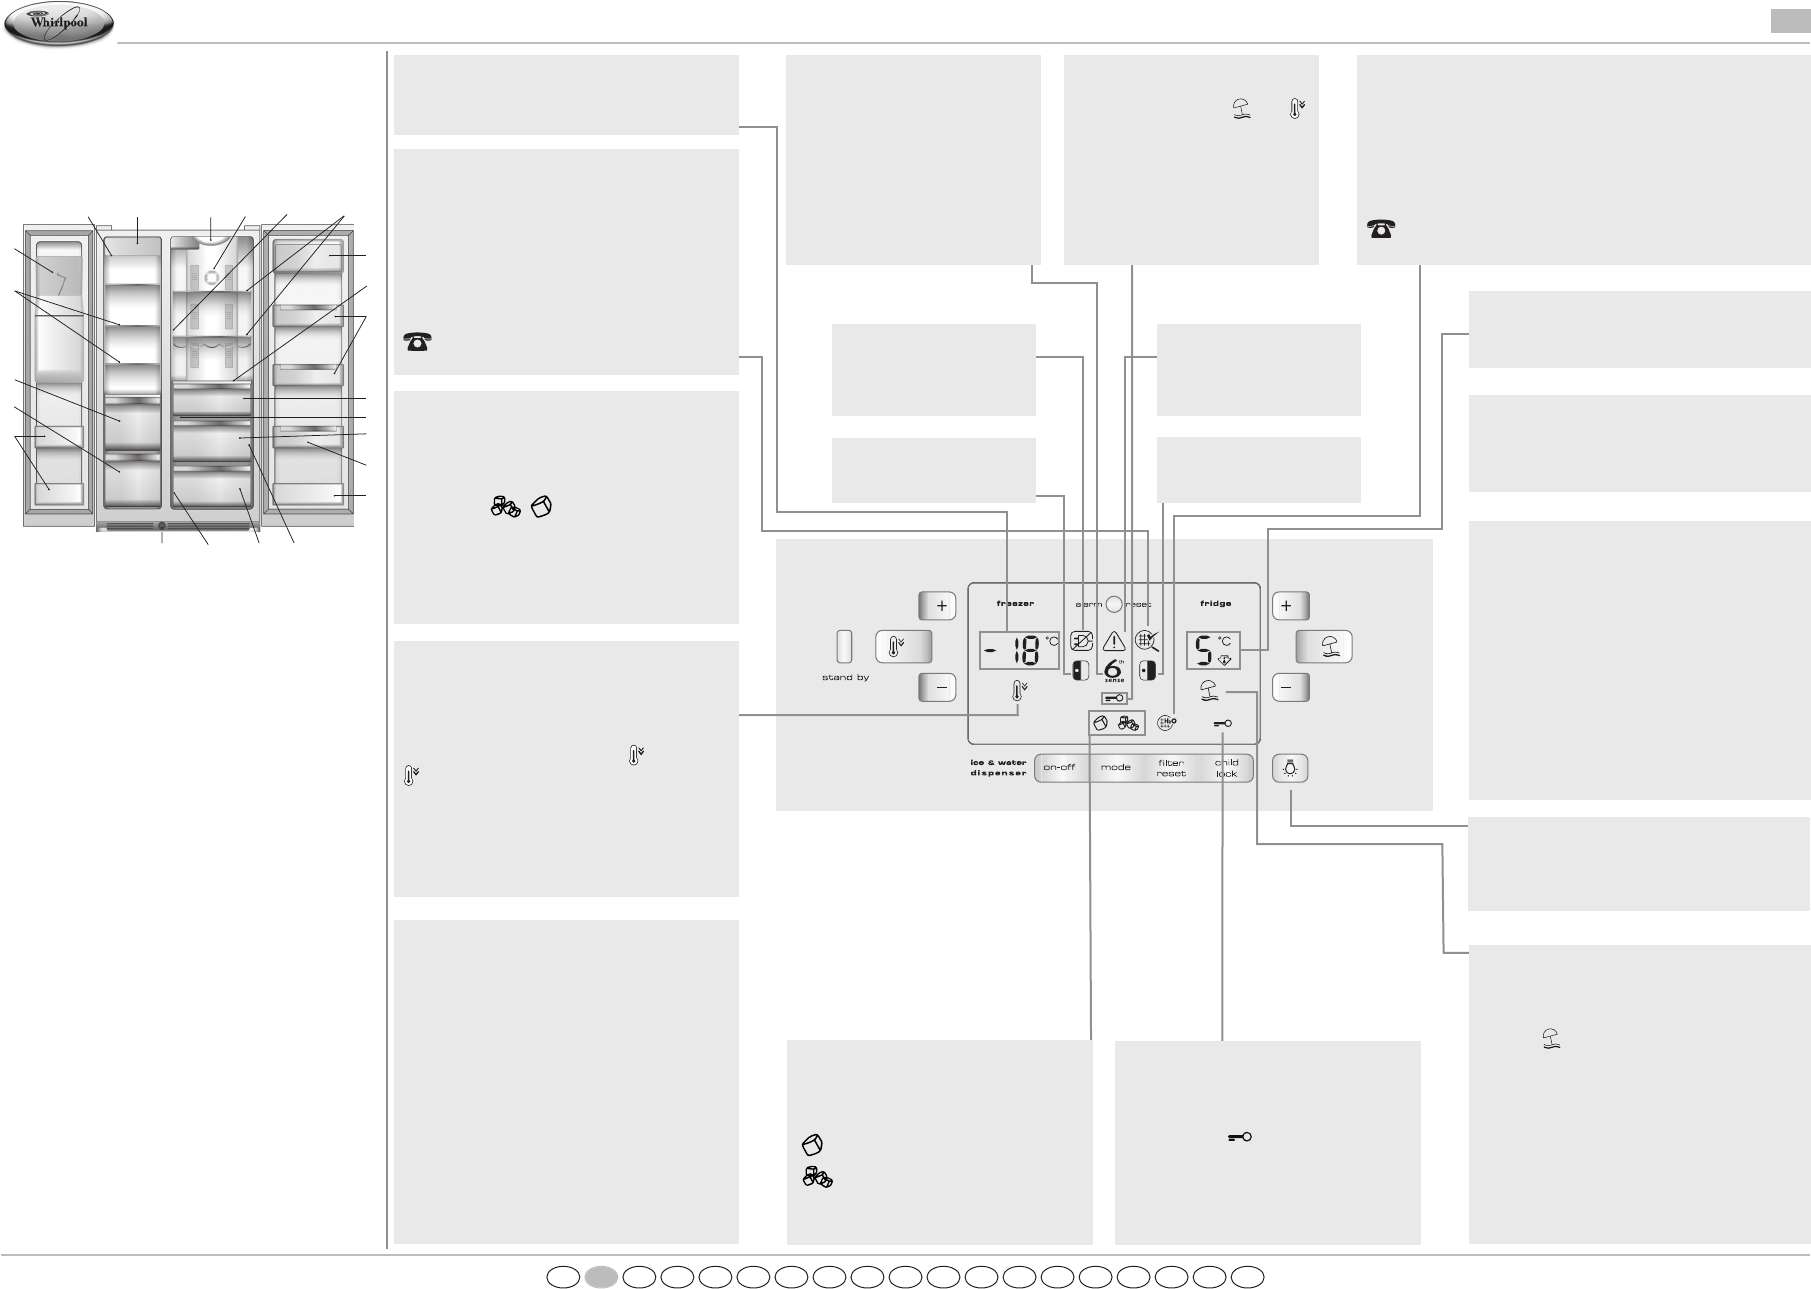
Alarm Reset
(Acoustic alarm mute button)
Press the "Alarm Reset" button to stop the
acoustic alarm.
Standby
Press the "Standby" button for 3 seconds to
disable both compartments. In Standby mode the
displays do not show any symbols except for a
hyphen on the freezer display. To restore normal
operation, press the button until the previous
temperature settings are displayed.
Note: This operation will not disconnect the
appliance from the power supply.
After activating this function, remove all
perishable foodstuffs from the product.
Eco Mode
This function enables you to save energy. To
enable the function, press the refrigerator
compartment "+" button, then the "-" button, and
keep them pressed simultaneously for 5 seconds
until the display turns off.
When the function is activated, the display only
lights up and shows the word ECO when you use
the appliance or the control panel, otherwise the
display will remain off. Remember that this
operation does not disconnect the appliance from
the power supply. To restore normal operation,
carry out the same procedure until the previous
temperatures are displayed.
Child Lock
(Water / ice dispenser lock)
To lock/unlock the water/ice dispenser and
related buttons, press the "Child Lock"
button until the symbol is displayed and
the acoustic signal sounds.
Mode
(Type of ice)
Press the "Mode" button to select the
desired type of ice.
- = ice cubes
- = crushed ice
Vacation Mode
(Vacation Function)
This function can be used during extended
absences.
Press the button to enable/disable the
function. When the function is enabled, the related
symbol lights up and the refrigerator compartment
becomes much less cold. After activating this
function, remove all perishable foodstuffs from the
compartment and leave the door closed: the
refrigerator will maintain the right temperature to
prevent odours from forming.
The freezer compartment remains enabled: it is
therefore possible to continue to use it as usual.
Refrigerator compartment temperature
Press the "+" and "-" buttons to change the
temperature setting.
Water filter (where provided)
The colour of the symbol indicates the condition of the filter.
Blue or Green (depending on the model): new filter
Yellow: filter in good condition
Red: filter needs replacing.
After replacing the filter, press the "Filter reset" button until the
symbol becomes blue or green.
For Europe only
00800-40088400 - www.whirlpool.eu/myfridge
Malfunction Alarm
See section "What to do if...".
Blackout Alarm
See section "What to do if...".
Freezer compartment
door open
Refrigerator
compartment door open
6th Sense
(Sixth Sense Function)
This activates automatically to signal
that the appliance is working to
reach optimal storage conditions.
Freezer compartment temperature
Press the "+" and "-" buttons to change the
temperature setting.
Anti-bacterial and anti-odour filter
(where provided)
The colour of the symbol indicates the condition of
the filter.
Blue or no symbol: new filter
Yellow: filter in good condition
Red: filter needs replacing.
After replacing the filter, press the "Alarm Reset"
button until the symbol disappears or becomes blue.
For Europe only
00800-40088400 - www.whirlpool.eu/myfridge
Fast freezing
(Fast Freeze Function)
To be activated several hours before the food to
be frozen is placed in the freezer compartment
(24 hours before freezing large quantities of food).
To activate this function, press the button: the
symbol will be displayed.
The function disables automatically after 24 hours
or can be switched off manually by pressing the
button again.
On/Off
(Enabling/disabling the automatic ice maker)
Press the "On/Off" button to enable/disable the
automatic ice maker. When the automatic ice
maker is enabled, the display will show one of the
two symbols
Important: if the appliance is not connected to
the water supply, the automatic ice maker must be
disabled.
Light
(Water and ice dispenser light)
Press the button to switch the dispenser light
on/off.
Key Lock
To lock/unlock the buttons on the
control panel, press the and
buttons at the same time until the
symbol is displayed and the acoustic
signal sounds.