Thank you for selecting and buying V-TAC product. V-TAC will serve you the best. Please read
these instructions carefully before starting the installing and keep this manual handy for future
reference. If you have any another query, please contact our dealer or local vendor from whom
you have purchased the product. They are trained and ready to serve you at the best.
WARNING!
1. Please make sure to turn off the power before starting the installation.
1. Check that your mains supply is correct for the doorbell receiver.
2. The receiver is for indoor use only. Do not use outside or allow to become wet.
3. There are no user-serviceable parts. Do not attempt to repair either the transmitter or the
receiver by yourself.
THE FIRST USE GUIDE:
1. Plug the receiver into a mains socket and switch the socket on.
2. Press the transmitter push button and confirm that the transmitter indicator flashes, the doorbell
receiver sounds “Ding-Ding” and the receiver indicator flashes. The doorbell is paired. The default
ringtone is “Ding-Dong”. Users can change the ringtone easily, just refer to the “CHANGING THE
RINGTONE” steps.
CHANGING THE RINGTONE / PAIRING:
Step 1: Press the Backward or Forward button on the receiver to choose your favorite melody.
Step 2: Press and hold down the Volume button on the receiver for 5 seconds, until it makes a
“Ding” sound and the receiver indicator flashes (that means the doorbell entered into the Pairing
Mode, the pairing mode will only last 8 seconds, then it will automatically exit).
Step 3: Press the button on the transmitter quickly, it will makes a “Ding-Ding” sound and the
receiver indicator flashes.
Step 4: Press the button on the transmitter again to confirm whether the current ringtone is the one
you have set, if yes, the pairing is completed.
Remark: This method is also suitable for adding/pairing additional transmitters.
CLEARING THE SETTINGS:
Press and hold down the Forward button on the receiver for 5 seconds,
until it makes a “Ding” sound and the receiver indicator flashes, all the
settings will
be cleared, the doorbell will back to the factory default settings (it means
that the ringtone you have set and the transmitters you have add-
ed/paired will be cleared).
INSTALLATION:
1. Plug the receiver into a mains socket and switch the socket on.
2. Place the transmitter exactly where you intend to fix and, with the doors closed, confirm that the
doorbell receiver still sounds when you press the transmitter push button ( If the doorbell receiver does
not sound, this may be due to metal within the fixing surface and you may need to reposition the
transmitter ).
3. Fix the transmitter in place with bracket.
ADJUSTMENTS:
1. The volume of the doorbell may be adjusted to one of five levels. Press the Volume button on the
receiver to increase the volume by one level, the receiver will sound to indicate the selected level. If the
maximum level is already set, the doorbell will switch to the minimum level, which is the Silent Mode.
2. The melody played by the doorbell may be set to any one of 55 different selections. Press the Back-
ward or Forward button to select the next available melody, the receiver will sound to indicate the
selected melody. To set the doorbell ringtone to the selected melody, please refer to the “CHANGING
THE RINGTONE” steps.
CHANGING THE BATTERY:
1. Insert the Mini Screwdriver in the cover slot at the bottom of the transmitter and twist to release the
transmitter from the cover.
2. Remove the exhausted battery and dispose of properly.
3.Insert the new battery into the battery compartment. Observe
correct battery polarity (+ve and -ve), or the unit will not function and may be damaged.
4. Refit the transmitter to the cover, with the push button at the bottom.
In case of any query/issue with the product, please reach out to us at: support@v-tac.eu
For More products range, inquiry please contact our distributor or nearest dealers.
V-TAC EUROPE LTD. Bulgaria, Plovdiv 4000, bul.L.Karavelow 9B
This marking indicates that this product should
not be disposed of with other household wastes.
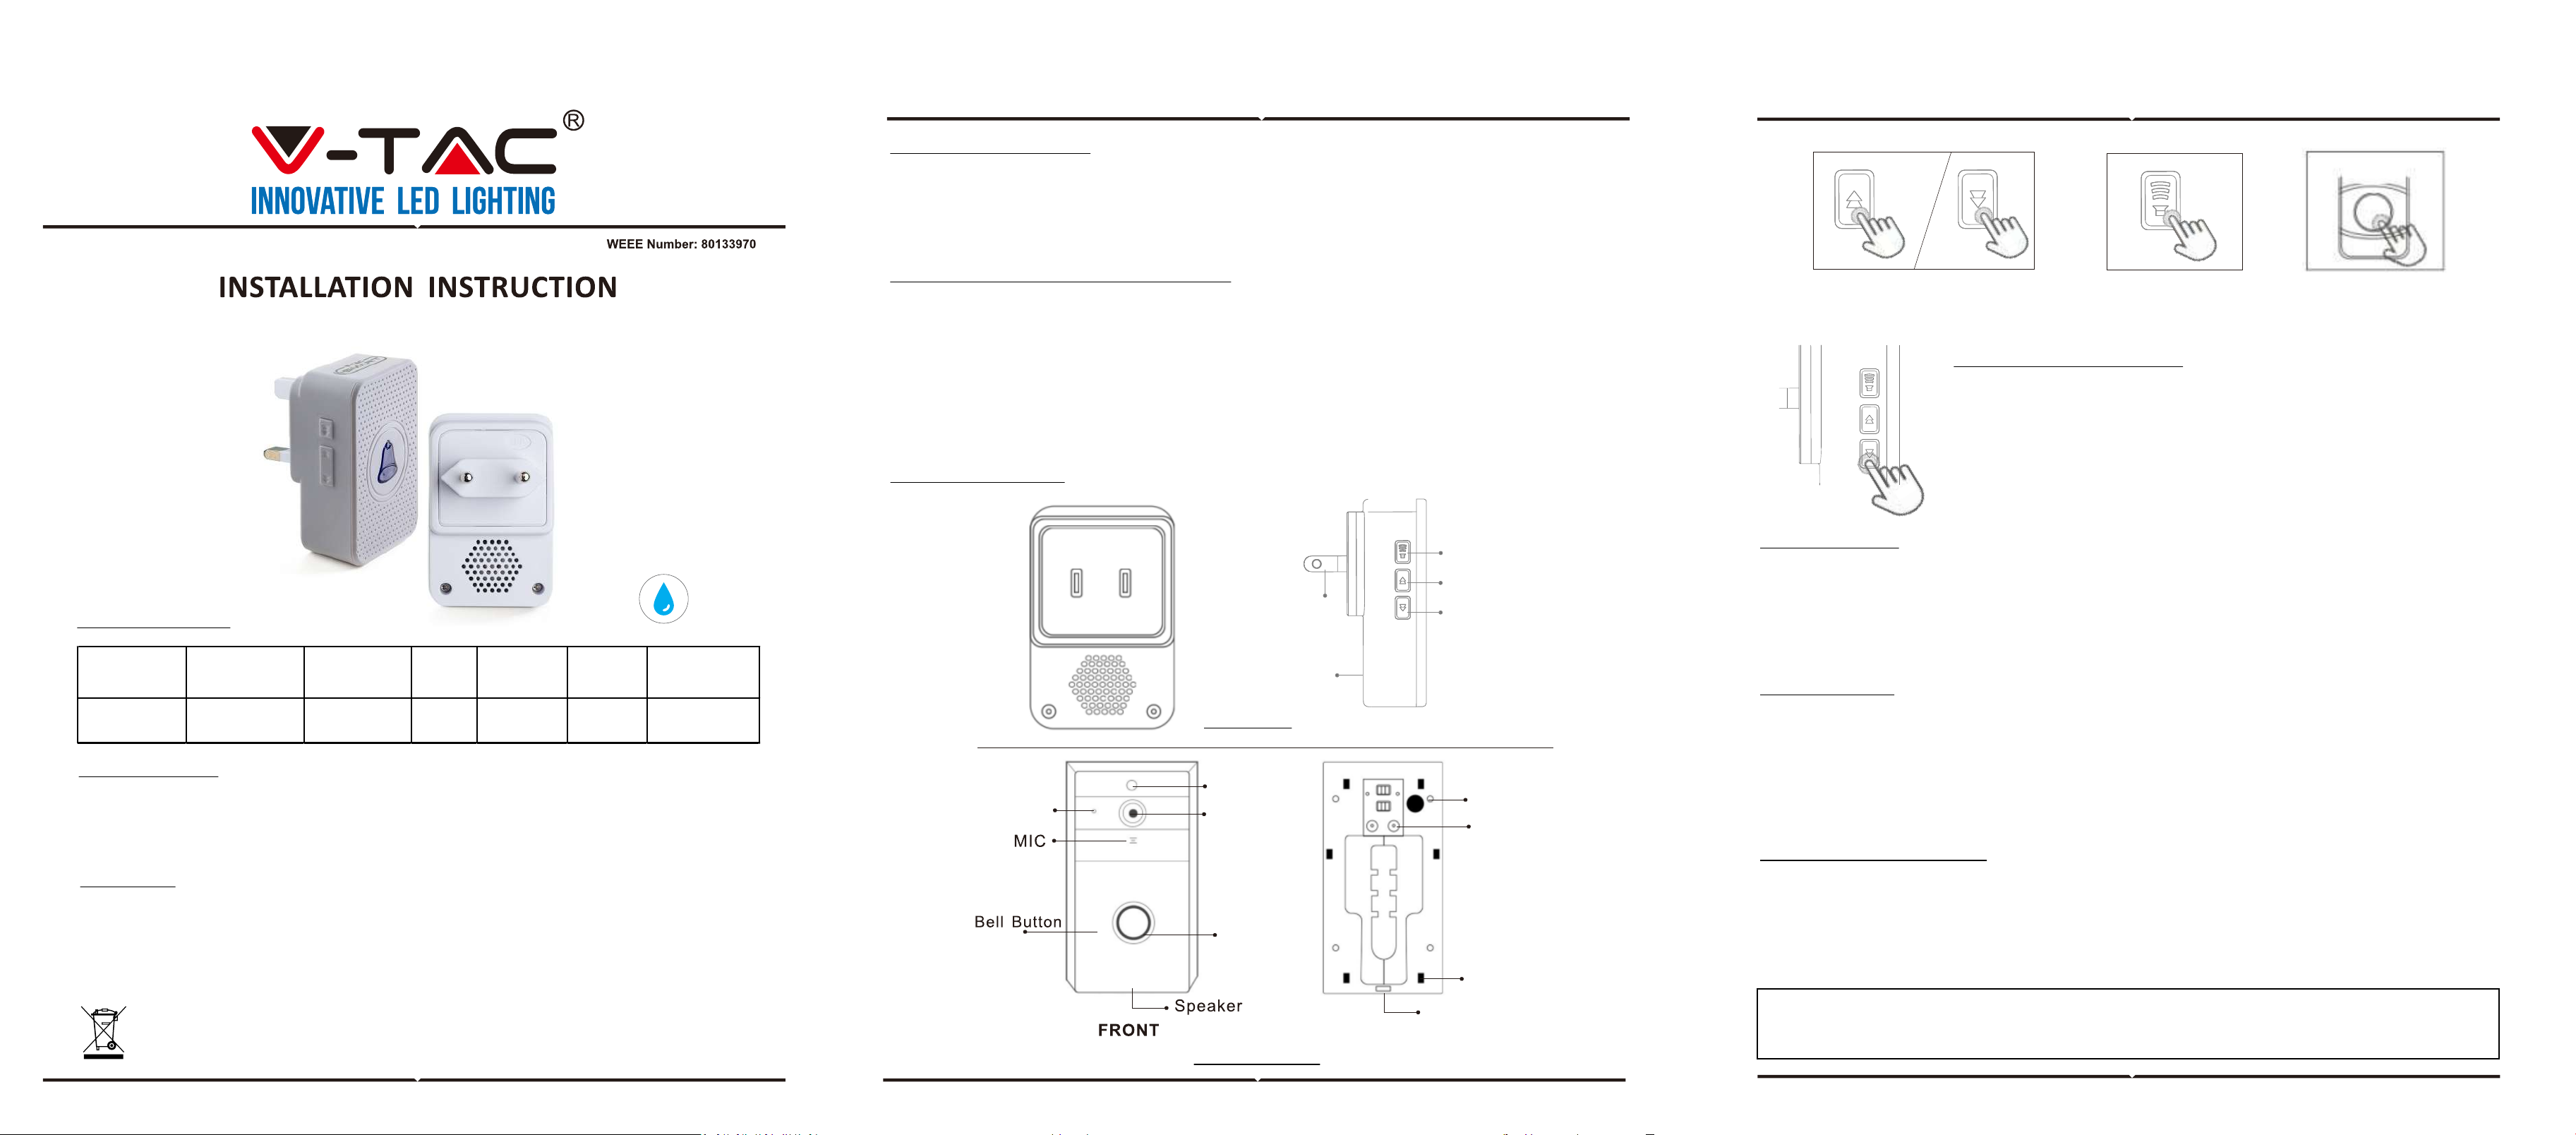
RECEIVER
PRODUCT DIAGRAM
TRANSMITTER
Speaker
AC Plug
Volume
Backward
Forward
Indicator Light
Light SensorPIR
HD 720P
Camera LensAC Input Hole
Stuck Hole
Security Screw
Backet Screws
Hole
BRACKET
STEP 1STEP 2STEP 3 - 4
IP55
RATING
INPUT POWERBATTERYOPERATION
TEMPERATURE
IP
RATING
NO OF
RINGTONES
OBJECT
DISTANCE
DECIBEL
LEVELS
AC:110-260V3.7V, 3400 mAH-30°C to 70°C /
-22°F to 158°FIP55551000 FT. /
300M
0-110 DB, 5
LEVELS
Hulp nodig? Stel uw vraag in het forum
Misbruik melden
Gebruikershandleiding.com neemt misbruik van zijn services uitermate serieus. U kunt hieronder aangeven waarom deze vraag ongepast is. Wij controleren de vraag en zonodig wordt deze verwijderd.
Product:
Spelregels forum
Om tot zinvolle vragen te komen hanteren wij de volgende spelregels:
lees eerst de handleiding door;
controleer of uw vraag al eerder door iemand anders is gesteld;
probeer uw vraag zo duidelijk mogelijk te stellen;
heeft u een probleem en al geprobeerd om dit op te lossen, vermeld dit erbij aub;
heeft u een oplossing gekregen van een bezoeker dan horen wij dat graag in dit forum;
wilt u een reactie geven op een vraag of antwoord, gebruik dan niet dit formulier maar klik op de knop 'reageer op deze vraag';
uw vraag wordt direct op de website gezet; vermijd daarom persoonlijke gegevens in te vullen;
Belangrijk! Als er een antwoord wordt gegeven op uw vraag, dan is het voor de gever van het antwoord nuttig om te weten als u er wel (of niet) mee geholpen bent! Wij vragen u dus ook te reageren op een antwoord.
Belangrijk! Antwoorden worden ook per e-mail naar abonnees gestuurd. Laat uw emailadres achter op deze site, zodat u op de hoogte blijft. U krijgt dan ook andere vragen en antwoorden te zien.
Abonneren
Abonneer u voor het ontvangen van emails voor uw V-Tac VT-5413 bij:
nieuwe vragen en antwoorden
nieuwe handleidingen
U ontvangt een email met instructies om u voor één of beide opties in te schrijven.
Ontvang uw handleiding per email
Vul uw emailadres in en ontvang de handleiding van V-Tac VT-5413 in de taal/talen: Engels als bijlage per email.
De handleiding is 0,18 mb groot.
U ontvangt de handleiding per email binnen enkele minuten. Als u geen email heeft ontvangen, dan heeft u waarschijnlijk een verkeerd emailadres ingevuld of is uw mailbox te vol. Daarnaast kan het zijn dat uw internetprovider een maximum heeft aan de grootte per email. Omdat hier een handleiding wordt meegestuurd, kan het voorkomen dat de email groter is dan toegestaan bij uw provider.
Uw handleiding is per email verstuurd. Controleer uw email
Als u niet binnen een kwartier uw email met handleiding ontvangen heeft, kan het zijn dat u een verkeerd emailadres heeft ingevuld of dat uw emailprovider een maximum grootte per email heeft ingesteld die kleiner is dan de grootte van de handleiding.
Er is een email naar u verstuurd om uw inschrijving definitief te maken.
Controleer uw email en volg de aanwijzingen op om uw inschrijving definitief te maken
U heeft geen emailadres opgegeven
Als u de handleiding per email wilt ontvangen, vul dan een geldig emailadres in.
Uw vraag is op deze pagina toegevoegd
Wilt u een email ontvangen bij een antwoord en/of nieuwe vragen? Vul dan hier uw emailadres in.