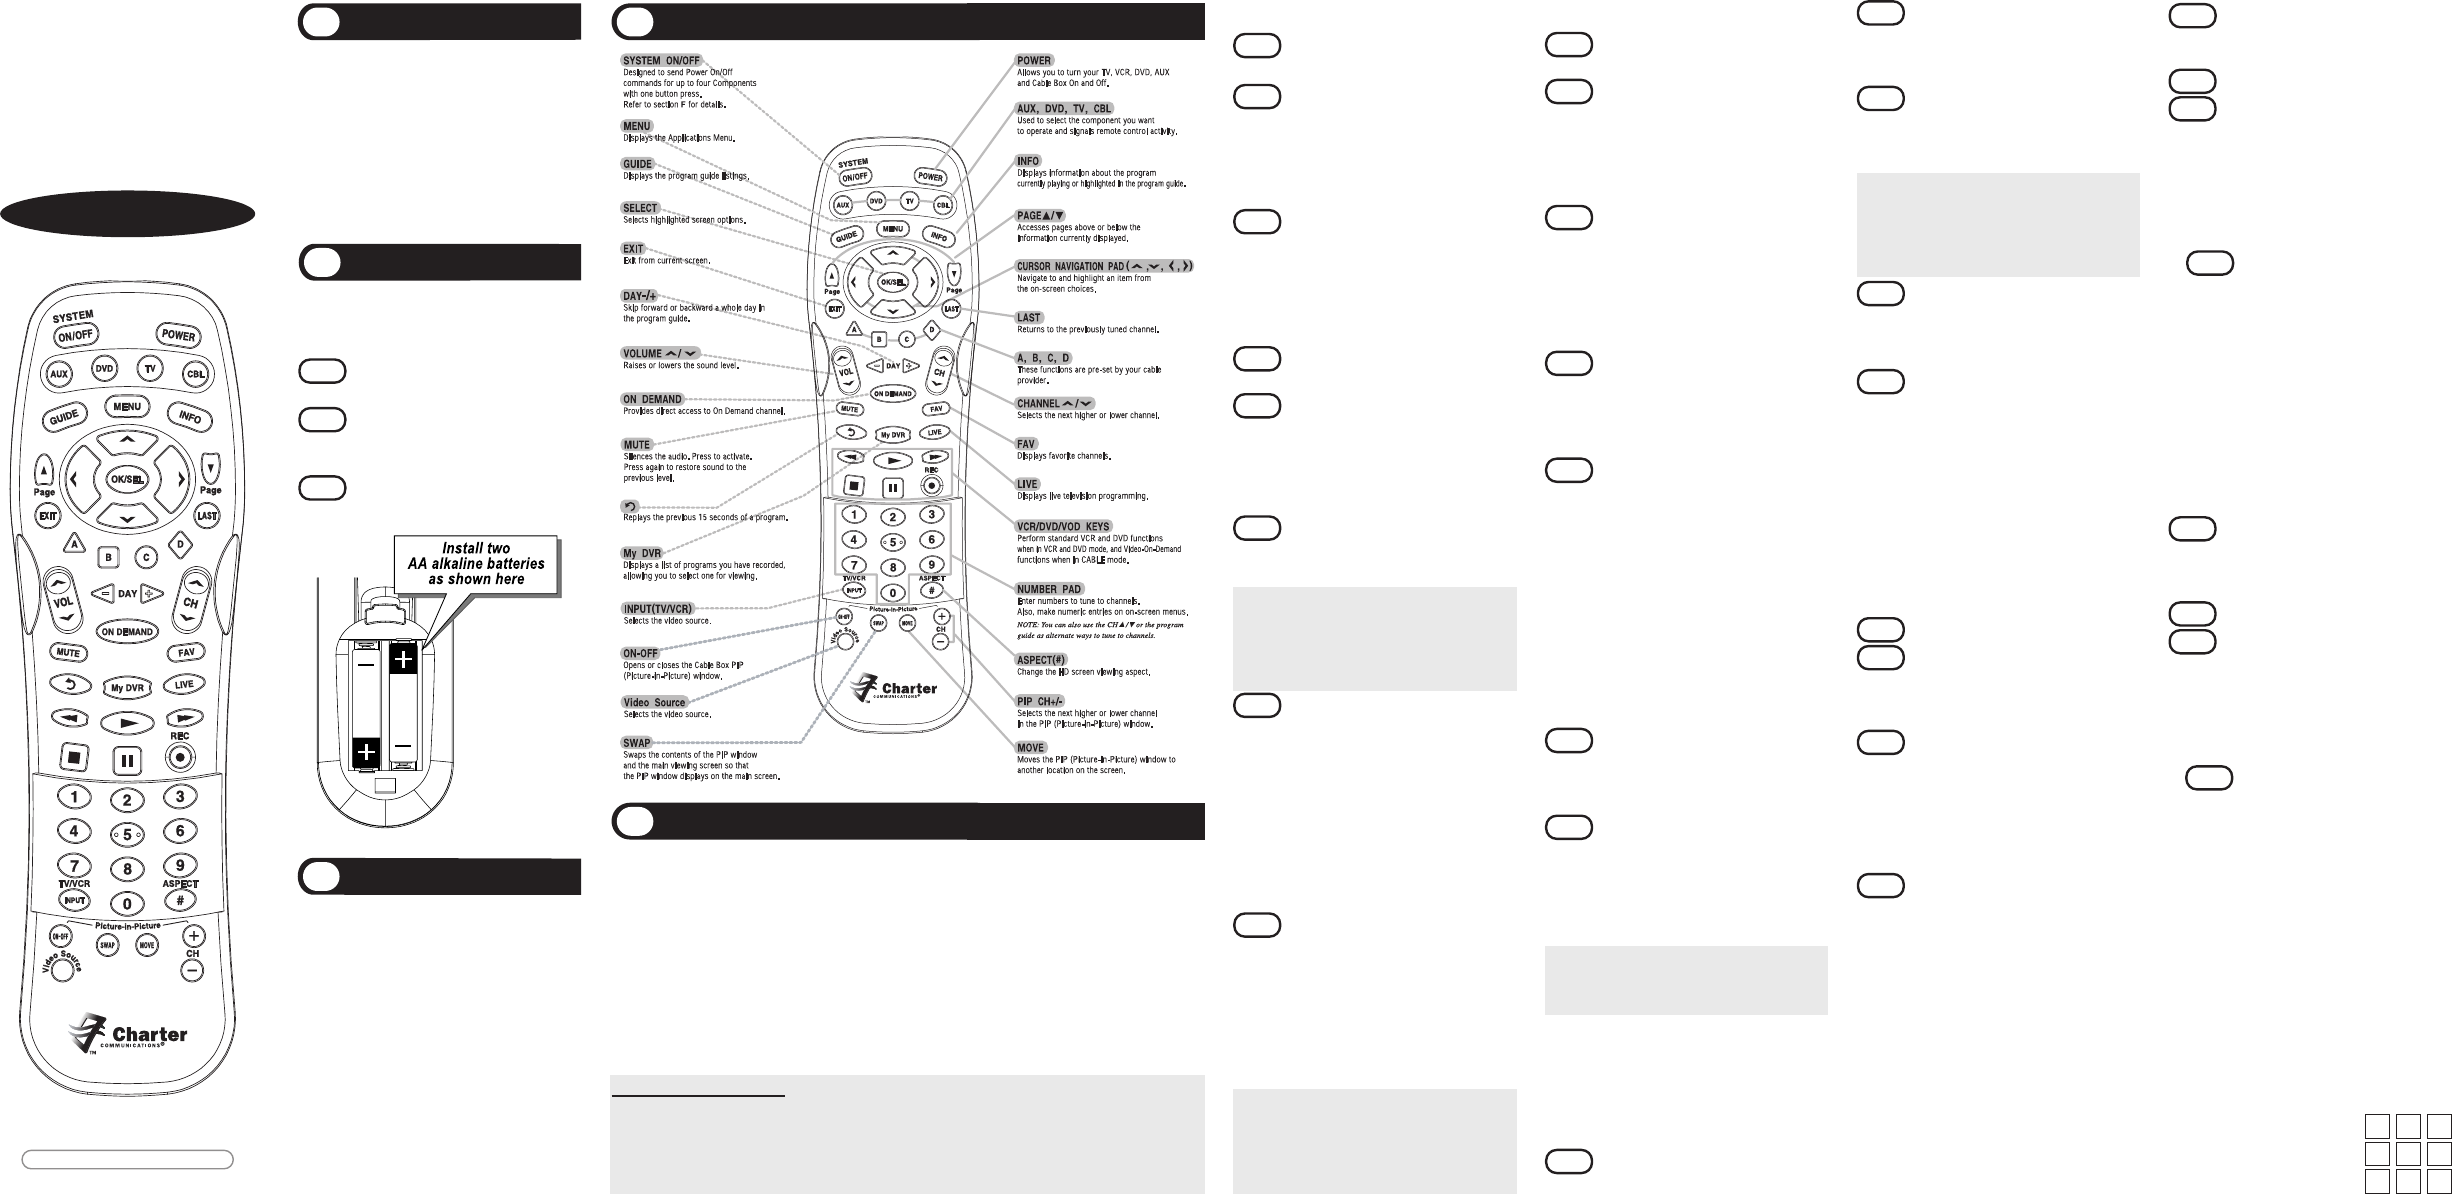
Button Functions
4
Programming the Remote Control
5
There are three ways you can program your remote control:
*
Quick Set-Up Method
*
The Pre-P
rogramm
rogrammed 3-Digit Code Method
*
The Auto-Search Method
The Quick Set-Up Method is a unique new feature that enables the fastest and easiest set-up by using
one-digit codes for up to 10 major brands for each component.
The Pre-Programmed Code Method allows you to setup all the buttons at once by entering 3-digit code
numbers that correspond to a particular Component’s manufacturer/brand, so it’s the fastest and
easiest of the two methods. (Code Tables are on the backside of this Instruction Sheet.) The Auto-
Search Method scans through all the codes in the remote control, one at a time.
IMPORTANT SETUP NOTES:
This pertains to all programming steps. When you are in setup mode in each component, a component
LED will light up for 30 seconds. If you do not press a button within 30 seconds, the LED light will turn off
and exit setup mode and you will need to start over.
When programming a combo unit, program as a VCR or DVD first.
A. Quick Set-Up Method
STEP1
Turn on the device you want to program-
to program your TV, turn the TV on.
STEP2
Point the remote at the TV and press
and hold the TV key for 3 seconds.
While Holding the TV key, the TV LED
will light off and on again. Begin to press
the number keys, one at a time, starting
with 1, then 2, 3…0 until the TV turns off.
STEP3
Release the TV key to save the code.
The TV LED will blink twice to confirm
the code is stored.
Repeat these steps for your DVD, Aux, etc.
B. Pre-Programmed 3-Digit Code Method
STEP1
Turn on the Component you want to
program (TV, VCR, DVD or AUX) .
STEP2 Press the [COMPONENT] button (TV,
DVD or AUX) to be programmed and
[OK/SEL] button simultaneously for 3
seconds. The Component LED will light
for 30 seconds indicating the unit is
ready to be programmed.
STEP3 Point the remote control toward the
Component and enter the 3-digit code
number assigned to your brand.
*Note : If the 3-digit code number you just
entered is correct, the Component will
turn Off. If it did not turn Off, continue
entering code numbers listed for that
brand until the Component turns Off.
STEP4 After you’ve entered the correct code
number and the Component has turned
Off, press the [POWER] button to turn
the Component back On. Now it’s time
to test the VOLUME and MUTE buttons
for the TV (or PLAY and STOP buttons
for VCR and DVD) to make sure they all
work. If any of the functions do not
work as they should, repeat from STEP
3 using the next 3-digit code number
listed for that brand.
STEP5 Once you have found the correct 3-
digit code, save it by pressing the same
[COMPONENT] button one more time.
The Component LED light will blink
twice to confirm that the code was
successfully stored.
Now, program the rest of your Components by
repeating STEPS 1-5.
*Note : If the Pre-Programmed Method did
not work, or if the Code Tables do not
list your Component brand, use the
Auto-Search Method as explained in
Section B.
C. Auto-Search Method
STEP1 Turn on the Component you want to
program (TV, VCR, DVD or AUX).
STEP2 Press the [COMPONENT] button (TV,
DVD or AUX) to be programmed and
[OK/SEL] button simultaneously for 3
seconds. The Component LED will light
for 30 seconds indicating the unit is
ready to be programmed.
STEP3 Point the remote toward the
Component and press the [CH
] or
[CH] button one step at a time or
keep it pressed. The remote will emit a
series of ON/OFF commands. Release
the [CH] or [CH] button as soon as
the Component turns Off.
STEP4
Test functions. (Same as for 3-Digit Code
Programming Method - Section A). If any
of the functions do not work as they
should, repeat from STEP 3 using [CH]
or [CH] buttons to find the correct code.
STEP5
Save the code. (Same as for 3-Digit Code
Programming Method - Section A).
Now, repeat the Auto-Search Method for those
Components you could not program earlier with the
Pre-Programmed Method.
D. Finding a Component Button’s
Setup Code Number
If you used the Auto-Search Method to program a
Component, you may not know what the correct code
number is. Here is a way for you to identify the code
number, so you can record it for future reference.
STEP1
Press the [COMPONENT] button (TV, DVD or
AUX) you want to verify and the [OK/SEL]
button simultaneously for 3 seconds. The
Component LED will light for 30 seconds.
STEP2
Press the [INFO] button and count the
number of times the Component LED light
blinks. This number indicates the first digit
of the code, followed by the second and
third, each separated by a one second
pause when the LED will turn off.
*Note
: 10 blinks represents the number zero.
Example : One blink, (pause), eight blinks, (pause) and
three blinks, indicates code number 183.
E. AUX Function: Programming a 4
th
Component
You can take advantage of the AUX function to
program a 4
th
Component such as a second TV, VCR,
DVD or Audio Component.
STEP1
Turn on the 4
th
Component you want to
program (TV, VCR, DVD or Audio).
STEP2
Press the [AUX] button and the [OK/SEL]
button simultaneously for 3 seconds.The
[AUX] Component LED will light for 30
seconds.
STEP3
Press the [COMPONENT] button you want
to setup. Point the remote control toward
the Component and enter the 3-digit code
number assigned to your brand.
*Note : If the 3-digit code number you just entered is
the correct number, the Component will turn
Off. If it did not turn Off, continue entering
code numbers listed for that brand until the
Component turns Off.
STEP4
Test functions. (Same as for 3-Digit Code
Programming Method - Section A). If
any of the functions do not work as they
should, you need to find a new code.
STEP5
Once you have found the correct 3-digit
code, save it by pressing the [AUX] button
one more time. The Component LED light
will blink twice to confirm the code was
stored. Now when you press the AUX
button, all the buttons will work with that 4
th
Component.
F. Programming the System On/Off Button
This allows you to program the System On/Off button
so it can send up to four power On/Off commands
with one button press.
STEP1
Press the [CBL] button.
STEP2
Press the [SYSTEM ON/OFF] button and the
[OK/SEL] button simultaneously for 3
seconds. The [CBL] Component LED will
light for 30 seconds.
STEP3
Press the first [COMPONENT] button you
want to store in the [SYSTEM ON/OFF]
button and then the [POWER] button.
Repeat this for other Components until you
have stored all the desired power
commands into the [SYSTEM ON/OFF]
button.
STEP4
Press the [CH+] button to save the power
commands you stored. The [CBL] button
will blink twice to confirm the commands
have been saved.
G. Programming Channel Control
You can program the channel controls (Channel Up,
Channel Down, Last and Numbers) from one
Component to operate in another Component mode.
Default channel control settings on the remote control
are as follows:
CBL : CBL T V : CBL
DVD : DVD AUX : AUX
If you wish to operate the TV channel control in TV
mode, use the following steps.
Universal Remote Control, Inc.
www.universalremote.com
OCE-0053A REV 11(07/13/09)
UR4U-MDVR-CHD2
Operating Instructions
For 4-Function
Cable Remote Control
This remote control is designed to operate all
Motorola and Scientific Atlanta digital set top
boxes (including HD and DVR), plus the
majority of TVs, VCRs, DVDs and AUDIO
equipment on the market as shown below.
CABLE : Cable Converters TV : Televisions
DVD : DVDs, TV/DVDs, VCRs and TV/VCRs
AUX : Audio Receivers and DVRs, etc.
Introduction
1
DEFAULT STATUS:
Component Default: CABLE
Channel Default: CABLE channel +/- and
numbers operate through the CABLE box.
You have the option of controlling channel +/-
and numbers through the TV, VCR or DVD.
Refer to section G for programming steps.
Volume Default: CABLE volume +/- and mute
operate through the TV. You have the option
of controlling volume through the Cable box,
VCR or DVD. Refer to section H for
programming steps.
Operations
3
Replacing Batteries
2
Before you program or operate this remote
control, you must first install two new AA Alkaline
batteries.
STEP1 Remove the battery compartment cover
on the back of your remote control.
STEP2 Check battery polarity carefully, and
install the batteries as shown in the
illustration below.
STEP3 Replace the battery compartment cover.
STEP1
Press the [TV] button and the [OK/SEL]
button simultaneously for 3 seconds. The
[TV] Component LED will light for 30 seconds.
STEP2
Press the [VOL -] button.
STEP3
Press the [TV] button again.
The Component LED will blink twice to
confirm the programming.
To return to original state:
If you wish to restore the CABLE channel control in
TV mode, repeat the above steps but press [CBL]
in
STEP3
.
H. Programming Volume Control
You can program the volume controls (Volume Up,
Volume Down and Mute) from one Component to
operate in another Component mode. Default volume
control settings on the remote control are as follows:
CBL : TV T V :TV
DVD :TV AUX : AUX
If you wish to operate the CBL volume control in
CBL mode, use the following steps.
STEP1
Press the [CBL] button and the [OK/SEL]
button simultaneously for 3 seconds. The
[CBL] Component LED will light for 30
seconds.
STEP2
Press the [VOL +] button.
STEP3
Press the [CBL] button.
The Component LED will blink twice to
confirm the programming.
To return to original state:
If you wish to restore the TV volume control in CBL
mode, repeat the above steps but press [TV]
in
STEP3
.
I. Programming a Favorite Channel
See on-screen Guide Menu.
J. Low Battery Warning
When the batteries are low and need to be
replaced with fresh batteries, the Component LED
lights will blink 2 times in sequence whenever a
[POWER] button is pressed to turn on equipment.
K. Memory Lock System
This remote control is designed to retain
programmed memory for 10 years even after
batteries are removed from the remote control.
L. Record Your Component Set-up Codes
TV Set-up Code Number:
DVD Set-up Code Number:
AUX Set-up Code Number: