OBSAH B
1
A
F
G
H
I
E
C
D
B
Autokamera TrueCam H7
3M držiak na sklo (2x)
Adaptér do autozapaľovača
s dvoma USB výstupmi
Napájací micro USB kábel
o dĺžke 3 m
Dátový Micro USB kábel do PC
Náhradná 3M nálepka pre opätovné
prilepenie držiaku na sklo (2x)
3M držiak pre uchytenie
napájacieho kábla (5x)
Ochranný obal pre uschovanie
a prenášanie
Elektrostatická nálepka na sklo
SK
ĎALŠIEINF
6
Na adrese http://truecam.eu/downloads nájdete kompletný návod
a aktualizácie firmware.
ZÁKLADNÉFUNK
Záznam do slučky
Kamera automaticky delí záznam na kratšie video súbory a pri zaplnení
SD karty začne prepisovať najstaršie nechránené súbory novými.
Vďaka tomu sa nemusíte starať o voľné miesto na karte.
Ochrana súboru
Ak chcete súbor ochrániť proti prepísaniu, stlačte tlačidlo WiFi
v priebehu nahrávania alebo zvoľte Chrániť v menu Režimu prehrávania.
G-senzor
Pokiaľ G-senzor zaznamená náraz, automaticky ochráni aktuálne
nahrávané video proti prepísaniu.
Pozor, pri nastavení vysokej citlivosti a jazde po nerovnom povrchu
môže dôjsť ku samovoľnému chráneniu súborov a úplnému zaplneniu
SD karty.
Timelapse
Umožňuje vytvárať video pomocou snímok 0,2 s, 0,5 s a 1 s.
Vďaka trvalému napájaniu umožňuje dlhodobé sledovanie udalostí
okolo zaparkovaného automobilu.
ZÁKLADNÉNAST
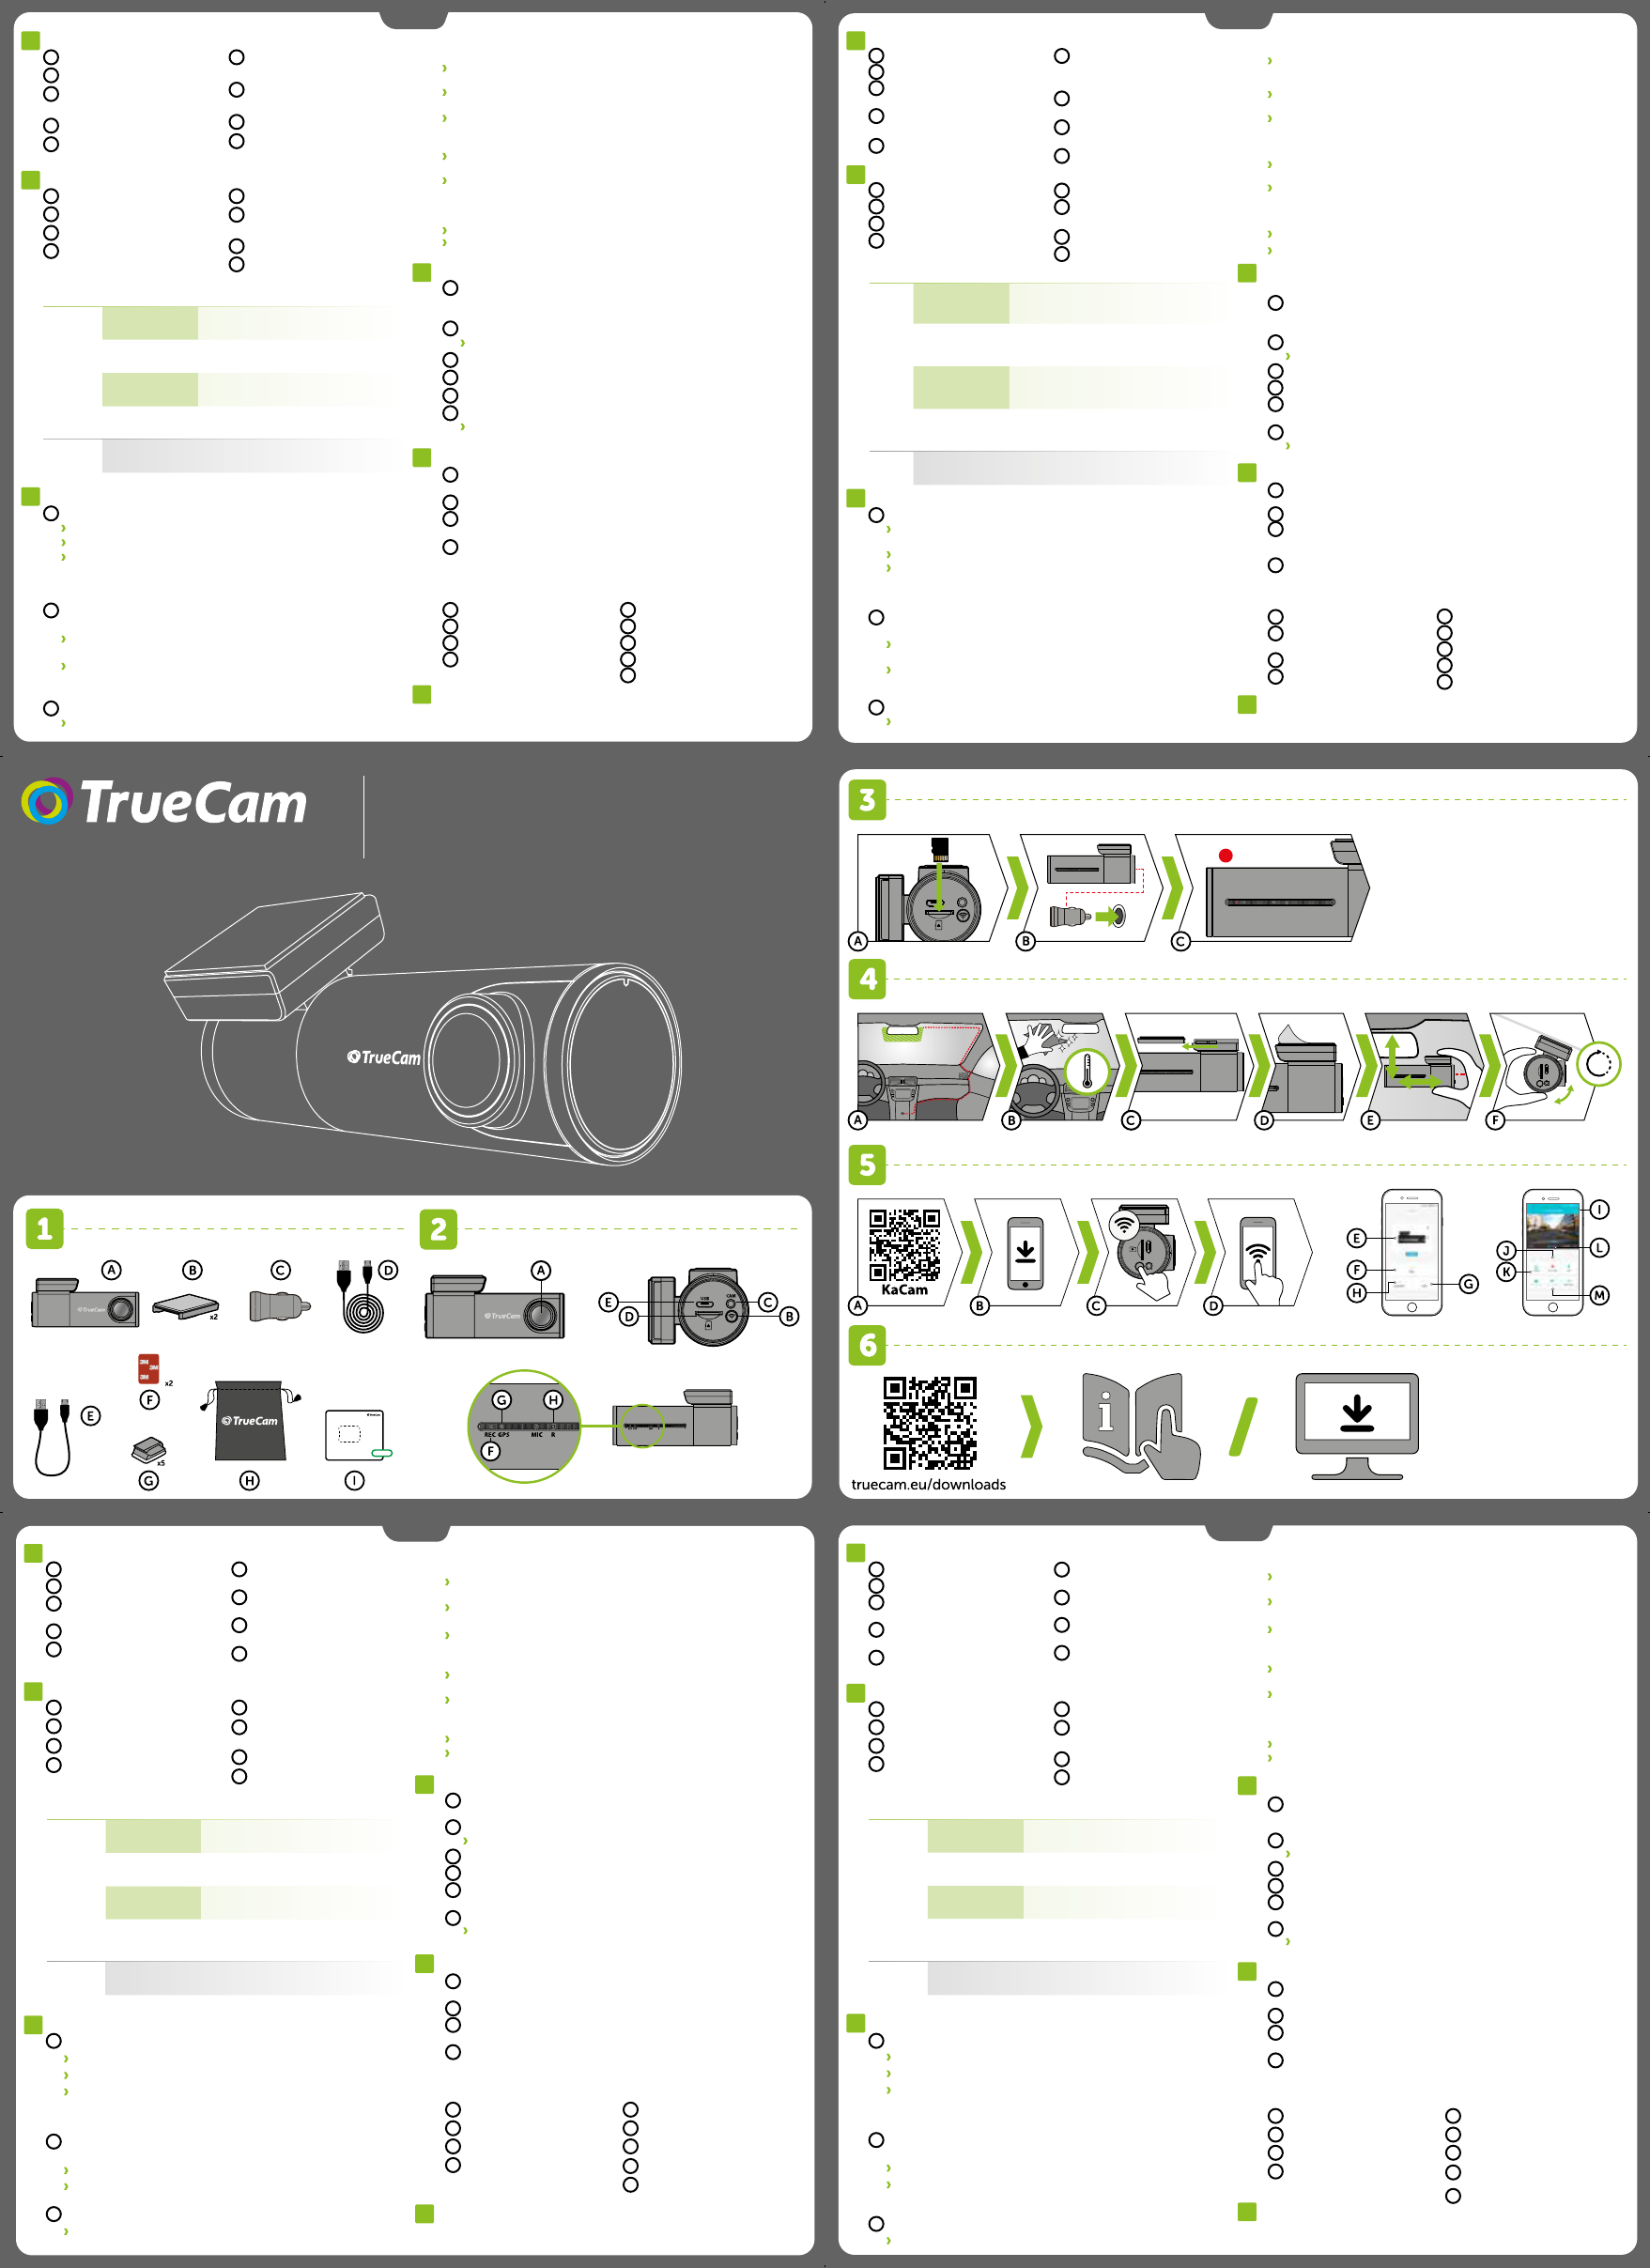
3
A
Vložte micro SD kartu podľa obrázku na kamere.
Používajte značkové karty triedy 10 a vyššej s kapacitou až 128 GB.
Kartu vyberajte iba pri vypnutej kamere.
Kartu pri prvom použití naformátujte priamo v kamere dlhým
podržaním tlačidla WiFi (10s), alebo pomocou mobilnej aplikácie a
aspoň raz za mesiac formátovanie opakujte pre zaistenie správneho
fungovania kamery.
Zapojte adaptér do autozapaľovača a pomocou USB káblu
ho prepojte s kamerou.
Kamera je určená k prevádzke iba pri pripojení k napájaniu.
Namiesto batérie obsahuje kamera superkondenzátor,
ktorý umožňuje napájanie a má niekoľkonásobne dlhšiu životnosť
ako klasická batéria.
Kamera sa automaticky zapne a začne nahrávať.
U niektorých vozidiel je najprv nutné otočiť kľúčom v zapaľovaní.
B
C
E
F
UMIESTNENIENASKL
4
A
D
Ideálnym miestom pre pripevnenie autokamery je priestor medzi
čelným sklom a spätným zrkadlom tak, aby neprekážala šoférovi
vo výhľade.
Uistite sa, že sklo je v mieste uchytenia čisté a suché.
Ideálna teplota pre lepenie je 20°C - 40°C.
Zasuňte kameru do držiaku.
Odstráňte fóliu z 3M nálepky na držiaku kamery.
Pred prilepením na sklo nasmerujte zapnutú kameru tak, aby mala
správny výhľad.
Pritlačte 3M nálepku na sklo a chvíľu držte.
Pre ľahšie odlepenie držiaka môžete medzi 3M nálepku a čelné sklo
prilepiť elektrostatickú samolepku.
B
C
WIFIAPLIKÁ
5
A
D
Načítajte QR kód alebo vyhľadajte aplikáciu KaCam na App Store/
Google Play.
Nainštalujte aplikáciu do svojho smartfónu alebo tabletu.
Zapnite WiFi v kamere – pridržaním tlačidla WiFi (3s) na kamere ->
kamera zvukovo ohlási zapnutú WiFi.
Na telefóne/tablete sa pripojte na WiFi sieť s názvom kamery, zadajte
heslo (z výroby 12345678), spustite aplikáciu a pripojte sa ku kamere.
B
B
C
Pripojiť kameru
Súbory stiahnuté do telefónu
Informácie
Aktualizovať
Nastavenie kamery
Spustiť/ukončiť nahrávanie
Súbory v kamere
Vyfotiť
Náhľad prednej/zadnej kamery
OVLÁD
PLA
OVLÁD
PLA
F
G
H
E
I
K
J
L
M
ZOZNÁMENIES
2
F
G
H
C
D
B
A
E
Širokouhlý objektív
Tlačidlo WIFI
Vstup zadnej kamery
Slot pre pamäťovú kartu
Vstup napájania
Dióda napájania / nahrávania
(červená),
Dióda GPS (zelená)
Tlačidlo RESET
OVLÁD
TLAČIDL
FUNKCIE INŠTRUKCIE
WIFI
OCHRÁNIŤ
ZÁZNAM
Stlačením tlačidla ochráníte záber
ZAPNE / VYPNE
WIFI
Podržaním tlačidla po dobu
3 sekúnd zapnete / vypnet
FORMÁ
Dlhým podržaním tlačidla po dobu
10 sekúnd naformátujet
NAST
2.4
5
Dvojitým kliknutím prepínat
medzi 2.4
RESET
RESETUJE
KAMERU
Stlačením sponkou po dobu
5 sekúnd resetujete k
MOREINFORMA
6
You’ll find the complete manual and firmware updates
at http://truecam.eu/downloads
BASICFUNCTIONS:
Loop Recording
Camera automatically splits the video into shorter files and overwrites
the oldest unprotected files when the SD card is full.
This means you don‘t have to worry about free space on the card.
File Protection
To protect the file from being overwritten, press WiFi while recording
or select Protect from the playback mode menu.
G-senzor
If the G-Sensor detects an impact, it automatically protects the video
currently being captured against being overwritten.
Attention, when the settings are set to high sensitivity and you are driving
over uneven surfaces this can cause files to be automatically protected
and the filling up of the SD card.
Timelapse
Allows you to create video using 0.2s, 0.5s, and 1s frames.
With a permanent power supply, it enables long-term monitoring
of events around a parked car.
BASICSETTINGS
3
A
Insert the microSD card as shown into the camera.
Use Class 10 and higher branded cards up to 128 GB.
Only remove the card, when the camera is turned off.
Format the card when using it for the first time directly in the camera
by holding down the WiFi button (10s) or using the mobile app.
Repeat the formatting at least once a month to ensure the camera
works properly.
Insert the adapter into the car cigarette lighter and connect
it to the camera using the USB cable.
The camera is designed to operate only when connected to a power
supply.
Instead of a battery, the camera contains a supercapacitor that
provides power which has several times the lifespan of a conventional
battery.
Camera turns on automatically and begins recording.
For some vehicles, the ignition key must be turned first.
B
C
E
F
PLACEMENT
4
A
D
The ideal place to mount your camera is the space between
the windscreen and the rear-view mirror so as not to obstruct
the driver‘s view.
Make sure that the glass is clean and dry at the attachment point.
The ideal bonding temperature is 20°C - 40°C.
Slide the camera into the mount.
Remove the film from 3M adhesive pad on the camera holder.
Before attaching it to the glass, point the camera to capture best view.
Press the 3M adhesive pad onto the glass and hold it for a while.
You can attach the electrostatic sticker between the 3M sticker
and the windshield for easier removal of the holder.
B
C
WIFIAPPLIC
5
A
D
Scan the QR code or search for KaCam on the App Store/Google
Play.
Install the app on your smartphone or tablet.
Turn on WiFi on the camera by holding the WiFi button
(3s) on the camera -> the camera will sound when the WiFi turns on.
On your phone/tablet, connect to the WiFi network with
the camera‘s name, enter the password (factory default
is 12345678), launch the application and connect to the camera.
B
B
C
Connect the camera
Files dragged to your phone
Information
Version Update
Camera settings
Start/stop recording
Files in the camera
Take photo
Front / rear camera preview
KACAM
–WITHOUT
KACAM
–WITHC
F
G
H
E
I
K
J
L
M
GETTINGT
2
F
G
H
C
D
B
A
E
Wide-angle lens
WIFI button
Rear camera input
Memory card slot
Power input
Status LED (lit = camera on,
blinking = recording)
GPS LED (green)
RESET button
P
1
A
F
G
H
I
E
C
D
B
TrueCam H7 Dashcam
3M windscreen mount (2x)
Cigarette lighter adapter
with two USB outputs
3-metre micro USB charging cable
Micro USB data cable for PC
Spare 3M adhesive pads
to attach holder to glass (2x)
3M adhesive power cable
clips (5x)
Protective carry bag
Electrostatic glass sticker
CONTROLS:
BUTTON FUNCTION INSTRUCTIONS
WIFI
PROTEC
Press the button t
the current
TURN WIFI ON
Press and hold the button
for
FORMA
Press and hold the button
for
2.4
WIFI SETTINGS
Double tap to switch
between 2.4
RESET RESET C
Press
to reset the camer
BEDIENUNG:
TA FUNKTION ANWEISUNGEN
WIFI
VIDEO
Drücken sie die taste, um
das aktuelle video zu schützen
WIFI EIN / A
Durch gedrücktes halt
für 3 sekunden
ein-/ausgeschalte
FORMA
Langes gedrücktes halten
der taste für
formatiert die kart
EINSTELLUNGEN
2.4
5
Double tap to switch
between 2.4
RESET
NEUST
DER KAMERA
Durch drück
für 5
WEITEREINFORMA
6
Unter der Adresse http://truecam.eu/downloads finden Sie die vollständige
Bedienungsanleitung, die Firmware-Updates.
GRUNDFUNKTIONEN:
Aufnahme von Schleifen
Die Kamera teilt automatisch die Aufzeichnung in kürzere Video-Dateien
und beim Belegen der SD Karte beginnt sie die älteren ungeschützten
Dateien neu zu überschreiben.
Dank dessen müssen Sie sich nicht um freien Speicherplatz auf der Karte kümmern.
Schutz der Dateien
Falls Sie eine Datei vor dem Überschreiben schützen möchten, drücken
Sie die Taste WiFi im Verlauf der Aufzeichnung oder wählen Sie Schützen
im Menü des Aufzeichnungsmodus.
G-Sensor
Falls der G-Sensor einen Stoß verzeichnet, so schützt er automatisch
das gerade bereitgestellte Video vor dem Überschreiben.
Vorsicht, bei der Einstellung einer hohen Empfindlichkeit und bei der Fa
-
hrt über eine unebene Oberfläche können die Dateien selbsttätig geschützt
und die SD Karte vollständig belegt werden.
Timelapse
Ermöglicht das Erstellen von Videos mit Frames in den Größen 0,2s, 0,5s und 1s.
Mit einer permanenten Stromversorgung können Ereignisse rund um ein
geparktes Auto langfristig überwacht werden.
GRUNDEINSTELLUNGENUNDGRUNDFUNKTIONEN
3
A
Legen Sie die Micro SD Karte wie auf der Abbildung in die Kamera
Verwenden Sie Marken-Karten der Klasse 10 und höher mit einer Ka-
pazität bis zu 128 GB.
Nehmen Sie die Karte nur heraus, wenn die Kamera ausgeschaltet ist.
Formatieren Sie die Karte bei der ersten Verwendung direkt in der Ka
-
mera durch langes gedrücktes Halten der WiFi Taste (10s), oder über
die mobile Applikation und wiederholen Sie den Formatierungsvorgang
mindestens einmal im Monat, damit die Kamera richtig funktioniert.
Schließen Sie den Adapter an den Zigarettenanzünder und schließen
Sie ihn mit dem USB-Kabel an der Kamera.
Die Kamera ist nur für den Betrieb bestimmt, wenn sie an die Strom-
versorgung angeschlossen ist.
Anstelle einer Batterie enthält die Kamera einen Superkondensator,
der das Laden ermöglicht und eine vielfach längere Lebensdauer hat
als klassische Batterien.
Die Kamera schaltet sich automatisch an und beginnt aufzuzeichnen
Bei manchen Fahrzeugen ist es zuerst notwendig, den Schlüssel
in der Zündung umzudrehen.
B
C
WIFIAPP
A
D
Lesen Sie den QR-Code ein oder suchen Sie die App KaCam im App
Store / auf Google Play.
Installieren Sie die App auf Ihrem Smartphone oder Ihrem Tablet.
Schalten Sie WiFi in der Kamera ein – Drücken der Taste WiFi (3s) auf der Ka-
mera -> die Kamera bestätigt mit einem Ton, dass WiFi eingeschaltet wurde
Verbinden Sie Ihr Telefon/Tablet mit dem WiFi Netz mit der Bezeichnung
der Kamera, geben Sie das Passwort ein (werksseitig 12345678), starten
Sie die Applikation und verbinden Sie sich mit der Kamera.
B
B
C
5
Anschluss der Kamera
Dateien auf das Smartphone
übertragen
Informationen
Aktualisieren
Kameraeinstellungen
Starten / Beenden der Aufzeichnung
Dateien in der Autokamera
Fotografieren
Sicht der vorderen / hinteren Kamera
BEDIENUNGDERAPP
PLA
BEDIENUNGDERAPP
PLA
F
G
H
E
I
K
J
L
M
KENNENLERNENDERKAMERA/BEDIENUNG
2
F
G
H
C
D
B
A
E
Weitwinkelobjektiv
WiFi Taste
Eingang der hinteren Kamera
Speicherkarten Slot
Eingang Stromversorgung
Diode Stromversorgung /
Aufnahme (rot),
Diode GPS (grün)
RESET Taste
P
1
A
F
G
H
I
E
C
D
B
Autokamera TrueCam H7
3M Halterung für die Scheibe (2x)
Adapter für den Zigarettenanzünder
mit zwei USB-Ausgängen
Micro USB-Kabel mit einer Länge
von 3 m
Daten Micro USB Kabel
3M Klebepad-Ersatz für das erneute
Ankleben der Magnethalterung
auf das Glas (2 x)
3M Halterung für die Befestigung
des Stromversorgungskabels (5 x)
Schutzverpackung für die
Aufbewahrung und den Transport
Aufkleber aus elektrostatischem Glas
E
F
ANBRINGUNGA
SICHERHEITSV
A
D
Die ideale Stelle für die Befestigung der Autokamera ist der Bereich zwischen
der Frontscheibe und dem Rückspiegel, damit sie dem Fahrer nicht die Sicht
behindert.
Achten Sie darauf, dass das Glas an der Befestigungsstelle sauber und trocken ist
Die ideale Temperatur für die Befestigung sind 20°C - 40°C.
Schieben Sie die Kamera in die Halterung ein.
Drücken Sie die 3M Klebepads auf das Glas und drücken Sie sie eine Weile an.
Vor dem Bekleben des Glases richten Sie die angeschaltete Autokamera
so aus, dass sie die richtige Sicht hat.
Drücken Sie die 3M Klebepads auf das Glas und drücken Sie sie eine Weile an.
Sie können den elektrostatischen Aufkleber zwischen dem 3M-Aufkleber und
der Windschutzscheibe anbringen, um den Halter leichter entfernen zu können.
B
C
4
OBSAHB
1
A
F
G
H
I
E
C
D
B
Autokamera TrueCam H7
3M držák na sklo (2x)
Adaptér do autozapalovače se dvěma
USB výstupy
Napájecí micro USB kabel o délce 3m
Datový Micro USB kabel do PC
Náhradní 3M nálepka pro opětovné
přilepení držáku na sklo (2x)
3M držák pro uchycení napájecího
kabelu (5x)
Ochranný obal pro uschování
a přenášení
Elektrostatická samolepka na sklo
F
G
H
C
D
B
SEZNÁMENÍSKAMEROU/O
2
A
E
Širokoúhlý objektiv
Tlačítko WIFI
Vstup zadní kamery
Slot pro paměťovou kartu
Vstup napájení
Stavová dioda (svítí = kamera
je zapnutá, bliká = nahrávání)
Dioda GPS (zelená)
RESET
CS
DALŠÍINF
6
Na adrese http://truecam.eu/downloads naleznete kompletní návod
a aktualizace firmware
ZÁKLADNÍFUNK
Záznam do smyčky
Kamera automaticky dělí záznam na kratší video soubory a při zaplnění
SD karty začne přepisovat nejstarší nechráněné soubory novými.
Díky tomu se nemusíte starat o volné místo na kartě.
Ochrana souborů
Chcete-li soubor ochránit proti přepsání, stiskněte tlačítko WiFi
v průběhu nahrávání anebo zvolte Chránit v menu Režimu přehrávání.
G-senzor
Pokud G-senzor zaznamená náraz, automaticky ochrání aktuálně
pořizované video proti přepsání.
Pozor, při nastavení vysoké citlivosti a jízdě po nerovném povrchu může
dojít k samovolnému chránění souborů a úplnému zaplnění SD karty.
Timelapse
Umožňuje vytvářet video pomocí snímků v intervalu 0.2s, 0.5s a 1s.
Při trvalém napájení umožňuje dlouhodobě monitorovat dění kolem
zaparkovaného vozu.
ZÁKLADNÍNAST
3
A
Vložte microSD kartu dle obrázku na kameře
Používejte značkové karty třídy 10 a vyšší o kapacitě až 128 GB.
Kartu vyjímejte pouze při vypnuté kameře.
Kartu při prvním použití zformátujte přímo v kameře dlouhým
přidržením tlačítka WiFi (10s), nebo pomocí mobilní aplikace
a alespoň jednou za měsíc formátování opakujte pro zajištění
správného fungování kamery.
Zapojte adaptér do autozapalovače a pomocí USB kabelu jej
propojte s kamerou.
Kamera je určena k provozu pouze při připojení k napájení.
Namísto baterie obsahuje kamera superkondenzátor, který umožňuje
napájení a má několikanásobně delší živostnost, než klasická baterie.
Kamera se automaticky zapne a začne nahrávat.
U některých vozidel je nejprve nutné otočit klíčem v zapalování.
B
C
E
UMÍSTĚNÍNASKL
4
A
D
Ideálním místem pro připevnění autokamery je prostor mezi čelním
sklem a zpětným zrcátkem tak, aby nepřekážela řidiči ve výhledu.
Ujistěte se, že sklo je v místě uchycení čisté a suché.
Ideální teplota pro lepení je 20°C - 40°C.
Zasuňte kameru do držáku.
Sundejte folii z 3M nálepky na držáku kamery.
Před přilepením na sklo nasměrujte zapnutou kameru tak, aby měla
správný výhled.
Přitlačte 3M nálepku na sklo a chvíli držte
Pro snadnější odlepení držáku můžete mezi 3M nálepku a čelní sklo
přilepit elektrostatickou samolepku.
B
C
F
WIFIAPLIKA
5
A
D
Načtěte QR kód nebo vyhledejte aplikaci KaCam na App Store/
Google Play.
Nainstalujte aplikaci do svého chytrého telefonu nebo tabletu.
Zapněte WiFi v kameře – přidržením tlačítka WiFi (3s) na kameře ->
kamera zvukově ohlásí zapnutou WiFi.
Na telefonu/tabletu se připojte na WiFi síť s názvem kamery, zadejte
heslo (z výroby 12345678), spusťte aplikaci a připojte se ke kameře.
B
B
C
Připojit kameru
Soubory přetažené do telefonu
Informace
Aktualizovat
Nastavení kamery
Spustit/ukončit nahrávání
Soubory v kameře
Vyfotit
Náhled přední/ zadní kamery
OVLÁD
–BEZPŘIPOJENÍ
OVLÁD
–POPŘIPOJENÍ
F
G
H
E
I
K
J
L
M
OVLÁD
TLAČÍTK
FUNKCE INSTRUKCE
WIFI
OCHRÁNIT
ZÁZNAM
Stiskněte tlačítk
aktuálního záběru
ZAPNE / VYPNE
WIFI
Přidržením tlačítka po dobu
3 vteřin zapnet
FORMÁ
Dlouhým přidržením tlačítka po dobu
10 vteřin zf
NAST
2.4
5
Dvojitým stisknutím přepínát
mezi 2.4
RESET
RESETUJE
KAMERU
Stisknutím sponkou po dobu
5 vteřin r
Quick Start Guide
H7