V E 5
EN
NL
FR
DE
ES
PT | Manual
IT | Man
SV | Bruksa
PL | Inst
CS
SK | Návod na použ
P
DESCRIP
BESKRIV
1
2
3
4
6
5
2 3
4 5 6
WWW.TR
T
5015
7 8
10 11
1
9
ENInstruction manual
SAFETY
• The appliance is not to be used by persons
(including children) with reduced physical,
sensory or mental capabilities, or lack of
experience and knowledge, unless they have
been given supervision or instruction
concerning use of the appliance by a person
responsible for their safety.
• Children should be supervised to ensure that
they do not play with the appliance.
• By ignoring the safety instructions the
manufacturer cannot be held responsible for
the damage.
• If the supply cord is damaged, it must be
replaced by the manufacturer, its service agent
or similarly qualified persons in order to avoid a
hazard.
• This appliance is only to be used for household
purposes and only for the purpose it is made
for.
• The electrical supply must be switched off at
the outset, preferably by means of a switch in
the distribution box, before any installation,
maintenance or repair work is undertaken.
• Always attach the fan to the ceiling, never to
the power point itself.
• The minimum distance between the blades of
the fan and the floor has to be more than 2.3m.
The minimum carrying capacity must be 100kg.
• Take account of the minimal separation
distance from other objects and the room
required around the fan.
• All electrical connections and connection cables
must comply with the appropriate rules and
match the operating instructions
• The fan must be properly earthed to avoid the
risk of an electric shock.
• Never mount the fan in a moist or wet place.
• Be careful when working near the rotating
blades.
• The fitting must be correctly installed if it is to
operate reliably.
• If in any doubt consult a professional, taking
local installation requirements into account.
Some countries stipulate that lighting may be
installed only by registered installers.
• Clamping screws in electrical connections must
be adequately tightened.
• Take note of the symbols when connecting
wires: N=Neutral, L=Phase, = Earth, LS=Live,
switched.
SAFETY INSTRUCTIONS
• Read the manual carefully before use. Keep the
manual for future reference.
• Only use the appliance and the accessories for
their intended purposes. Do not use the
appliance and the accessories for other
purposes than described in the manual.
• Do not use the appliance if any part or any
accessory is damaged or defective. If a part or
an accessory is damaged or defective, it must
be replaced by the manufacturer or an
authorised repair agent.
• Children should be supervised to ensure that
they do not play with the appliance.
• The use of this appliance by children or
persons with a physical, sensory, mental or
motorial disability, or lack of experience and
knowledge can give cause to hazards. Persons
responsible for their safety should give explicit
instructions or supervise the use of the
appliance.
• Do not use the appliance near bathtubs,
showers, basins or other vessels containing
water.
• Do not immerse the appliance in water or other
liquids. If the appliance is immersed in water or
other liquids, do not remove the appliance with
your hands. Immediately remove the mains
plug from the wall socket. If the appliance is
immersed in water or other liquids, do not use
the appliance again.
Electrical safety
• Keep the appliance and the mains cable out of
the reach of children younger than 8 years.
• Before use, always check that the mains
voltage is the same as the voltage on the rating
plate of the appliance.
• Connect the appliance to an earthed wall
socket. If necessary, use an earthed extension
cable of a suitable diameter (at least 3 x 1
mm2).
• For additional protection, install a residual
current device (RCD) with a rated residual
operating current that does not exceed 30 mA.
• The appliance is not intended to be operated by
means of an external timer or separate remote-
control system.
• Make sure that water cannot enter the contact
plugs of the mains cable and the extension
cable.
• Always fully unwind the mains cable and the
extension cable.
• Make sure that the mains cable does not hang
over the edge of a worktop and cannot be
caught accidentally or tripped over.
• Keep the mains cable away from heat, oil and
sharp edges.
• Do not use the appliance if the mains cable or
the mains plug is damaged or defective. If the
mains cable or the mains plug is damaged or
defective, it must be replaced by the
manufacturer or an authorised repair agent.
• Do not pull the mains cable to disconnect the
mains plug from the mains.
• Disconnect the mains plug from the mains
when the appliance is not in use, before
assembly or disassembly and before cleaning
and maintenance.
Safety instructions for grills
• Do not use this appliance outdoors.
• Place the appliance on a stable and flat
surface.
• Place the appliance on a heat resistant and
splash proof surface.
• Do not place the appliance on a hob.
• Make sure that there is sufficient space around
the appliance to allow heat to escape and
provide sufficient ventilation.
• Make sure that the appliance does not come
into contact with flammable material.
• Keep the appliance away from heat sources.
Do not place the appliance on hot surfaces or
near open flames.
• Do not cover the appliance.
• Do not use charcoal or similar combustible
fuels.
• Do not let metal cutlery touch the grill plate to
prevent damage to the non-stick coating.
• Beware of steam and splashes when putting
food on the hot grill plate.
• Caution: Hot grease can splash from the grill
plate.
• Do not pour water onto the hot grill plate. The
water will splash and damage the grill plate.
• Always be careful when touching the appliance.
Use oven gloves if you need to touch the
appliance during or shortly after use.
• The grill plate becomes very hot during use. Do
not touch the hot grill plate.
• The accessible surfaces of the appliance can
become very hot during use. Do not touch the
accessible surfaces.
• Make sure that your hands are dry before
touching the appliance.
• Do not move the appliance while it is switched
on or is still hot. Remove the mains plug from
the wall socket and wait until the appliance has
cooled down.
• Do not use the appliance near birds (e.g.
tropical birds such as parrots). The grill plate is
finished with a non-stick coating based on
PTFE. Upon heating, the coating may release
small amounts of gases which are fully
harmless for people. However, the nervous
systems of birds are extremely sensitive to
these gases.
• Store the appliance in a dry place when not in
use. Make sure that children do not have
access to stored appliances.
Warning! This appliance must be earthed.
Disclaimer
Subject to change; specifications can be changed without further notice.
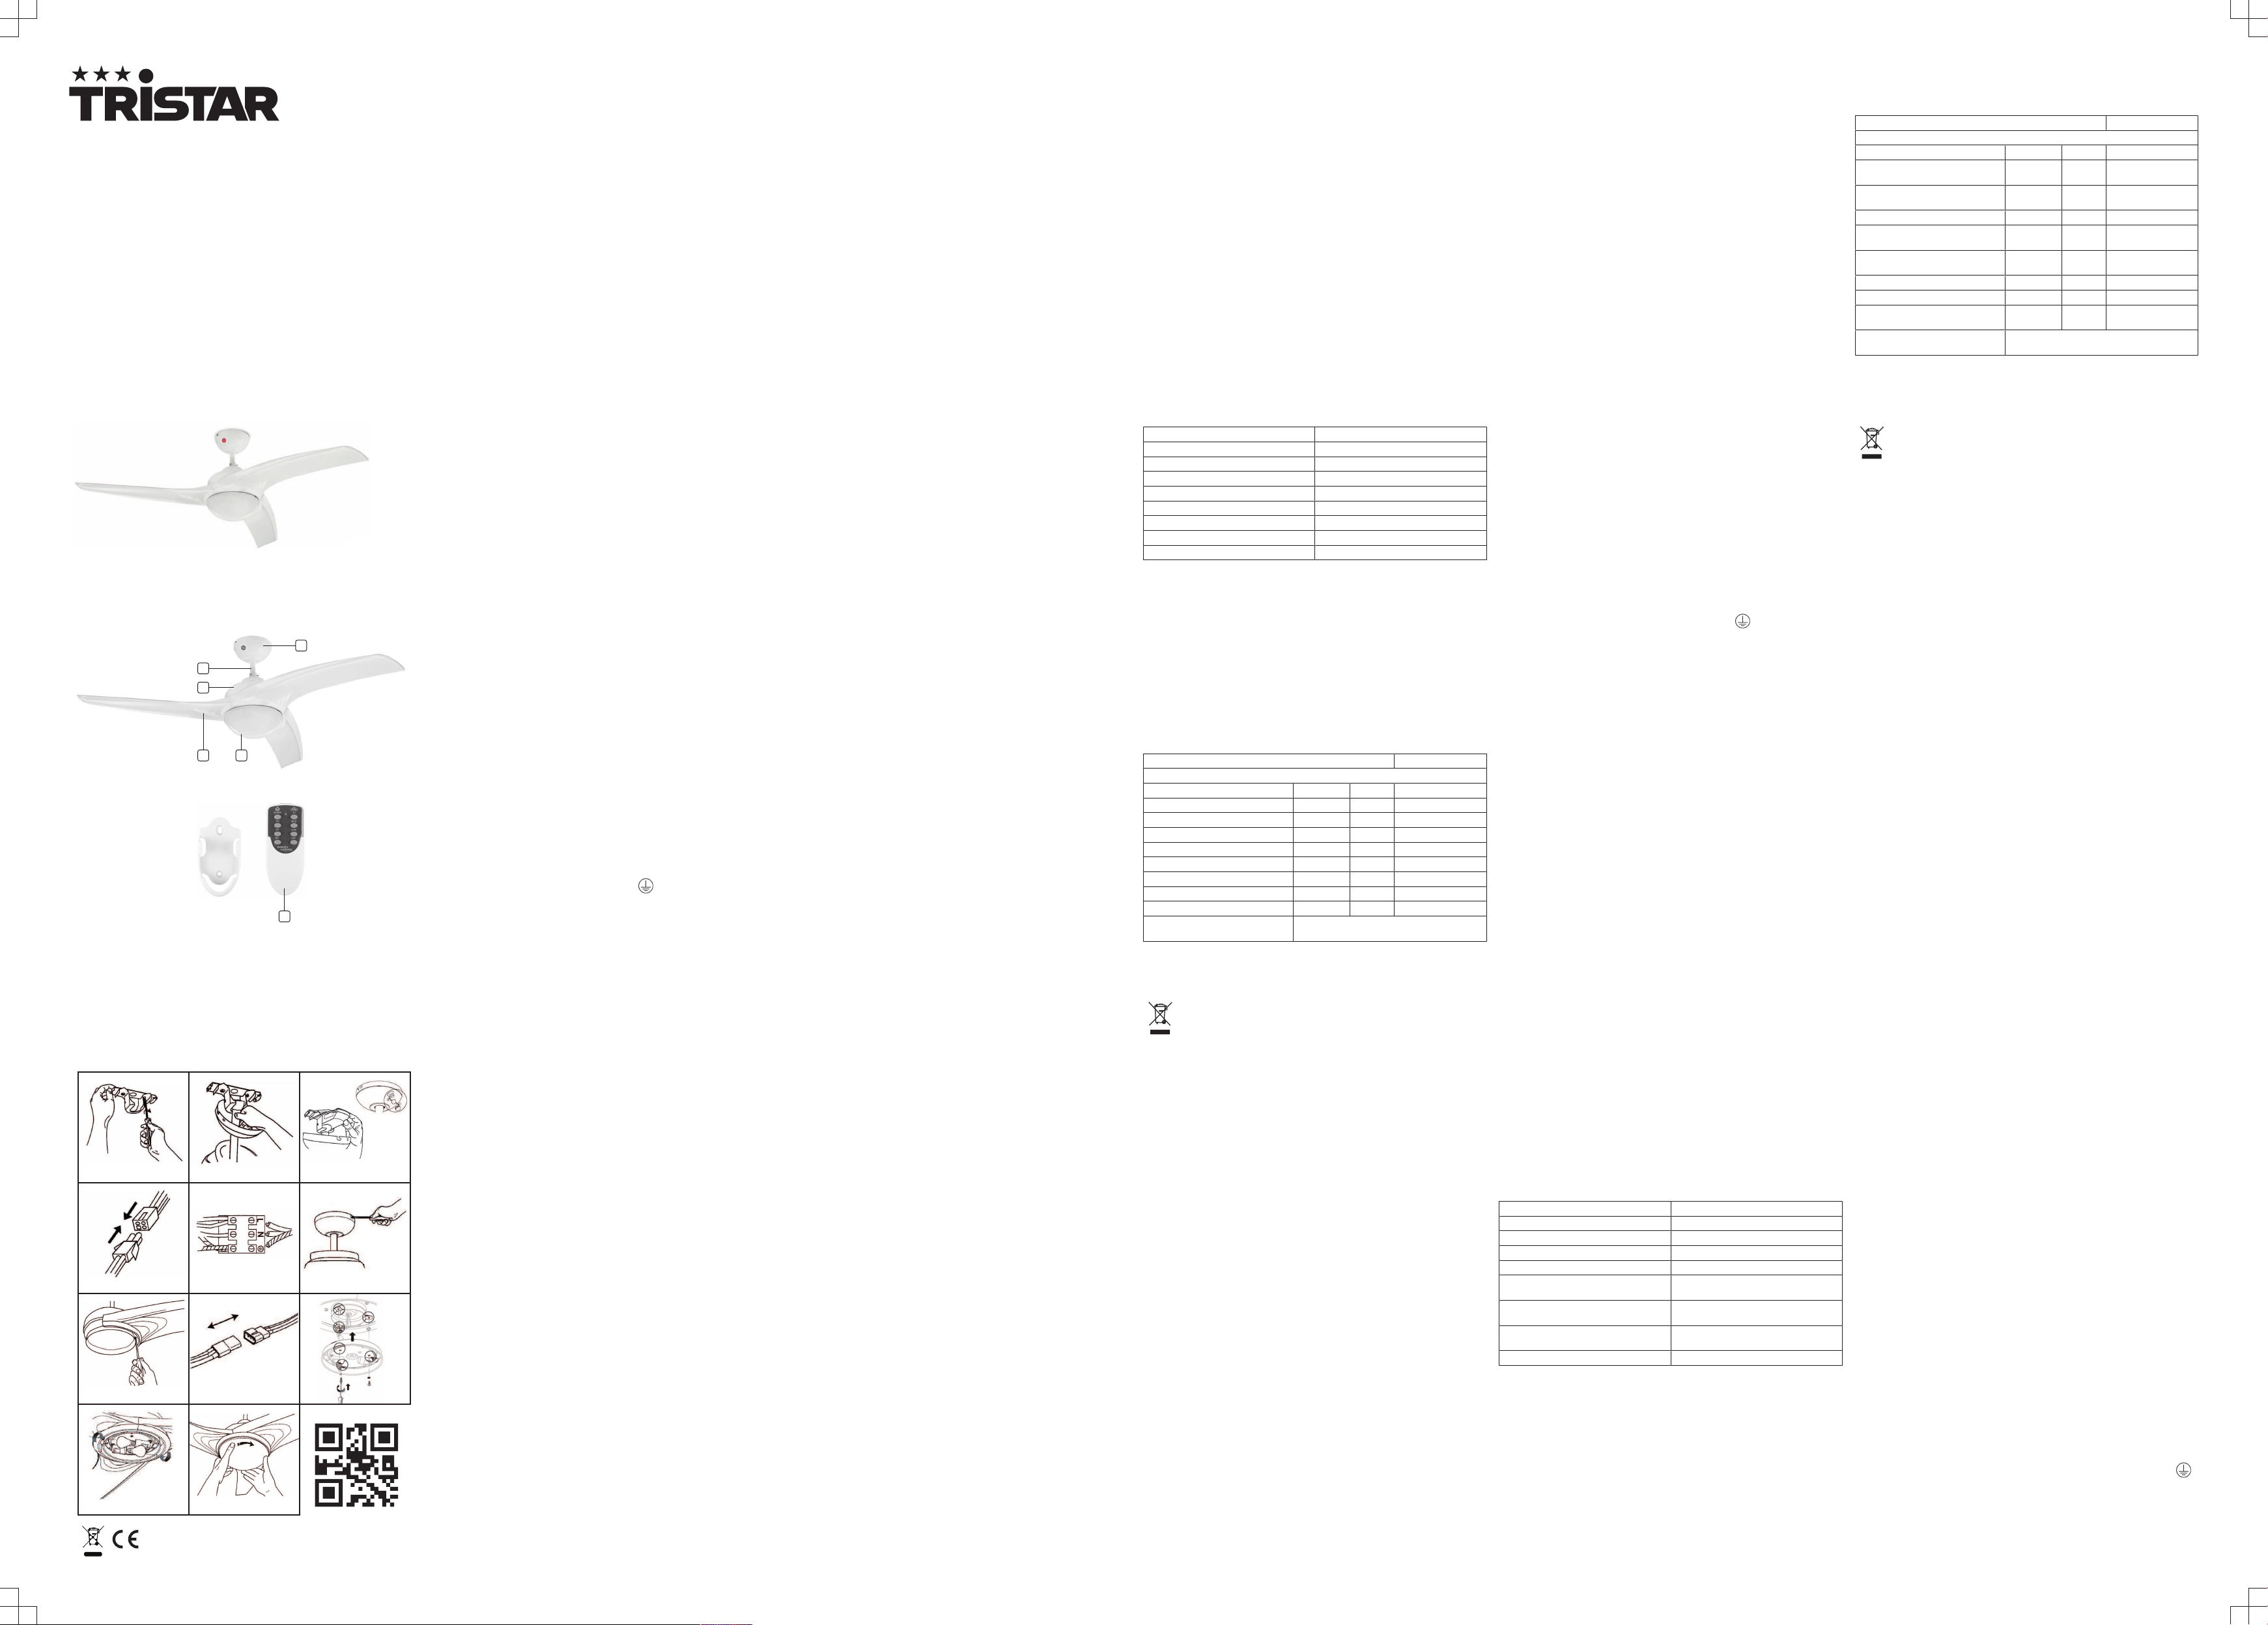
PARTS DESCRIPTION
1. Canopy with I.R. sensor
2. Down rod
3. Motor unit
4. Fan blades
5. Lamp
6. Remote control
BEFORE THE FIRST USE
• Take the appliance andaccessoriesoutthebox.Removethe
stickers,protective foilorplasticfrom thedevice.
• Place the device in a place with at least 50 cm free space around the
unit.
Installation of the fan
1. Secure the mounting plate to the ceiling with the provided two screws,
spring washers and flat washers. Ensure the support for the mounting
plate must be capable of safely and securely holding the moving
weight of the fan.
2. Hang the fan assembly onto the mounting plate. The mounting plate
has a lug recess on it, it must be aligned with the corresponding
groove on the ball joint of the fan.
3. Insert the remote control receiver between the bracket and the ball
joint and the sensor as shown.
4. Insert the male connector into the female connector (from the remote
control receiver to the fan, and from the remote control to the terminal
block).
5. Connect the wires from the earthed mains supply to the terminal
block.
6. Lift up the canopy into place over the mounting plate. Ensure that you
do not trap any wires.
7. Install the fan blade assembly onto the motor by tightening the screws
and spring washers.
8. Connect the light kit by clipping together the two plastic male/female
connectors.
9. Fit the light kit to the switch housing by using the three light kit-fixing
screws and star washers. Ensure that you do not trap any wires.
10. Install the light bulbs (E27 max 46W, max 105x60mm, not supplied) to
the lamp holder. Switch the power on to check the correct operation of
the light and the fan.
11. Install the lamp shade onto the motor housing by rotating the lamp
shade clockwise.
Remote control:
• 2xAAA size batteries are required.
• Ensure batteries are inserted in the correct direction.
• When replacing, ensure both batteries are changed simultaneously.
USE
• Control the fan and light by pushing the corresponding buttons on the
remote control as explained in the table below:
Remote control Mode
ON/OFF Turn light on or off
2H 2 hours timer function
4H 4 hours timer function
8H 8 hours timer function
HI Turn fan on at high speed
MED Turn fan on at medium speed
LOW Turn fan on at low speed
OFF Turn fan off
• The transmitter is infrared, the remote control must be pointed to the I.R.
sensor on the appliance for proper operation.
• When using the timer function, the fan turns off after the selected 2, 4 or
8 hours.
• The lamp must be switched on and off manually by using the on/off
button.
• The switch on the motor housing controls the direction of air movement:
– In cold weather: press the “RIGHT” switch so that the blades push the
hot air down and let it circulate through the room.
– In hot weather: Push switch “LEFT” so that the blades will create a
breeze and circulate the cold air through the room.
Note: Let the fan stop operating before using the direction switch in order
to prevent any damage to the motor or injury. The switch should stay in
the RIGHT or LEFT position when the fan is working.
TABLE
Information requirements for comfort fans P
Information to identify the model(s) to which the information relates to:
Description Symbol Value Unit
Maximum fan flow rate F 158.59 m³/min
Fan power input P 46.2 W
Service value Sv 2.79 (m³/min)/W
Standby power consumption Psb 0.47 W
Off power consumption Poff - W
Fan sound power level Lwa 50.4 dB(A)
Maximum air velocity C 2.32 meters/sec
Season electricity consumption Q N/A kWh/a
Measurement standard for
service value IEC 60879:1986
CLEANING AND MAINTENANCE
• Clean the appliance with a damp cloth. Never use harsh and abrasive
cleaners, scouring pad or steel wool, which damages the device.
ENVIRONMENT
This appliance should not be put into the domestic garbage at the
end of its durability, but must be offered at a central point for the recycling
of electric and electronic domestic appliances. This symbol on the
appliance, instruction manual and packaging puts your attention to this
important issue. The materials used in this appliance can be recycled. By
recycling of used domestic appliances you contribute an important push to
the protection of our environment. Ask your local authorities for
information regarding the point of recollection.
Support
You can find all available information and spare parts at www.tristar.eu!
NLInstruction manual
VEILIGHEID
• Dit apparaat is niet bedoeld voor gebruik door
personen (inclusief kinderen) met verminderde
lichamelijke, zintuiglijke of verstandelijke
vermogens of personen met een gebrek aan
ervaring en kennis, tenzij iemand die
verantwoordelijk is voor hun veiligheid toezicht
op hen houdt of hen heeft uitgelegd hoe het
apparaat dient te worden gebruikt.
• Houd toezicht op kinderen zodat ze niet met het
apparaat spelen.
• Als u de veiligheidsinstructies negeert, kan de
fabrikant niet verantwoordelijk worden
gehouden voor de mogelijke schade.
• Als het netsnoer beschadigd is, moet het
worden vervangen door de fabrikant, de
onderhoudsmonteur van de fabrikant of door
personen met een soortgelijke kwalificatie om
gevaar te voorkomen.
• Dit apparaat is uitsluitend voor huishoudelijk
gebruik en voor het doel waar het voor bestemd
is.
• Alvorens met enige installatie-, onderhouds- of
reparatiewerkzaamheden te beginnen moet de
voeding worden uitgeschakeld, bij voorkeur via
een schakelaar in de verdeelkast.
• Bevestig de ventilator altijd aan het plafond,
nooit aan het voedingspunt zelf.
• De afstand tussen de ventilatorbladen en de
vloer moet minimaal 2,3 m bedragen. Het
draagvermogen moet minimaal 100 kg zijn.
• Houd rekening met de minimaal vereiste
afstand tot andere voorwerpen en de rond de
ventilator benodigde ruimte.
• Alle elektrische bedrading en aansluitingen
moeten in overeenstemming zijn met de
toepasselijke regelgeving en de
gebruiksinstructies.
• De ventilator moet correct worden geaard om
het risico van elektrische schokken te
vermijden.
• Installeer de ventilator nooit op een vochtige of
natte plaats.
• Wees voorzichtig bij werkzaamheden in de
buurt van de draaiende bladen.
• Voor een betrouwbare werking moet de fitting
correct worden geïnstalleerd.
• Volg de lokale installatievereisten en raadpleeg
bij twijfel een professional. In sommige landen
mag verlichting alleen worden geïnstalleerd
door erkende elektriciens.
• De klemschroeven van elektrische
aansluitingen moeten correct worden
vastgezet.
• Let bij het aansluiten van draden op de
symbolen: N=Neutraal, L=Fase, = Aarde,
LS=Bekrachtigd, geschakeld.
ONDERDELENBESCHRIJVING
1. Kap met infraroodsensor
2. Plafondstang
3. Motoreenheid
4. Ventilatorbladen
5. Lamp
6. Afstandsbediening
VOOR HET EERSTE GEBRUIK
• Haal het apparaat en de accessoires uit de doos.Verwijder de stickers,
de beschermfolie of het plastic van het apparaat.
• Bevestig het apparaat op een plaats met minimaal 50 cm vrije ruimte
rondom.
Installatie van de ventilator
1. Bevestig de montageplaat met de meegeleverde twee schroeven,
veerringen en platte ringen aan het plafond. Zorg ervoor dat de steun
voor de montageplaat stevig genoeg is om het bewegende gewicht
van de ventilator te dragen.
2. Hang de ventilator aan de montageplaat. U ziet een uitsparing op de
montageplaat. Deze moet worden uitgelijnd met de overeenkomstige
groef in het kogelgewricht van de ventilator.
3. Plaats de ontvanger van de afstandsbediening tussen de beugel, het
kogelgewricht en de sensor (zie afbeelding).
4. Steek de mannelijke aansluiting in de vrouwelijke aansluiting (van de
ontvanger van de afstandsbediening in de ventilator en van de
afstandsbediening in het klemschroefblok).
5. Sluit de draden van de geaarde voeding aan op het klemschroefblok.
6. Beweeg de kap omhoog en op zijn plek op de montageplaat. Zorg
ervoor dat er geen draden klem komen te zitten.
7. Installeer de ventilatorbladen op de motor door de schroeven en
veerringen aan te draaien.
8. Sluit de verlichtingsset aan door de twee plastic mannelijke/
vrouwelijke aansluitingen aan elkaar te klemmen.
9. Bevestig de verlichtingsset met de drie schroeven en tandringen van
de set op de schakelaarbehuizing. Zorg ervoor dat er geen draden
klem komen te zitten.
10. Plaats een lampen (E27, max. 46W, max. 105x60mm, niet
meegeleverd) in de fitting. Schakel de stroom in om te controleren of
de lamp en de ventilator naar behoren werken.
11. Installeer de lampenkap op de motorbehuizing door de kap rechtsom
te draaien.
Afstandsbediening:
• Er zijn 2 AAA-batterijen vereist.
• Controleer of u de batterijen in de juiste richting hebt geplaatst.
• Zorg er bij het vervangen voor dat beide batterijen tegelijk worden
vervangen.
GEBRUIK
• U bedient de ventilator en de verlichting door op de bijbehorende
knoppen op de afstandsbediening te drukken (zie onderstaande tabel):
Afstandsbediening Modus
ON/OFF De verlichting in- of uitschakelen
2H Timerfunctie voor 2 uur
4H Timerfunctie voor 4 uur
8H Timerfunctie voor 8 uur
HI Ventilator inschakelen op hoge
snelheid
MED Ventilator inschakelen op
gemiddelde snelheid
LOW Ventilator inschakelen op lage
snelheid
OFF Ventilator uitschakelen
• De zender maakt gebruik van infrarood; voor een juiste werking moet de
afstandsbediening op de infraroodsensor op het apparaat worden
gericht.
• Als u de timerfunctie gebruikt, wordt de ventilator na de geselecteerde 2,
4 of 8 uur uitgeschakeld.
• De lamp moet handmatig worden in- en uitgeschakeld met de aan/uit-
knop.
• U bepaalt de richting van de luchtstroom met de schakelaar op de
motorbehuizing:
– Bij koud weer: zet de schakelaar op UP, zodat de bladen de warme
lucht omlaag duwen en door de ruimte laten circuleren.
– Bij warm weer: zet de schakelaar op DOWN, zodat de bladen een
briesje veroorzaken en de koude lucht door de ruimte laten circuleren.
Opmerking: zet de ventilator stil voordat u de richtingsschakelaar
gebruikt. Zo voorkomt u lichamelijk letsel en schade aan de motor. De
schakelaar moet in de stand UP of DOWN blijven staan wanneer de
ventilator in werking is.
TABEL
Ventilatorspecificaties P
Informatie om na te gaan over welk model de informatie gaat:
Beschrijving Symbool Waarde Eenheid
Maximale luchtstroming
ventilator F 158.59 m³/min
Inkomend vermogen van
ventilator P 46.2 W
Servicewaarde Sv 2.79 (m³/min)/W
Stroomverbruik in stand-
bystand Psb 0.47 W
Stroomverbruik in
uitgeschakelde stand Poff - W
Geluidsniveau van ventilator Lwa 50.4 dB(A)
Maximale luchtstroomsnelheid C 2.32 meter/sec
Seizoensgebonden
stroomverbruik Q N/A kWh/a
Meetstandaard voor
servicewaarde IEC 60879: 1986
REINIGING EN ONDERHOUD
• Reinig het apparaat met een vochtige doek. Gebruik nooit agressieve of
schurende reinigingsmiddelen, schuursponzen of staalwol; dit
beschadigt het apparaat.
MILIEU
Dit apparaat mag aan het einde van de levensduur niet bij het
normale huisafval worden gedeponeerd, maar moet bij een speciaal
inzamelpunt voor hergebruik van elektrische en elektronische apparaten
worden aangeboden. Het symbool op het apparaat, in de
gebruiksaanwijzing en op de verpakking attendeert u hierop. De in het
apparaat gebruikte materialen kunnen worden gerecycled. Met het
recyclen van gebruikte huishoudelijke apparaten levert u een belangrijke
bijdrage aan de bescherming van ons milieu. Informeer bij uw lokale
overheid naar het inzamelpunt.
Support
U kunt alle beschikbare informatie en reserveonderdelen vinden op
www.tristar.eu!
FRInstruction manual
SÉCURITÉ
• Cet appareil ne doit pas être utilisé par des
personnes (enfants inclus) ayant des capacités
physiques, sensorielles ou mentales réduites
ou un manque d'expérience et de
connaissances, à moins qu'elles ne bénéficient
d'une supervision ou d'instructions concernant
l'utilisation de l'appareil émanant d'une
personne responsable de leur sécurité.
• Les enfants ne doivent pas jouer avec l'appareil
ni l'utiliser sans surveillance.
• Si vous ignorez les consignes de sécurité, le
fabricant ne peut être tenu pour responsable
des dommages.
• Si le cordon d'alimentation est endommagé, il
doit être remplacé par le fabricant, son
réparateur ou des personnes qualifiées afin
d'éviter tout risque.
• Cet appareil est uniquement destiné à des
utilisations domestiques et seulement dans le
but pour lequel il est fabriqué.
• L'alimentation électrique doit être coupée à la
source, de préférence au moyen d'un
interrupteur dans la boîte de distribution, avant
l'installation et toute réparation ou opération de
maintenance.
• Toujours fixer le ventilateur au plafond, jamais
à la prise de courant.
• La distance entre les pales du ventilateur et le
sol doit être au minimum de 2,3m. La capacité
de charge minimum doit être de 100kg.
• Tenir compte de la distance de séparation
minimale avec les autres objets et de l'espace
nécessaire autour du ventilateur.
• Toutes les connexions et tous les câbles
électriques doivent être conformes aux normes
en vigueur et satisfaire aux exigences du mode
d'emploi.
• Le ventilateur doit être correctement relié à la
terre afin d'éviter tout risque de choc électrique.
• Ne jamais monter le ventilateur à un endroit
humide ou mouillé.
• Toujours faire attention à proximité des pales
en rotation.
• L'installation doit être effectuée correctement
pour une utilisation sans danger.
• En cas de doute, consulter un professionnel en
tenant compte des exigences d'installation
locales. Dans certains pays, l'éclairage doit
obligatoirement être installé par un installateur
certifié.
• Les vis de fixation des connexions électriques
doivent être correctement serrées.
• Tenir compte des symboles lors de la
connexion des câbles: N=Neutre, L=Phase,
= Masse, LS=Sous tension, alimenté.
DESCRIPTION DES PIÈCES
1. Canopée avec capteur IR
2. Tige inférieure