495026
4
Verklein
Vergroot
Pagina terug
1/102
Pagina verder
6:,1*
)$1
),;
48,(7
+L32:(5
21(728&+
&20)257
6/((3
1
#
4
5
6
(
%
"
9
!
-
~
2
3
7
$
&
8
)
,
+
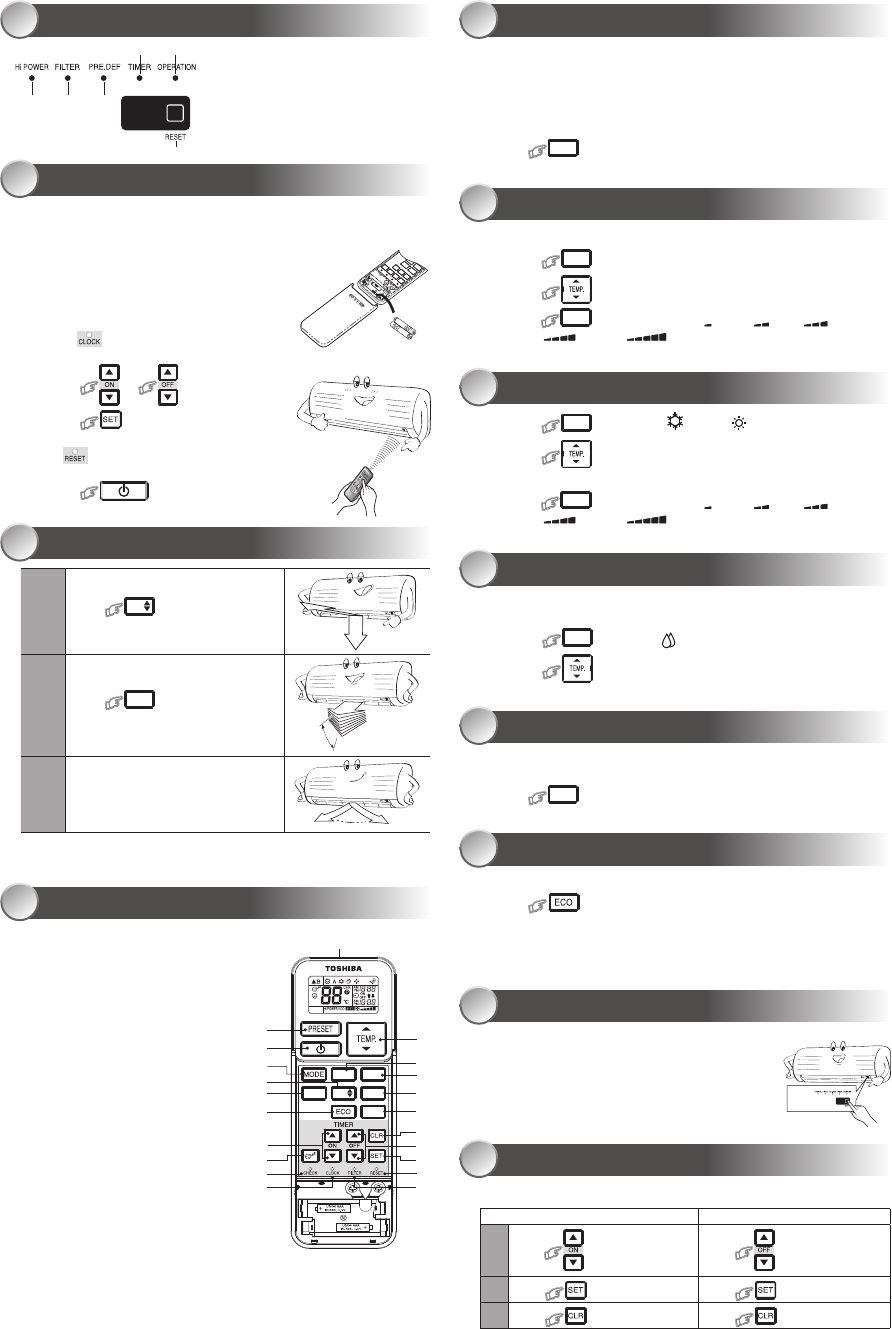
INDOOR UNIT DISPLAY
1
PREPARATION BEFORE USE
2
Preparing Filters
1. Open the air inlet grille and remove the air lters.
2. Attach the lters. (see detail in the accessory sheet).
Loading Batteries (when use wireless operation.)
1. Remove the slide cover.
2. Insert 2 new batteries (AAA type)
following the (+) and (–) positions.
Clock Setup
1. Push
by tip of the pencil.
If timer indication is ashing, go to the next step 2.
2. Press
or : adjust the time.
3. Press : Set the time.
Remote Control Reset
Push
by tip of the pencil or
1. Remove the batteries.
2. Press
.
3. Insert the batteries.
AIR FLOW DIRECTION
3
Note:
Do not move the louver manually by others.
The louver may automation positioning by some operation mode.
Note:
The provided Remote Controller is a wireless type, which also can be
used as a wire. Please see “How to Connect The Remote Controller
for Wired Operation”, located in installation instruction, in case of wired
control is required.
In wire operation, remote controller will return to initial condition
(PRESET, TIMER and CLOCK will return to initial condition) when user
shutdown power supply of Air conditioner.
REMOTE CONTROL
4
1
Infrared signal emitter
2
Start/Stop button
3
Mode select button (MODE)
4
Temperature button (TEMP)
5
Fan speed button (FAN)
6
Swing louver button (SWING)
7
Set louver button (FIX)
8
On timer button (ON)
9
Off timer button (OFF)
!
Setup button (SET)
"
Clear button (CLR)
#
Memory and Preset button (PRESET)
$
One-Touch button (ONE-TOUCH)
%
High power button (Hi-POWER)
&
Economy button (ECO)
(
Quiet button (QUIET)
)
Comfort sleep button (COMFORT SLEEP)
~
Filter reset button (FILTER)
+
Set clock button (CLOCK)
,
Check button (CHECK)
-
Reset button (RESET)
ONE-TOUCH
5
Press the “ONE-TOUCH” button for fully automated operation that is
customized to the typical consumer preferences in your region of the world.
The customized settings control temperature air ow strength, air ow
direction and other settings to provide you alternate contact with “ONE-
TOUCH” of the button. If you prefer other settings you can select from the
many other operating functions of your Toshiba unit.
Press
21(728&+
: Start the operation.
AUTOMATIC OPERATION
6
To automatically select cooling or heating operation
1. Press
02'(
: Select A.
2. Press
: Set the desired temperature.
3.
Press
)$1
: Select AUTO, LOW , LOW+ , MED ,
MED+ , or HIGH .
1. Press
02'(
: Select Cool , or Heat .
2. Press
: Set the desired temperature.
Cooling: Min. 17°C, Heating: Max. 30°C
3.
Press
)$1
: Select AUTO, LOW , LOW+ , MED ,
MED+ , or HIGH .
COOLING / HEATING OPERATION
7
DRY OPERATION
8
For dehumidi cation, a moderate cooling performance is controlled
automatically.
1. Press
02'(
: Select Dry .
2. Press : Set the desired temperature.
Hi-POWER OPERATION
9
To automatically control room temperature and air ow for faster cooling or
heating operation (except in DRY mode)
Press
+L32:(5
: Start and stop the operation.
ECO OPERATION
10
To automatically control room to save energy (except in DRY mode)
Press : Start and stop the operation.
Note: Cooling operation; the set temperature will increase automatically 1
degree/hour for 2 hours (maximum 2 degrees increase).
For heating operation the set temperature will decrease.
123
45
6
1
Hi POWER (Green)
2
FILTER (Orange)
3
PRE.DEF (Preheat/Defrost) (Orange)
4
TIMER (Yellow)
5
OPERATION (Green)
6
RESET button
TEMPORARY OPERATION
11
In case of the misplaced or discharged remote control
Pressing the RESET button, the unit can start or
stop without using the remote control.
Operation mode is set on AUTOMATIC operation,
preset temperature is 25°C and fan operation is
automatic speed.
TIMER OPERATION
12
Daily timer allows the user to set both the ON & OFF timers and will be
activated on a daily basis.
Set the timer when the air conditioner is operating.
Setting the ON Timer Setting the OFF Timer
1
Press : Set the desired ON
timer.
Press : Set the desired
OFF timer.
2
Press : Set the timer. Press : Set the timer.
3
Press : Cancel the timer. Press : Cancel the timer.
1
Press
),;
: Move the louver in
the desired vertical direction.
2
Press
6:,1*
: Swing the air
automatically and press again to stop.
3
For horizontal direction, adjust
manually.
4

Hulp nodig? Stel uw vraag in het forum

Spelregels
1

Forum

Toshiba-RAS-16

Zoeken resetten

  • Hoe kan ik verwarmen met de airco Gesteld op 2-4-2026 om 20:07

    Reageer op deze vraag Misbruik melden
    • AI antwoord: Geachte bezoeker,

      U vraagt hoe u uw Toshiba RAS-16 airconditioner kunt gebruiken om te verwarmen. De Toshiba RAS-16 is een model dat zowel kan koelen als verwarmen. Hieronder vindt u een algemene uitleg over hoe u deze functie inschakelt:

      1. **Schakel het apparaat in:** Zorg ervoor dat uw airconditioner is aangesloten op het stroomnet en schakel deze in met de afstandsbediening.

      2. **Selecteer de verwarmingsmodus:** Op uw afstandsbediening vindt u meestal een knop om de modus te selecteren. Deze knop heeft vaak aanduidingen zoals "MODE" of symbolen die verschillende functies representeren. Zoek naar het symbool van een zon of de tekst "HEAT". Druk op deze knop totdat de verwarmingsmodus is geselecteerd.

      3. **Stel de gewenste temperatuur in:** Gebruik de pijltjestoetsen (meestal omhoog en omlaag, of '+' en '-') op uw afstandsbediening om de gewenste temperatuur in te stellen. Voor verwarmen stelt u de temperatuur hoger in dan de huidige kamertemperatuur.

      4. **Ventilatorsnelheid (optioneel):** U kunt eventueel ook de ventilatorsnelheid aanpassen met de daarvoor bestemde knop ("FAN" of een ventilator-symbool). Een hogere ventilatorsnelheid zorgt voor een snellere verspreiding van de warmte.

      5. **Wacht tot het apparaat opwarmt:** Nadat u de instellingen heeft geconfigureerd, zal het apparaat enige tijd nodig hebben om op te starten en de gewenste temperatuur te bereiken. Dit kan enkele minuten duren.

      **Belangrijke overwegingen:**

      * **Buitentemperatuur:** Bij zeer lage buitentemperaturen (rond het vriespunt of lager) kan de verwarmingscapaciteit van de airconditioner afnemen en kan het apparaat in de ontdooimodus gaan om ijsvorming op de buitenunit te voorkomen. Dit is normaal en zorgt ervoor dat de efficiëntie behouden blijft.
      * **Energieverbruik:** Verwarmen met een airconditioner (warmtepomp) is doorgaans energiezuiniger dan traditionele elektrische verwarming, maar het energieverbruik is afhankelijk van de ingestelde temperatuur, de buitentemperatuur en de isolatie van de ruimte.

      Mocht u verdere vragen hebben of specifieke problemen ondervinden, dan kunt u altijd contact opnemen met een erkend installateur of de klantenservice van Toshiba. Geantwoord op 2-4-2026 om 20:07

      Waardeer dit antwoord Misbruik melden
  • Waar vindt ik de handleiding van de Airco Toshiba RasB16j2kvg-e Gesteld op 26-6-2023 om 18:11

    Reageer op deze vraag Misbruik melden

Misbruik melden

Gebruikershandleiding.com neemt misbruik van zijn services uitermate serieus. U kunt hieronder aangeven waarom deze vraag ongepast is. Wij controleren de vraag en zonodig wordt deze verwijderd.

Product:

Bijvoorbeeld antisemitische inhoud, racistische inhoud, of materiaal dat gewelddadige fysieke handelingen tot gevolg kan hebben.

Bijvoorbeeld een creditcardnummer, een persoonlijk identificatienummer, of een geheim adres. E-mailadressen en volledige namen worden niet als privégegevens beschouwd.

Spelregels forum

Om tot zinvolle vragen te komen hanteren wij de volgende spelregels:

Belangrijk! Als er een antwoord wordt gegeven op uw vraag, dan is het voor de gever van het antwoord nuttig om te weten als u er wel (of niet) mee geholpen bent! Wij vragen u dus ook te reageren op een antwoord.

Belangrijk! Antwoorden worden ook per e-mail naar abonnees gestuurd. Laat uw emailadres achter op deze site, zodat u op de hoogte blijft. U krijgt dan ook andere vragen en antwoorden te zien.

Abonneren

Abonneer u voor het ontvangen van emails voor uw Toshiba RAS 16 bij:


U ontvangt een email met instructies om u voor één of beide opties in te schrijven.


Ontvang uw handleiding per email

Vul uw emailadres in en ontvang de handleiding van Toshiba RAS 16 in de taal/talen: Nederlands, Duits, Engels, Frans, Italiaans, Portugees, Spaans, Pools, Turks, Deens, Zweeds, Noors, Fins als bijlage per email.

De handleiding is 11,74 mb groot.


U ontvangt de handleiding per email binnen enkele minuten. Als u geen email heeft ontvangen, dan heeft u waarschijnlijk een verkeerd emailadres ingevuld of is uw mailbox te vol. Daarnaast kan het zijn dat uw internetprovider een maximum heeft aan de grootte per email. Omdat hier een handleiding wordt meegestuurd, kan het voorkomen dat de email groter is dan toegestaan bij uw provider.

Uw handleiding is per email verstuurd. Controleer uw email

Als u niet binnen een kwartier uw email met handleiding ontvangen heeft, kan het zijn dat u een verkeerd emailadres heeft ingevuld of dat uw emailprovider een maximum grootte per email heeft ingesteld die kleiner is dan de grootte van de handleiding.

Er is een email naar u verstuurd om uw inschrijving definitief te maken.

Controleer uw email en volg de aanwijzingen op om uw inschrijving definitief te maken

U heeft geen emailadres opgegeven

Als u de handleiding per email wilt ontvangen, vul dan een geldig emailadres in.

Uw vraag is op deze pagina toegevoegd

Wilt u een email ontvangen bij een antwoord en/of nieuwe vragen? Vul dan hier uw emailadres in.


Info