1 9
2 8
7
4 5 6 10
12
11
EN
CLOCK RADIO CR62 CLOCK RADIO CR62
EN
Carefully read the instructions of this manual, r
safety
This appliance has been designed solely for domestic use; the manufacturer’
shall not be engaged in the event of any professional use, any misuse or any use not
complying with the operating instructions.
This symbol, representing a lightning bolt inside an equilateral triangle, is
intended to alert the user to the presence of uninsulated, dangerous voltage
in the product’
shock.
This symbol, representing an exclamation mark inside an equilateral triangle,
is intended to alert the user to the presence of operating and maintenance
instructions in the documentation accompanying the product.
This symbol complies with the standards in force for this type of pr
Disposing of the appliance at the end of its life
This appliance bears the WEEE mark (Waste of Electric and Electr
Equipment) signifying that, at the end of its life cycle, it should not be
disposed of with household waste, but at a recycling centre.
The recycling of waste contributes to the conservation of our environment.
Disposing of batteries at the end of their life
In order to respect the envir
household waste.
Dispose of them at your nearest recycling centr
collection point.
WARNING CONCERNING USE AND INST
A
to rain or humidity
point or in a humid location (bathroom, swimming pool, sink, etc).
A
• Do not place any object containing water (e.g. vases, etc.) on the appliance.
• Do not place the appliance in full sunlight, close to heating equipment or any heat
source, or in a location subject to excessive dust or mechanical shocks.
• Do not expose the appliance to extreme temperatures. The appliance is designed
for use in moderate climates.
• Do not place any object that produces heat (candle, ash tray
appliance.
MAINS VOL
• This appliance is designed to operate with the adapter supplied. If you replace the
adapter
• The adapter should not be obstructed or should be readily accessible during use.
• If you need to use an extension cord, take all necessary precautions to ensur
no-one can trip over it or get tangled up in it.
• Do not plug in or unplug the adapter when your hands are not dry
• T
humidity
in a humid location.
INFORMA
• The appliance must be equipped with the appropriate batteries in order to function
properly
• Only recommended batteries should be used.
• Polarity must be respected when inserting batteries.
• The batteries should be inserted in such a way as to avoid any short circuit.
• Do not mix used and new batteries.
• Do not mix alkaline, standard (carbon-zinc) and rechar
batteries.
• Do not rechar
• Replace all batteries at the same time with identical batteries.
• Remove the batteries when unused for a long time.
• If the liquid contained in the batteries comes in contact with eyes or skin, wash the
area immediately and carefully with clear water and consult a doctor
• Battery shall not be exposed to excessive heat such as sunshine, re or the like.
A: Danger of explosion if batteries are not inserted correctly
Consult the following table if there is a problem with the appliance.
MAINTENANCE AND CLEANING
• Unplug the appliance before cleaning it.
• Remove ngerprints and dust with a soft and slightly damp cloth. Do not use
abrasive products or solvents that may damage the appliance’
A
whatsoever
• If it is not used for a long time, unplug the appliance and remove the batteries.
Note: Unit design and specications are subject to change without notice. The
manufacturer reserves the right to make the necessary impr
SPECIFICA
Mains voltage adaptor:
Input : 100-240V ~ 50/60Hz 0.3A
Output : 6V 300 mA
FM frequency range: 88-108MHz
Speaker: 0.3W
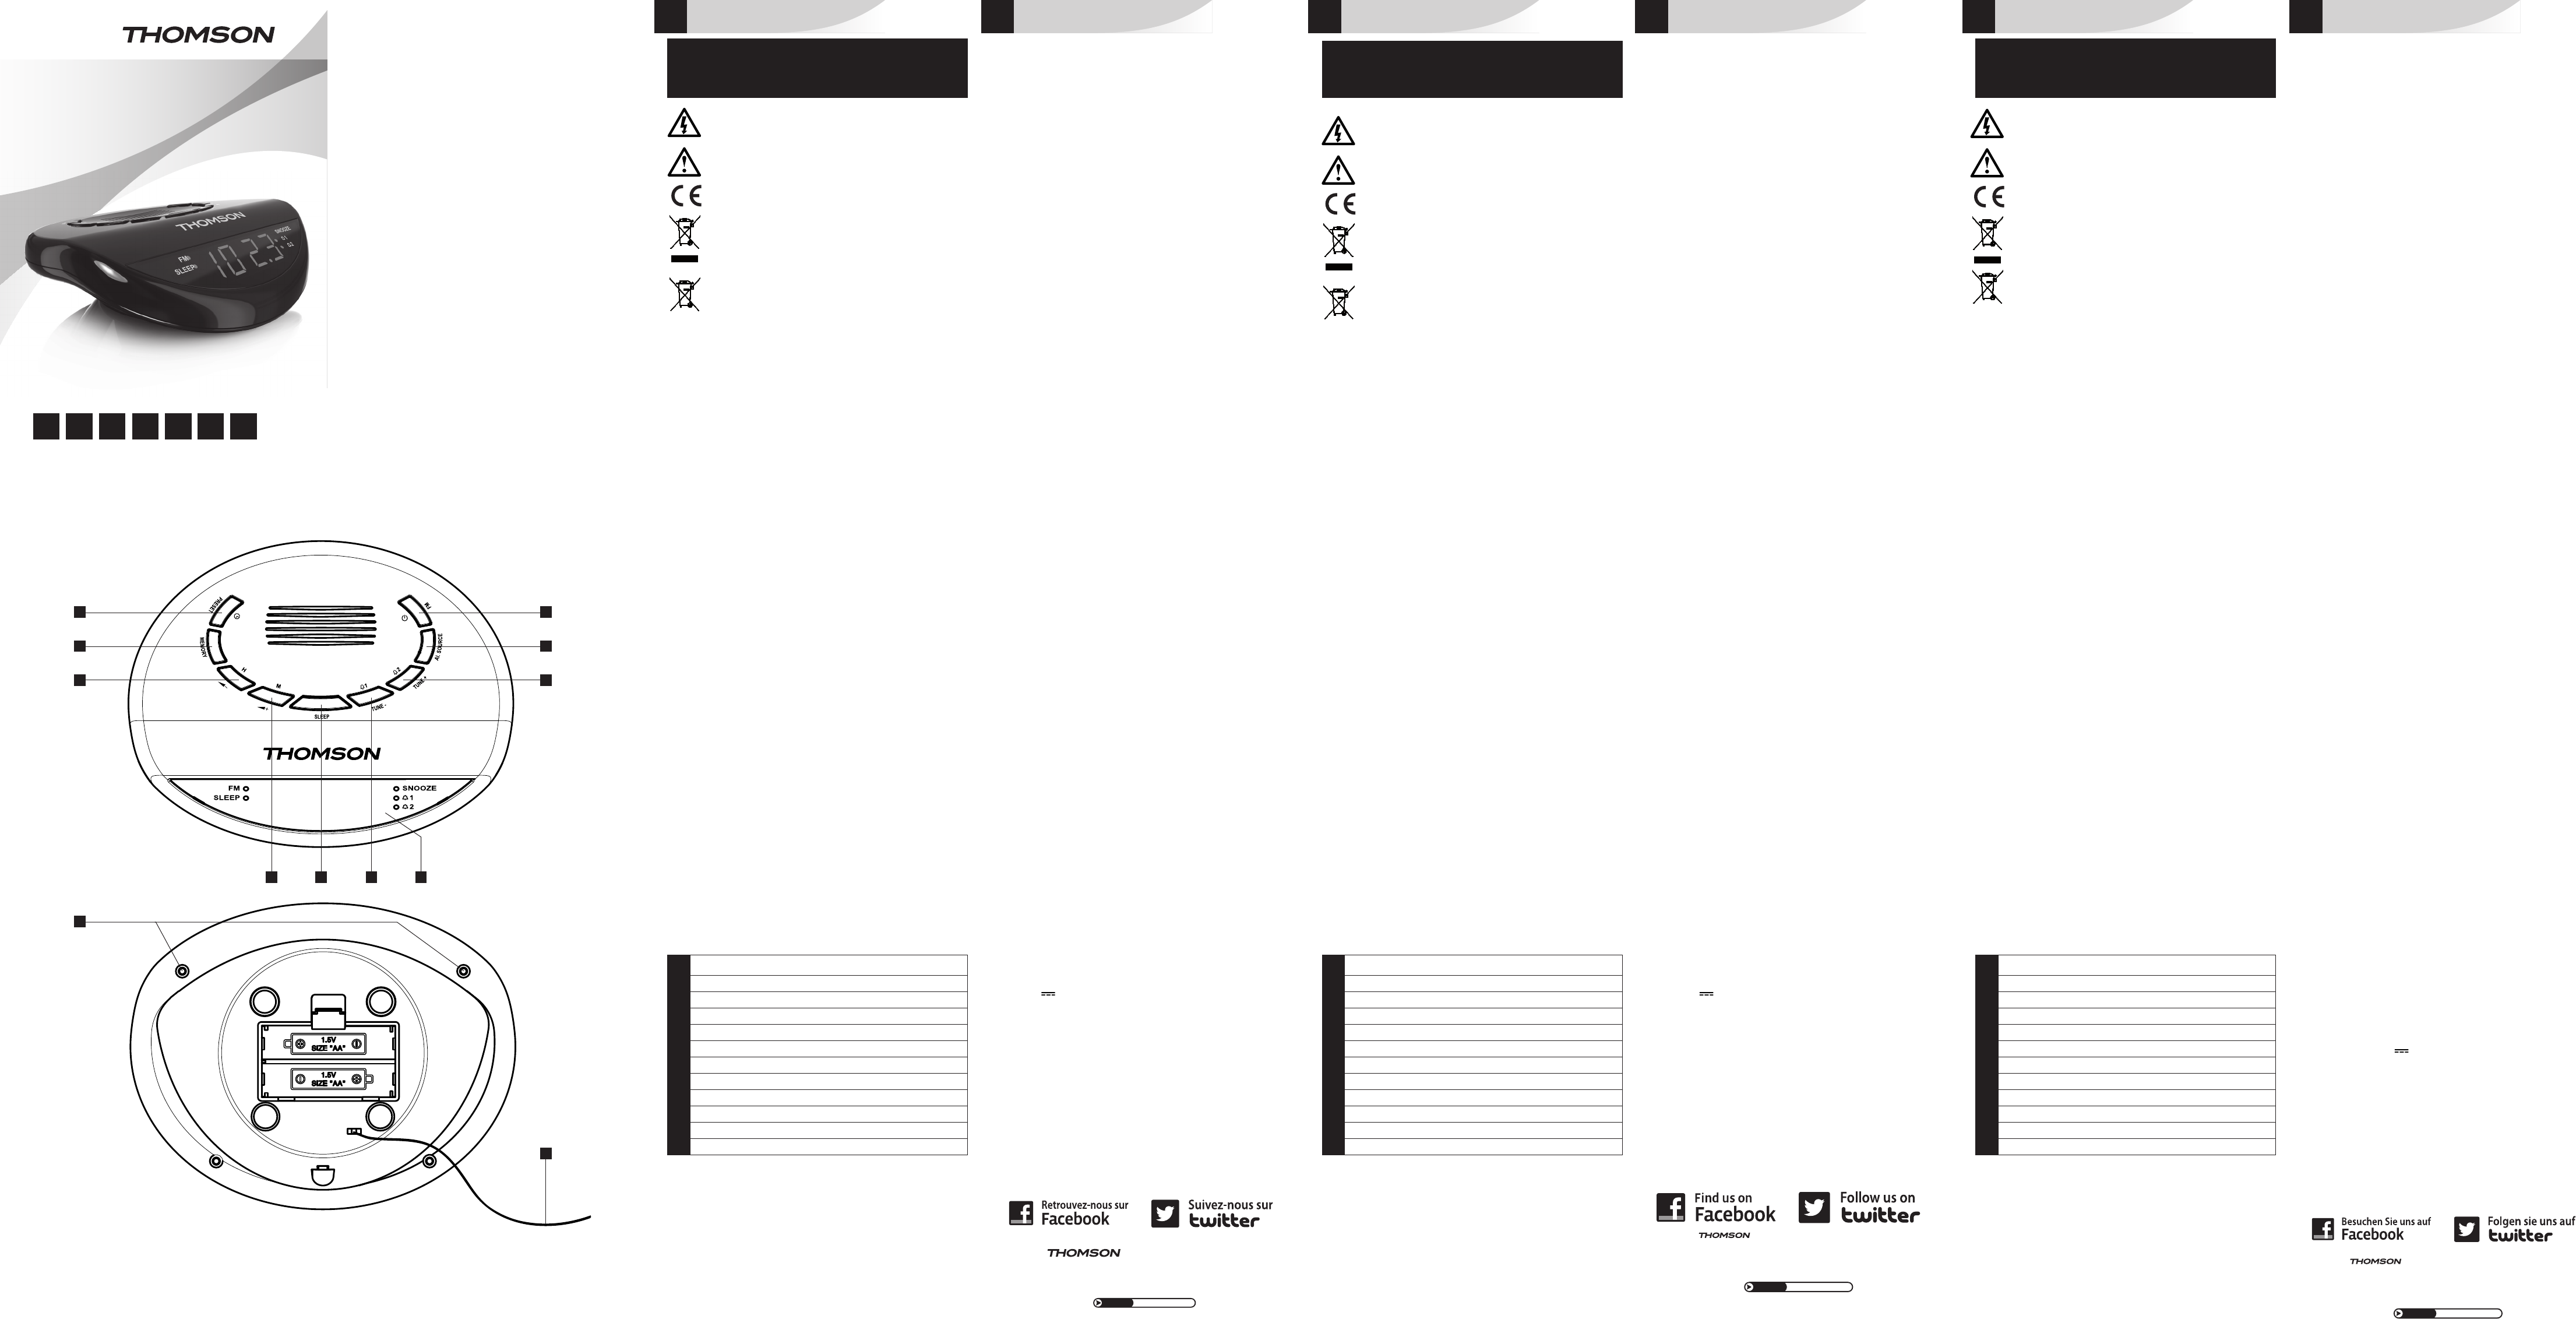
1 PRESET / CLOCK SETTING
2 MEMORY
3 VOL - / H: button for setting the volume (-) / hour
4 VOL + / M: button for setting the volume (+) / minutes
5 SLEEP: sleep function
6 TUNE - / AL1: button for setting frequencies (-) / alarm 1
7 TUNE + / AL2: button for setting frequencies (+) / alarm 2
8 AL. SOURCE: alarm mode selector button
9 FM: Radio on/off button
10 LED screen
11 SNOOZE: function causes alarm to repeat
12 Wire-lament aerial
• Place the appliance on a surface that is at, rigid and stable.
• Do not install the appliance in an inclined position. It is designed to work solely in a
horizontal position.
• Install the appliance in a location with sufcient ventilation to avoid internal
overheating. Avoid restricted spaces such as bookcases, cabinets, etc.
• Do not obstruct the appliance’
• Do not install the appliance on a soft surface, such as a carpet or blanket, that might
block the ventilation openings.
• Do not place heavy objects on the appliance.
• This appliance is not a toy; do not allow children to use it unsupervised.
• Never let children insert foreign objects into the appliance.
• Due to the effect of electrostatic and/or fast electrical transient phenomena, the
product may not operate properly and will need to be r
POWER SUPPL
Connect the mains adapter lead to the socket in the back of the radio/alarm clock.
Plug the adapter into a mains socket.
Only use the adapter supplied. Before using another adapter
same ratings and complies with current regulations.
Plug the power cable into a mains socket.
BA
The back-up system ensures that the clock continues to function in the event of a
power
• Open the battery compartment on the underside of the apparatus.
• Insert 2 LR6-type (AA) 1.5V batteries, polarity as indicated (+/-).
• Close the battery compartment.
SETTING THE TIME
The radio/alarm clock must be powered up.
• Hold down the PRESET button for 2 seconds: the display will ash on and off.
• Press the VOL + / M button to set the minutes.
• Press the VOL - / H button to set the hour
• Press the PRESET button again to conrm your choice and return to the
normal display
SETTING THE ALARM (1 and 2)
CHOICE OF ALARM MODE: RADIO / TRADITIONAL ALARM / NA
• Hold down the TUNE - / AL1 button (alarm 1) or the TUNE + / AL2 button
(alarm 2) for 2 seconds: the display will ash on and off.
• Press the VOL + / M button to set the minutes.
• Press the VOL - / H button to set the hour
• Press the TUNE - / AL1 button to conrm: the last radio station selected will
be displayed and will ash on and off.
• Press the AL SOURCE button repeatedly to select the desir
Radio / bU (alarm bell) / NS1 (natural sound 1: waves) / NS2 (natural sound 2:
birdsong) / NS3 (natural sound 3: frog) /NS4 (natural sound 4: str
• Press TUNE - / AL1 to conrm your choice and return to the normal display
Please note: once the alarm has been set, it will go off automatically: an indicator
light is displayed on the screen beside the symbol AL1 or AL2 .
ACTIV
• Press the AL SOURCE button repeatedly to activate or deactivate alarms 1
and 2:
• the indicator light will appear (alarm activated) or disappear (alarm
deactivated) on the screen beside the symbol AL1 or AL2 .
For a reminder of the set alarm time:
• Hold down the TUNE - / AL1 button (alarm 1) or the TUNE + / AL2 button
(alarm 2) for 2 seconds: the screen will display the set alarm time for 10
seconds, then return to normal.
SNOOZE FUNCTION
• The alarm repetition buttons (11 ) are located underneath the radio/alarm
clock: press the front part of the alarm clock to stop the alarm temporarily; it
will come on again after 9 minutes. An indicator light will appear on the screen
beside the word SNOOZE .
SWITCHING OFF THE ALARM
• The alarm is programmed to function for 59 minutes.
• Press the FM / ON / OFF button to stop the alarm, which will come on again
the next day (after 24 hours).
USING THE RADIO
The alarm clock must be powered up.
• Press the FM / ON / OFF button: The radio will come on, with the LED screen
showing the frequency
• Press the TUNE + / AL2 and TUNE - / AL1 buttons to nd the frequency you
want.
• Hold down the TUNE + / AL2 and TUNE - / AL1 buttons for 2 seconds to
initiate an automatic search. The search will stop automatically when a radio
station is tuned into correctly
• Press the VOL - / H et VOL + / M buttons to adjust the sound volume, on a
scale of 0 to 15.
• Press the FM / ON / OFF button again to switch off the radio.
PLEASE NOTE: T
MEMORY (up to 20 radio stations)
With the radio switched on:
• Manual memorisation: select a frequency by pressing the TUNE - / AL1 and
TUNE + / AL2 buttons.
• Press the MEMOR button: the P01 display will ash on and off. Press the
MEMORY button again to memorise the radio fr
• By repeating this operation, you can memorise up to 20 stations.
• Automatic memorisation: hold down the MEMORY button for 2 seconds: a
frequency search will be performed automatically
up to 20 stations.
ACCESS TO MEMORISED ST
• Switch on the radio.
• Press the PRESET button: the radio will broadcast the most r
memorised station. Press the PRESET button repeatedly to move fr
memorised station to another (P01 to P20).
SLEEP FUNCTION
• Press the SLEEP button to activate the radio for 120 minutes. The radio will
switch off by itself at the end of this period.
• Press the SLEEP button repeated at any time to r
90, 60, 45, 30, 15 minutes.
is a trademark of TECHNICOLOR S.A. used
under license by:
Parsons International France - 19 Boulevard Albert Einstein
77420 Champs sur Marne - France
French time: Monday to Thursday (from 9 am to 6 pm) and
Friday (9 am to 3:30 p.m.)
N°Azur
(+33
)
0825 745 770
call rate according to operator
www
RADIO-REVEIL
CLOCK RADIO
RADIOWECKER
RADIODESPERT
RADIOSVEGLIA
WEKKERRADIO
KLOCKRADIO
CR62
FR FR
RADIO-REVEIL CR62 RADIO-REVEIL CR62
FR EN
Lire attentivement toutes les instructions de la présente notice, en respectant
les consignes d’utilisation et de sécurité. Conserver cette notice et en aviser les
utilisateurs potentiels.
Cet appareil a été conçu pour un usage domestique uniquement, toute utilisation
professionnelle, non appropriée ou non conforme au mode d’emploi, n’engage pas la
responsabilité du fabricant.
Ce symbole représentant un éclair dans un triangle équilatéral est destiné à
alerter l’utilisateur de la présence d’une tension dangereuse non isolée dans
le boîtier du produit sufsamment important pour présenter un risque de
choc électrique.
Ce symbole représentant un point d’exclamation dans un triangle équilatéral
est destiné à alerter l’utilisateur de la présence d’instructions d’utilisation et
d’entretien dans la documentation accompagnant le produit.
Ce symbole indique que l’appareil est conforme aux normes en vigueur
relatives à ce type de produit.
Elimination de l’appareil en n de vie
Cet appareil comporte le symbole DEEE (Déchet d’Equipement Electrique et
Electronique) signiant qu’en n de vie, il ne doit pas être jeté aux déchets
ménagers, mais déposé au centre de tri de la localité.
La valorisation des déchets permet de contribuer à préserver notre
environnement.
Elimination des piles en n de vie
Pour respecter l’environnement, ne pas jeter les piles usagées aux déchets
ménagers.
Les déposer au centre de tri de la localité ou dans un collecteur prévu à cet
effet.
A
A
risque d’incendie ou de choc électrique. Par conséquent ne pas utiliser l’appareil à
proximité d’un point d’eau ou dans une pièce humide (salle de bain, piscine, évier
A
• Ne placer aucun objet rempli de liquide (ex. : vases…) sur l’appareil.
• Ne pas placer l’appareil en plein soleil, à proximité d’un appar
toute source de chaleur
chocs mécaniques.
• Ne pas exposer à des températures extrêmes. Cet appareil est destiné à êtr
sous un climat tempéré.
• Ne placer aucun élément thermogène (bougie, cendrier…) à proximité de l’appareil.
ADAPT
• Cet appareil est conçu pour fonctionner avec l’adaptateur fourni. En cas de
remplacement, utiliser un autre adaptateur qui comporte des caractéristiques
identiques.
• L
d’utilisation.
• Dans le cas où une rallonge est nécessaire, prendr
d’éviter tout risque de chute.
• Ne pas brancher ou débrancher l’adaptateur avec les mains humides.
• Ne pas exposer l’appareil à la pluie ou à l’humidité pour éviter tout risque d’incendie
ou de choc électrique. Par conséquent ne pas utiliser l’appareil à proximité d’un
point d’eau ou dans une pièce humide.
INFORMA
• Pour fonctionner correctement, l’appareil doit êtr
effet.
• Seules les piles du type recommandé doivent être utilisées.
• Les piles doivent être mises en place en respectant le sens de polarité.
• Les bornes des piles ne doivent pas être mises en court-circuit.
• Ne pas mélanger des piles neuves et des piles usagées.
• Ne pas mélanger des piles alcalines, des piles standard (carbone-zinc), des
batteries rechar
• Ne pas rechar
• Remplacer toutes les piles en même temps par des piles neuves identiques entre
elles.
• Retirer les piles en cas de non-utilisation prolongée.
• Si le liquide qui sort de la pile entre en contact avec les yeux ou la peau, laver
la zone atteinte immédiatement et minutieusement à l’eau claire et consulter un
médecin.
• Ne pas exposer les piles à une chaleur excessive telle que rayon solaire, feu ou
assimilé.
A : Danger d’explosion si les piles ne sont pas placées correctement.
En cas de problème avec l’appareil et avant toute demande de réparation, veuillez
vérier les cas suivants :
ENTRETIEN ET NETTOY
• Débrancher l’appareil avant de le nettoyer
• Oter les traces de doigt et de poussière à l’aide d’un chiffon doux légèr
humide. Ne pas utiliser de produits abrasifs ou de dissolvants susceptibles
d’endommager la surface de l’appareil.
A
que ce soit.
• En cas de non-utilisation prolongée, débrancher l’appareil et r
SPECIFICA
Adaptateur secteur :
Entrée : 100-240V ~ 50/60Hz 0.3A
Sortie : 6V 300 mA
Gamme de fréquence FM : 88-108MHz
Haut-parleur : 0.3W
1
PRESET /REGLAGE DE L
2
MEMORY
3
VOL - / H : réglage volume - / heures
4
VOL + / M : réglage volume + / minutes
5
SLEEP : fonction sommeil
6
TUNE - / AL1 : réglage des fréquences - / alarme 1
7
TUNE + / AL2 : réglage des fréquences + / alarme 2
8
AL. SOURCE : sélecteur d’alarme
9
FM : Marche/Arrêt radio
10
Ecran LED
11
SNOOZE : répétition d’alarme
12
Antenne laire
• Placer l’appareil sur une surface plane, rigide et stable.
• Ne pas installer l’appareil en position inclinée. Il est conçu pour fonctionner
uniquement à l’horizontale.
• Installer l’appareil dans un endroit sufsamment ventilé pour éviter une sur
interne. Eviter les espaces restreints tels qu’une bibliothèque, une armoire,…
• Ne pas obstruer les orices de ventilation de l’appareil.
• Ne pas installer l’appareil sur une surface molle, comme un tapis ou une couverture,
qui pourrait bloquer les orices de ventilation.
• Ne pas poser d’objets lourds sur l’appareil.
• Cet appareil n’est pas un jouet, ne pas laisser son utilisation à des enfants sans
surveillance.
• Ne jamais laisser les enfants introduire des objets étrangers dans l’appar
• Sous l’inuence de phénomènes électriques transitoires rapides et/ou
électrostatiques, le produit peut présenter des dysfonctionnements et nécessiter
l’intervention de l’utilisateur pour une réinitialisation.
ALIMENT
Connecter la che de l’adaptateur secteur sur la prise située au dos de l’appareil.
Brancher l’adaptateur dans une prise de courant secteur
Utiliser uniquement l’adaptateur fourni. Pour utiliser un autre adaptateur
qu’il comporte des caractéristiques identiques et conforme aux normes en vigueur
Brancher le cordon d’alimentation sur une prise secteur
SYSTEME DE SAUVEGARDE
Le système de sauvegarde maintient l’heure réglée sur l’appar
d’interruption du courant.
• Ouvrir le compartiment à piles situé sous l’appareil.
• Insérer 2 piles de type LR6 (AA) 1.5V en respectant le sens de polarité indiqué.
• Refermer le compartiment à piles.
REGLAGE DE L
L
• Presser le bouton PRESET durant 2 secondes : l’afchage clignote.
• Presser le bouton VOL + / M pour ajuster les minutes.
• Presser le bouton VOL - / H pour ajuster les heures.
• Presser le bouton PRESET pour valider et revenir à l’afchage normal.
REGLAGE DE L
CHOIX DU MODE D’ALARME : RADIO / SONNERIE / SON DE LA NA
• Presser le bouton TUNE - / AL1 (alarme 1) ou TUNE + / AL2 (alarme 2) durant
2 secondes : l’afchage clignote.
• Presser le bouton VOL + / M pour ajuster les minutes.
• Presser le bouton VOL - / H pour ajuster les heures.
• Presser le bouton TUNE - / AL1 pour valider : l’afchage de la dernière station
radio sélectionnée clignote.
• Presser successivement le bouton AL. SOURCE pour sélectionner le mode
d’alarme : Radio / bU (sonnerie)/NS1 (son nature 1 : vagues)/
NS2 (son nature 2 : chant d’oiseau) / NS3 (son nature 3 : gr
nature 1 : ruisseau).
• Presser TUNE - /AL1 pour valider et revenir à l’afchage normal.
Remarque : une fois l’alarme réglée, celle-ci est automatiquement activée :
un témoin lumineux apparaît sur l’écran à côté du symbole AL1 ou AL2 .
ACTIV
• Presser successivement le bouton AL. SOURCE pour activer ou désactiver les
alarmes 1 et 2.
• Le témoin lumineux apparaît (alarme activée) ou disparaît (alarme désactivée)
sur l’écran à côté du symbole AL1 ou AL2 .
Rappel de l’heure d’alarme :
• Presser le bouton TUNE - / AL1 (alarme 1) ou TUNE + / AL2 (alarme 2) durant
2 secondes : l’écran afche l’heure d’alarme durant 10 secondes puis revient
à l’afchage normal.
REPETITION D’ALARME (SNOOZE)
• Les boutons (11 ) de répétition d’alarme sont situés sous l’appareil : presser
la partie avant de l’appareil pour interrompr
s’enclenchera à nouveau après 9 minutes. Un témoin lumineux apparaît sur
l’écran à côté du terme SNOOZE.
ARRET DE L
• L
• Presser le bouton FM / ON / OFF pour stopper l’alarme, qui s’enclenchera à
nouveau le lendemain (après 24 heures).
UTILISA
L
• Presser le bouton FM / ON / OFF : la radio s’allume et l’écran LED afche la
fréquence.
• Presser les boutons TUNE + / AL2 et TUNE - / AL1 pour recher
fréquence.
• Presser durant 2 secondes les boutons TUNE + / AL2 et TUNE - / AL1
pour lancer une recherche automatique. La r
lorsqu’une station de radio est captée correctement.
• Presser les boutons VOL - / H et VOL + / M pour ajuster le volume sonore de
0 à 15.
• Presser le bouton FM / ON / OFF pour éteindre la radio.
NOTE: Pour une meilleure réception, déployer l’antenne laire.
MEMOIRE (jusqu’à 20 stations radio)
Lorsque la radio est allumée :
• Mémorisation manuelle : Sélectionner une fréquence en pressant les boutons
TUNE + / AL2 et TUNE - / AL1.
• Presser le bouton MEMOR : l’afchage P01 clignote. Presser à nouveau le
bouton MEMORY pour mémoriser la fréquence radio.
• Répéter l’opération pour mémoriser jusqu’à 20 stations.
• Mémorisation automatique : presser le bouton MEMOR durant 2 secondes :
la recherche de fréquences s’ef
20 station captées.
ACCES AUX MEMOIRES
• Allumer la radio.
• Presser le bouton PRESET : la radio diffuse la dernière station mémorisée.
Presser successivement le bouton PRESET pour passer d’une mémoire à une
autre (P01 à P20).
FONCTION SOMMEIL (SLEEP)
• Presser le bouton SLEEP pour diffuser la radio durant 120 minutes. La radio
s’éteint automatiquement à la n du délai.
• Presser successivement le bouton SLEEP à tout moment pour ajuster
la durée : 120, 90, 60, 45, 30, 15 minutes.
Note : Les caractéristiques et le design de cet appareil peuvent être modiés sans
préavis, le fabricant se réservant le droit d’apporter les améliorations qu’il juge
nécessaires.
est une marque de TECHNICOLOR
S.A. utilisée sous licence par :
Parsons International France - 19 Boulevard Albert Einstein
77420 Champs sur Marne - France
Heure française : du lundi au jeudi (de 9h à 18h) et le vendredi (de 9h à 15h30)
0825 745 770
N°Azur
T
www
DE ES IT NL SE
DE DE
RADIOWECKER CR62 RADIOWECKER CR62
Lesen Sie aufmerksam alle Anweisungen dieser Bedienungsanleitung und befolgen Sie
die V
auf und informieren Sie eventuelle weitere Benutzer über den Aufbewahrungsort.
Dieses Gerät ist ausschließlich für eine V
gewerbliche oder zweckentfremdete Nutzung des Gerätes schließt die Haftung des
Herstellers aus.
Das Symbol, das einen Blitz in einem gleichseitigen Dreieck zeigt,
soll den Benutzer vor dem V
Spannung im Gehäuse des Produktes warnen, die so hoch ist, dass sie ein
Stromschlagrisiko darstellen kann.
Das Symbol, das ein Ausrufezeichen in einem gleichseitigen Dreieck zeigt,
soll den Benutzer auf wichtige Bedienungs- und Wartungsanweisungen in den
Unterlagen hinweisen, die mit dem Produkt mitgeliefert werden.
Dieses Gerät entspricht den für diesen Produkttyp geltenden Normen.
Entsorgen des Geräts am Ende seiner Lebensdauer
Dieses Gerät ist mit dem Siegel WEEE (elektrischer und elektronischer Müll)
versehen; dies bedeutet, dass es nicht über den Hausmüll entsorgt wer
darf, sondern in die örtliche Müllsortieranlage gegeben werden muss.
Die Wiederverwertung von Abfällen trägt zum Umweltschutz bei.
Entsorgen der Batterien am Ende ihrer Lebensdauer
Zum Schutz der Umwelt die verbrauchten Batterien nicht in den Hausmüll
werfen.
Die Batterien bei der Sondermüllsammelstelle der jeweiligen Gemeinde
abgeben oder in einem Batteriesammelbehälter entsorgen.
HINWEIS FÜR DEN GEBRAUCH UND DIE AUFSTELLUNG
ACHTUNG: Setzen Sie das Gerät nicht Regen oder Feuchtigkeit aus, um jegliche
Gefahr eines Brandes oder Stromschlags zu vermeiden. Demzufolge darf das
Gerät nicht in der Nähe von Wasser oder in einem feuchten Raum (Badezimmer
Swimmingpool, Spüle usw
ACHTUNG: Das Gerät niemals in Wasser oder eine sonstige Flüssigkeit tauchen.
• Keine mit Flüssigkeit gefüllten Gegenstände (z. B. V
• Stellen Sie das Gerät nicht in die Sonne, in die Nähe eines Heizkörpers oder einer
anderen Hitzequelle, oder an Orte, an denen es außer
Stößen ausgesetzt ist.
• Setzen Sie das Gerät nicht extremen T
V
NETZADAPTER
• Dieses Gerät wurde für den Betrieb mit dem mitgelieferten Adapter konzipiert. Im
Fall eines Auswechselns ist darauf zu achten, dass der neue Adapter die gleichen
Merkmale besitzt.
• Der Adapter darf nicht blockiert sein und muss während des Gerätebetriebs immer
leicht zugänglich sein.
• Sollte ein V
treffen, um die Gefahr des Darüberstolperns zu verhindern.
• Den Adapter nicht mit feuchten Händen ein- oder ausstecken.
• Setzen Sie das Gerät nicht Regen oder Feuchtigkeit aus, um jegliche Gefahr eines
Brandes oder Stromschlags zu vermeiden. Demzufolge darf das Gerät nicht in der
Nähe von Wasser oder in einem feuchten Raum betrieben wer
HINWEISE ZU DEN BA
• Damit es richtig funktioniert, muss das Gerät mit dafür vorgesehenen Batterien
ausgestattet sein.
• Es dürfen nur Batterien des empfohlenen T
• Die Batterien müssen unter Einhaltung der Polarität eingesetzt werden.
• Die Pole der Batterien dürfen nicht kurzgeschlossen werden.
• Keine neuen und alten Batterien mischen.
• Keine alkalinen Batterien, Standardbatterien (Zink-Kohle) und auadbare Batterien
(Nickel-Cadmium) mischen.
• Batterien nicht wieder auaden oder versuchen, sie zu öffnen. Die Batterien nicht
verbrennen.
• Alle Batterien gleichzeitig mit neuen identischen Batterien ersetzen.
• Batterien bei längerem Nichtgebrauch aus dem Gerät entfernen.
• W
diese sofort und sorgfältig mit klar
• Setzen Sie die Batterien nicht übermäßiger Hitze wie z.B. direktem Sonnenlicht,
Feuer oder ähnlichem aus.
ACHTUNG: Explosionsgefahr wenn die Batterien nicht korrekt eingelegt sind.
Hinweis: Die Eigenschaften und das Design dieses Geräts können ohne
V
als erforderlich erachteten V
TECHNISCHE DA
Netzstromadapter:
Eingansspannung: 100-240V ~ 50/60Hz 0.3A
Ausgangsspannung: 6V 300 mA
Frequenzbereich FM: 88-108 MHz
Lautsprecher: 0.3W
1 PRESET / EINSTELLEN DER UHRZEIT
2 MEMORY
3 VOL - / H: Lautstärkeregler - / Stunden
4 VOL + / M: Lautstärkeregler + / Minuten
5 SLEEP: Funktion Sleep-Timer (Abschaltautomatik)
6 TUNE - / AL1: Frequenzwahlschalter - / Alarm 1
7 TUNE + /AL2: Frequenzwahlschalter + / Alarm 2
8 AL. SOURCE: Alarm-Wahlschalter
9 FM: Radio Ein- /Ausschalttaste
10 LED-Display
11 SNOOZE: W
12 Drahtantenne
• Stellen Sie keinen Gegenstand, der Wärme abgibt (Kerze, Aschenbecher
unmittelbare Nähe des Geräts.
• Stellen Sie das Gerät auf eine ebene, feste und stabile Fläche.
• Stellen Sie das Gerät nicht in geneigter Position auf. Es wurde nur für einen Betrieb
in waagerechter Position konzipiert.
• Stellen Sie das Gerät an einem ausreichend belüfteten Ort auf, um einen Wärmestau
im Geräteinneren zu vermeiden. V
beengten Orten wie z. B. in einem Schrank oder Bücherregal usw
• V
• Stellen Sie das Gerät nicht auf eine weiche Unterlage wie z. B. einen T
eine Decke, wodurch die Lüftungsöffnungen ver
• Stellen Sie keine schweren Gegenstände auf das Gerät.
• Dieses Gerät ist kein Spielzeug. Lassen Sie nicht zu, dass es von Kindern
unbeaufsichtigt benutzt wird.
• Achten Sie darauf, dass Kinder niemals Gegenstände in das Gerät stecken.
• Störimpulse über die Netzzuleitung und/oder elektrostatische Störungen können im
Extremfall zu Fehlfunktionen am Gerät führen und eine Neuinitialisierung erfor
machen.
STROMVERSORGUNG
Stecken Sie den Adapterstecker in die Buchse an der Geräterückseite.
Schließen Sie den Adapter an den Netzstrom an.
V
eines anderen Adapters muss sicher
technischen Eigenschaften besitzt sowie den geltenden Normen entspricht.
Netzkabel an den Netzstrom anschließen.
UHRZEITSPEICHER
Durch den Uhrzeitspeicher wird die im Gerät eingestellte Uhrzeit bei Str
gesichert.
• Öffnen Sie das Batteriefach auf der Unterseite des Gerätes.
• Legen Sie 2 Batterien T
angegebenen Polarität ein.
• Schließen Sie das Batteriefach wieder
EINSTELLEN DER UHRZEIT
Das Gerät muss eingeschaltet sein.
• Halten Sie die TPRESET 2 Sekunden lang gedrückt: Die Anzeige blinkt.
• Drücken Sie die TVOL + / M zum Einstellen der Minuten.
• Drücken Sie die TVOL - / H zum Einstellen der Stunden.
• Zum Bestätigen TPRESET drücken und zur Normalanzeige zurückkehren.
ALARM 1 und 2 EINSTELLEN
WECKMODUS AUSWÄHLEN: RADIO / WECKSIGNAL / NA
• Halten Sie die TTUNE + / AL1 (Alarm 1) oder TUNE - / AL2 (Alarm 2) 2
Sekunden lang gedrückt: Die Anzeige blinkt.
• Drücken Sie die TVOL + / M zum Einstellen der Minuten.
• Drücken Sie die TVOL - / H zum Einstellen der Stunden.
• Zum Bestätigen TTUNE + / AL1 drücken: Der zuletzt gewählte
Radiosender blinkt im Display
• Wählen Sie den gewünschten W
TAL. SOURCE aus:
Radio / bU (W
2: V
rauschender Bach).
• Zum Bestätigen TTUNE + / AL1 drücken und zur Normalanzeige
zurückkehren.
Anmerkung: Beim Einstellen des W
Display erscheint neben dem Symbol AL1 oder AL2 eine Kontrollleuchte.
ALARM EIN-/AUSSCHAL
• Schalten Sie durch mehrmaliges Drücken der TAL. SOURCE Alarm 1
oder 2 ein oder aus:
• Im Display geht neben dem Symbol AL1 oder AL2 die Kontrollleuchte an
(Alarm eingeschaltet) oder aus (Alarm ausgeschaltet).
Uhrzeit des W
• Halten Sie die TTUNE - / AL1 (Alarm 1) oder TUNE + / AL2 (Alarm 2) 2
Sekunden lang gedrückt: Im Display wird 10 Sekunden lang die W
angezeigt und wieder zur Normalanzeige zurückgewechselt.
WECKWIEDERHOLUNG (SNOOZE)
• Die W11) benden sich auf der Unterseite des
Geräts: Drücken Sie auf die V
vorübergehend unterbr
automatisch wieder ein. Im Display erscheint neben SNOOZE eine
Kontrollleuchte.
ALARM AUSSCHAL
• Der Alarmbetrieb ist für eine Dauer von 59 Minuten vorprogrammiert.
• Drücken Sie zum Ausschalten die TFM /ON/OFF Der Alarm schaltet
sich am nächsten T
RADIOBETRIEB
Das Gerät muss eingeschaltet sein.
• Drücken Sie die TFM /ON/OFF : Das Radio wird eingeschaltet und die
Frequenz im LED-Display angezeigt.
• Suchen Sie die gewünschte Frequenz durch Drücken der TTUNE - /
AL2 und TUNE + / AL1.
• Halten Sie die TTUNE + / AL2 und TUNE - / AL1 2 Sekunden lang
gedrückt, um den automatischen Sendersuchlauf zu starten. Der Suchlauf
endet automatisch, sobald ein Radiosender korrekt empfangen wird.
• Drücken Sie die TVOL - / H und VOL + / M , um die gewünschte
Lautstärke zwischen 0 und 15 einzustellen.
• Schalten Sie das Radio durch Drücken der TFM /ON/OFF wieder aus.
Hinweis: V
SENDERSPEICHERFUNKTION (bis zu 20 Radiosender)
Bei eingeschaltetem Radio:
• Manuelle Speicherfunktion: Wählen Sie durch Drücken der TTUNE + /
AL2 und TUNE - / AL1 eine Frequenz aus.
• Drücken Sie die TMEMORY : Im Display blinkt P01. Radiofr
erneutes Drücken der TMEMORY speichern.
• V
• Automatische Speicherfunktion: Halten Sie die TMEMORY 2 Sekunden
lang gedrückt: Der Frequenzsuchlauf wird automatisch gestartet und
speichert bis zu 20 empfangene Sender
GESPEICHERTE SENDER ABRUFEN
• Radio einschalten.
• Drücken Sie die TPRESET : Das Radio spielt den zuletzt gespeicherten
Sender ab. WPRESET
von einem gespeicherten Sender zum nächsten (P01 bis P20).
FUNKTION SLEEP-TIMER (SLEEP)
• Drücken Sie die SLEEP -T
programmieren. Nach dieser Zeit schaltet das Radio sich automatisch aus.
• Drücken Die die SLEEP -T
einzustellen: 120, 90, 60, 45, 30, 15 Minuten.
ist eine Handelsmarke der TECHNICOLOR
S.A., genutzt unter Lizenz von:
Parsons International France - 19 Boulevard Albert Einstein
77420 Champs sur Marne - France
Stunde Französischer Zeit: Montag bis Donnerstag (von 9 bis 18 Uhr) und
Freitag (9.00 bis 15.30 Uhr)
N°Azur
(+33
)
0825 745 770
According T
www
Ziehen Sie die nachstehende T
PFLEGE UND REINIGUNG
• Ziehen Sie den Netzstecker
• Entfernen Sie Fingerspuren und Staub mit Hilfe eines weichen, leicht
angefeuchteten T
die Oberäche des Geräts beschädigen könnten.
ACHTUNG: Das Gerät niemals in Wasser oder eine ander
• Falls Sie das Gerät längere Zeit nicht verwenden, ziehen Sie den Netzstecker
und nehmen Sie die Batterien aus dem Gerät.
V