GB
- 10 - - 11 -
Installation
Connecting the mains power supply lead (see Fig.).
The mains lead consists of a 3-phase cable:
L = phase conductor (usually black, brown or grey)
N = neutral conductor (usually blue)
PE = protective-earth conductor (green/yellow)
If you are in any doubt, identify the conductors using
a voltage tester; then switch off the power again. Con-
nect the phase conductor (L) and neutral conductor (N)
to the terminal block.
Important:
n Reversing the connections will result in a short-
circuit in the light unit or in your fuse box later on.
In this case, you must identify the individual con-
ductors once again and re-connect them. A mains
switch for switching the unit ON and OFF may of
course be installed in the mains power supply
lead.
Safety Precautions
n Disconnect the power supply before attempting
any work on the unit.
n During installation, the electrical wiring being con-
nected must be dead. Therefore, switch off the
power first and use a voltage tester to make sure
the wiring is off circuit.
n Installing the SensorLight involves work on the
mains voltage supply. This work must therefore
be carried out professionally in accordance with
applicable national wiring regulations and electrical
operating conditions. (
D
-VDE 0100,
A
- ÖVE /
ÖNORM E8001-1,
- SEV 1000)
n Only use genuine replacement parts.
n Repairs must only be made by specialist work-
shops.
After the wall mount/ceiling holder has been in-
stalled and the mains connection has been made,
the SensorLight can be used for the first time. When
putting the light into operation manually at the light
switch, it will switch OFF after 10 sec. for the calibra-
tion phase and is then activated for sensor mode.
It is not necessary to operate the light switch a
second time.
Functions
Install mode
The light features an install mode to
avoid strong glare from the LEDs at
full output during installation.
To select this mode, press button .
The light dims to 10 % output until
button is pressed a second time or
automatically activates the selected
sensor functions after 30 min.
= 30 min install
Twilight setting (response threshold)
Factory setting: 2000 lux
The light's response threshold
can be set to any level from
approx. 2 – 2000 lux.
Control dial set to =
daylight operation (approx. 2000 lux)
Control dial set to =
night-time operation (approx. 2 lux)
2 – 2000 lux
Reach setting (sensitivity)
Factory setting: 8 m
Reach is understood to mean the
diameter of the more or less circular
detection zone produced on the
ground after mounting the Sensor-
Light at a height of 2.5 m.
Control dial set to " · " = min. reach
(approx. diameter 1 m)
Control dial set to + = max. reach
(approx. diameter 8 m)
Control dial set to – = sensor OFF
Motion detection and all other sensor functions are
completely deactivated. In this setting, the light can
be used like a normal light and turned ON and OFF at
the light switch.
You can reduce reach in four directions by fitting the
shrouds provided (see page 4).
Ø 1 m – 8 m
Time setting (switch-OFF delay)
Factory setting: 5 seconds
The light can be be set to stay ON
for any time from approx. 5 sec. to
a maximum of 15 min.
Any movement detected before this
time elapses will re-start the timer.
Note: After the light switches OFF, it takes approx.
1 sec. before it is able to start detecting movement
again. The light will only switch ON in response to
movement once this period has elapsed.
5 sec - 15 min
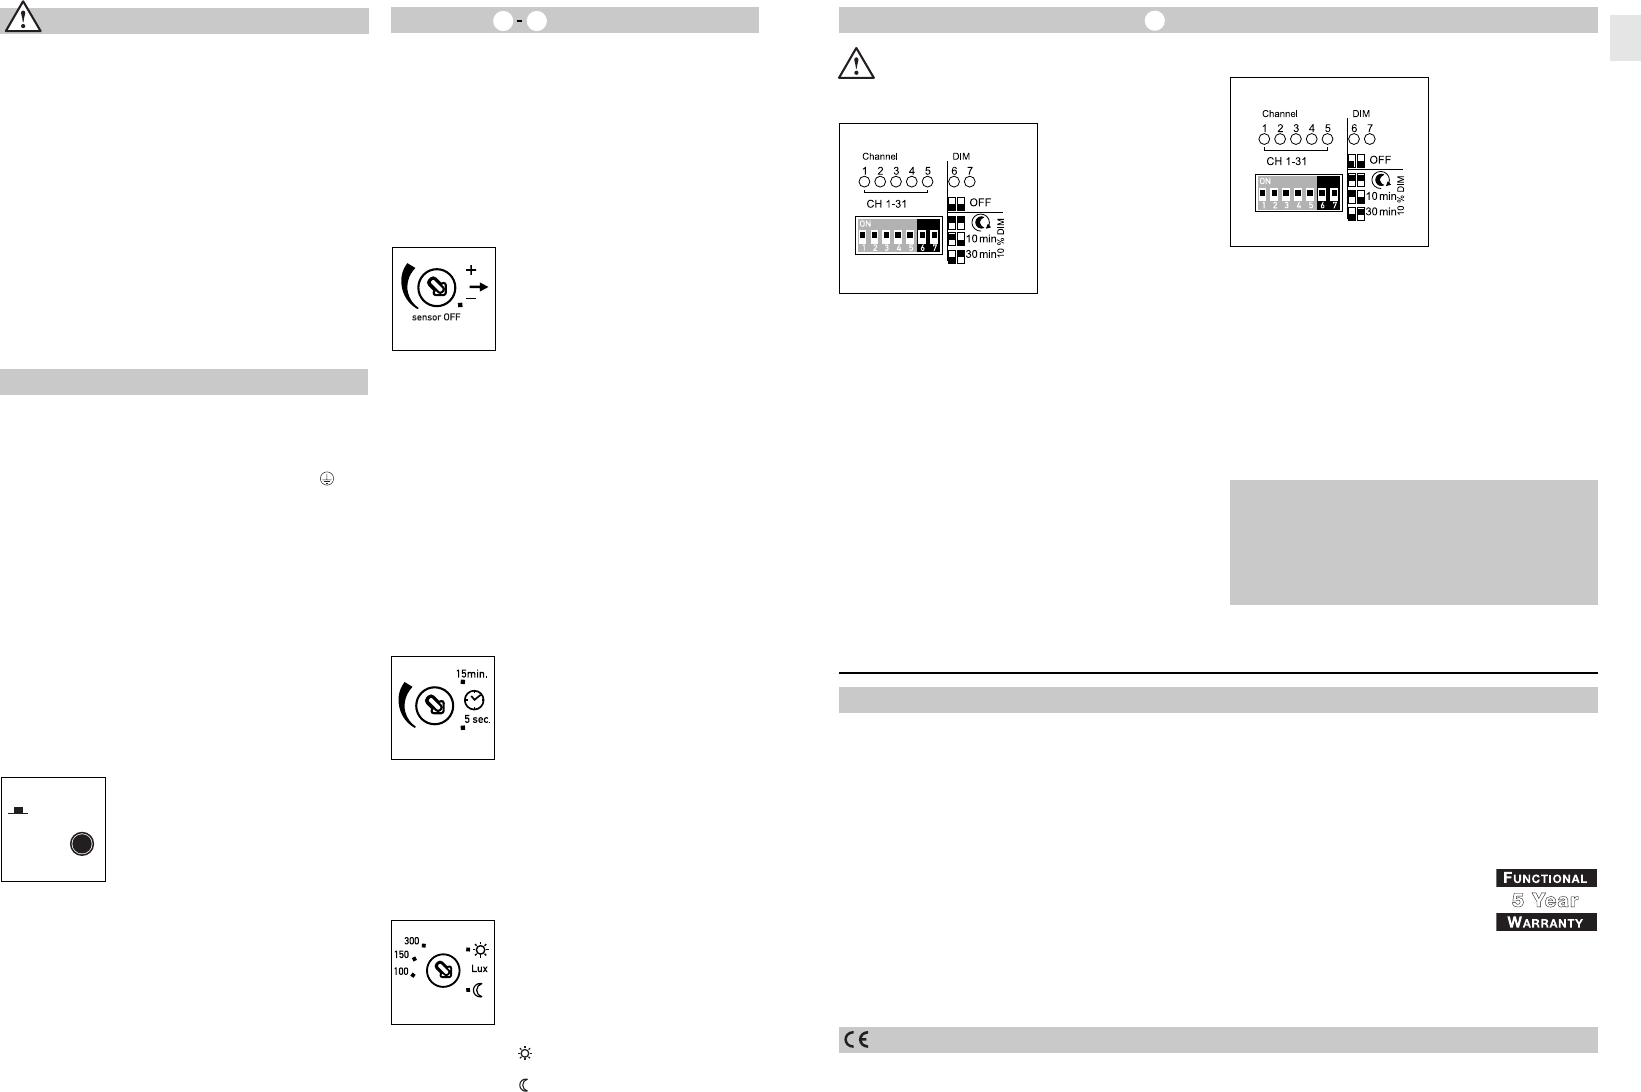
Function Setting by DIP Switches
00 = No dimming level. Light ON in response to
movement as from the twilight setting for the
time selected
11 = dimmed all night long. Light ON in response to
movement. Light OFF as from twilight setting
selected
10 = Light ON in response to movement from
twilight setting / + basic brightness (10%) for
10 min. after time set elapses
01 = Light ON in response to movement from
twilight setting / + basic brightness (10%) for
30 min. after time set elapses
Basic brightness 10 %
Basic brightness provides illumination at approx.
10 % of full light output. The light only switches to
maximum output of 100 % (for the time selected,
see Switch-off delay ) in response to movement
in the detection zone. The light then switches to the
level of basic brightness selected.
Declaration of Guarantee
All rights are based on our guarantee period. We guar-
antee that your STEINEL Professional sensor product
will remain in perfect condition and proper working or-
der for a period of 5 years. We guarantee that this
product is free from material, manufacturing and de-
sign flaws. In addition, we guarantee that all electronic
components and cables function in the proper manner
and that all materials used and their surfaces are with-
out defects.
Making Claims
If you wish to make a claim, please send your product
complete and carriage paid with the original receipt of
purchase, which must show the date of purchase and
product designation, either to your retailer or directly
to us at STEINEL (UK) Limited, 25 Manasty Road,
Axis Park, Orton Southgate, Peterborough, PE2 6UP.
For this reason, we recommend that you keep your
receipt of purchase in a safe place until the guarantee
period expires. STEINEL shall assume no liability for
the costs or risks involved in returning a product.
For information on making claims under the terms
of the guarantee, please go to
www.steinel-professional.de/garantie
If you have a guarantee claim or
would like to ask any question
regarding your product, you are
welcome to call us at any time on
our service hotline 01733 366700.
Declaration of Conformity
This product complies with
- Low-Voltage Directive 2014/35/EC
- EMC Directive 2014/30/EC
- WEEE Directive 2012/19/EC
Note: 1 = ON / 1-7
0 = OFF / 1-7
fi
fi
DIP 1-5 (channel selection)
Factory setting: DIP switch 0/OFF
DIP 6-7 – Dimming function
00000 OFF
00001 Channel 1
00010 Channel 2
00011 Channel 3
00100 Channel 4
00101 Channel 5
00110 Channel 6
00111 Channel 7
01000 Channel 8
01001 Channel 9
01010 Channel 10
01011 Channel 11
01100 Channel 12
01101 Channel 13
01110 Channel 14
01111 Channel 15
10000 Channel 16
10001 Channel 17
10010 Channel 18
10011 Channel 19
10100 Channel 20
10101 Channel 21
10110 Channel 22
10111 Channel 23
11000 Channel 24
11001 Channel 25
11010 Channel 26
11011 Channel 27
11100 Channel 28
11101 Channel 29
11110 Channel 30
11111 Channel 31