RCD 1
Portable radio CD player
User manual
GB
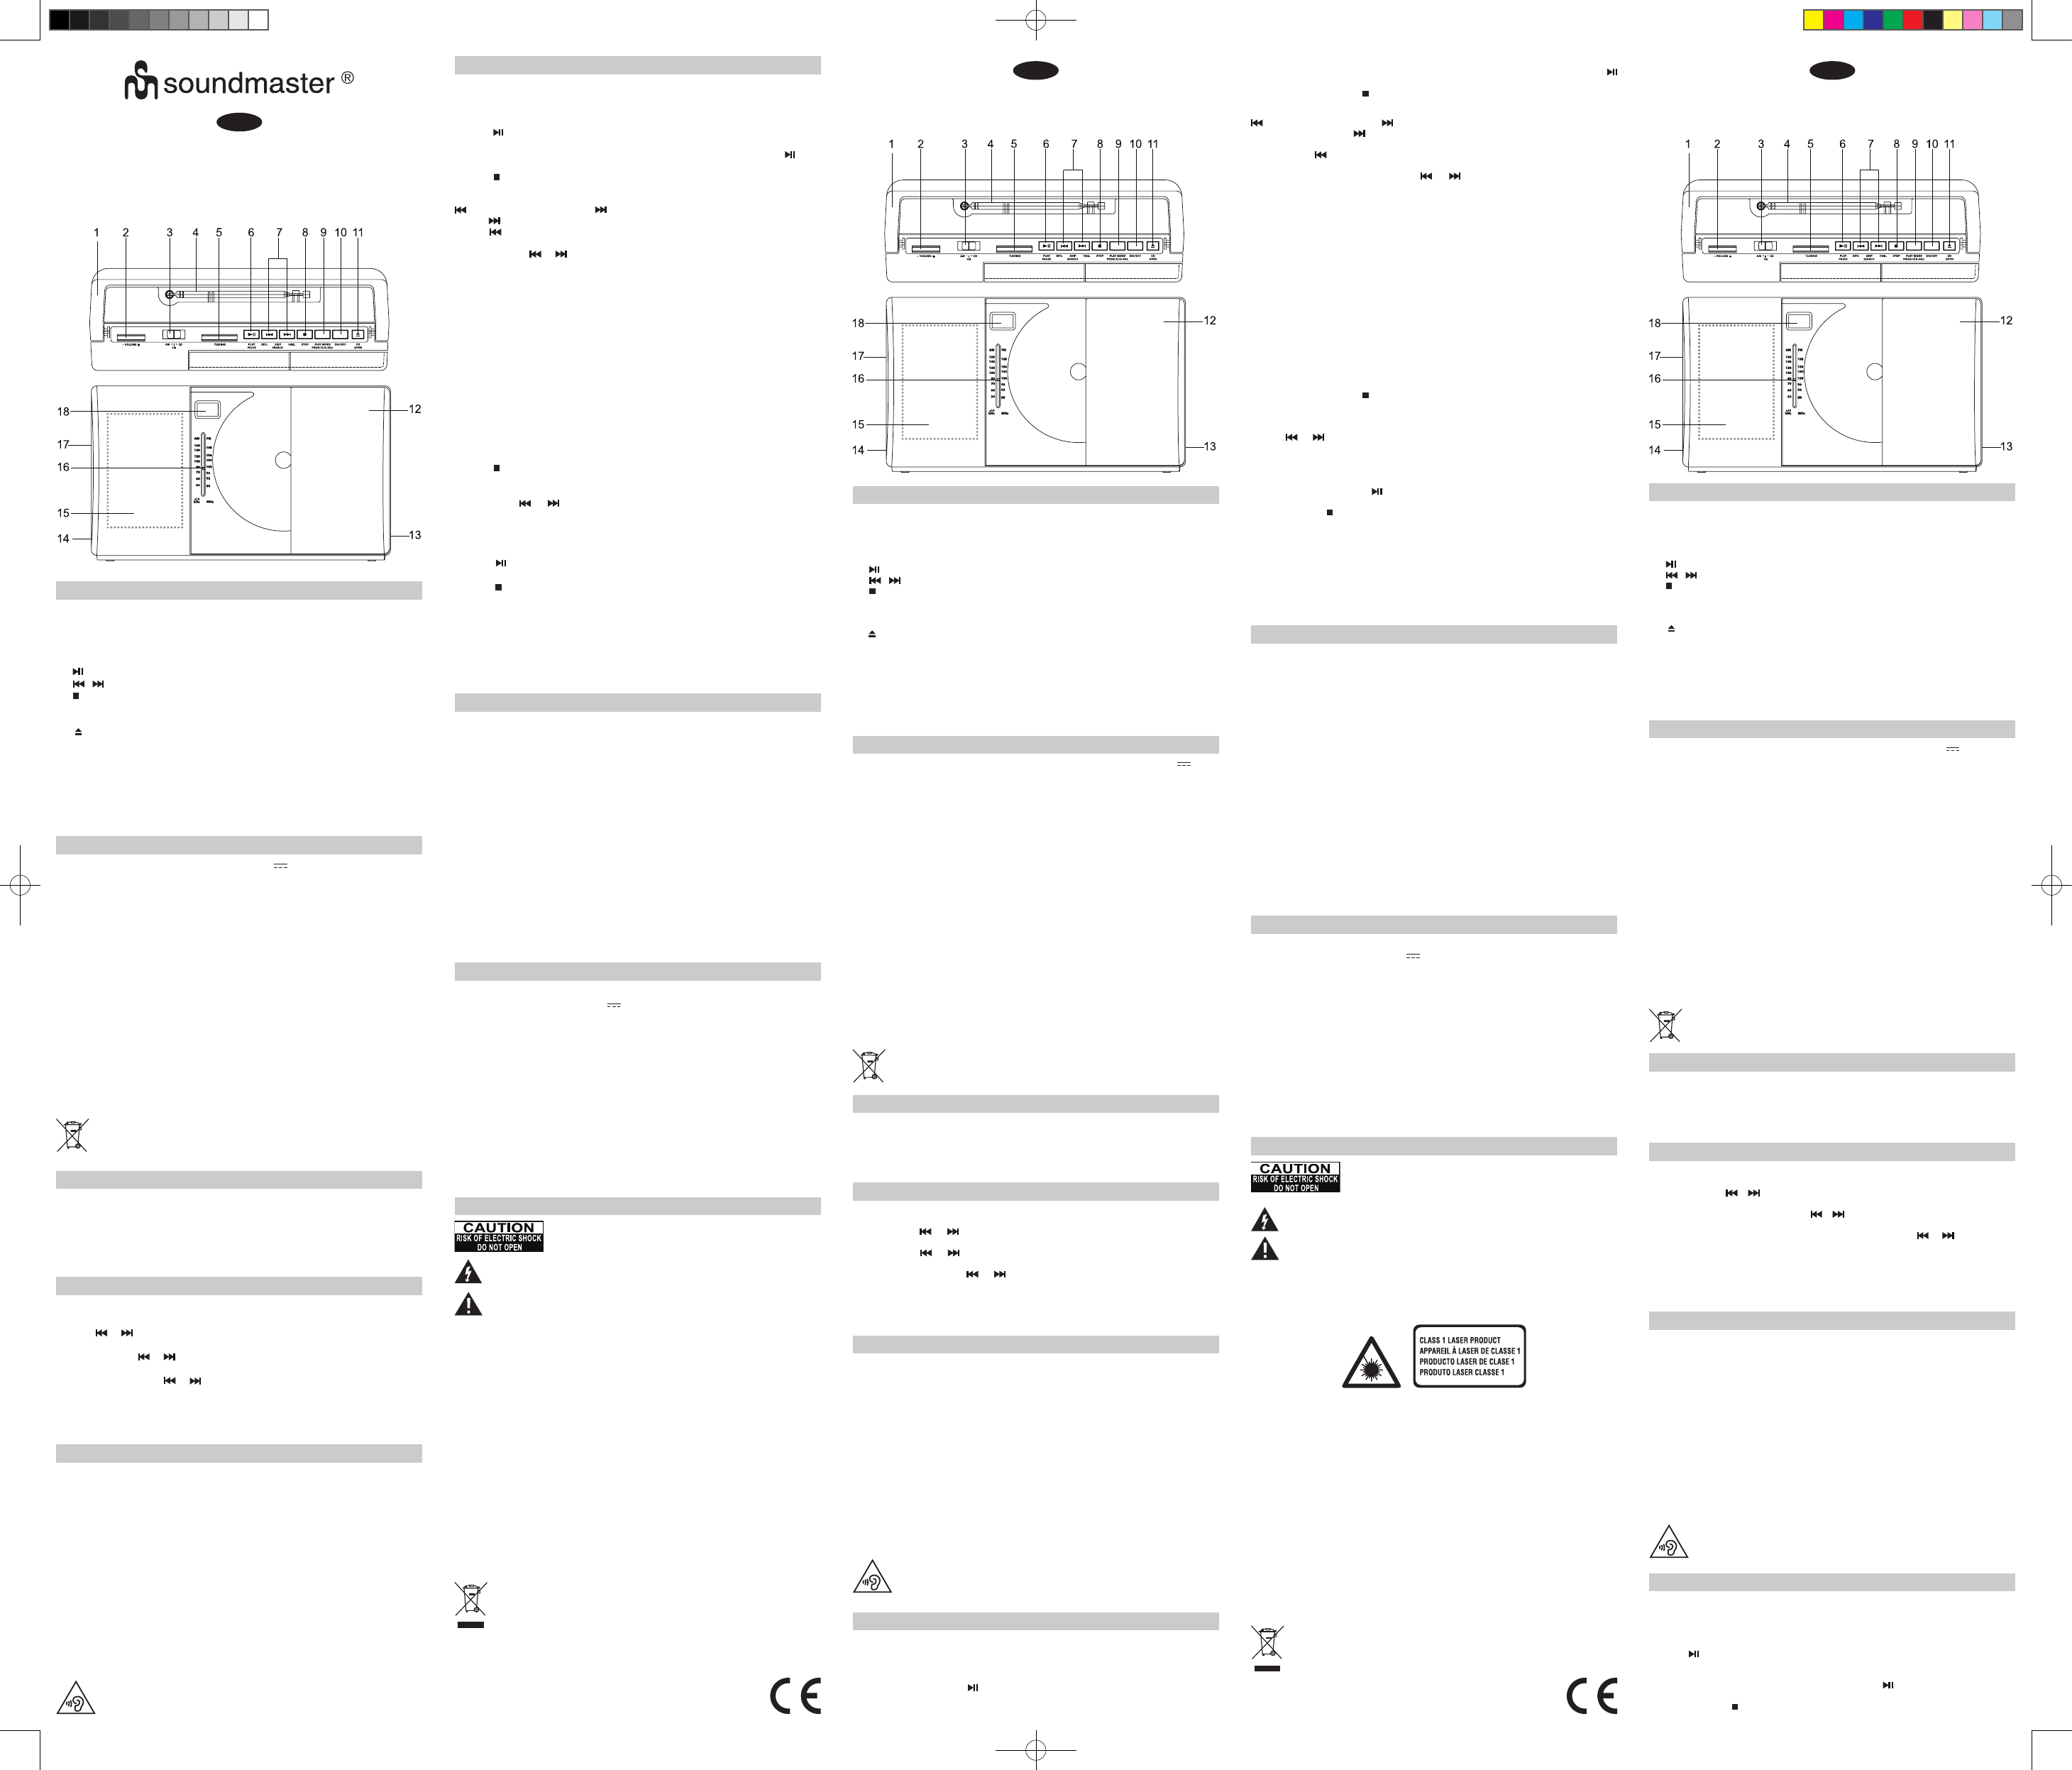
1. CARRYING HANDLE
2. VOLUME CONTROL
3. FUNCTION SWITCH (AM - FM - CD)
4. TELESCOPIC
5. TUNING CONTROL
6. CD PLA BUTTON
7. / REVBUTT
8. CD STOP BUTT
9. PLA BUTTON.
10. ON/OFF BUTTON
1 CD OPEN BUTTON
12.
13.
14.
15.
16.
17.
18. LCD DISPLA
CON
P
ALIMENT
MISE EN
ENCENDER/AP
CONFI
ESCUCHA
RÉGL
ECOUTE
ESCUCHA
MAI
CARACTÉRISTIQUE
ECOUTE
TUR
TIME SETTI
LIST
LIST
DESC
ID
ALIM
MAI
SP
MORE INF
CONS
This set operates on (size C / UM-2 1.5V x 6)
AC OPERA
Connect at the back of the unit the
convenient standard
USING ON batteries
Open the lid of the battery compartment on the back and insert 6 PCS (size C/ UM2)
batteries (not supplied), with the + and – marks correctly aligned, then close the lid.
T
from the
while the cord is connected.
The batteries need to be replaced when:
The volume decreases, or sound is distorted during operation.
Notes on batteries
• Do not mix different types of batteries or old batteries with new ones.
• Never recharge the batteries, apply heat to them or take them apart.
• Battery shall not be exposed to excessive heat such as sunshine, re or the like.
•
NOTE:
used for a long period of time.
Cet appareil fonctionne sur secteur (230 V ~ 50 Hz) ou sur piles 9V CC (taille
C / UM-2 1.5V x 6)
Fonctionnement sur secteur
Connectez le cordon d’alimentation secteur fourni à l’entrée alimentation
àl’arrière de l’appareil avant brancher extrémité (che) dans une prise
secteur
FONCTIONNEMENT SUR PILES
Ouvrez le compartiment pour piles situé à l’arrière de l’appareil et insérez-y 6
piles de type C/ UM2 (non fournies), en respectant le schéma de polarité indiqué
à l’intérieur du compartiment. Refermez ensuite le compartiment. Pour passer de
l’alimentation secteur à l’alimentation sur piles, débranchez le câble d’ alimentation
secteur de la prise murale. Lorsque l’appareil est connecté à l’alimentation secteur
les piles ne sont pas utilisées.
Remplacement des piles
Les piles doivent être remplacées lorsque le volume diminue ou le son est
déformépendant le fonctionnement de l’appareil.
Remarques relatives aux piles
• Ne mélangez pas des piles de différents types ou des piles usagées et nouvelles.
• Ne rechargez, ne chauffez et ne démontez jamais les piles.
• piles ne peuvent pas être exposées à des sources de chaleur excessive,
comme la lumière du soleil, le feu, etc.
• respect l’environnement vous débarrassez
usagées.
REMARQUE: éviter tout écoulement, retirez toujours les de l’appareil
lorsque celui-ci n’estpas utilisé pendant une période prolongée.
REMARQUE:
lecture de nouveau sur la touche
pour reprendre la lecture.
5. pour arrêter la lecture du disque.
AUTRES FONCTIONS DU LECTEUR CD
Piste précédente/suivante :
- pour passer au titre suivant ou à plusieurs reprises pour
sauter plusieurs titres.
- Appuyez sur pour revenir au début du titre ou à plusieurs reprises pour revenir
en arrière et sauter plusieurs titres.
- ou pour avancer ou revenir en arrière
dans un titre.
LECTURE RÉPÉTÉE
Pendant le mode de lecture de CD, Il est possible de répéter une piste de CD autant
de fois que vous le voulez.
Rappuyez une fois sur PLA pour répéter la piste
que vous avez sélectionnée. L'indicateur de répétition « REP » clignote.
Appuyez deux fois sur PLA pour répéter tout le
disque. L'indicateur de répétition « REP » s'allume.
Appuyez trois fois sur PLA pour lire aléatoirement
un disque. L'indicateur de répétition « MIX » s'allume.
Pour désactiver la fonction RÉPÉTITION
Appuyez successivement sur PLA jusqu'à ce
que l'indicateur du mode répétition « REP » ou « MIX » disparaisse de l’écran. Cette
fonction répétition s’annule automatiquement à l’ouverture de la porte du CD ou à la
mise en arrêt de l’appareil.
1. sur CD et « -- » s'afche.
2.
la porte.
3.
4. pour lancer la lecture du CD puis réglez le volume à
votre convenance. Numéro de piste XX et “►” s’afche à l’écran.
1.
en pantalla.
2.
compartimento para CD y después cierre la tapa de dicho compartimento.
3. T
4. Pulse para jugar y volumen.
número de la pista XX aparecerá en la pantalla.
NOT
de de nuevo para reanudar el
juego.
5. Presione STOP para dejar de escuchar el disco.
LECTURE PROGRAMMEE
Programmez vos pistes quand l'appareil est à l'ARRÊT
1. .
2. Appuyez sur PLA,
indicateurs
l'écran LCD.
3. Avec ou , sélectionnez une piste voulue, appuyez ensuite sur PLA
PROGRAM/CLOCK-ADJ. pour mémoriser la piste.
4.
20 pistes peuvent être programmées, en mémoire dans l’ordre que vous préférez.
Si la mémoire est pleine, l’écran afchera « FU » pour indiquer
5. PLA pour lancer la lecture programmée,
l'indicateur
6. Appuyez sur pour arrêter le disque. Rappuyez pour annuler les pistes
programmées,
total s'afche à nouveau.
REMARQUE IMPORT
Mode veille automatique
REMARQUE: Dans un soucis d'économie d'énergie, à la n de la lecture et
qu’aucune opération n'est effectuée sur l'appareil pendant une période de 15
minutes celui ci se mettra automatiquement en mode veille. Pour allumer l'unité de
nouveau, appuyez sur ON/OFF .
Nettoyage
A
de le nettoyer
-
ventilation à l'arrière ou sur les côtés de l'appareil.
-
l'appareil.
- un objet ou un liquide entre dans l'appareil, débranchez immédiatement ce
dernier et faites-le contrôler par un ingénieur agréé.
Remarques sur les disques
*
octogonaux). L
* Ne placez pas plusieurs disques dans le compartiment.
* N’essayez pas d’ouvrir le compartiment du disque pendant la lecture.
* Ne touchez pas la lentille. V
*
fonctionner
centre vers l’extérieur
des températures élevées ou une humidité importante. Ils pourraient se déformer
Après la lecture, replacez vos disques dans leur boîtier
Remarque importante
Retirez le disque du compartiment si l’appareil doit être transporté.
Appuyez sur le bouton ON/OFF pour allumer l'appareil.
Faites glisser le commutateur de fonction (AM - FM - CD) pour sélectionner le mode
audio entre CD et radio (AM-FM).
Appuyez de nouveau sur le bouton ON/OFF pour éteindre l'appareil. "OFF"
indicateur sera afché sur l'écran, puis reprendre l'heure actuelle.
Pulse el botón ON / OFF para encender la unidad.
Deslice el interruptor de función (AM-FM-CD) para seleccionar el modo de audio
entre CD y radio (AM-FM).
Pulse el botón ON / OFF
pantalla y luego reanudar la hora actual.
1. PLA
CLOCK-ADJ. durante 2 segundos, en la pantalla parpadeará “24H” o “12H”.
2. o para seleccionar el formato de 12 o 24 horas.
3. PLA; los dígitos de la
hora parpadearán. Pulse el botón o para jar la hora.
4. PLA para conrmar;
los dígitos de los minutos parpadearán. Pulse el botón o para jar los
minutos.
5. PLA para
conguración de hora.
Nota: “:” cada cuando hora esté Si elige
formato de 12 horas, el icono PM se utilizará para la hora de la tarde.
1. Deslice el interruptor de función (AM-FM-CD) a la posición
2. Seleccione su estación de radio y ajustar el nivel de volumen.
FM: Extienda y gire la antena cuando recibió la señal es débil.
AM:
para obtener la mejor posición de recepción.
3. Para dejar de escuchar la radio, pulse el botón ON/OFF para apagarlo.
VOLUMEN
Gire el control VOLUMEN +/- para ajustar el sonido a un nivel cómodo.
USO DE
Conecte un par de auriculares estéreo con minitoma de 3,5 mm a la toma de
teléfono de la unidad. El altavoz se desactivará automáticamente cuando se estén
utilizando los auriculares.
Nota: Para establecer un nivel de sonido de auriculares seguro, coloque el control de
volumen a un punto bajo.
cómodamente y con claridad, y sin distorsión.
V
1. PLA
ADJ. pendant 2 secondes, « 24H » ou « 12H » clignote sur l'écran.
2. Appuyez ou pour sélectionner le format d'heure 12 ou 24 heures.
3. Rappuyez sur PLA, les heures clignotent.
Appuyez sur ou pour régler les heures.
4. Rappuyez sur PLA pour
clignotent. Appuyez ou pour régler les minutes.
5. Rappuyez sur PLA pour terminer le réglage de
l'heure.
Remarque: « : » clignote une fois par seconde quand l'heure tourne. Si le format 12
heures est sélectionné, l'icône PM indique l'après-midi.
Press the ON/OFF button to turn the unit on.
Slide the FUNCTION SWITCH (AM - FM - CD) to select the audio mode between
CD and RADIO (AM-FM).
Press the ON/OFF button again to turn
on the display and then resume the current time.
1. PLA
button for 2 seconds , “24H” or “12H ” blinks on the display
2. Press or button to select 12 or 24 hour format.
3. Press the PLA button again, the hour digits
blink. Press the or button to set the hour.
4. Press the PLA to minute
digits blink. Press the or button to set the minute.
5. Press PLA again to complete time setting.
Note: “:” blinks every second when the time is counting, if 12 hours format is
selected, PM icon is used for the afternoon time.
Before throwing any batteries away
able to take them back for specic recycling.
Avant de jeter les piles, consultez votre revendeur car celui-ci peut les
reprendre pourles recycler
Antes de tirar las pilas, consulte a su proveedor: puede entregárselas para
reciclarlas.
1. Slide the FUNCTION SWITCH (AM - FM - CD) to
2. Select your radio station and adjust the volume level.
FM: Extend and rotate the antenna when received the signal is weak.
AM:
get the best receiving position.
3. TON/OFF to turn off.
VOLUME
TVOLUME +/- control to adjust the sound to comfortable level.
USING HEADPHONES (Headphones Not Included)
Connect a set of stereo headphones
unit. The speaker are automatically cut off when headphones are in use.
Note:
setting. Slowly increase the sound until you can hear it comfortably and clearly
and without distortion.
Maximum output voltage ≤150 mV
T
for long periods.
Afin de réduire les risques de lésions auditives, n’écoutez pas de la
musique à un volume élevé pendant longtemps.
Para evitar posibles daños en el oído, no escuche a un volumen elevado
durante largos periodos.
1. Slide the FUNCTION SWITCH (AM - FM - CD) to CD position.”--“is displayed.
2.
the CD door
3.
4. Press
on display
NOTE: also knob suspend “►” blink, once
again to resume play .
5. Press to stop listening to the disc .
OTHER CD PLA
REV :
- Press to skip forward to the next track or repeatedly to skip several tracks.
- Press to beginning of the track or press repeatedly to skip backward several
tracks.
- Press and hold or to search quickly within a track.
REPEA
During the CD playback mode,
many times as you like.
Press PLA once to repeat your selected track.
The repeat indicator ”REP” blinks.
Press PLA twice to repeat the whole disc. The
repeat indicator ”REP” lights up.
Press PLA three times to disc mixture playback.
The repeat indicator ”MIX” lights up.
T
Press PLA button repeatedly until the repeat
indicator “REP”
when the CD door is opened or turning off the unit.
PROGRAM PLA
T
1. Press button.
2. Press PLA, indicator few
seconds, and then “PROG” and “00” start blinking on LCD.
3. Select with or your desired track, then press PLA
CLOCK-ADJ. to store your program in memory
4.
programmed in memory in a preferred order
“FU” for indicating.
5. Press PLA button to start playing program mode, the “PROG”&
“►”and programmed track number “XX” will show on display
6. Press to stop the disc. Press again to cancel the programmed tracks, and
“PROG.” icon will go off, display goes back to show the total number of tracks.
IMPORT
Automatic standby mode
In a concern of saving energy
is operated on the device for a period of 15 minutes, the unit will automatically switch
to Standby mode. TON/OFF button.
Cleaning
W
- Use a soft, dry
- Using solvents, abrasive or alcohol-based products risks damaging the appliance.
-
checked by an authorized engineer
Notes on disc
*
result in malfunctions.
* Do not place more than one disc in the disc compartment.
* Do not try to open the disc compartment during playing.
*
* there it may cause tracking error.
Before playing, clean the disc with a cleaning cloth. Wipe the disc from the center
out. Don't store discs in places with high temperatures or high humidity
become warped.
Important Note
Before transporting the unit, remove the disc from the disc compartment.
POWER SUPPL
DC: 9V 1.5V 6TYPE C / LR14 / UM2
UNIT DIMENSION: 265(W) x 157(H) x 82(D)
RADIO SECTION
FREQUENCY RANGE:
FM/FREQUENCY MODULA
AM/AMPLITUDE MODULA
COMP
SECTIONOPTICAL
CAUTION: This set uses a laser beam.
of beam, the set should only be opened by properly trained personnel. The unit
conforms to the international
community
and electromagnetic compatibility EMC.
CAUTION: T
the device, there is no part inside for the user
servicing to qualied personnel.
A
ne démontez pas l’appareil. L
pièce
technicien qualié.
The lightning with the arrow symbol in the triangle is a warning sign alerting
the user to “dangerous voltage” inside the unit.
Le
l'utilisateur de la présence d’une « tension dangereuse » dans l'appareil.
IMPORT
- The Marking plate is located at the back of the device
- sure to have a minimum distance of 5 cm around the unit for sufcient
ventilation.
-
tablecloths, curtains, etc.
- Do not place naked ame sources, such as lighted candles on the apparatus.
- Do not expose this appliance to dripping or splashing water
- Do not place objects lled with liquids, such as glass, vase on the device.
- Use the apparatus only in moderate climates.
-
batteries.
-
similar heat source.
-
object lled with liquids such as vases shall be placed on the apparatus.
-
product may malfunction and the user must perform a power reset of the device.
-
be disconnected from the mains.
-
accessed during intended use.
If in the future, you need to get rid of this product, please note that W
electrical products should not be disposed of with household waste.
Recycling facilities exist. Check with your municipality or ask your dealer for
advice. (Directive for W
Si vous souhaitez vous débarrasser de cet appareil, pensez à le recycler
dans une décharge pour appareils ménagers électriques. Renseignez-
vous pour connaître votre centre de recyclage le plus proche. Informez-
vous auprès des autorités locales ou de votre revendeur pour de plus
amples détails. (Directive sur les Déchets des équipements électriques et
électroniques)
RCD 1
RADIO/LECTEUR CD PORT
FR
1. POIGNEE DE TRANSPOR
2. REGLAGE DU VOLUME
3. BOUTON FONCTIONS (AM - FM - CD)
4.
5. MOLETTE DE RECHERCHE DES ST
6. PLA (TOUCHE LECTURE/P
7. / REV (Piste précédente/suivante)
8. STOP (TOUCHE ARRET
9. PLA
(MODE LECTURE/PROGRAMME/RÉGLAGE HORLOGE)
10. ON/OFF (MARCHE/ARRÊT)
1 CD OPEN
(TOUCHE OUVER
12. COUVERCLE COMP
13. COUVERCLE DU COMP
14.
15. HAUT
16. POINTEUR DES ST
17. PHONES (PRISE CASQUE)
18. AFFICHAGE
1. Mango
2. Control del volumen
3. Interruptor de función (AM - FM - CD)
4.
5. Sintonizador de radio
6. PLA (Reproducir/pausa CD)
7. / REV (Revers./A
8. STOP(CD Parada)
9. PLA (MODO REPROD./PROGRAMAR/
RELOJ-AJU.)
10. ON/OFF (ENCENDIDO/AP
1 CD OPEN (Apertura del CD)
12. Compartimento del disco
13. Compartimento de las pilas
14. Entrada de alimentación de red (AC ~)
15. Altavoz
16. Dial de escala
17. Phones (Auricular toma)
18. Pantalla LCD
Este aparato funciona con una tensión de 230 V ~ 50 Hz or DC 9V (tamaño C /
UM-2 1,5V x 6)
FUNCIONAMIENTO CA
Conecte el cable de alimentación a la entrada de alimentación (AC ~) situada en la
partetrasera del aparato antes de conectar el otro extremo (enchufe) a una toma de
corriente.
ALIMENT
Abra el compartimento de las pilas situado en la parte posterior del aparato,introduzca
6 pilas del tipo D (no incluidas) respetando la polaridad (signos+ y -) y
cierre el compartimento.
Para cambiar el tipo de alimentación, de CA
desenchufe elcable de alimentación de la toma de pared y del aparato.
Sustitución de las pilas
Las pilas han de cambiarse cuando, durante el funcionamiento del aparato, el
volumen disminuya o el sonido se deforme.
Notas relativas a las pilas
• No mezcle pilas de diferentes tipos ni
• No recargue, caliente ni desmonte nunca las
•
exposición al sol, al fuego, etc.
•
NOT
las pilas paraevitar que se vierta líquido del interior de las mismas.
1.
2. Sélectionnez une station de radio et réglez le volume à votre convenance.
FM: Déployez et orientez l’antenne si le signal reçu est faible.
AM:
l’appareil pour obtenir la meilleure qualité de réception des signaux.
3. Pour éteindre la radio, appuyez sur ON/OFF .
VOLUME
Réglez la molette du VOLUME +/- à votre convenance.
UTILISA
Branchez des écouteurs stéréo avec che de 3,5 mm sur prise
casque de l'appareil. Le haut-parleur se désactive automatiquement lorsque des
écouteurs sont branchés.
Remarque: Pour établir un niveau sonore sûr avec vos écouteurs: Commencez
avec
confortable et sans distorsion.
T
ALIMENT
DC: 9V 1.5V 6TYPE C / LR14 / UM2
DIMENSIONS DE L
RADIO SECTION
GAMME DE FRÉQUENCES:
FM: 87.5 - 108 MHz
AM: 540 - 1600KHz
DISQUE COMP
TETE DE LECTURE LASER: LASER 3 F
A ! utilise un tout accident
ce type de rayons, l’appareil ne peutêtre ouvert que par un technicien qualié.
L
Communauté européenne, demême qu’aux normes actuelles de sécurité électrique
et de compatibilité électromagnétique CEM.
A
ÉLECTRIQUE, N’EXPOSEZ P
A
ouverts ou défectueux. Évitez toute exposition aux rayons.
A
-
de ventilation avec des objets tels que journaux, nappes, rideaux, etc.
-
proximité de l’appareil.
- Utilisez cet appareil sous un climat tempéré.
- N’exposez pas l’appareil à des éclaboussures ou à l’humidité.
-
permettre une ventilation sufsante.
-
de l’appareil.
- La plaque signalétique se trouve à l’arrière de cet appareil.
- secteur permet de débrancher l’appareil et doit rester
facilement accessible. Pour couper complètement l’alimentation de l’appareil,
débranchez complètement la che d’alimentation secteur de la prise secteur
La
accessible durant l’utilisation.
-
produit peut présenter des dysfonctionnements et une réinitialisation peut s’avérer
nécessaire.
RCD 1
LECTOR DE CD DE LA
ES
The exclamation point in the triangle is a warning sign alerting the user of
important instructions accompanying the product.
Le point d’exclamation à l’intérieur d’un triangle avertit l’utilisateur de la
présence d’importantes instructions dans le manuel accompagnant l’appareil.
RD-509N IB SOUN 001 REV3.indd 1 2015/6/1 10:24:33