3-265-723-12 (1)
DAB/FM/MW/L
DIGIT
Operating Instructions
XDR-S1
© 2004 Sony Corporation Printed in China
Printed on 100% recycled paper using
VOC (Volatile Organic Compound)-free
vegetable oil based ink.
SC
Digital
NR
MEGA B
SLEEP
VOL
+
-
+
-
SOUND
TUNE/SET UP
SC
MENU/ENTER
OPERA SLEEP
TIMER ST
DISPLADigital NR
AUTO TUNE
BAND
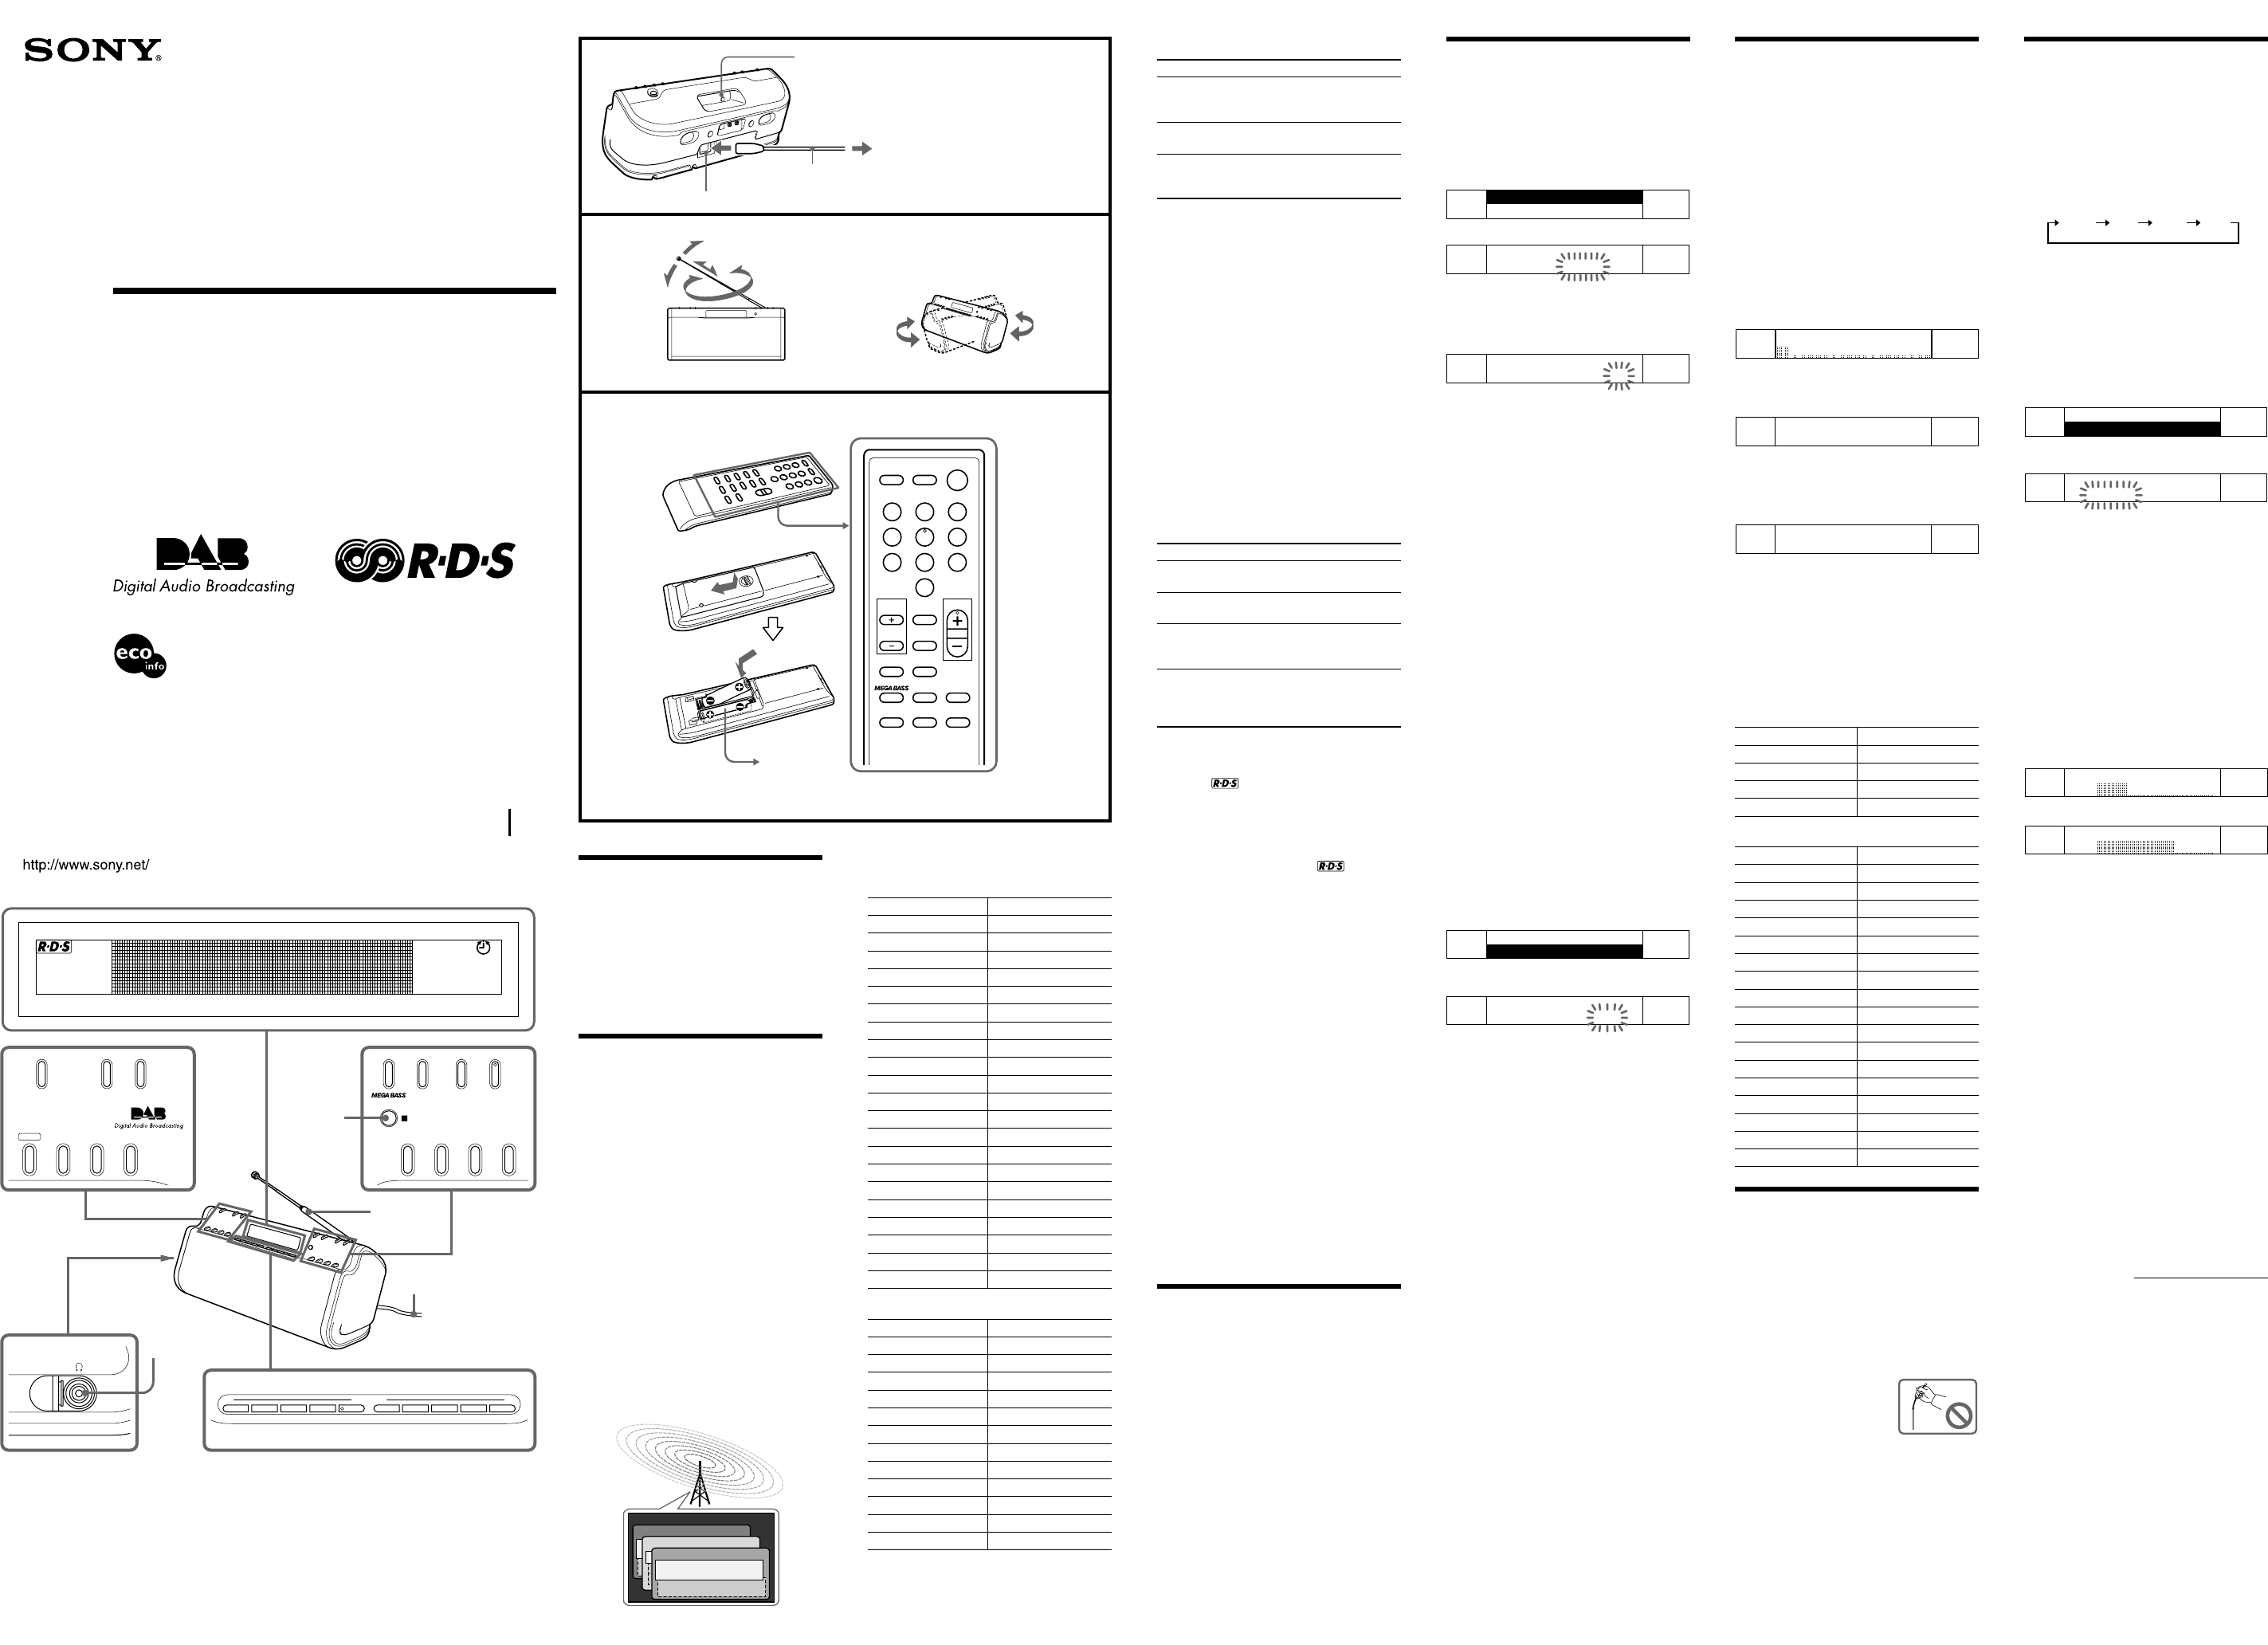
Telescopic
antenna
AC power cord
Infrared
receiver
TIMER
ST
SLEEP
OPERA
123
456
789
10
TUNE/
SET UP
SOUND
MENU/ENTER SC
AUTO TUNE
BAND
Digital NR
DISPLA
CANCEL
TEXT MEMO
LINE
VOL
A
B
C
AC power cord
AC IN
To wall outlet
DAB BAND-III /FM DAB L-BAND/MW/LW
Size AAA
(R03) × 2
The VOL + and the PRESET 5
button have a tactile dot.
WARNING
To prevent fire or shock hazard, do not
expose the unit to rain or moisture.
To avoid electrical shock, do not open the
cabinet. Refer servicing to qualified
personnel only.
Do not install the appliance in a confined space, such
as a bookcase or built-in cabinet.
To prevent fire or shock hazard, do not place objects
filled with liquids, such as vases, on the apparatus.
Featur
–What is DAB?
DAB (Digital Audio Broadcasting) is a new
multimedia broadcasting system that transmits audio
programmes with a quality which approaches CD
quality.
Each DAB broadcast multiplex “services ” (radio
programmes) into an “ensemble ” which are then
broadcast.
Each service (radio programme) contains “compo-
nent,” which you can select and you wish to listen to.
All services and components are identified by name,
so you can access any of them without having to
know their frequencies.
Furthermore, additional information (called
programme associated data) can be broadcast along
with the services in the form of text.
DAB programmes are broadcast in Band-III (174 to
240 MHz) and L-Band (1 452 to 1 491 MHz), with
each band divided into ensemble (41 in Band-III and
23 in L-Band). These ensemble have its own channel
label. For the details of the channel label and its
frequency, see “DAB frequency table.” One ensemble
is broadcast per channel by each DAB station.
Note
The status of the DAB broadcast depends on your
country or region.
Ensemble
Service
Service
Service
Secondary Component
Component
DAB frequency table
BAND-III (MHz)
No. Channel Frequency No. Channel Frequency
15 174.928 22 10B 211.648
25 176.640 23 10C 213.360
35 178.352 24 10D 215.072
45 180.064 25 10N 210.096
56 181.936 26 11A 216.928
66 183.648 27 11B 218.640
76 185.360 28 11C 220.352
86 187.072 29 11D 222.064
97 188.928 30 11N 217.088
10 7B 190.640 31 12A 223.936
11 7C 192.352 32 12B 225.648
12 7D 194.064 33 12C 227.360
13 8A 195.936 34 12D 229.072
14 8B 197.648 35 12N 224.096
15 8C 199.360 36 13A 230.784
16 8D 201.072 37 13B 232.496
17 9A 202.928 38 13C 234.208
18 9B 204.640 39 13D 235.776
19 9C 206.352 40 13E 237.488
20 9D 208.064 41 13F 239.200
21 10A 209.936
L-BAND (MHz)
No. Channel Frequency No. Channel Frequency
42 LA 1 452.960 54 LM 1 473.504
43 LB 1 454.672 55 LN 1 475.216
44 LC 1 456.384 56 LO 1 476.928
45 LD 1 458.096 57 LP 1 478.640
46 LE 1 459.808 58 LQ 1 480.352
47 LF 1 461.520 59 LR 1 482.064
48 LG 1 463.232 60 LS 1 483.776
49 LH 1 464.944 61 LT 1 485.488
50 LI 1 466.656 62 LU 1 487.200
51 LJ 1 468.368 63 LV 1 488.912
52 LK 1 470.080 64 LW 1 490.624
53 LL 1 471.792
DAB Features
DAB broadcast reception
Receiving DAB broadcast means selecting one
service among the multiplex radio programmes into
an ensemble, not receiving one frequency such as the
current FM/MW broadcasts.
To receive a DAB broadcast in this unit, it is
necessary to scan using the DAB search function and
to find the available ensemble in advance.
Any broadcast found during the DAB search are
stored in the unit.
When tuning the unit to the DAB broadcast, it
receives the signal according to the stored information
list.
–What is RDS?
Introduced by the European Broadcasting Union
(EBU) in 1987, the Radio Data System (RDS) allows
information such as station name, etc., to be received
via the 57kHz sub-carrier signal of FM broadcasts.
However, the availability of the RDS data varies
according to area. It therefore may not always be
possible to receive the RDS information.
RDS Features
Using the RDS Functions
When the unit receives an FM station transmitting
RDS data, “
” appears in the display and the
above functions are available. Tune to an FM station
by performing “Manual tuning”, “Preset tuning”, or
“Scan tuning”, and then perform the above functions
as required.
Notes
•When RDS data is not receiv
” will
disappear
• RDS function will not be activ
being receiv
also not work properly in areas where RDS
transmissions are in the experimental stage.
• If the radio signal being receiv
take time to receiv
Other Features
•A total of 40 stations or services can be preset, 10
D
LW.
• Easy to press 10 PRESET TUNING buttons.
• Scan tuning that automatically scans the FM, MW
and L
• Radio standby timer that turns on the radio at a
preset time.
• Sleep timer that turns off the radio automatically
(can be set to turn off after 15, 30, 45 or 60
minutes).
• Noise reduction function for FM, MW and L
• MEGA BASS sound pr
•5 sound characteristics.
• Digital volume function provides for v
adjustment of volume le
• Backlight for viewing the display in the dark.
• Adjustable LCD contrast.
• Optical-Line out, Line-in/out terminal. (MD Link)
Power sour
Using on house current
(See Fig. A)
Connect the AC power cord (supplied) to the AC IN
jack of the unit and plug it in to a wall outlet.
Note
If the AC power cord is disconnected for more than 5
minutes, the settings for the clock, standby timers, any
lists of receivable broadcasts for DAB search and
preset station memory will be initialized. Should this
happen, set the function again.
Setting the clock
“AM 12:00 ” will blink in the display when the AC
power cord is plugged in for the first time. (“0:00 ”
for non-UK models)
1 Press MENU/ENTER to show the menu
display.
2 Press TUNE/SETUP +/- to select
“TIME SET” and press MENU/ENTER .
1.TIME SET
2.CLOCK AUTO ADJUST
Then the “hour” sign starts blinking.
3 Press TUNE/SETUP +/- to set the hour
for the current time, and then press
MENU/ENTER.
The “minute” sign starts blinking.
4 Press TUNE/SETUP +/- to set the
minute, then press MENU/ENTER.
The clock starts operating, and “: ” starts blinking.
Tips
•To set the current time rapidly
TUNE/SETUP +/-.
•To set the current time exactly to the seconds, adjust
the minute function in step 4 and then press
MENU/ENTER to synchronize it with a time signal
(such as the telephone time signal).
•To display the time while the unit is on, press
DISPLAa few times. (See “Changing
the display”.)
Notes
• If you do not operate MENU/ENTER or
TUNE/SETUP +/- within 65 seconds while setting
the clock, the clock setting mode will be cancelled.
•To cancel the clock setting mode halfway
DISPLA.
Pressing the button will terminate the menu mode.
•The clock system varies depending on the model
purchased. For example, in the 24-hour system,
“0:00” is indicated as midnight, and “12:00” is
indicated as noon.
Setting the Clock Auto
Adjustment Function
This function enables the built-in clock of this unit to
automatically synchronize with the RDS data being
received.
1 Press MENU/ENTER to show the menu
display.
2 Press TUNE/SETUP +/- to select
“CLOCK AUTO ADJUST” and press
MENU/ENTER.
1.TIME SET
2.CLOCK AUTO ADJUST
“CLOCK AUTO ADJUST ” appears and current
setting of “ON ” or “OFF ” starts blinking.
3 Press TUNE/SETUP +/- to select “ ON ”,
then press MENU/ENTER.
RDS data will adjust the clock when the unit receives
it.
To turn off this function, select “CLOCK AUTO
ADJUST” function and then press TUNE/SETUP +/-
to select “OFF ”, then press MENU/ENTER.
Notes
•This function works only when recei
• If it may not operate depending on the areas, disable
this function.
• If this function is being activ
clock manually
next time the unit recei
Initial setting for
the DAB
DAB Search makes it easy to create a preset list of
receivable DAB broadcasts.
When you set up the unit for the first time, or move
this unit, adjust the telescopic antenna in the proper
position. Then follow the steps below.
DAB search automatically creates a list of receivable
broadcasts (from minimum BAND-III frequency to
maximum L-BAND frequency).
1 Press OPERATE to turn on the radio.
“PUSH AUTO TUNE” appears in the display.
2 Press BAND to select the DAB band.
3 Press AUTO TUNE .
Sound is silent, and “DAB < SEARCHING > ”
appears in the upper line, and lower line indicated
with the square marks will become big from left
to right while the scanning.
DAB search takes about 3 minutes. When finished,
the unit receives the first service of the lowest
ensemble stored by the DAB search.
DAB ALPHA1 RADIO
11B 218.640MHz
Notes
• If no broadcasts are found by the D
“DAB < NO ENSEMBLE > ” and default frequency
appear in the display
DAB < NO ENSEMBLE >
11B 218.640MHz
And to cancel the D
broadcasts, press AUTO TUNE once.
In both cases, the unit returns to the status same as
before the DAB search, and the recei
will not be changed.
•When you move this unit, search for the D
broadcasts again.
• If the
newest recei
setting. The initial setting list is as follo
United Kingdom: (MHz)
Channel Frequency Channel Frequency
11B 218.640 12B 225.648
11C 220.352 12C 227.360
11D 222.064 12D 229.072
12A 223.936
Other countries/regions: (MHz)
Channel Frequency Channel Frequency
5C 178.352 LA 1452.960
8B 197.648 LB 1454.672
8C 199.360 LC 1456.384
9D 208.064 LD 1458.096
10B 211.648 LE 1459.808
10D 215.072 LF 1461.520
11A 216.928 LG 1463.232
11B 218.640 LH 1464.944
11C 220.352 LI 1466.656
11D 222.064 LJ 1468.368
12A 223.936 LK 1470.080
12B 225.648 LL 1471.792
12C 227.360 LM 1473.504
12D 229.072 LN 1475.216
13A 230.784 LO 1476.928
13B 232.496 LP 1478.640
13C 234.208
Impr
Reception
(See Fig. B)
DAB BAND-III/FM:
Extend the telescopic antenna and adjust the length
and the angle for best reception.
DAB L-BAND/MW/LW:
Rotate the unit horizontally for optimum reception.
An antenna is built in the unit.
Note
Adjust the direction of the antenna
by holding the bottom of it. The
antenna can be damaged when you
move the antenna with excessive
force.
Headphone jack
DAB
SERVICE/
COMPONENT
LABEL DISPLAY
PTY
DYNAMIC
LABEL
Features
• Displays the service label and
the component label you are
listening to.
• Displays the program type of
the received service.
• Displays and scrolls the text of
broadcast information.
• Memorizes and recalls it.
The VOL + and the PRESET 5 button have a tactile dot.
RDS
STATION NAME
DISPLAY
PTY
RADIO TEXT
CLOCK AUTO
ADJUSTMENT
Features
• Displays the station name you
are listening to.
• Displays the program type of
the received programme.
• Displays and scrolls the radio
text of broadcast information.
• Memorizes and recalls it.
• Automatic current time
synchronization.
• Auto adjustment for daylight
saving time.
Operating the
Radio
–Manual tuning
1 Press OPERATE to turn on the radio.
When the unit is turned on again, the last listening
band is received.
2 Press BAND repeatedly to select the
desired band.
Each press changes the band as follows:
DAB LW MW FM
When you select the DAB band, there are 2
modes of setting. Usually the “NORMAL” setting
is used to tune in to a service in the preset list
created by the DAB search. Alternatively, you can
also search an ensemble by frequency by setting
to “MANUAL.”
Normal mode:
1 Press MENU/ENTER to show the menu
display.
2 Press TUNE/SETUP +/- to select “TUNING
MODE” and press MENU/ENTER .
3.STANDBY TIMER SET
4.TUNING MODE
“TUNING MODE ” appears and current setting of
“NORMAL ” or “MANUAL ” starts blinking.
TUNING MODE
NORMAL MANUAL
3 Press TUNE/SETUP +/- to select “NORMAL ”,
then press MENU/ENTER .
Manual mode:
1 Repeat step 1 and 2 as Normal mode.
2 Press TUNE/SETUP +/- to select “MANUAL ”,
then press MENU/ENTER .
3 Press TUNE/SETUP +/- to tune in to the
desired service or station.
Two short beeps sound when the lowest ensemble
of DAB or the minimum frequency of LW/MW/
FM is received during tuning.
4 Adjust the volume using VOL+/-.
Tip
You can adjust the volume by 32 steps. The volume
increases as the slider is moved towards the right.
VOL:
N
VOL:
Notes in FM, MW and LW usage
•When you press TUNE/SETUP +/- , the frequency
digits change by one step. When you hold do
the frequency digits change rapidly
• The channel step is set to 0.05 MHz on FM, 9 kHz
on MW
• When you select FM, the name of station will
appear if that station transmits RDS data. (See
“Changing the display”.)
Notes in DAB usage
• Before receiving D
ensembles should be stored on the list by the D
search. (See “Initial setting for the D
•“< WAITING >” blinks in the display when the unit
is tuned in to an ensemble.
•“< NO SERVICE >” message appears when the
selected service is not being broadcast, and
“< NO ENSEMBLE >” message appears when the
ensemble for the selected service cannot be receiv
•You will hear a beep when selecting the f
of the first ensemble in the recei
pressing TUNE/SETUP +/-.
•When the selected service finishes during reception,
the sound stops and a “< NO SERVICE > ”
message appears. In this case, press
TUNE/SETUP +/- to return to the first ser
the same ensemble.
Continue to next page
RESET button
Press this button with a pointed object when the radio fails
to function properly. The clock settings, and the services
and stations you have preset, etc., will revert to the factory
preset.