English
Checking the accessories supplied
Rechargeab
A/V connecting cable (Son
USB connection su
W
Lens Cap (1)
CD-ROM (1)
“PMB
bloggie Han
Instruction Ma
Im
Specifications
Effective Pixel: A
(1080 30P)
Optical zoom
Forma
Still: JPEG Exif ver 2.21, DCF complia
Mo
P
Rechargeab
P
Operating T
0°C - 40°C (32°F - 104°F)
Getting further detailed information from the
Handbook”
Sufficient info
further detailed information, ho
supp
on a com
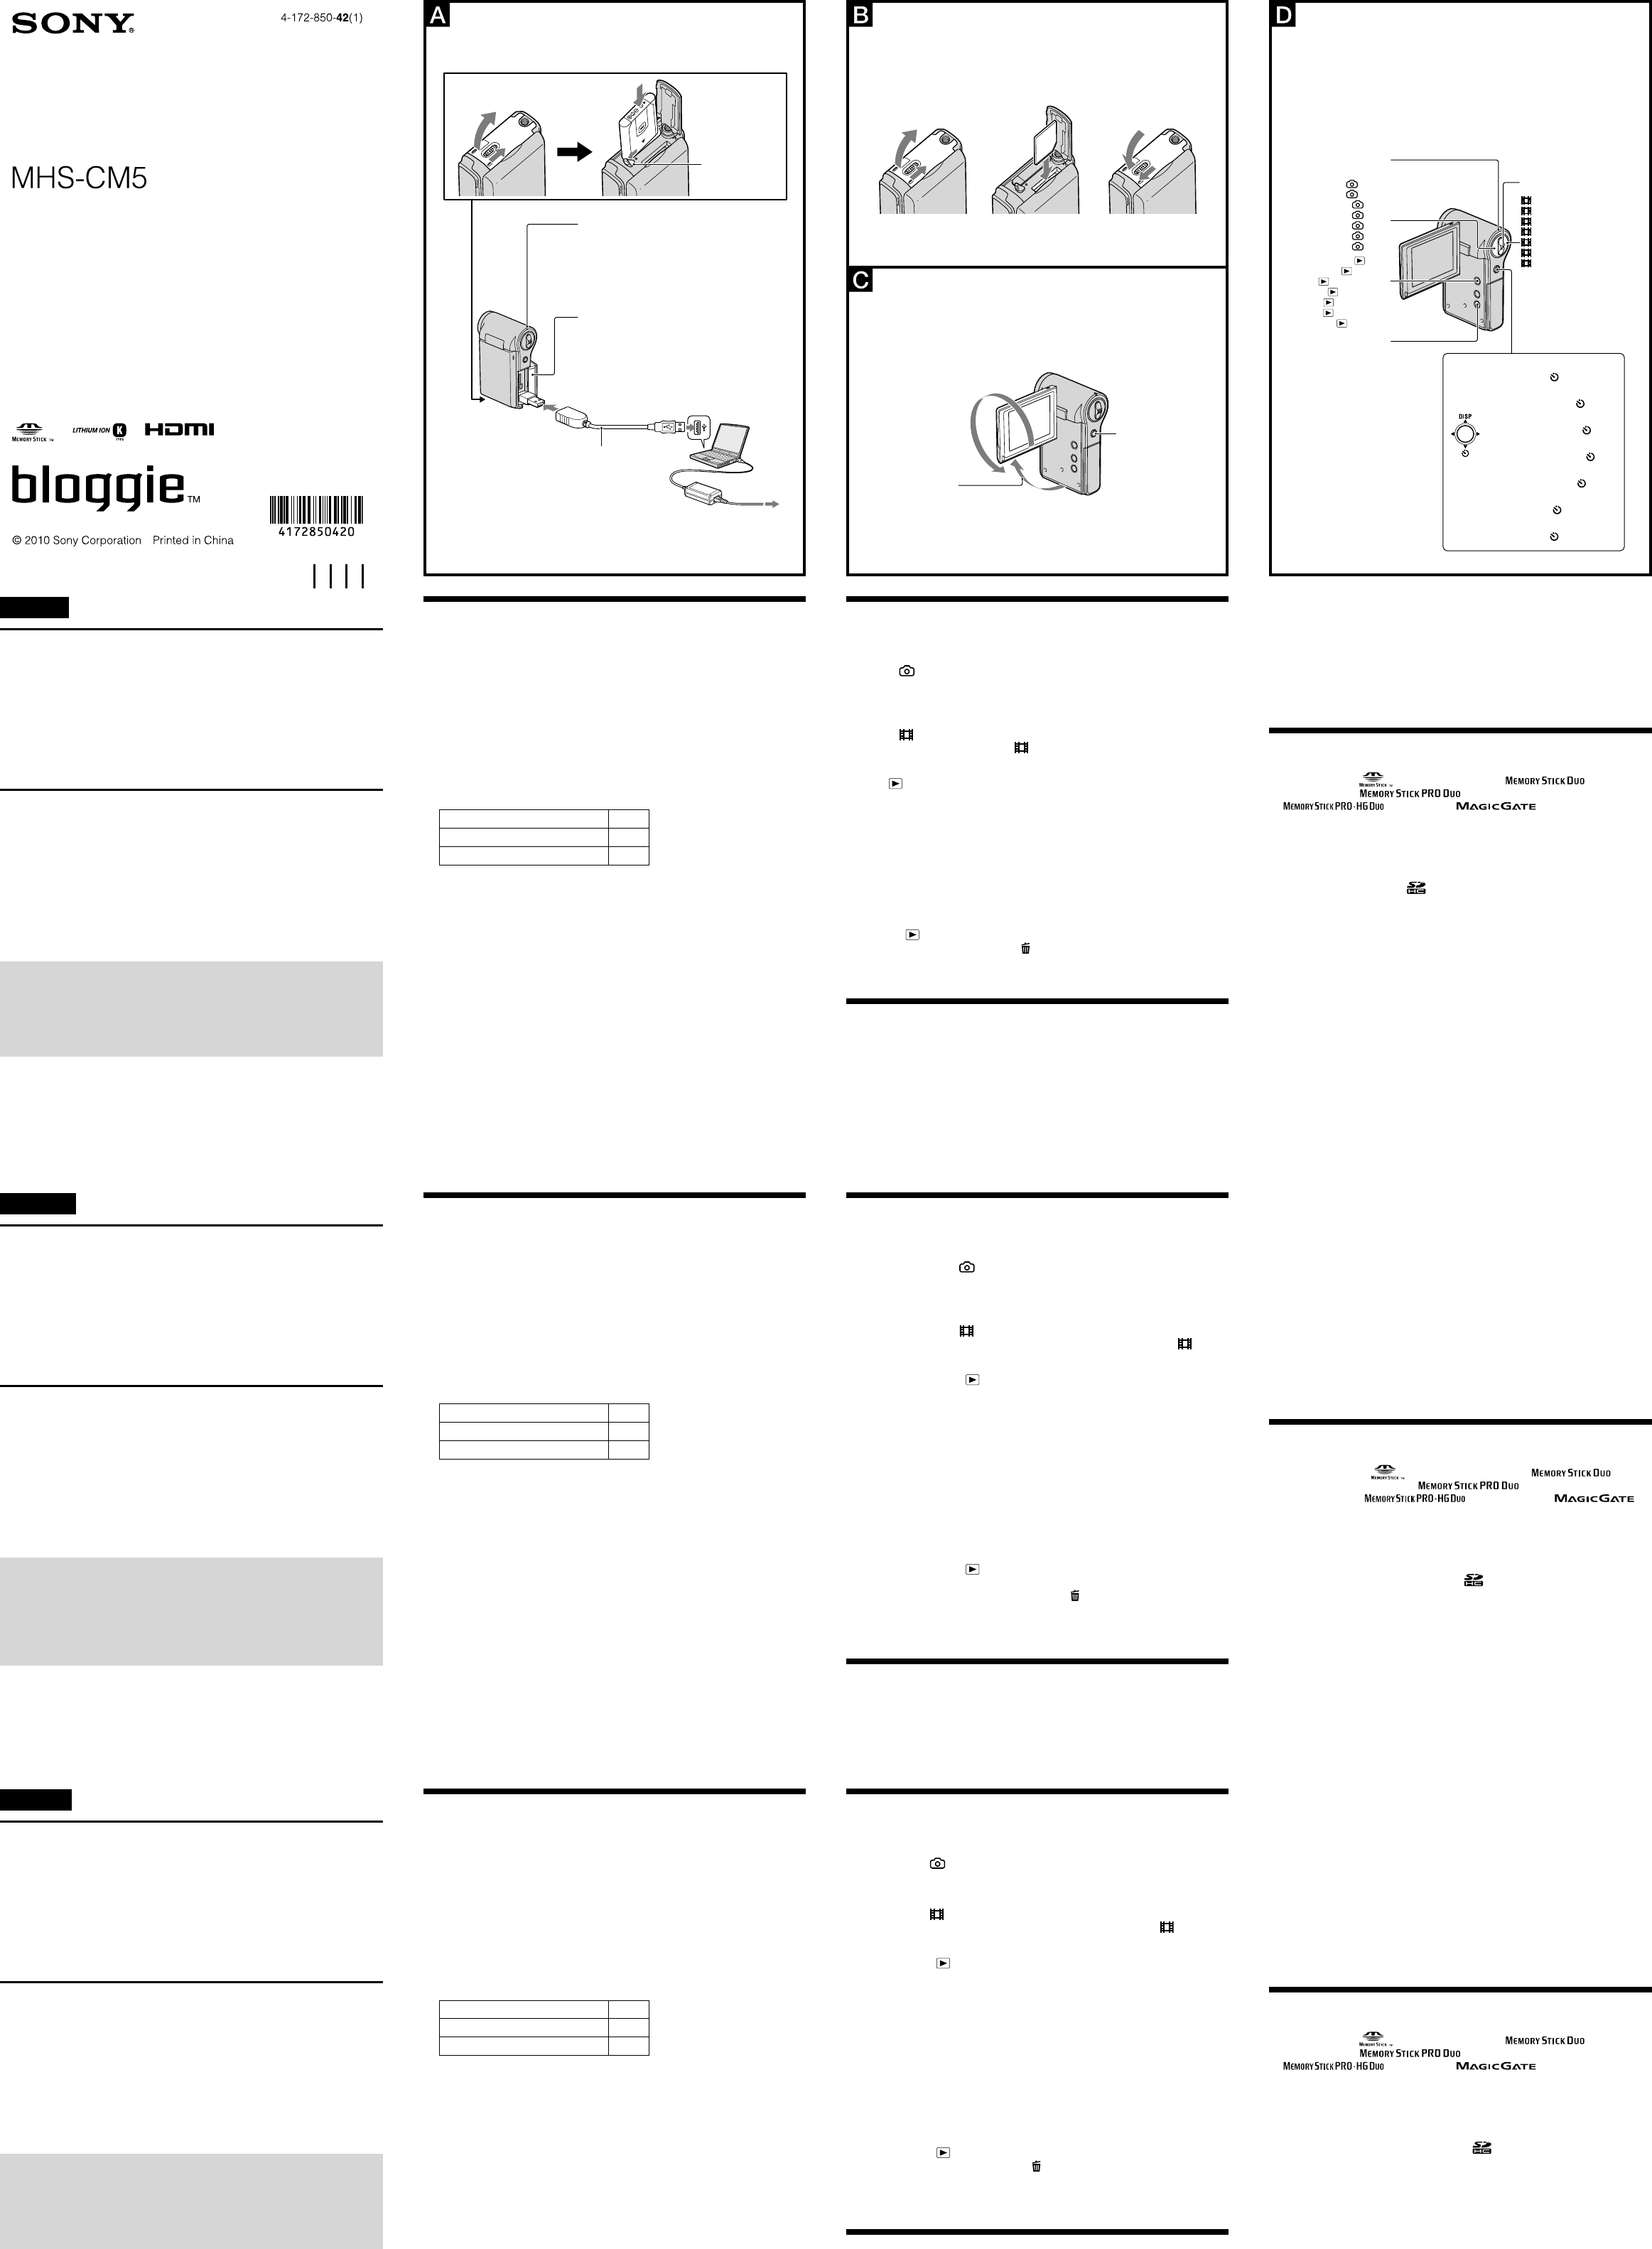
Getting star
1 Charging the battery pack (See illustration
).
the cover
connection sup
The P
turns off when char
The time requir
W
start charging the ba
Appro
Continuo 105
T 50
Playback time 150
The image size: [1280 × 720 30P]
Continuo
contin
T
you repea
Recording an
When using the camera a
The battery is fully charged.
Do not use a deformed or da
2 Inserting the memor
).
illustration un
3 T
illustration
).
The P
Basic Operations
Shooting images (See illustration
).
When shooting s
Press the (Photo) b
The shortest sh
(3 ft 3 3/8 inches) (T) (from the lens).
When shooting m
Press the (Mo
T (Movie) bu
Vie
).
(Play) bu
Index screen a
/
/
/
.
When pla
Press the m
Tilt to
to fast fo
to rewind. (Pr
normal playback.)
Tilt to
to displa
/
.
Deleting images (See illustration
).
(Play) bu
(Delete) with
/
.
/
and pr
, and pr
Enjoying with y
Operating the
This camera has an a
upload images easily t
For deta
a USB connection su
to close the A
If th
XP
[PMBP
[OK]).
The Language Selection screen appears.
U
[I Agree]. “PMB P
T
“bloggie
“M ” ”
Stick PRO Duo ”
“ ” ”
Stick
trademarks of Son
Microsoft, W
register
Stat
SDH
HDMI, the HDMI log
or regist
In additio
trademarks or r
manufact
or
marks ar
manual.
Charging the battery/Charge de la batt
Carica della batteria/C
Aufladen des Akkus/De batterij opladen
Battery eject lever
Levier d’
batterie
Leva di espulsione della
batteria
Palanca de expulsión de
la batería
Patilha de ejecção da
bateria
Akku-Auswurfhebel
Batterij-uitwerphendel
Pow
T
Spia di alimentazione/carica
Indicador luminoso de alimentación/carga
Luz indicadora de alimentação/carregament
Netz-/Ladeanzeige
Aan/Uit/Laden-lampje
USB connection support cable (supplied)
Câble prenant en charge la connexion
USB (fourni)
Cavo di supporto per collegamento USB
(in dotazione)
Cable de soporte de conexión USB
(suministrado)
Cabo de suporte de ligação USB
(fornecido)
USB-V
Kabel voor ondersteuning van de USB-
aansluiting (bijgeleverd)
Jack cover
Cache de la prise
Copripresa
Cubierta de la toma
T
Buchsenabdeckung
Afdekking aansluiting
Inser
Inserimento della scheda di memoria/
Inserción de la tarjeta de memoria/
Inserir o car
De geheugenkaar
T
Encender la alimentación/Ligar a alimentação/
Einschalten des Geräts/De camera inschak
90 degrees (max.)
90 degrés (maximum)
90 gradi (max.)
90 grados (máx.)
90 graus (máx.)
90 Grad (max.)
90 graden (max.)
Multi-selector
Sélecteur
multidirectionnel
Selettore multiplo
Selector múltiple
Multi-selector
Steuerkreuz
Navigatietoets
Menu on :
/
/
/
Menu off : DISP/
Menu activé :
/
/
/
Menu désactivé : DISP/
Menu abilitato :
/
/
/
Menu disabilitato : DISP/
Menú activado :
/
/
/
Menú desactivado : DISP/
Menu ligado :
/
/
/
Menu desligado : DISP/
Menü ein :
/
/
/
Menü aus : DISP/
Menu aan :
/
/
/
Menu uit : DISP/
Multi-selector
Sélecteur multidirectionnel
Selettore multiplo
Selector múltiple
Multi-selector
Steuerkreuz
Navigatietoets
Zoom lever
Manette de zoom
Leva dello zoom
Palanca de zoom
Patilha do zoom
Zoomhebel
Zoomhendel
(Movie)
(Film)
(Filmato
(Película)
(Filme)
(Film)
(Film)
Pow
T
charge
Spia di alimentazione/carica
Indicador luminoso de
alimentación/carga
Luz indicadora de
alimentação/carregamento
Netz-/Ladeanzeige
Aan/Uit/Laden-lampje
(Photo)
(Photo)
(Foto
(Foto
(Foto
(Foto
(Foto
(Play)
(Lecture)
(Riproduzione)
(Reproducir)
(Reprodução)
(
(Afspelen)
MENU
Identifying parts/Identification des pièces/
Identificazione delle parti/Identificación de las par
Identificar peças/T
Onderdelen en bedieningselementen
Fr
V
Batterie r
Câble de raccordem
Câble pren
Dragonne (1)
Bouchon d
CD-ROM (1)
« PMB » (logiciel, qui com
Guide pra
Mode d
A
Spécifications
Pixels efficaces: envir
de pixels (1080 30P)
Zoom optique
Forma
Imag
Film : com
Alimenta
Batterie r
Consommatio
T
0° C à 40° C (32° F à 104° F)
Pour obt
sur le « Guide pratique de bloggie » dans le CD-ROM fourni
Les informatio
Cependant, si vous souha
reportez-vous a
« Guide pra
un écran d’
Prépar
1 Charge de la batterie (v
).
fermez le cache.
câble pr
Le témoin d
batterie et s
La durée de la charg
No
de commencer à cha
Durée d’
Durée d’ 105
Durée d’ 50
Durée de lecture 150
T
La durée d’
comp
pouvez enregistr
La durée d’
comp
arrêt de l
Condition d
Lorsque l
La batterie est com
N’
2 Insertion de la car
).
l’
3 Mise sous tension de l’appar
l’horloge (voir illustra
).
Le témoin d
Opérations de base
Prise de vue (voir illustr
).
Lors d
A (Photo).
La distance de prise de vue la plus courte es
100 cm (3 pieds 3 3/8 pouces) (T) (depuis l
Lors d
A (Film).
P (Film).
Visualisa
).
(Lecture).
L
multidir
/
/
/
.
Lors de la lecture de films :
A
Inclinez le sélecteur vers
pour effectuer un rembobin
pour une
avance ra
multidir
Inclinez le sélecteur vers
pour afficher l’
le volume à l
/
.
Effacement d’
).
(Lecture) et sélectionnez l’ima
effacer
(Sup
/
.
/
et app
, puis
app
Profit
Fonctionnement de l’
Cet appar
cette a
ser
P
P
l’
Lecture au
Lecture au
Si l
W
[PMBPOR
[PMBP_W
[OK]).
L
L
cliquez sur [J’
Marques de c
« bloggie » est une marq
« Memo
», « Memo »,
« Memo », « Memo
PRO-HG Duo », « », « MagicGate », « »,
« MagicGa
marq
Microsoft, W
marq
Éta
Le logo SDH
HDMI, le logo HD
commerciales o
En outre
en général, des mar
développeurs o
ou
ne sont
pas utilisés dans tous les cas da
Italiano
Contr
Pacco ba
Cavo di collegam
Cavo di su
Cinturino (1)
Copriobiettiv
CD-ROM (1)
“PMB
Guida all’
Istruzioni per l
A
Specifiche tecniche
Pixel effetti
(1080 30P)
Zoom ottico
Forma
Fermi immagine: JPEG Exif ver 2.21, co
Filma
Alimentazione
Pacco ba
P
T
da 0° a 40° C
Per inf
bloggie”
Di seguito veng
informazioni p
in dotazione. La “
schermo del com
Informazioni pr
1 Carica del pacco ba
).
quindi chi
supporto per collegam
La spia di alimentazione/ca
batteria e si spegne al termine della carica.
Il tempo necessario per caricare co
Si consiglia di collegar
caricare il pacco bat
T
T 105
T 50
T 150
Dimensioni dell
T
carica è in grado di funzionare in modo con
registrare un filma
T
carica è in grado di funzionare in con
registrazione, accen
Condizioni per la registrazione e la rip
Se si utilizza la fotocamera a 25°C.
La batteria è com
No
2 Inserimento della scheda di memoria (in vendita separ
(vedere figur
).
illustrato in figura, fino a udire uno sca
3 Acc
dell’
).
La spia di alimentazione/ca
Operazioni di base
Ripresa di immagini (vedere figur
).
P
Premer (Foto).
La distanza di scatto minima è di cir
P
Premer (Filmato).
P (Filmato).
Visualizzazione delle immagini (v
).
(Ripr
V
in posizione
/
/
/
.
P
Premer
Inclina
per scorrere in a
per
scorrere all
modo di riproduzio
Inclina
per visualizzare la schermata di con
quindi reg
/
.
Cancellazione di immagini (v
).
(Ripr
(Canc.) con
/
.
/
e premer
, quindi pr
selettor
Utilizzo c
Uso di
La fotocamera è dota
l’
multimediali.
P
collegamen
[×] per chiudere la pr
Se la procedura guidata A
[Compu
[PMBPOR
quindi far
[OK]).
V
selezione della regione
la schermata del con
su [Accet
Marchi c
“bloggie
“M ” ”
Stick PRO Duo ”
“ ” ”
Stick
commerciali r
Microsoft, W
commerciali r
U
Il logo SDH
HDMI, il logo HD
fabbrica o mar
Inol
marchi co
o produ
o
non sono sta
utilizzati.
Mobile HD Snap Camera/Instruc
Appareil photo numérique Snap HD mobile/Mode
d’
F
Cámara fot
compacta/Manual de instrucciones
Câmara Snap Móvel HD/Manual de instruções
Mobile HD-S
Draagbare HD Snap-camera/G