ZS-PS20CP
Disposal of waste batteries
(applicable in the European Union
and other European coun
separate c
is symbol on the ba
that the bat
treated as ho
On certain batteries this symbol migh
comb
symbols for m
battery con
lead.
By ensuring these bat
you will help p
for the en
otherwise b
the battery
conserve natural r
In case of p
integrity r
incorporat
qualied ser
T
over the p
point f
equipm
Fo
to remo
battery over t
recycling of was
Fo
product o
your ho
you pur
Notice for customers: the f
only applicable to equipment sold in countries
applying EU directives
e man
1-7-1 Ko
A
Sony Deutschland G
Stu
please refer to the addr
guaran
Notes on DualDiscs
A DualDisc is a two sided disc product which mates D
recor
on the other side. H
does not confo
playback on this p
WARNING
T
expose this apparatus t
T
cabinet. Refer servicing to qualied personnel only
T
the appa
And do not place ligh
T
this appa
objects lled with liquids, such as vases, on the a
As the main p
mains, co
Should yo
the main plug fr
Do not install the ap
bookcase or built-in cab
Do not expose the batteries (bat
installed) to excessive hea
like for a lo
3-878-117-12 (1)
ZS-PS20CP
Operating Instructions
GB
©2008 Sony Corporation Printed in China
Excessive sound p
headpho
MPEG Layer
licensed from Fra
Disposal of Old Electric
Equipment (A
Union and other European coun
with separate c
is symbol on the pr
that this pr
waste. I
collection point fo
electronic equip
disposed of correctly
negativ
health, which could otherwise b
waste handlin
will help to con
informa
con
disposal ser
product.
A
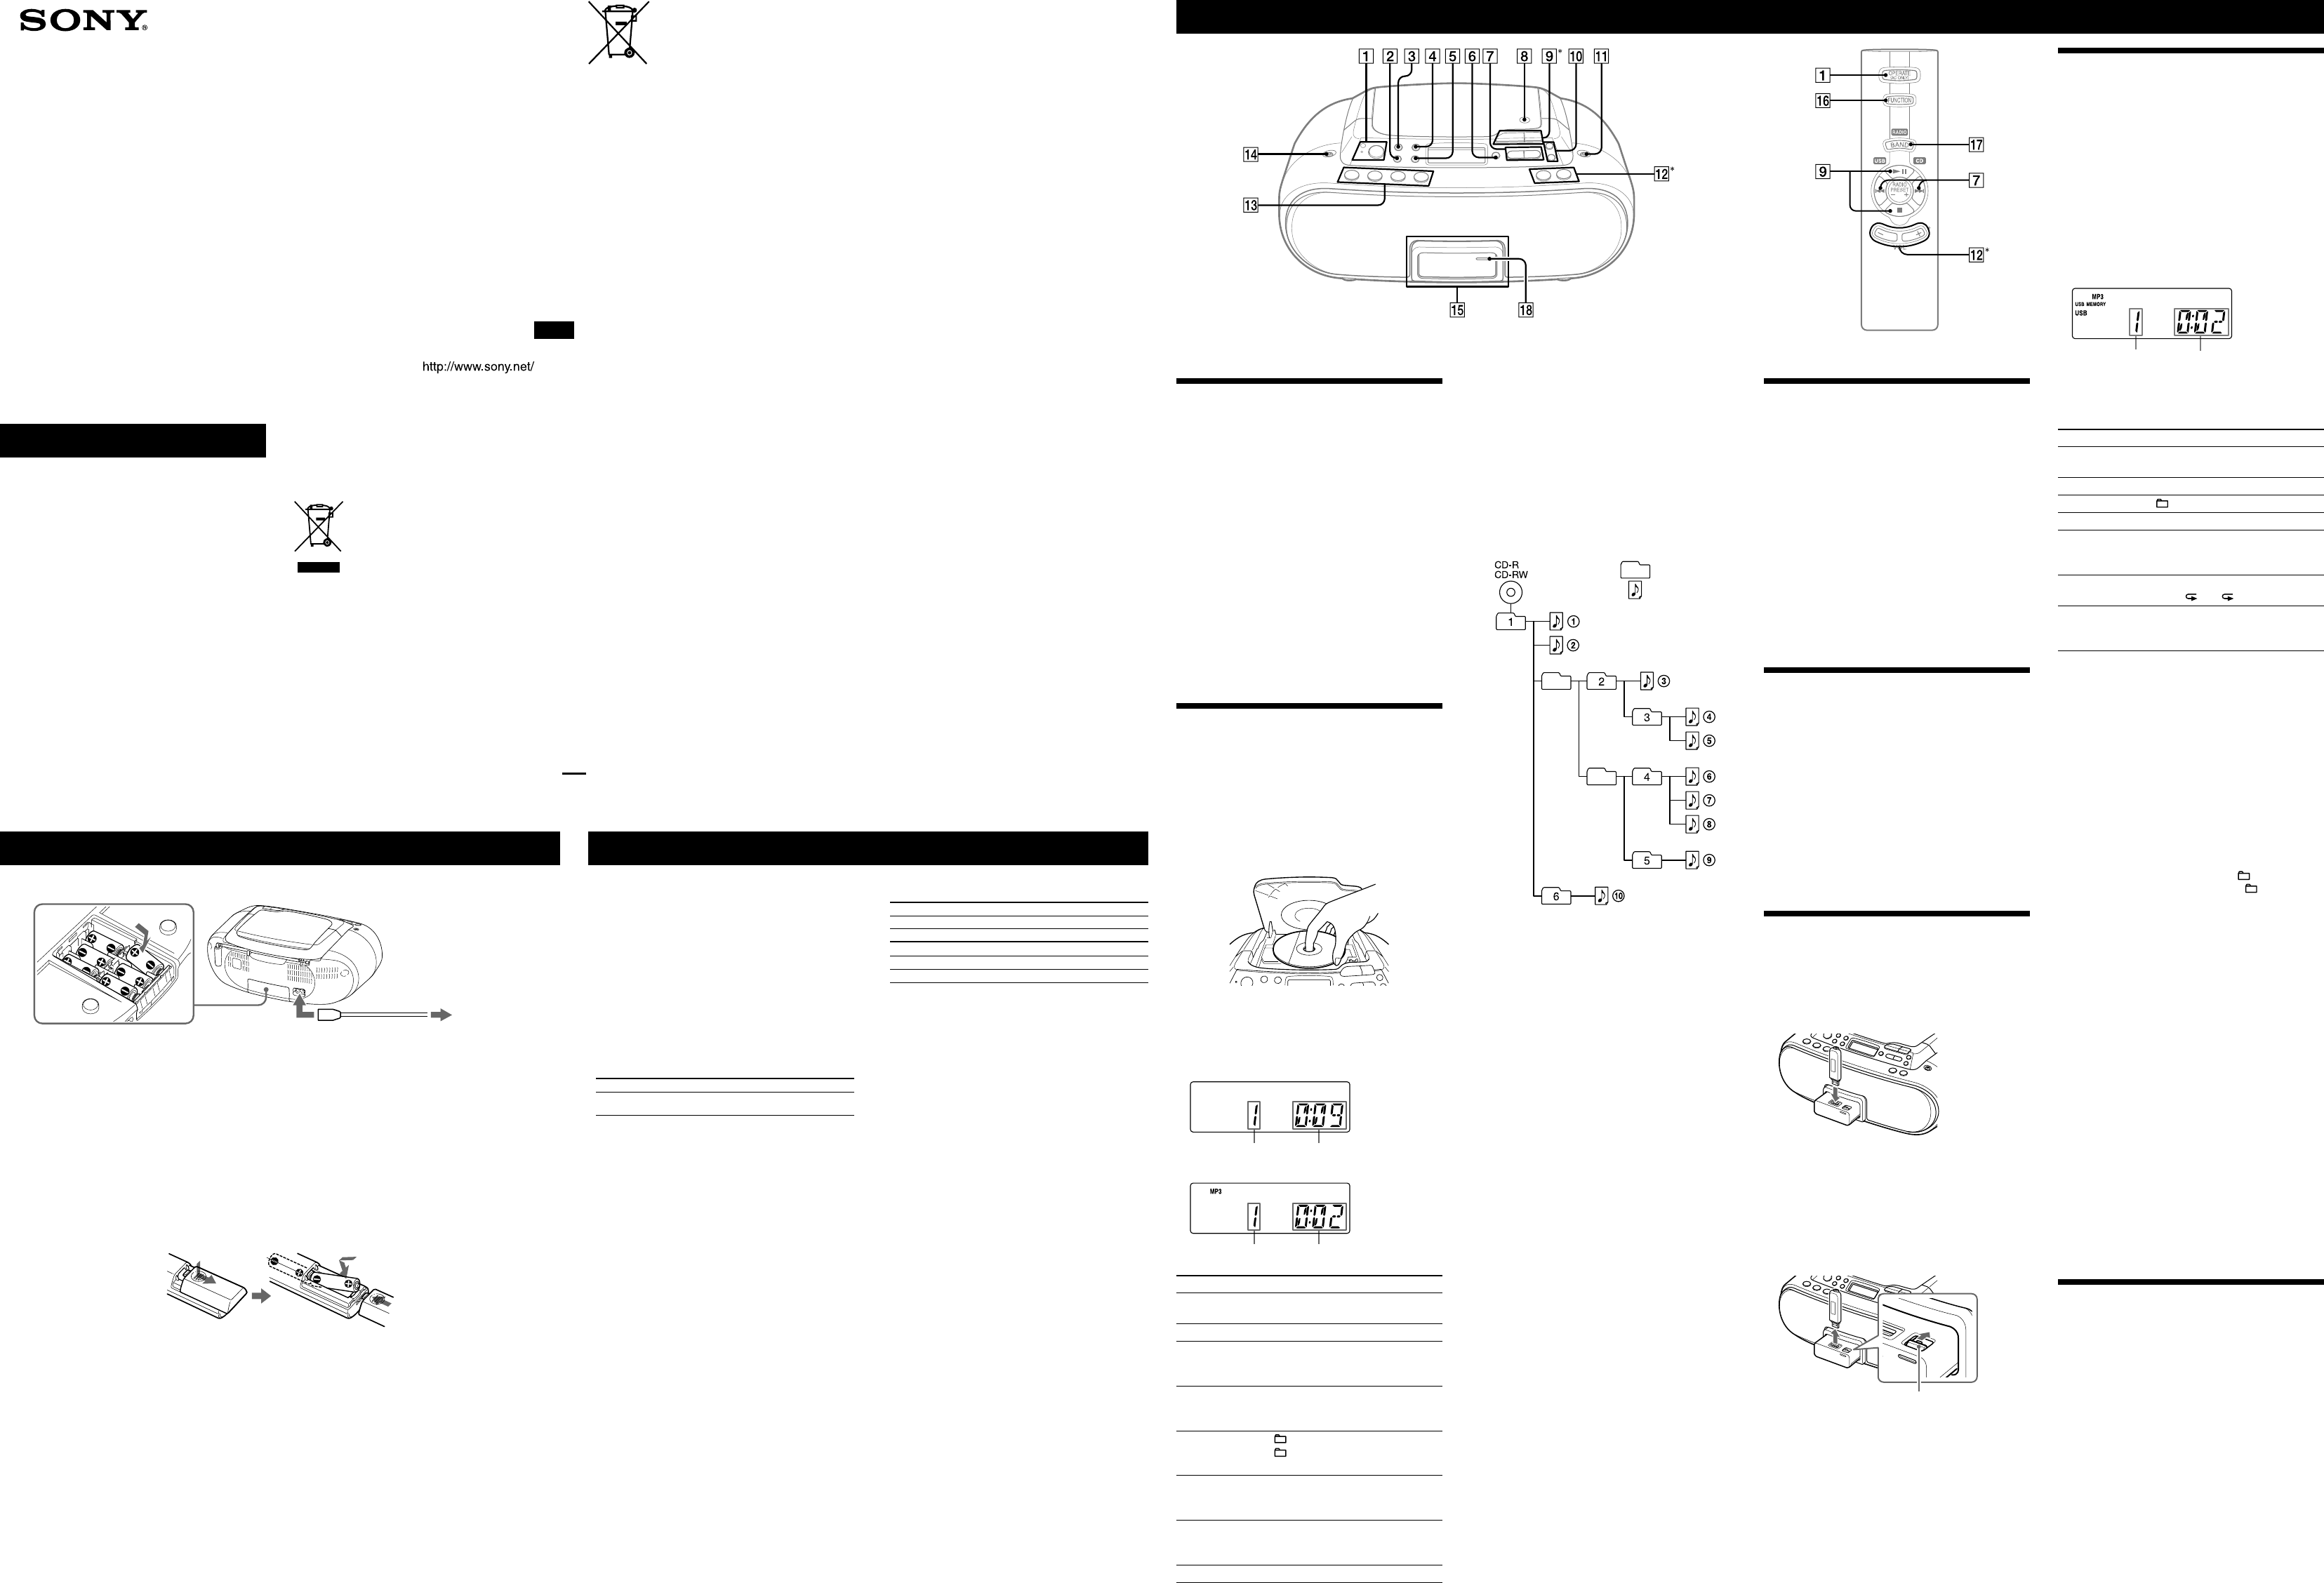
P Specific
Tips
playing (Resume p
number to be pla
track/MP3/WMA le), press
or open the CD com
stop mode.
Note
Y
“PGM” is li
.
Example of folder structure and playing order
e playin
Folder
MP3/WMA file
Notes on MP3/WMA discs
During this time, “READING
or non-MP3/WMA les on the disc, i
to begin or for the next MP3/WMA le to start pla
Do not save unnecessary folders o
on a disc to be used for MP3/WMA listening.
Maximum dir
characters.
Other characters ar
has the ID3 tag informa
name
the le name.
MP3/WMA le, the unit cannot r
generate ra
may not be pla
Listening to the radio
1 Press RADIO
on the unit (BAND
on the
remote) repeat
Each time you pr
as follows:
“FM “
2 Hold down
until the frequency digits
begin to change in the display
e unit a
stops when i
If yo
repeatedly to c
When an FM st
appears.
Tip
If the FM br
until “M
in the display an
Changing the AM tuning inter
If yo
followin
1 Press RADIO
on the unit until
2 Press DISPLA
on the unit for 2 seconds.
3 Press RADIO
on the unit for 2 seconds.
“9k STEP” or “10k S
4 Press PRESET + or –
on the unit to select
STEP”
interval.
5 Press DISPLA
on the unit.
Aer chan
your p
Opening/closing the S
Connecting a USB device
1 Press
.
e Sliding T
is ejected.
2 Connect your USB device to the
(USB) port
.
Tip
A digital music pla
connected to the
(USB) port
.
Closing the Sliding Tray
1 Remove the USB device (see
USB device
2 Slide the Lock
as indicated by the arrow
Lock
3 Push the Sliding
into the unit until it clicks.
Notes
Doing so may ca
before mo
2 to the wall outlet1 to AC IN
Connect the AC power co
or insert six R14 (size C) batt
.
Notes
indicato
Replace all the batteries with new ones. Befor
Preparing the remote
Insert two R03 (size AAA) bat
Replacing batteries
W
the batteries wi
Basic Operations
Listening to music of a USB de
Y
(digital music pla
M
this unit.
See “Playab
USB devices that can be connected to this uni
* Files with cop
be played on this unit.
1 Press USB
on the unit.
2 Connect the USB device to the
(USB) port
(See
“Connecting a USB device
“USB MEM
3 Press
.
e unit starts pla
File number After the file name is display
playing time will appear
4 Press
to adjust the volume.
Other operations
T Press
Pa
. T
but
Sto
.
Select a folder + or –
.
Select a le
or
.
Find a poin
le
Ho
or
during
playback, and r
the desired point.
Select Rep REPEA
on the unit r
until “ ” or “ 1” ap
Remove the US
device
Ho
until “N
appears, then r
device.
* When pla
dieren
Tips
(Resume play). During sto
playing time to be pla
MP3/WMA le), press
.
Note
Always hold do
and make sur
before r
“NO DE
or damage the US
T
Press M
repeatedly while the USB device is not
playing. Y
device (or in the selected folder while “ ” lig
aer ano SHUF”), or
Program P
Notes on the USB device
–
–
device. If there ar
long time fo
device, there may be a delay befo
connected USB device.
on the connected USB device.
skipped.
“
extension, bu
or malfunction.
contain
e maximum num
depending on the le and folder s
recordin
use an incom
produced, o
Connec
Y
such as a portable digital m
speakers of this unit. Be sure t
com
refer to the in
connected.
1 Connect the AUDIO IN jack
on the unit to the line
output jack of the portable digital music player or
other components using an audio connecting cable
(not supplied).
2 T
3 Press A
and start playing sound on the
connected component.
e sound from the co
from the speakers.
T
cable (not s
and two pho
Before using the unit
About the operating v
e unit
the unit. Fo
frequency range, a
voltag
T
Press O
.
T
Press V
.
T
Connect the headphones to the (h
.
T
Press MEGA B
on the unit.
“MEGA B
T
Playing a CD/MP3/WMA disc
1 Press CD
on the unit.
(On the remot
and then pr
FUNCTION
repeatedly un
display
2 Press PUSH OPEN/CL
on the unit, and
place a disc with the label side up in the CD
compartment.
T PUSH OP
CLOSE
on the unit.
3 Press
.
e unit pla
When yo
appears in the di
informa
Audio CD
T Playing time
MP3/WMA disc (Example:
File number After the file name is display
playing time will appear
T Press
Pa
. T
again.
Sto
.
Go to the next
track/MP3/WMA
le
.
Go back to the
previous track/
MP3/WMA le
.
Select a folder on
an MP3/WMA
disc
+ on the unit to g
– to go backwar
.
Locate a point
while listening to
the sound
(forward) or
(backward)
on the unit while pla
hold it un
Locate a point
while obser
the display
(forward) or
(backward)
on the unit in pa
until you n
Remove the CD
PUSH OPEN/CL
.
* V
and
on the unit ha
a tactile dot.
Personal Audio System
Battery life
For pla
FM reception
Sony R14P: a
Sony alkaline LR14: app
CD playback
Sony R14P: a
Sony alkaline LR14: app
Dimensions
Ap
(14
1
/
4
× 5
5
/
8
× 9
1
/
4
inches) (incl. p
Mass
Ap
Supp
AC pow
Remote con
Design and specications ar
Optional accessories
Sony MDR headp
CD player section
System
Compact disc digital audio system
Laser diode properties
Emission dura
Laser output: Less than 44.6 µW
(is outp
200mm from the objective lens surface on the
Optical Pick-up Block with 7mm a
Spindle speed
200 r/min (rpm) to 500 r/min (rpm) (CL
Num
2
Frequency respo
20 - 20 000 Hz +1/–2 dB
W
Below measurable limit
Radio section
Frequency rang
FM: 87.5 - 108 MHz
AM: 531 - 1 611 kHz (9 kHz step)
530 - 1 610 kHz (10 kHz step)
Antennas
FM: T
AM: Built-in ferrite bar a
USB section
Supported b
MP3 (MPEG 1 A
32 - 320 kbps, VBR
WMA:
16-320Kbps,VBR
Samplin
MP3 (MPEG 1 A
32/44.1/48 kHz
WMA:
32/44.1/48kHz
(USB) port
USB-A (Full Speed)
General
Speaker
Full range: 8 cm (3
1
/
4
inches) dia., 4 Ω, cone type (2)
Inp
(USB) port: T
current 500 mA
A
Outputs
Headph
For 16 - 68 Ω im
Po
1.7 W + 1.7 W (at 4 Ω, 10% harmonic di
Po
For pla
Malaysia and S
ailand model: 220 V A
Kor
Other models: 230 V AC, 50 Hz
9 V DC, 6 R14 (size C) batteries
For r
3 V DC, 2 R03 (size AAA) batteries
Po
AC 13 W
Music discs encoded with cop
protection technologies
is prod
to the Compact Disc (CD) standar
music discs encoded with cop
technologies ar
Please be aware tha
that do no
playab