Français
Deutsch
English
Carica di un blocco batteria
Per caricare applicando il blocco batteria a
questo apparecchio
1 Collegare il cavo di alimentazione CA ad una presa a muro.
La spia VTR/CAMERA (verde) si illumina.
2 Installare il blocco batteria.
Allineare l’estremità del blocco batteria indicata dal segno 4 con il bordo
della chiusura terminali di questo trasformatore e quindi inserire e far
scorrere il blocco batteria in direzione della freccia. Spingere in basso fino a
che la chiusura terminali è coperta.
La spia CHARGE (arancione) si illumina e la carica ha inizio.
Quand la spia CHARGE si spegne, la carica normale è completata (carica
normale). Per una carica completa, che permette di usare il blocco batteria per
un tempo più lungo del normale, lasciare applicato il blocco batteria per circa
un’ora (carica completa ).
Rimuovere il blocco batteria quando necessario. Può essere usato anche se la
carica non è stata completata.
Per rimuovere il blocco batteria
Farlo scorrere in direzione opposta alla freccia nell’illustrazione A .
Tempo di carica
La seguente tabella mostra il tempo di carica per un blocco batteria che è
completamente scarico.
Blocco batteria NP-F730 NP-F750 NP-F930 NP-F950
Tempo di carica (min.)
250 (190) 270 (210) 330 (270) 360 (300)
• Minuti circa per caricare completamente un blocco batteria scarico (carica
completa).
• I numeri tra parentesi indicano il tempo per la carica normale (carica
normale).
• Per verificare la durata del blocco batteria, fare riferimento al manuale di
istruzioni dell’apparecchio video usato.
• Il tempo di carica può differire a seconda delle condizioni del blocco batteria
o della temperatura ambientale.
•
I blocchi batteria NP-500H/520/F530/F550 possono essere caricati, ma non
possono essere usati con la videocamera digitale DSR-200A/200AP/200/200P.
Note
• Quando è installato un blocco batteria completamente carico, la spia
CHARGE si illumina momentaneamente e quindi si spegne.
• Se la spia CHARGE non si illumina o lampeggia, controllare che il blocco
batteria sia applicato correttamente al trasformatore CA. Se non è applicato
bene non viene caricato.
Se la spia CHARGE lampeggia
Controllare con il seguente diagramma.
Per caricare il blocco batteria
nell’apparecchio video
– In qualsiasi momento Vedere l’illustrazione B.
Collegare questo trasformatore all’apparecchio video usando il cavo di
collegamento DK-715 in dotazione.
Installare il blocco batteria sull’apparecchio video e spegnere l’apparecchio
video.
Per dettagli sul collegamento e il tempo di carica, fare riferimento al manuale
di istruzioni dell’apparecchio video.
1 Collegare il cavo di alimentazione ad una presa a muro.
La spia VTR/CAMERA (verde) si illumina.
2 Collegare il cavo di collegamento DK-715 in dotazione al
connettore DC OUT di questo trasformatore.
3 Collegare la piastrina di collegamento all’apparecchio video.
4 Lasciare spento l’apparecchio video.
L‘indicatore di stato del blocco batteria sul display dell’apparecchio video si
illumina e la carica del blocco batteria installato nell’apparecchio video ha
inizio.
Nota
I blocchi batteria non possono essere caricati se inseriti nell'adattatore per
blocchi batteria NPA-10000 (non in dotazione).
Per caricare due blocchi batteria
contemporaneamente
È possibile caricare un blocco batteria applicato a questo trasformatore e un
altro blocco batteria installato nell’apparecchio video contemporaneamente.
1 Installare i blocchi batteria su questo trasformatore e
sull’apparecchio video.
2 Eseguire i collegamenti mostrati nell’illustrazione B.
3 Lasciare spento l’apparecchio video.
La spia CHARGE di questo trasformatore e l‘indicatore di stato del blocco
batteria sull’apparecchio video si illuminano e la carica ha inizio.
Quando la spia CHARGE di questo apparecchio e l‘indicatore di stato del
blocco batteria dell‘apparecchio video si spengono, la carica normale è stata
completata. Per una carica completa, lasciare applicato il blocco batteria per
circa un’ora.
Note
• Quando la carica del blocco batteria applicato a questo trasformatore è stata
completata o quando si collega il cavo di alimentazione, la spia VTR/
CAMERA di questo trasformatore può illuminarsi momentaneamente.
Questo non è un problema.
• La carica del blocco batteria nell’apparecchio video viene interrotta durante
l’uso dell’apparecchio video. La carica riprende quando l’apparecchio video
viene spento.
• Se i blocchi batteria applicati all'apparecchio video e al trasformatore CA
sono di tipi diversi, l'apparizione dell'indicatore di stato del blocco batteria
sull'apparecchio video può essere leggermente ritardata e anche
l'illuminazione della spia CHARGE sul trasformatore CA può essere
leggermente ritardata.
Alimentazione di un apparecchio video
1 Eseguire i collegamenti mostrati nell’illustrazione B.
Rimuovere il blocco batteria applicato all‘apparecchio video.
2 Regolare l’interruttore di alimentazione dell’apparecchio video su
CAMERA o VTR.
La spia VTR/CAMERA (verde) del trasformatore si illumina durante il
funzionamento dell’apparecchio video.
Nota
Tenere il trasformatore lontano dall’apparecchio video se l’immagine
è disturbata.
Vedere l’illustrazione A.
Connecting cord DK-715 (supplied)
Cordon de liaison DK-715 (fourni)
Verbindungskabel DK-715 (mitgelisfort)
Cavo di collegamento DK-715 (in dotazione)
VTR/CAMERA lamp (green)
Témoin VTR/CAMERA (vert)
VTR/CAMERA-Lampe (grün)
Spia VTR/CAMERA (verde)
Terminal shutter
Obturateur de borne
Anschlußadeckung
Chiusura terminali
Veuillez contacter votre revendeur Sony et lui apporter l’appareil qui ne
fonctionne pas.
Retirez la batterie de l’adaptateur secteur, puis remettez-la en place.
Si le témoin CHARGE clignote
encore:
Installez une autre batterie
rechargeable.
Si le témoin CHARGE s’allume mais ne
clignote pas de nouveau:
Si le témoin CHARGE s’allume parce que la
recharge est terminée, il n’y a aucun
problème.
Si le témoin CHARGE clignote
de nouveau:
Le problème vient de
l’adaptateur secteur.
Si le témoin CHARGE s’allume mais ne
clignote pas de nouveau:
Si le témoin CHARGE s’éteint parce que la
recharge est terminée, le problème vient de
la première batterie rechargeable installée.
Pour charger une batterie
Recharge avec la batterie sur l’adaptateur
Voir l’illustration A.
1 Branchez le cordon sur une prise murale.
Le témoin VTR/CAMERA (vert) s’allume.
2 Installez la batterie rechargeable.
Alignez l’extrémité de la batterie indiquée par le repère 4 sur le bord de
l’obturateur de borne de l’adaptateur, puis insérez et poussez la batterie
dans le sens de la flèche jusqu‘à ce que l‘obturateur soit couvert.
Le témoin CHARGE (orange) s’allume et la recharge commence.
Quand le témoin CHARGE s’éteint, la recharge normale est terminée
(Recharge normale ). Pour une recharge complète, qui vous permettra
d’utiliser pendant plus longtemps la batterie, laissez la batterie rechargeable en
place pendant environ une heure (Recharge complète ).
Enlevez la batterie rechargeable quand nécessaire. Elle peut être utilisée même
si elle n’est pas complètement rechargée.
Pour enlever la batterie rechargeable
Poussez-la dans le sens opposé à la flèche sur l’illustration A .
Temps de recharge
Le tableau suivant indique le temps de recharge quand la batterie est
complètement déchargée.
Batterie rechargeable NP-F730 NP-F750 NP-F930 NP-F950
Temps de recharge (min.) 250 (190) 270 (210) 330 (270) 360 (300)
• Temps de recharge approximatif en minutes pour recharger complètement
une batterie vide (Recharge complète ).
• Les chiffres entre parenthèses indiquent le temps normal (Recharge
normale).
• Voir le mode d’emploi de l’appareil vidéo utilisé pour l’autonomie de la
batterie.
• Le temps de recharge varie selon l’état de la batterie et la température
ambiante.
• Les batteries rechargeables NP-500H/520/F530/F550 peuvent être chargées,
mais elles ne peuvent pas être utilisées avec les camescopes numériques
DSR-200A/200AP/200/200P.
Remarques
• Quand vous insérez une batterie pleine dans l’adaptateur, le témoin
CHARGE s’allume puis s’éteint.
• Si le témoin CHARGE ne s'allume pas ni ne clignote, vérifiez si la batterie est
bien installée sur l'adaptateur secteur. Si ce n'est pas le cas, elle ne pourra
pas être rechargée.
Si le témoin CHARGE clignote
Consultez le tableau suivant.
Recharge de la batterie sur l’appareil vidéo
– Utiliser quand nécessaire Voir l’illustration B.
Raccordez l’adaptateur à l’appareil vidéo avec le cordon de liaison fourni DK-
715.
Installez la batterie sur l’appareil vidéo et mettez l’appareil vidéo hors tension.
Pour les détails sur le raccordement et le temps de recharge, consultez le mode
d’emploi de l’appareil vidéo.
1 Raccordez le cordon d’alimentation à une prise murale.
Le témoin VTR/CAMERA (vert) s’allume.
2 Raccordez le cordon de liaison fourni DK-715 au connecteur DC
OUT de cet appareil.
3 Raccordez la plaque de connexion à l’appareil vidéo.
4 Laissez l’appareil vidéo hors tension.
L‘indicateur de batterie dans l‘afficheur l’appareil vidéo s’allume et la
recharge de la batterie installée sur l’appareil vidéo commence.
Remarque
Les batteries rechargeables ne peuvent pas être rechargées avec l'adaptateur de
batterie NPA-10000 (non fourni).
Pour charger deux batteries simultanément
Vous pouvez recharger en même temps la batterie installée sur l’adaptateur
secteur et celle installée sur l’appareil vidéo.
1 Installez les batteries rechargeables sur l’adaptateur secteur et sur
l’appareil vidéo.
2 Raccordez le cordon comme indiqué sur l’illustration B .
3 Laissez l’appareil vidéo hors tension.
Le témoin CHARGE de l’adaptateur et l‘indicateur de l’appareil vidéo
s’allument et la recharge commence.
Quand le CHARGE témoin de l’adaptateur et batterie de l’appareil video
s’éteignent, la recharge normale est terminée. Pour une recharge complète,
laissez la batterie rechargeable en place pendant environ une heure.
Remarques
• Quand la recharge de la batterie/ installée sur l’adaptateur est terminée, ou
quand vous raccordez le cordon de liaison, le témoin VTR/CAMERA de
l’adaptateur peut clignoter pendant un instant. Cela n’indique pas un
problème.
• La recharge de la batterie sur l’appareil vidéo s’arrête quand l’appareil vidéo
fonctionne. Elle se poursuit dès que l’appareil est mis hors tension.
• Si les batteries installées sur l‘appareil vidéo et sur l‘adaptateur secteur sont
de différents types, l‘indicateur de batterie peut mette un peu de temps à
apparaître sur l‘appareil vidéo et le témoin CHARGE de l‘adaptateur secteur
peut s‘allumer aussi un peu en retard.
Pour utiliser l’appar
1 Faites les raccordements indiqués sur l’illustration B.
Enlevez la batterie de l‘appareil vidéo.
2 Réglez l’interrupteur de l’appareil vidéo sur CAMERA ou VTR.
Le témoin VTR/CAMERA (vert) de cet appareil s’allume pendant le
fonctionnement de l’appareil vidéo.
Remarque
Eloignez l’adaptateur de l’appareil vidéo s’il perturbe l’image.
Laden des Akkus
Laden des am Netzadapter angebrachten
Akkus
1 Stecken Sie das Netzkabel bzw. den Netzadapter in die Steckdose.
Die VTR/CAMERA-Lampe (grün) leuchtet auf.
2 Bringen Sie den Akku an.
Richten Sie das mit 4 markierte Ende des Akkus auf die Kante der
Anschlußabdeckung am Netzadapter aus, und schieben Sie dann den Akku
in Pfeilrichtung auf den Adapter.
Die CHARGE-Lampe (orangefarben) leuchtet auf, und das Laden beginnt.
Wenn die CHARGE-lampe erlischt, ist der Normal-Ladebetrieb beendet. Sie
können den Akku dann noch etwa eine Stunde angebracht lassen, um ihn ganz
voll zu laden (Maximal-Ladebetrieb ).
Der Akku kann auch vorzeitig abgetrennt werden; es ist nicht erforderlich, den
Akku stets ganz voll zu laden.
Zum Abnehmen des Akkus
Schieben Sie den Akku in die dem Pfeil von Abb. A entgegengesetzte
Richtung.
Ladezeiten
Die folgende Tabelle zeigt die erforderlichen Zeiten zum Laden eines
vollständig leeren Akkus.
Akku NP-F730 NP-F750 NP-F930 NP-F950
Ladezeit (Min.) 250 (190) 270 (210) 330 (270) 360 (300)
• Ungefähre Zeit in Minuten zum vollständigen Laden eines leeren Akkus
(Maximal-Ladebetrieb ).
• Die Zeiten für Normal-Ladebetrieb stehen in Klammern.
• Zur Betriebszeit siehe die Bedienungsanleitung des Videogeräts.
• Die Ladezeit hängt vom Zustand des Akkus und der Umgebungstemperatur
ab.
• Die Akkus NP-500H/520/F530/F550 können geladen werden, sie können
jedoch nicht mit dem Digital-Camcorder DSR-200A/200AP/200/200P
verwendet werden.
Hinweise
• Wenn ein voll geladener Akku am Netzadapter angebracht wird, leuchtet
die CHARGE-Lampe kurz auf und erlischt dann wieder.
• Wenn die CHARGE-Lampe weder blinkt noch leuchtet, überprüfen Sie sich,
daß der Akku richting am Netzadapter angebracht ist. Der Akku wird nur
geladen, wenn er richtig angebracht ist.
Wenn die CHARGE-Lampe blinkt
Gehen Sie das folgende Diagramm durch.
Laden des am Videogerät angebrachten
Akkus
– Damit das Gerät stets betriebsbereit ist Siehe Abb. B
Schließen Sie den Netzadapter über das mitgelieferte Verbindungskabel DK-
715 an das Videogerät an, bringen Sie den Akku am Videogerät an, und
schalten Sie das Videogerät aus.
Einzelheiten zum Anschluß und zur Ladezeit entnehmen Sie bitte der
Anleitung des Videogeräts.
1 Stecken Sie das Netzkabel bzw. den Netzadapter in die Steckdose.
Die VTR/CAMERA-Lampe (grün) leuchtet auf.
2 Schließen Sie das mitgelieferte Verbindungskabel DK-715 an die
DC OUT-Buchse des Netzadapters an.
3 Schließen Sie die Kontaktplatte am Videogerät an.
4 Lassen Sie das Videogerät ausgeschaltet.
Die Akkuanzeige im Display des Videogerät leuchtet auf, und der im
Videogerät eingesetzte Akku wird geladen.
Vorsicht
Im Akkuadapter NPA-10000 (nicht mitgeliefert) eingelegte Akkus können
nicht geladen werden.
Zum gleichzeitigen Laden von zwei Akkus
Der am Netzadapter angebrachte und ein weiterer, im Videogerät eingesetzter
Akku können gleichzeitig geladen werden.
1 Bringen Sie die Akkus am Netzadapter und am Videogerät an.
2 Nehmen Sie den Anschluß entsprechend Abb. B vor.
3 Lassen Sie das Videogerät ausgeschaltet.
Die CHARGE-Lampe am Netzadapter sowie die Akkuanzeige am
Videogerät leuchten auf, und das Laden beginnt.
Am Ende des Normal-Ladebetriebs erlöschen die CHARGE-Lampe am
Netzadapter und die Akkuanzeige Videogerät. Sie können den Akku dann
noch etwa Stunde angebracht lassen, um ihn ganz voll zu laden.
Hinweise
• Wenn das Laden des am Netzadapter angebrachten Akkus beendet ist oder
das Verbindungskabel abgetrennt wird, leuchtet die VTR/CAMERA-Lampe
am Netzadapter möglicherweise kurzzeitig auf. Es handelt sich dabei nicht
um eine Störung.
• Das Videogerät kann während des Ladens nicht gleichzeitig betrieben
werden. Wird das Videogerät eingeschaltet, stoppt der Ladevorgang. Nach
dem Ausschalten wird der Ladevorgang automatisch wieder fortgesetzt.
• Wenn am Videogerät und am Netzadapter unterschiedliche Akkus
angebracht sind, erscheint die Akkuanzeige am Videogerät etwas verzögert
und auch die CHARGE-Lampe am Netzadapter leuchtet verzögert auf.
Zum Betrieb des V
1 Nehmen Sie den Anschluß entsprechend Abb. B vor.
Nehmen Sie den Akku vom Videogerät ab.
2 Stellen Sie den Betriebesschalter am Videogerät auf CAMERA oder
VTR.
Während das Videogerät betrieben wird, leuchtet die VTR/CAMERA-
Lampe (grün) am Netzadapter auf.
Hinweis
Falls es zu Bildbeeinträchtigungen kommt, entfernen Sie den Netzadapter
weiter vom Videogerät.
1
2
2
3
1
T
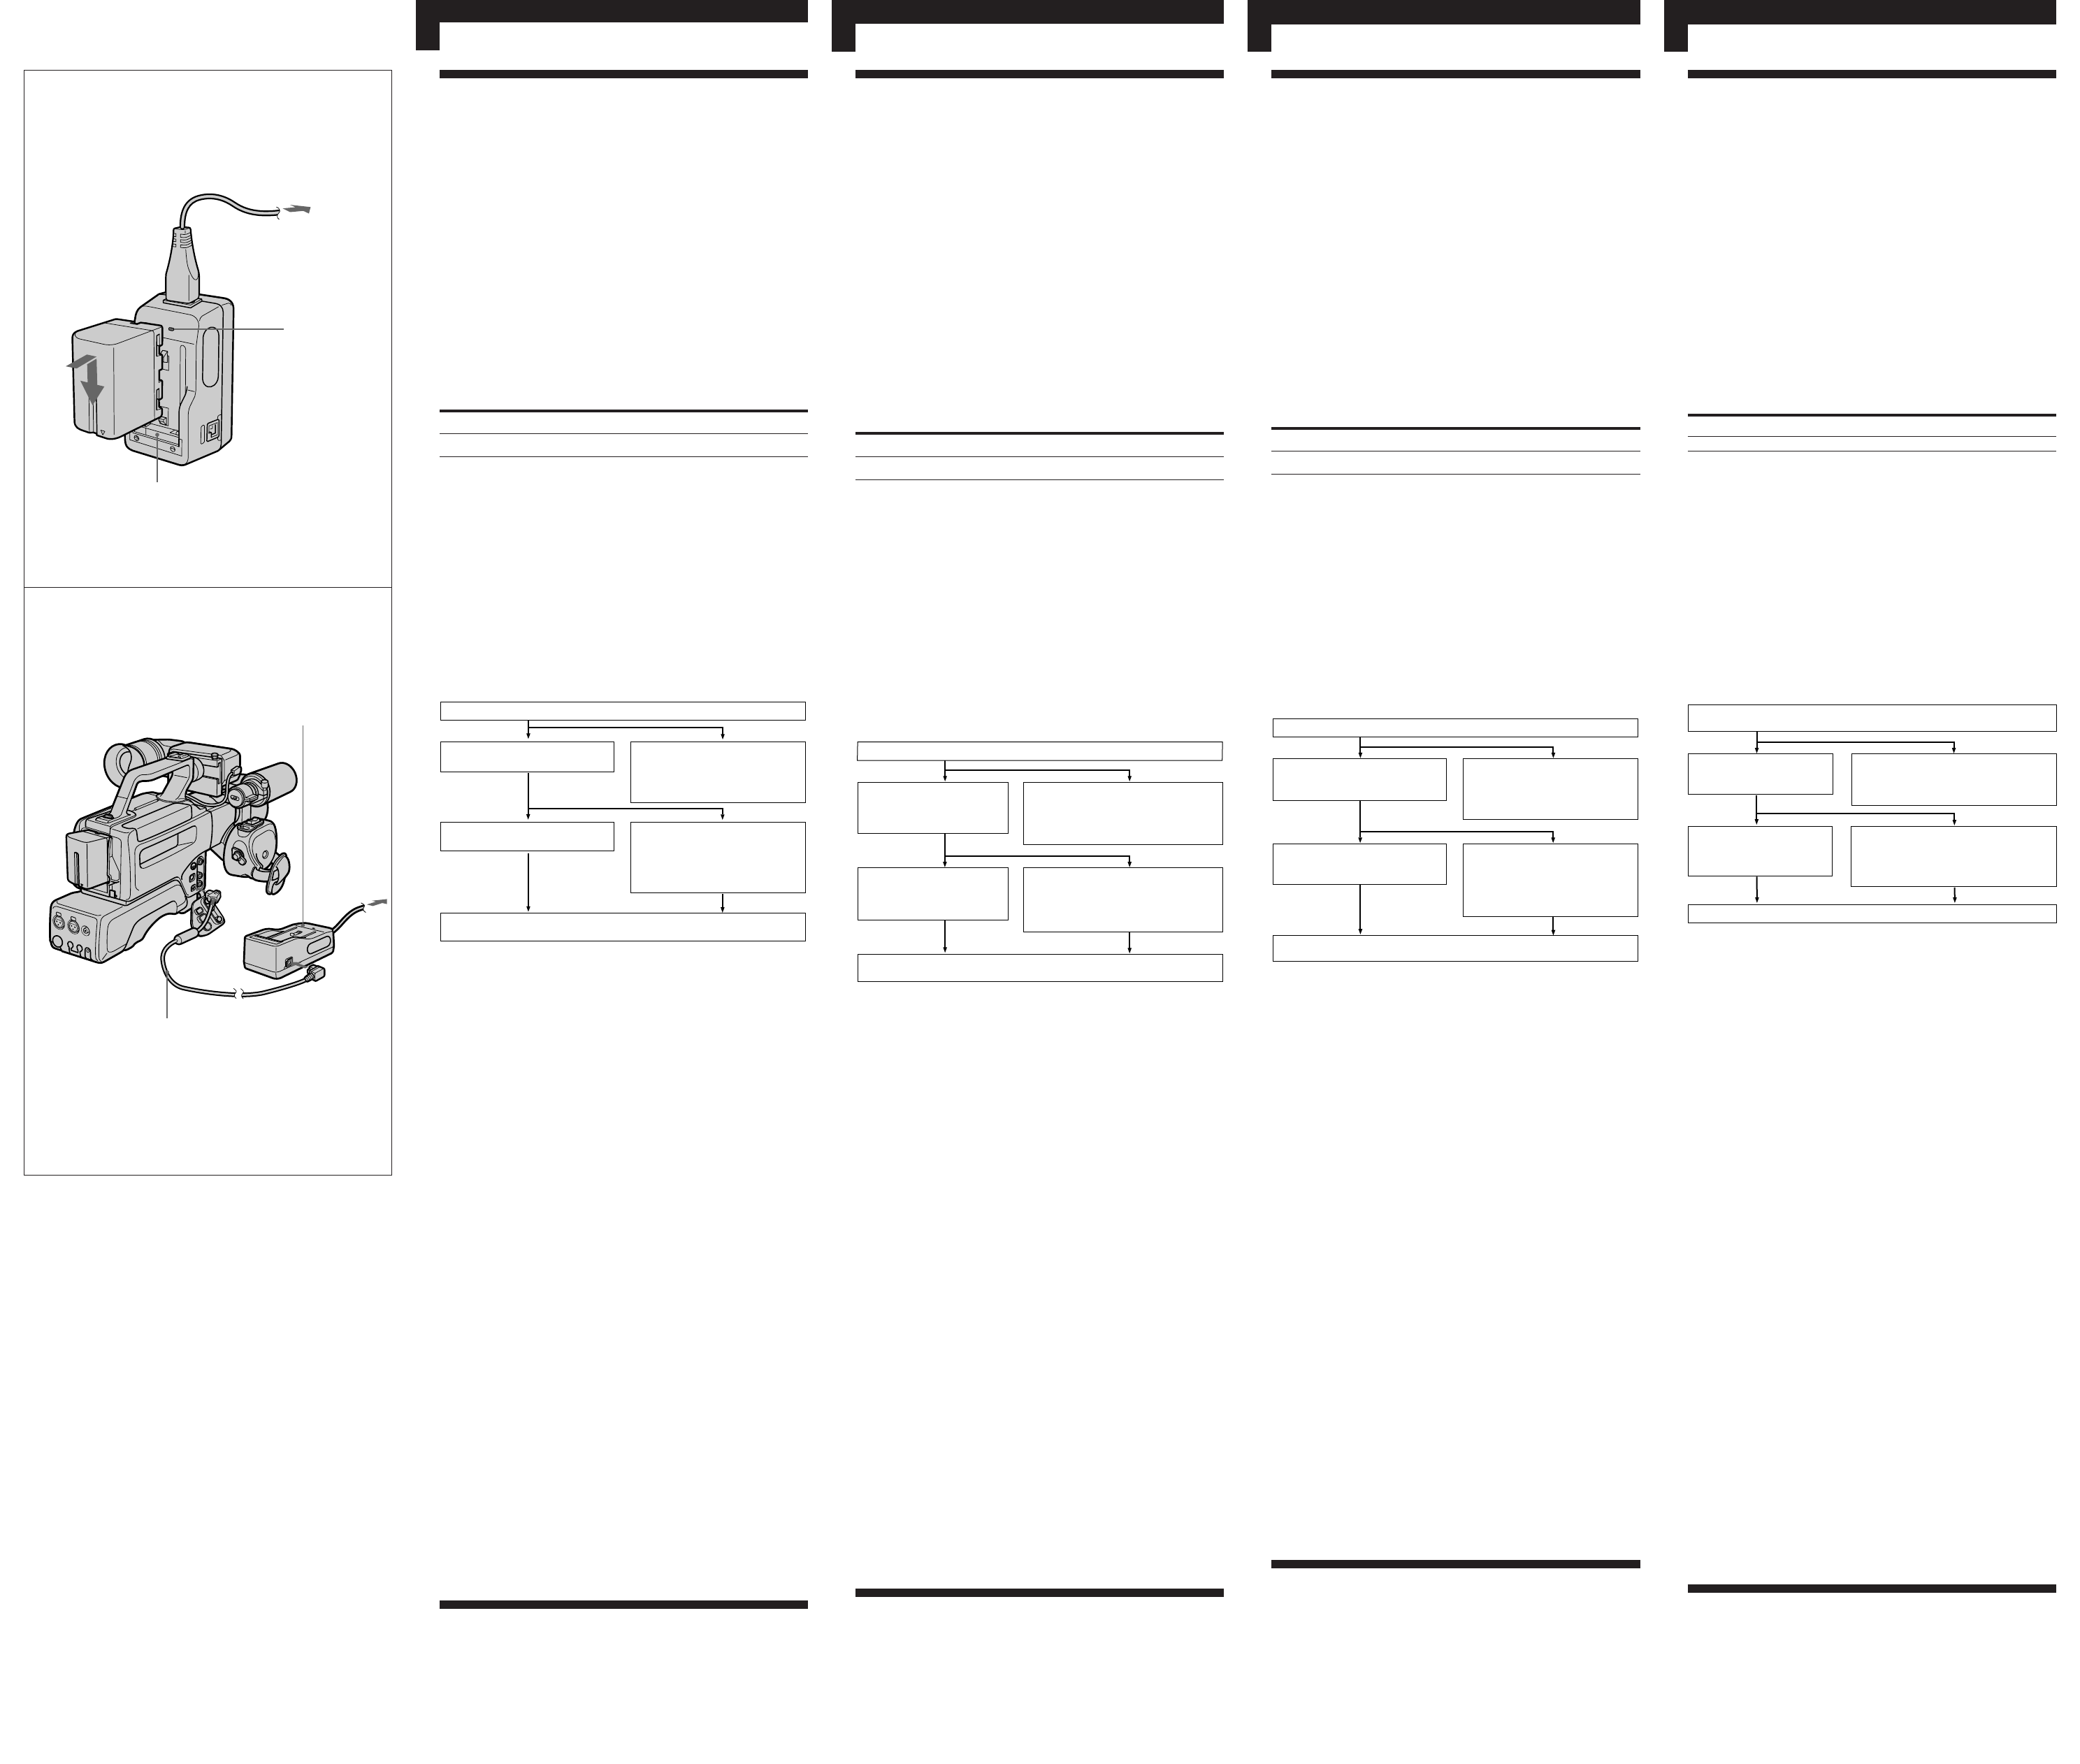
Charging by Attaching the Battery Pack to
This unit
1 Connect the power cord to a wall outlet.
The VTR/CAMERA lamp (green) will light.
2 Install the battery pack.
Align the end surface of the battery pack shown by the 4 mark to the edge
of the terminal shutter of this unit, then fit and slide the battery pack in the
direction of the arrow. Push down until terminal shutter is covered.
The CHARGE lamp (orange) will light and charging will begin.
When the CHARGE lamp goes out, normal charge is completed (Normal
charge). For a full charge, which allows you to use the battery longer than
usual, leave the battery pack in place for approximately one hour (Full charge ).
Remove the battery pack when required. It can be used even if the charging is
not completed.
To remove the battery pack
Slide it in the direction opposite to the arrow in the illustration A .
Charging time
The following table shows the charging time for the battery pack which is
discharged completely.
Battery pack NP-F730 NP-F750 NP-F930 NP-F950
Charging time (min.) 250190) 270 (210) 330 (270) 360 (300)
• Approximate minutes to charge an empty battery pack fully (Full charge ).
• Numbers in parentheses indicate the time when you charge normally
(Normal charge ).
• To ascertain the battery life, refer to the instruction manual of the video
equipment which you use.
• The charging time may differ depending on the condition of the battery pack
or the temperature of the environment.
• Battery packs NP-500H/520/F530/F550 can be charged, however, they
cannot be used with the DSR-200A/200AP/200/200P digital camcorder.
Notes
• When a fully charged battery pack is installed, the CHARGE lamp will once
light, then go out.
• If the CHARGE lamp does not light or flash, check that the battery pack is
correctly attached to the AC power adaptor. If it is not attached it will not be
charged.
When the CHARGE lamp flashes
Check through the following chart.
Charging the Battery Pack in the Video
Equipment
– To use anytime you need See illustration B .
Connect this unit to the video equipment using the supplied DK-715
connecting cord.
Install the battery pack to the video equipment and turn off the power of the
video equipment.
For details of the connection and charging time, refer to the instruction manual
of the video equipment.
1 Connect the power cord to a wall outlet.
The VTR/CAMERA lamp (green) will light.
2 Connect the supplied DK-715 connecting cord to the DC OUT
connector of this unit.
3 Connect the connecting plate to the video equipment.
4 Leave the power of the video equipment off.
The battery indicator in the display window of the video equipment will
light and charging of the battery pack installed in the video equipment will
begin.
Note
Battery packs cannot be charged while inside the NPA-10000 Battery Adaptor
(not supplied).
To charge two battery packs simultaneously
You can charge a battery pack attached to this unit and another battery pack
installed in the video equipment simultaneously.
1 Install the battery packs to this unit and to the video equipment.
2 Make the connections as shown in illustration B .
3 Leave the power of the video equipment off.
The CHARGE lamp on this unit and the battery indicator on the video
equipment will light and charging will begin.
When the CHARGE lamp on this unit and battery indicator on the video
equipment go out, normal charge is completed. For a full charge, leave the
battery pack in place for approximately one hour.
Notes
• When the charging of the battery pack attached to this unit is completed, or
when you connect the connecting cord, the VTR/CAMERA lamp on this
unit may light for a moment. This is not a problem.
• Charging of the battery pack in the video equipment will be stopped during
operation of the video equipment. Charging will start again when the power
of the video equipment is turned off.
• When the battery pack types attached to the video equipment and the AC
power adaptor are different, the appearance of the battery indicator on the
video equipment may be slightly delayed, and the illumination of the
CHARGE lamp on the AC power adaptor may be slightly delayed as well.
T
1 Make the connections shown in illustration B.
Remove attached battery from the video equipment.
2 Set the power switch of the video equipment to CAMERA or VTR.
The VTR/CAMERA lamp (green) on this unit will light during operation of
the video equipment.
Note
Keep this unit away from the video equipment if the picture is disturbed.
See illustration A.
Siehe Abb. A
CHARGE lamp
(orange)
Témoin CHARGE
(orange)
CHARGE Lampe
(orangefarben)
Spia CHARGE
(arancione)
B
A
Italiano
Wenden Sie sich mit dem fehlerhaften Netzadapter bzw. Akku an Ihren Sony
Händler.
Trennen Sie den Akku einmal vom Adapter ab, und bringen Sie ihn wieder an.
Falls die CHARGE-Lampe erneute
blinkt:
Bringen Sie einen anderen Akku an.
Falls die CHARGE-Lampe nicht
erneut blinkt, sondern leuchtet:
Erlischt die CHARGE-Lampe am
Ende des Ladevorgangs wieder, liegt
kein Problem vor.
Falls die CHARGE-Lampe erneut
blinkt:
Das Problem liegt am Netzadapter.
Falls die CHARGE-Lampe nicht
erneut blinkt, sondern leuchtet:
Erlischt die CHARGE-Lampe am
Ende des Ladevorgangs, ist der Akku,
der zuerst angebracht wurde, nicht in
Ordnung.
Contattare il proprio rivenditore Sony per il prodotto causa del problema.
Rimuovere il blocco batteria dal trasformatore e quindi reinstallare lo stesso blocco
batteria.
Se la spia CHARGE lampeggia
ancora: Installare un altro
blocco batteria.
Se la spia CHARGE si illumina e non
lampeggia più:
Se la spia CHARGE si spegne perché il tempo
di carica è trascorso, non c’è problema.
Se la spia CHARGE lampeggia
ancora:
Il problema è dovuto al
trasformatore.
Se la spia CHARGE si illumina e non
lampeggia più:
Se la spia CHARGE si spegne perché il tempo
di carica è trascorso, il problema è dovuto al
blocco batteria installato per primo.
Please contact your nearest Sony dealer in connection with the product with the
problem.
Remove the battery pack from this unit, then install the same battery pack again.
If the CHARGE lamp flashes again:
Install another battery pack.
If the CHARGE lamp lights and does
not flash again:
If the CHARGE lamp goes out
because the charging time has passed,
there is no problem.
If the CHARGE lamp flashes again:
The problem is with this unit.
If the CHARGE lamp lights and does
not flash again:
If the CHARGE lamp goes out
because the charging time has passed,
the problem is with the battery pack
first installed.